Blog Archives
The Benefits of Pretty Prototypes
Today I’m presenting you my rebuttal for an article posted on Example of Play on May 30th. Here’s the link:
It’s an interesting article and I am currently at the prototype phase with Trading Post. So now’s as good a time as ever to post my rebuttal. I’m a big fan of the visual aesthetic of quality prototypes versus handwritten game designs on 8.5×11 sheets of paper. It’s worth the effort to me to make a quality prototype. Let’s get started…
The BEST possible prototype is an amazing looking prototype.

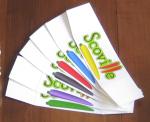
Prototype Cards for Trading Post and Scoville
Maybe. It’s all about perspective and approach.
When designing a board game you will have to create something physical to test the game. There are many approaches to this but here are the two genres that your prototype will likely fit into:
- Use pencil/pen/colored pencils/markers.
- Use art creation software and a printer.
These aren’t the only options, of course, but they are the basis for today’s rebuttal of that article.
It Can Be Worth the Effort to Make Nice Prototypes.
So there you are, sitting at Protospiel or an UnPub event. You’ve got your prototype on the table. It’s got a few poker chips for money. You’ve got an 8.5×11 piece of paper that has folds and creases. It’s covered with a few chicken scratches of notes, but still it serves as the game board. And you’ve got sleeved cards covered in Sharpie. Your table is empty. You glance at the exceedingly full table next to you to see what’s going on. On that table is a glowing, beautifully rendered, full art prototype on thick matte board with quality printed cards and an aesthetic that draws you in.
Uh oh.
Think of it like this. If you were an attender of Protospiel or UnPub and were looking for games to play, would you be more drawn to the nice fancy artwork where you can tell the designer put a lot of effort into his or her product? Or would you be more drawn to the 8.5×11 with Sharpie notes and no art?
One of the reasons I think Scoville had some of the buzz that it did after Protospiel-Milwaukee was due to the quality of the prototype. Several people commented on the thick, quality feel of the Orders and Recipes in the game. Others asked how I made the components. The point is that I put in a little extra effort to make things seem more like a real game rather than a prototype.
What Should Be the Focus of Your Playtester?
Let’s examine the same scenario as above. So someone sits down at your table, with your 8.5×11 covered in Sharpie. You think you’ve got a decent game here. So you teach them how to play and after a few rounds, when you believe things should really be taking off, you notice a look of confusion on their face.
Let’s get into their head a little bit. As that player you are trying to enter into whichever world the designer has built for you. Part of playing games is about stepping into a different world for a while. In this case you don’t know what world you’re entering because there is no theme and no artwork. This 8.5×11 with Sharpie thing has you in a mental police chase to try and figure out how things work in this game.
Your mind has lost it’s focus. You are staring at a white sheet of paper while trying to put yourself in some other world. Where will your focus be? I imagine it would be difficult to make the game your focus.
Let’s think of another example. It’s 1910 in Manhattan and you need a cab. You’re waiting in the rain watching for a cab to roll by. Whoops, one just drove by, but it looked just like a normal car. Aye. Wait, what’s this? A Yellow Cab? That sure was easy to spot. So you hop aboard the yellow cab and they take you on your way. And not surprisingly, you leave a nice little tip for the driver because he was so easy to spot.
Board game prototypes are the same. As I saw at Protospiel-Milwaukee and as evidenced by the plethora of games on Kickstarter alone, there are a lot of people designing games. Your game should have appropriate enough artwork to be able to draw in players, build buzz, get your name out there, and perhaps earn a publisher’s eye. I wouldn’t expect to get anywhere with my designs if they looked very poorly made.
Are You Willing To Change Things?
One of the problems with building a high quality prototype is that it can be difficult or cumbersome to make changes. With Scoville I just about wore out my rotary cutter. Every time I made some changes I’d have to print out new components and cut them and mount them to matte board.
One way around this issue is that when you make your original prototype, go ahead and make some blank components. That way you’ve got pieces that you can write on as placeholders until you’re ready to make a complete new version.
The article that I linked above discussed a card that the designers were unwilling to change for a long time. The point they made was that if you are unwilling to change it, it’s not a prototype. In their case they had an elegant card with full artwork.
I totally agree with their sentiment. And in the situation where you are unwilling to change a component then you might as well put full art on it.
Don’t Get Too Attached!
Another point of the article was that the designer expended a lot of effort to make a nice quad-fold board and then began to consider player tableaus rather than the nicely crafted board.
While I enjoy the quality feel of the components in my prototypes, I don’t let myself get attached to them. So what if I spent three hours designing a deck of cards and paid $10 to have the deck made at The Game Crafter. If the game is terrible with those cards then I have to be willing to get rid of them.
So that brings us to our balancing act of the show. There is a balance between the effort you put into making a quality prototype and the usefulness of that prototype. If you are solo testing there is absolutely nothing wrong with the 8.5×11 with Sharpie approach. If you are having friends over to try out a new game design there is nothing wrong with that approach either. If you are attending a convention and you are seeking valuable feedback, then please don’t go with the 8.5×11 approach. Put in some effort and make it look nice. Then after the convention when you apply that feedback, be willing to throw away your original quality prototype.
Why Awesome Prototypes are Better
If you’ve put in some effort and realize that you’ve made a quality prototype that you aren’t ashamed to show off then here are a few points to consider:
- You can believe that players will feel immersed in your game, and feedback will represent that.
- You will have built a prototype that you would be happy to send off if a publisher requests it.
- People are conventions will be more willing to playtest your game than the ugly 8.5×11 game at the next table.
- You will be honored as a great human being and a plaque with your image will be mounted at the Board Game Prototypers Hall of Fame!
Okay, maybe not that last one.
The bottom line is that, depending where you are in the design process, it may be time to make a nice, high quality prototype.
To Sum:
Spend a little effort and make things look nice so that you are the one that draws a crowd!
High Quality Prototype of an Untested game!
Bonus Trading Post Post

My Trading Post Logos
Over the past four weeks I’ve been writing about a new game redesign of mine by the name of Trading Post. Since there has been a decent level of interest in the game concept I thought I’d write one more article about the game. So far I’ve covered the following:
- 5-16-13: Origins of Trading Post
- 5-23-13: Early Prototying
- 5-30-13: Hiatus and Re-design
- 6-6-13: Path to GenCon
- BONUS Today 6-13-13: More on Trading Post
Today I’m giving you some bonus material on where the game is at, how to make it better, and some other tasty morsels. But let’s start with how good I am at focusing on things other than actually designing this game!
I’m Good at Wasting Time (and Effort!)
One of my downfalls in life is my desire for perfection. Perhaps perfection is the wrong word. That paints me as someone with OCD, not that there’s anything wrong with that. Perhaps a better word would be aesthetics. I desire for things to look good.
At the end of May an article was posted on Example of Play called, “The Benefits of Crappy prototypes.” I will provide a rebuttal for that article next week, but I wanted to mention it today because I am not a believer in crappy prototypes. And this may be my downfall.
I love a good looking prototype. I love good game art. If you’ve read my board game reviews you’ll see that artwork is consistently mentioned as either a like or a dislike. I approach game design as though I’m reading a story. I like to be enveloped in a different world and escape this one for an hour or so. Artwork is a key way to get that experience across to the players.
What this means is that I spend way, WAY too much time in Inkscape making prototype artwork. The upside is this:
The downside is that I have four logos (as seen above) for a game that no one has yet even played! I just can’t help myself.
So I had a think about what this all really means. I was a little disappointed in myself for the artwork side of things when the game design part of it seemed lagging. But then I remembered the whole purpose:
Games, and game design, are supposed to be fun! Why else design games or play them?
So I’ve realized that though the artwork doesn’t specifically help a game design move forward, I’m having a lot of fun working on the artwork. Thus, I shall continue.
Solo “Playtest” #1
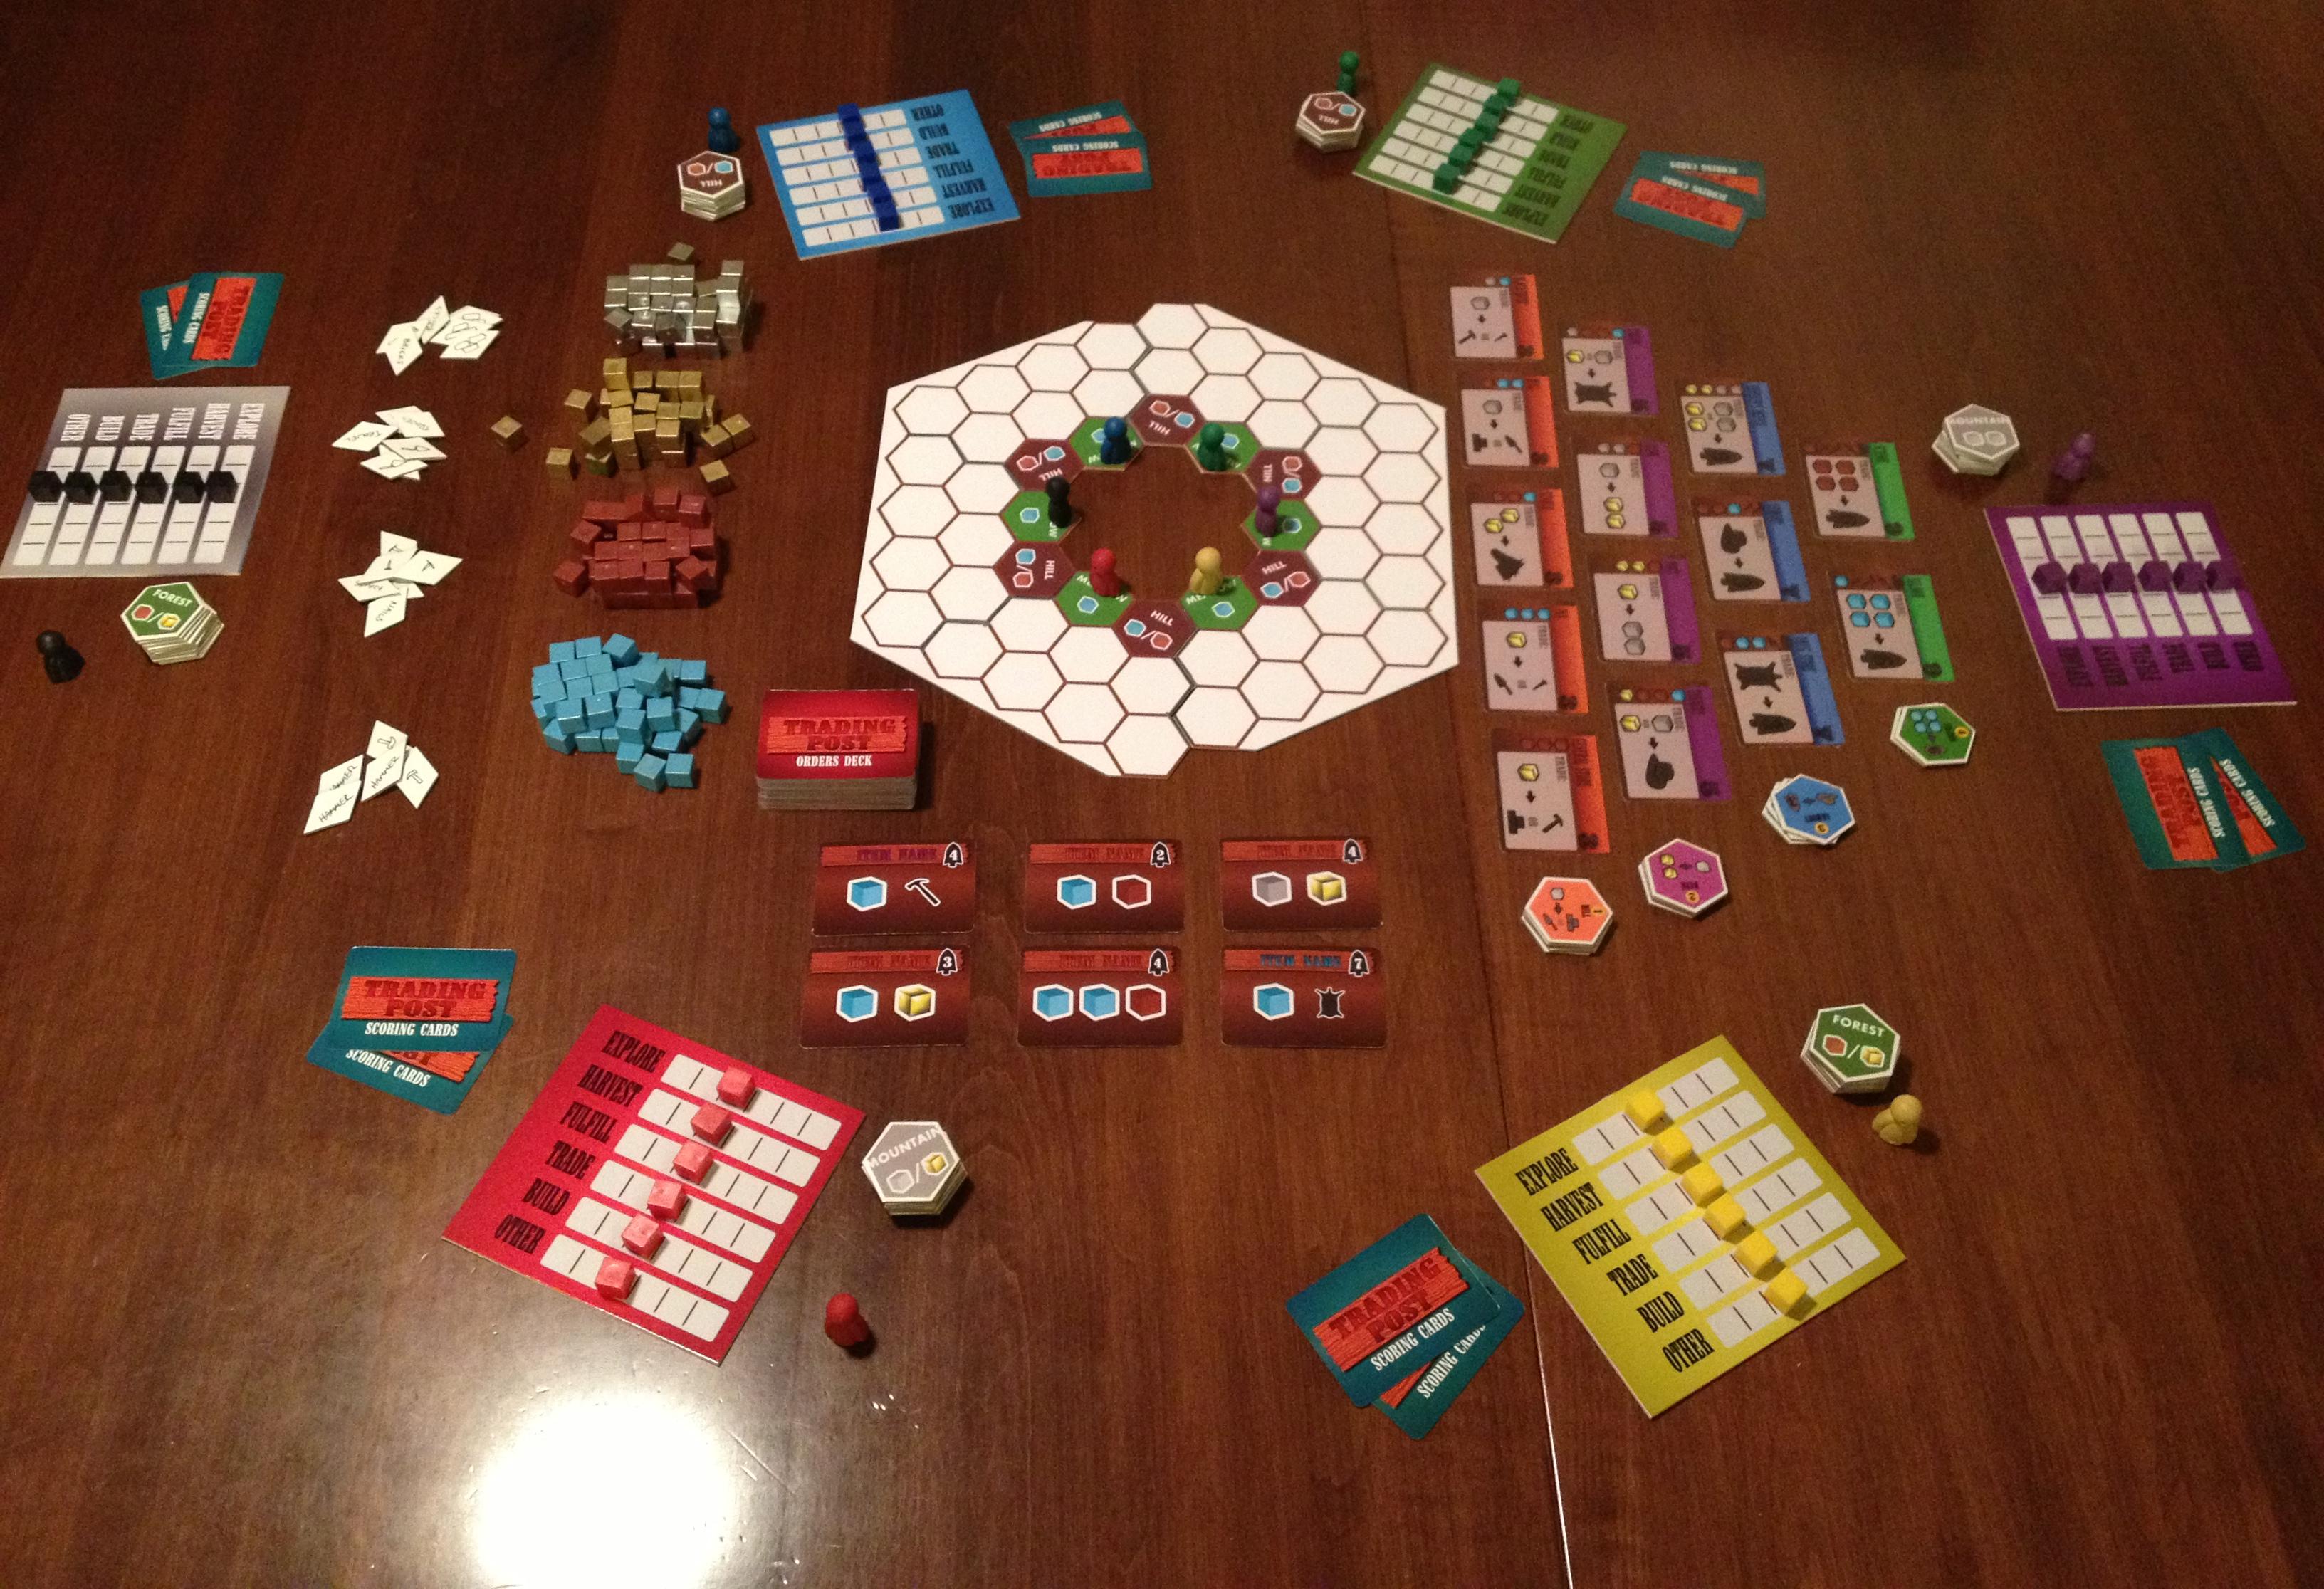
Last week I showed the picture of the game setup. I’m repeating the image here for easy reference:
Current Trading Post prototype. I think it at least looks cool!
Since this is an insight into the inner workings of my mind I am sharing the thoughts I wrote down while attempting to play the game for the first time.
First, some rules. On your turn you can take up to 3 actions. These can all be the same, or they can all be different. That’s up to you. The actions you can take are determined by the number of action points you have for each action. For example, if you had three points in the EXPLORE action track, then you could use all three actions on your turn to EXPLORE. After you have taken your 1, 2, or 3 actions, you must then move other action’s track cubes up in value. This is what I am calling a “Zero-Sum Action Point Allowance System.” (I would go with the acronym ZSAPAS, but I’m not going to use the term again in today’s article). Basically, for every action you take there is an equal an opposite reaction.
Here is a little game design nugget that you might enjoy:
During testing, if it seems like the first turn for all players is dictated, SKIP that first turn and make the result the new starting condition in the game.
What that means is that if all players have no choice (or only one beneficial choice) for what their first turn should be, fix it! Ever wonder why players start with 4 train cards in Ticket to Ride???
During the first solo playtest I made it 6 turns before I realized I wasn’t happy with the design. Here is the list of my chosen actions on this six turns:
- Explore/Harvest/Explore – Increased Fulfill/Trade/Trade
- Harvest – Increased Explore/Explore/Trade (I suppose you can always move up three action cubes – so much for “equal and opposite”)
- Explore/Explore/Trade – Increased Harvest/Harvest/Harvest
- Harvest/Harvest/Build (Stable) – Increased Explore/Explore/Explore
- Explore/Explore – Increased Harvest/Harvest/Harvest
- Harvest/Explore Quit.
After 6 turns I had been unable to fulfill any orders and I was only able to purchase one building. In Scoville players only have a total of about 7-10 turns. So after these 6 turns I realized that I have basically done nothing. At least nothing very fun. I need to adjust it so players feel a sense of accomplishment on each turn, or at least feel like they are setting themselves up for accomplishment soon.
Here are the notes I took at this point:
- Should the “Orders” be stacked? (What I meant here is that should the low level orders come out first, then the better ones, then the best, a la Power Grid Power Plants?)
- Should the highest valued Order card be replaced each turn that an order is not fulfilled?
- Should players always get to move their pawn 1 spot per turn without taking an action to do so? (Using the Explore action seemed critical and it was thus used very often. Then it had to be refreshed, so there were turns where I couldn’t move anywhere.)
- It takes too long to build even the basic buildings, which means it takes too long to get the man-made resources. How can this be sped up?
- Should players be able to complete a trade even if their pawn is not on a spot with another player or in the Trading Post (a la Settlers of Catan)?
- How do I make TRADING the focus?
That last point is a big one. Let’s talk about that…
Put the “Trading” in Trading Post!
Thus far in the design the trading aspect of the game has, for some lame reason or another, been the lesser focus of the design. I have always been more interested in the land exploration and development side of things. Why?
I don’t know. So I am going to switch over the focus of the game to actually put TRADING at the forefront. Sometimes I wonder how I get this far without realizing something so critical to the design. Which leads me to another game design nugget:
Designers should step back from their design every once in a while and pick apart every aspect. Ask yourself specific questions about each design decision and try to think if there is a better way!
One big example is when a level 1 friend pointed out that the black and white peppers in Scoville should cross-breed to silver/platinum/other grey color rather than gold. Color-wise it made sense. But since my original design was that they made gold I had simply stayed with it because I had never gone back and questioned why I did it that way. And I never asked myself if there was something better.
So the new thrust of the design for Trading Post is to bring trading to the forefront. Now I think that on every turn you will complete a trade at the start of your turn. This could then aid you when you choose your three actions for your turn. I’m imagining a “Trade Route” of trading cards on the table, which would still represent things the Trading Post needs. They could be set up like the races in Small World or the foraging trail in Morels or the buildings track in The Manhattan Project. In each of those games players can choose the first option(s) for free or pay to take one further done the path. This mechanic would work very well for the “Trade Route.” Or I could use a rondel for increased Euro-y awesomeness!
Another way that trading would become more integral, and increase player interaction at the same time, is to allow trading with other players no matter where you are located. Sometimes it’s easy to let thematic correctness run the show. But this is game design and we can fudge things now and then. Settlers of Catan is a very popular game that allows player to trade resources with other players no matter what. Now, explain thematically how that makes sense. What if your settlements and their settlements aren’t anywhere near each other on Catan? Well, if it’s good enough for Catan, then it’s good enough for this game!
The bottom line is that trading needs to be what makes this game special. If you want a game where exploration is the focus, then find some 18XX game.
How to Reboot…
A game is in there somewhere… I just have to find it!
So I am going to jump back a little and try to re-figure out how to play this game. Admittedly it wasn’t ever really set to begin with. But to make trading the focus will take some effort. I really think this can be a fun theme/game and so I will continue to work on it.
So it’s time to take some of the blank cards I ordered and put them to use. I’m excited to work on the Trade Route/Rondel idea and see how it changes the focus on the game.
Another thing I’ll probably change is that players should draw all their land from their set of ten land tiles as part of their setup. What this would do is drastically lower the exploration aspect of the game. Players would also be able to plan their moves more deeply and more intentionally. I like the sound of that.
Once I nail down how I want the trade route to work then I can put the pieces back together for how the rest of your turn would work. This should be pretty interesting and I’m going to take an open-source approach to this design. That means I’ll be posting about it for all of you to read. I hope to provide you with a designer’s perspective on making appropriate choices within the design process, and how to keep things simple. Trading Post posts likely won’t be weekly from here on out, but they will definitely pop up now and then as I work through stuff.
Thanks for reading and joining me on this ride!
Trading Post: Path to GenCon
![]()
I have a new game design I’m working on and today I am posting the last of 4 articles about it. Here are the four articles in this series:
- 5-16-13: Origins of Trading Post
- 5-23-13: Early Prototying
- 5-30-13: Hiatus and Re-design
- Today 6-6-13: Path to GenCon
Today we’re looking at my path forward with Trading Post as we near GenCon. I am hoping to have a game that has been playtested, is fun, and is able to be played near the Blue Noodle (UnPub area). So I’ll cover some development and what I’m hoping will happen with the game.
The Development Phase
Currently the game has not been played. What? You mean you’ve been reading a month’s worth of posts about some guy’s game that hasn’t even been played? Yes. And thanks for reading! I have nearly all the components together for the game. All that is missing is a scoring track and coins. Here is a picture of the game in its current prototype state:
Current Trading Post prototype. I think it at least looks cool!
So let’s talk about the different components that we see in that picture and discuss their purpose in the game.

A player’s territory.
Let’s start in the middle and work our way out. In the center is the land portion or map portion of the game. Each player has their own region, which is shown on the right. It is a player’s objective to explore their territory throughout the game. As they explore their territory they will draw a tile from their land tiles. These tiles are shown in the image above as the stack of hexes next to the player mats. The tiles will be either Meadow, Hill, Forest, or Mountain.
On the right of the map portion is the tree of buildings. Besides exploring your territory during the game you will also want to build buildings. The downside of building is that you lose a resource region of your territory. The upside is that you have a new trading opportunity in your own territory. Other players may visit it to complete the trade shown on the building hex, but they will have to pay you to do so. Buildings also count towards some of the scoring cards, which I will explain below.
To the left of the map portion are the resources. There are four natural resources in the game and four man made resources. The four natural resources are gained by harvesting them within your territory. The man made resources can be earned through the trade opportunities in certain buildings.
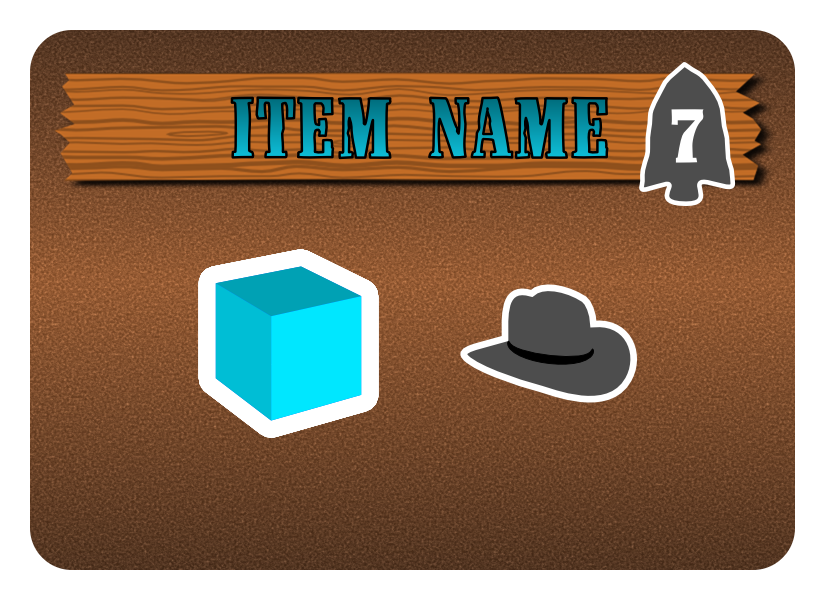
Example of a “Blue” order. This requires a Water and a Hat (Fedora?). The player earns 7 points.
Below the map portion in the image are the Orders cards. Thematically here the Trading Post is requesting certain orders to be fulfilled. On your turn you have the opportunity to fulfill any number of these if you have the action points available. Along with building buildings it is also critical to fulfill orders during the game. This is a significant way to earn points. It is also a way to earn endgame points if you have a scoring card that requires certain colored orders be fulfilled. Once orders have been fulfilled, at the end of the current turn they are restocked to the number of players.
In the image the game is set up for six players. Each player has a player mat, their ten territory tiles, a pawn for the scoring track that is not in the image, and two scoring cards. Each player will also have some coins to begin the game, but I have not yet totally figured out the role I want coins to play in the game. They may ultimately be excluded.
Scoring cards represent hidden endgame scoring conditions. These are similar to the route/destination tickets in Ticket to Ride. Some of these are requirements for building certain combinations of buildings. Others are for fulfilling certain combinations of orders. But they are all ways to score points at the end of the game. I chose this because I like all players to be able to hold on to hope. And endgame scoring is a mechanic for hope.
The player mat is where I think a lot of the interesting strategy comes into play. The mats in the picture do not have numbers on them, but you can imagine each row having 0 1 2 3 4 5 on them. Each row is a different action. The number on which your cube sits tells you how many of that action you have available on your turn. At the start of the game all players have two of each action available. On your turn you can do three different actions, each as many times as your cubes indicate. The cool part is that as those actions decrease, other actions have to increase equally. What we have here is a zero-sum action point allowance system. Here is an example of a first turn where the player has chosen to EXPLORE twice and HARVEST twice. This allows them to discover new parts of their territory, set themselves up to have more resources available on subsequent turns, and have some resources to use on their next turn. So they spent a total of four action points. Then they have to move non-used actions up by four points. In this case they chose to increase FULFILL by 1 and TRADE by 3.
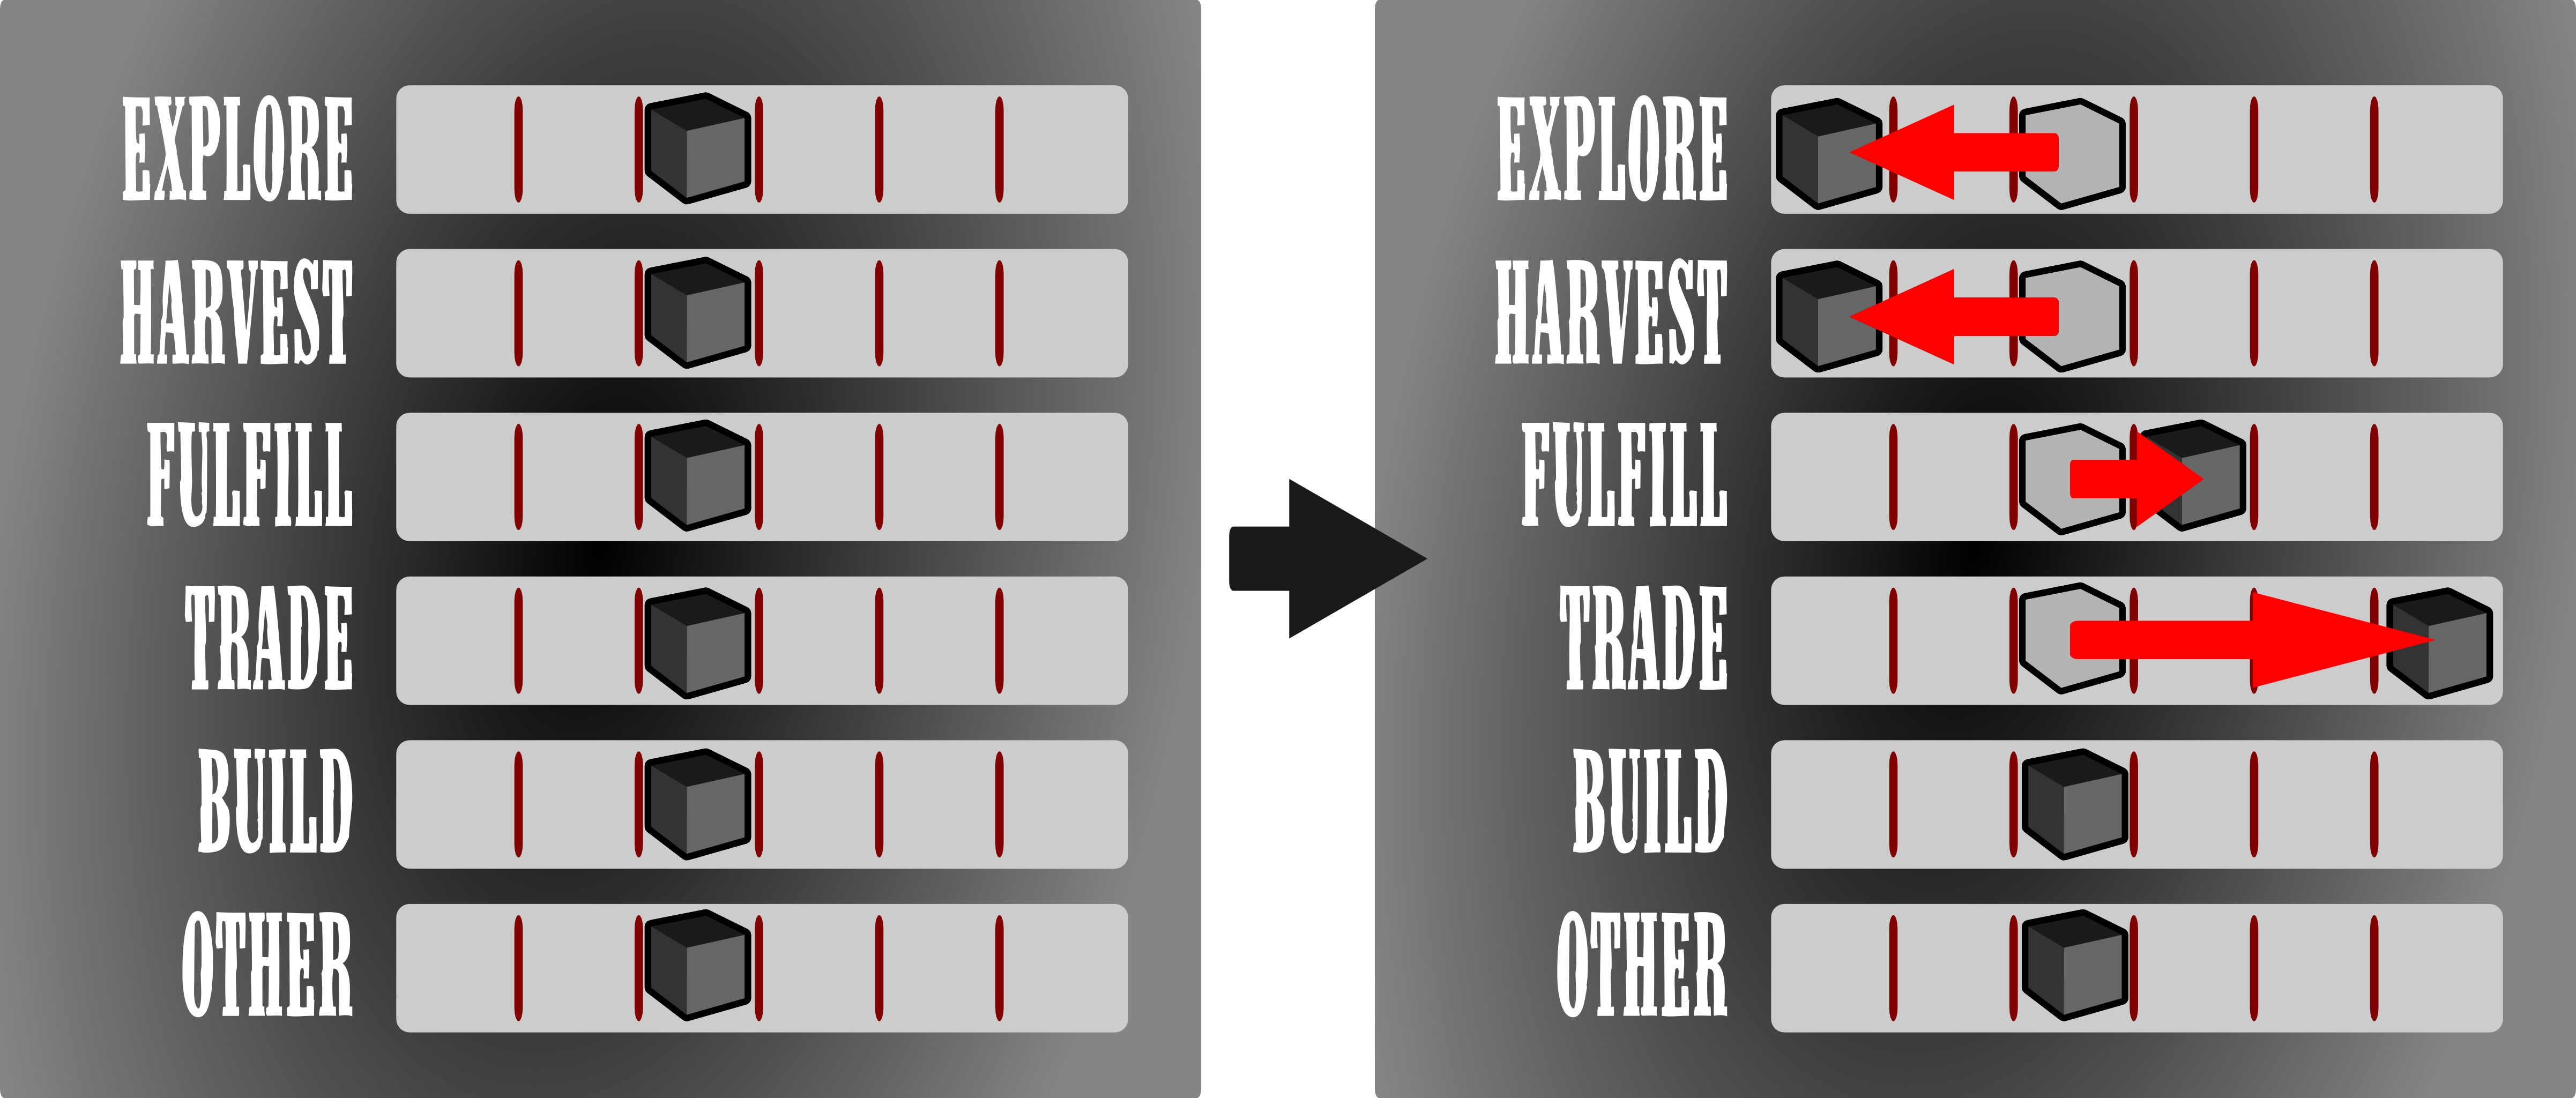
Player performs EXPLORE and HARVEST twice each. Then chooses to increase FULFILL one spot and TRADE three spots.
On their next turn they will be unable to explore and harvest. So likely their only option is to move their pawn to the Trading Post and hope they can fulfill an order or perform a trade based on the resources they harvest on their first turn. I think having this zero-sum action point allowance system in place will lead to some tense decisions in the game. Players will have to make sure they’re leaving themselves with the action points they want for the next turn.
Obviously, since this hasn’t yet been tested, this zero-sum action point allowance system will have to be extensively played. That leads me to the next thing I wanted to mention…
Playtesting
The first time I tried to play Scoville it played through to the end in a surprisingly well manner. I am a little worried about that with Trading Post. I feel like this will require much more testing than Scoville to get it to a point where I am comfortable showing it to a publisher. But GenCon is two months away, so the testing shall commence soon.
My main objective with any playtesting is to continually make sure the game is any fun.
It’s all about fun, right? Who wants to play a boring, crappy game with some weird, offbeat theme that doesn’t relate to anyone?
Now, perhaps there are a bunch of you who think the western trading post scene is for old guys who grew up watching John Wayne. I can assure you that in Trading Post out here a man settles his own problems. Trading Post is designed with a Euro identity in mind, but without anyone from the 13th-18th centuries looking boring on the cover of the box. I am very excited about this game and its potential.

Perhaps the most important step in the Game Design process!
I am fortunate to have a great group of friends who are willing to playtest my games here in town. So I am guessing they’ll try out this one as well. Since playtesting will be my focus for Trading Post over the next two months I figured I would list the things that I view as important during the playtesting phase of game design.
- Keep your design objectives in mind – do not get carried away on wild tangents just because one player mentioned something unusual. Keep asking yourself why you are designing this particular game and why you think it is unique and interesting.
- Offer bribes of beverages, snacks, and an awesome atmosphere to lure playtesters. And telling them their name would be in the rulebook if it were to get published doesn’t hurt either!
- Try to make sure the game is playable before subjecting anyone to it. This means solo playtesting.
- Don’t change major things on the fly during a playtest.
- Don’t implement more than one major change at a time between playtests – if you add two things and the game gets way better or way worse you may not know which change should be attributed to the difference in play.
- I recommend playtesting at least ten times before integrating major changes. This gives you a solid pool of plays from which to draw an understanding of an “average” game and also gives you enough opportunity to perhaps see any unusual play.
- One of the keys to playtesting is watching for patterns. If several different people all mention the same thing (not in the same playtest) then you’d better start paying attention to it.
- And I’d like to recommend shooting for a playtest goal of 100 playtests, but I’ve not done that with my games, so how could I hold you accountable. Do it! I don’t. You should. So 100 it is!
Those are just some guidelines. I also like to get into some nitty gritty stats when playtesting. For Trading Post I’ll be keeping stats on how often each color of orders get fulfilled, how often each type of orders get fulfilled, how often players will get to the green buildings, and so much more. There is a lot I could analyze with Trading Post so I have another recommendation for playtesting:
If your design is complex, playtest the game ten times and only focus on one element. Make no changes to anything else. Once that element seems “good,” move on to another.
I think I will have to proceed this way with Trading Post. I may start by watching how the buildings get purchased and built for a set of ten playtests. Then for the next ten I may focus on how the scoring conditions seem to play out. (Note: the data from the first ten playtests where scoring conditions were not the focus can still be used in this portion of the playtesting).
My goal over the next two months is to get 15 playtests completed. That’s one every four days, which might be a bit much, but you gotta have ambition if you wanna get anything done! Entering Protospiel-Milwaukee I had had 18 playtests in on Scoville. By then, even with only 18 under my belt, I felt I was able to teach it quickly and explain the thrust of the game. That way I was not wasting other playtesters time. I hope to meet this goal so that I don’t waste anyone’s time at GenCon where there is so much awesomeness to be had!
Pitching at GenCon
 Well I’d be a knucklehead if I assumed that a game that hasn’t even yet been played could be pitchable by GenCon. That will depend on how playtesting goes. So I am not going set of goal of pitching this game while there. My goal for moving forward with this game as GenCon approaches is to have something where the wrinkles have been ironed out and it seems fun.
But for those of you who may be pitching your own games I recommend reading the following two articles:
- Networking Earns Pitching – http://www.cheveedodd.com
- Pitch Like a Pro – http://www.hyperbolegames.com
The first is something you should probably be working on right now if you haven’t already done it. The second is an awesome guide to how it all works and how to do it right. I’m guessing my 2014 GenCon will be more about pitching than my 2013 GenCon.
While I won’t be pitching the game at GenCon I will definitely have at least one copy with me. If you want to give it a shot just let me know and we can schedule something! Head for the Blue Noodle! (www.UnPub.net)
Path Forward for Trading Post
Now I just gotta sucker my friends into playing an unpublished game that likely has no balance, and no reason to be good. Of course I’ll have to figure out those insignificant things like what you actually do on a turn. But I’m getting very close to solo testing. If this game seems to work after a decent amount of playtests then I’ll likely send a copy into the Prototype Penpal Program run by Grant Rodiek. It’s a great way to get designer level feedback and to see if your game is broken. Plus, it’s always fun to know that somewhere out there other people are playing your game!
Well I hope you’ve enjoyed my articles over the past few Thursdays about Trading Post. I’ve received some interesting feedback already and I appreciate all the kind things you’ve all said. I hope that this game seems fun to you. I’ll keep moving forward with it and will definitely keep blogging about it. Someone also suggested making Thursday the default Trading Post day. We’ll see. Thanks for reading! And don’t be shy with any comments about any of this.
Trading Post Part 2: Early Prototyping
Trading Post Logo… for now.
I have a new game design I’m working on and today I am posting the second of 4 articles about it. Including last week, today, and the next two Thursdays, I’ll be writing about the game from it’s creation to the present state. Here’s the four articles in this series:
- 5-16-13: Origins of Trading Post
- TODAY 5-23-13: Prototyping Early Versions
- 5-30-13: Hiatus and Re-design
- 6-6-13: Path to GenCon
So today let’s again jump back in time a few years and take a look at my early prototyping attempts, from when I didn’t know anything about prototyping games!
The Board:
One of the first things I attempted to make when I thought I had the design “together” enough was a board. I figured black and white was a great place to start. So I drew a few sketches about the layout and then opened The Gimp.
For those of you who don’t know what The Gimp is, here’s where you can go to learn more: http://www.gimp.org/
It is an open source image editing software. While it used to be my weapon of choice for image editing and graphic design, I now use Inkscape since it is a vector graphics software (and still free).
So in The Gimp I got a 21″ x 21″ file open and began by creating the main hex grid. Last week I wrote about a grid of squares with truncated corners where cubes could fit. Well, that was gone by the time I decided to make a prototype. So here we are already discussing a hex grid map with square tiles. In the earliest designs all the tiles were going to be 1″ squares. So the board reflected that. You’ll understand why I went with squares a little more in the discussion about components below.
The hex shaped grid for player territories was a beast to design. I actually had to do math to get the grid to be a hex in The Gimp. This would have been relatively easy in Inkscape. But it wasn’t very fun in The Gimp.
After wrestling with the hex grid territory region I added a few other smallish things to the board. This included the title, resource areas, a time track, and a spot for cards. After spending a completely ridiculous amount of time on a board for a prototype that hadn’t even been played, here’s what I ended up with:
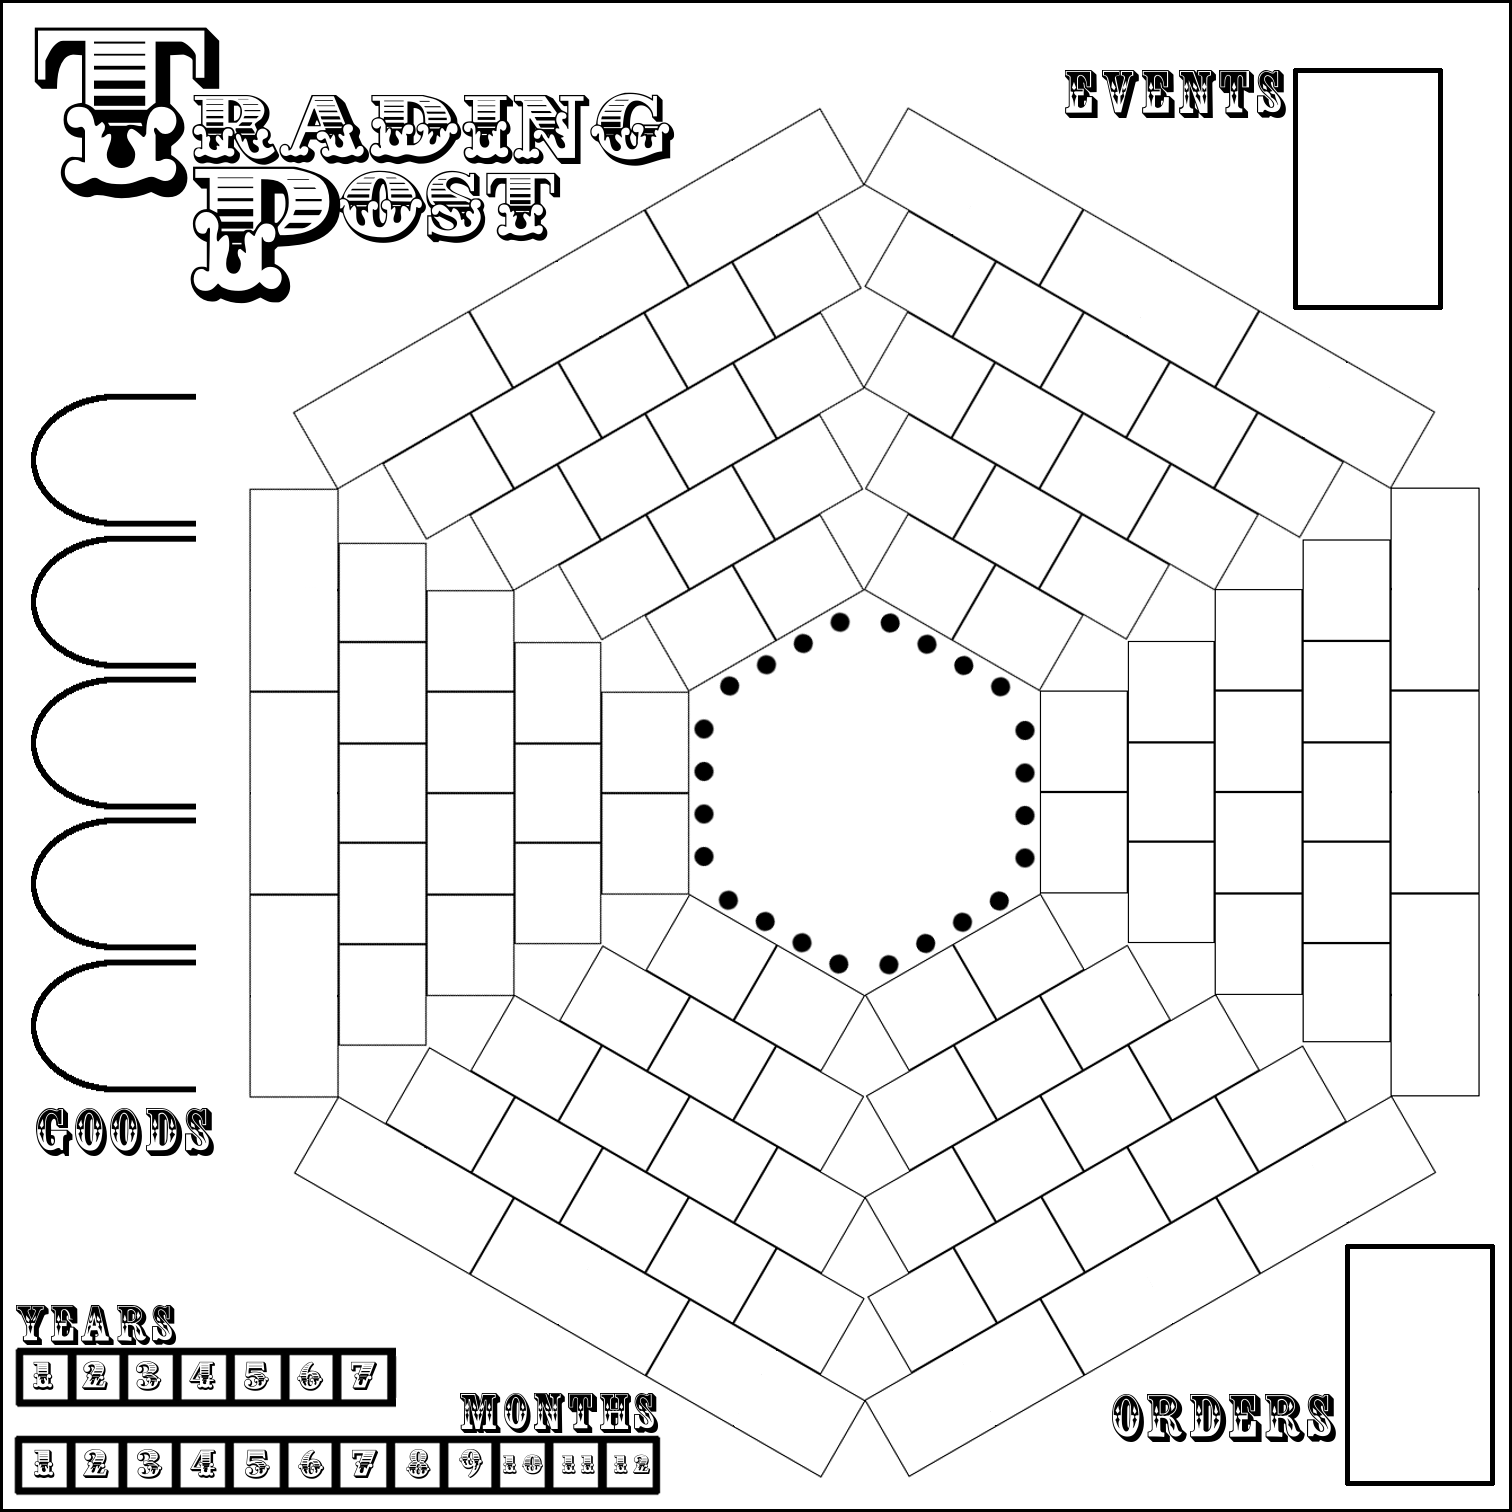
Well, it’s better than nothing, right?
As you can see it values function over form. Ugly though it be, it would still get the job done. So I printed it on 9 different sheets of paper and tried to get all the edges lined up. Maybe my struggles with creating a full size game board when working on Trading Post are what subconsciously led me to not having a full size board for Scoville.
The Territory Tiles:
The main concept of the design involves exploration of your territory. Players start with their pawns in the center and eventually should try to explore all of their territory. So I had to make tiles to put on the sections of your territory as you would discover them.
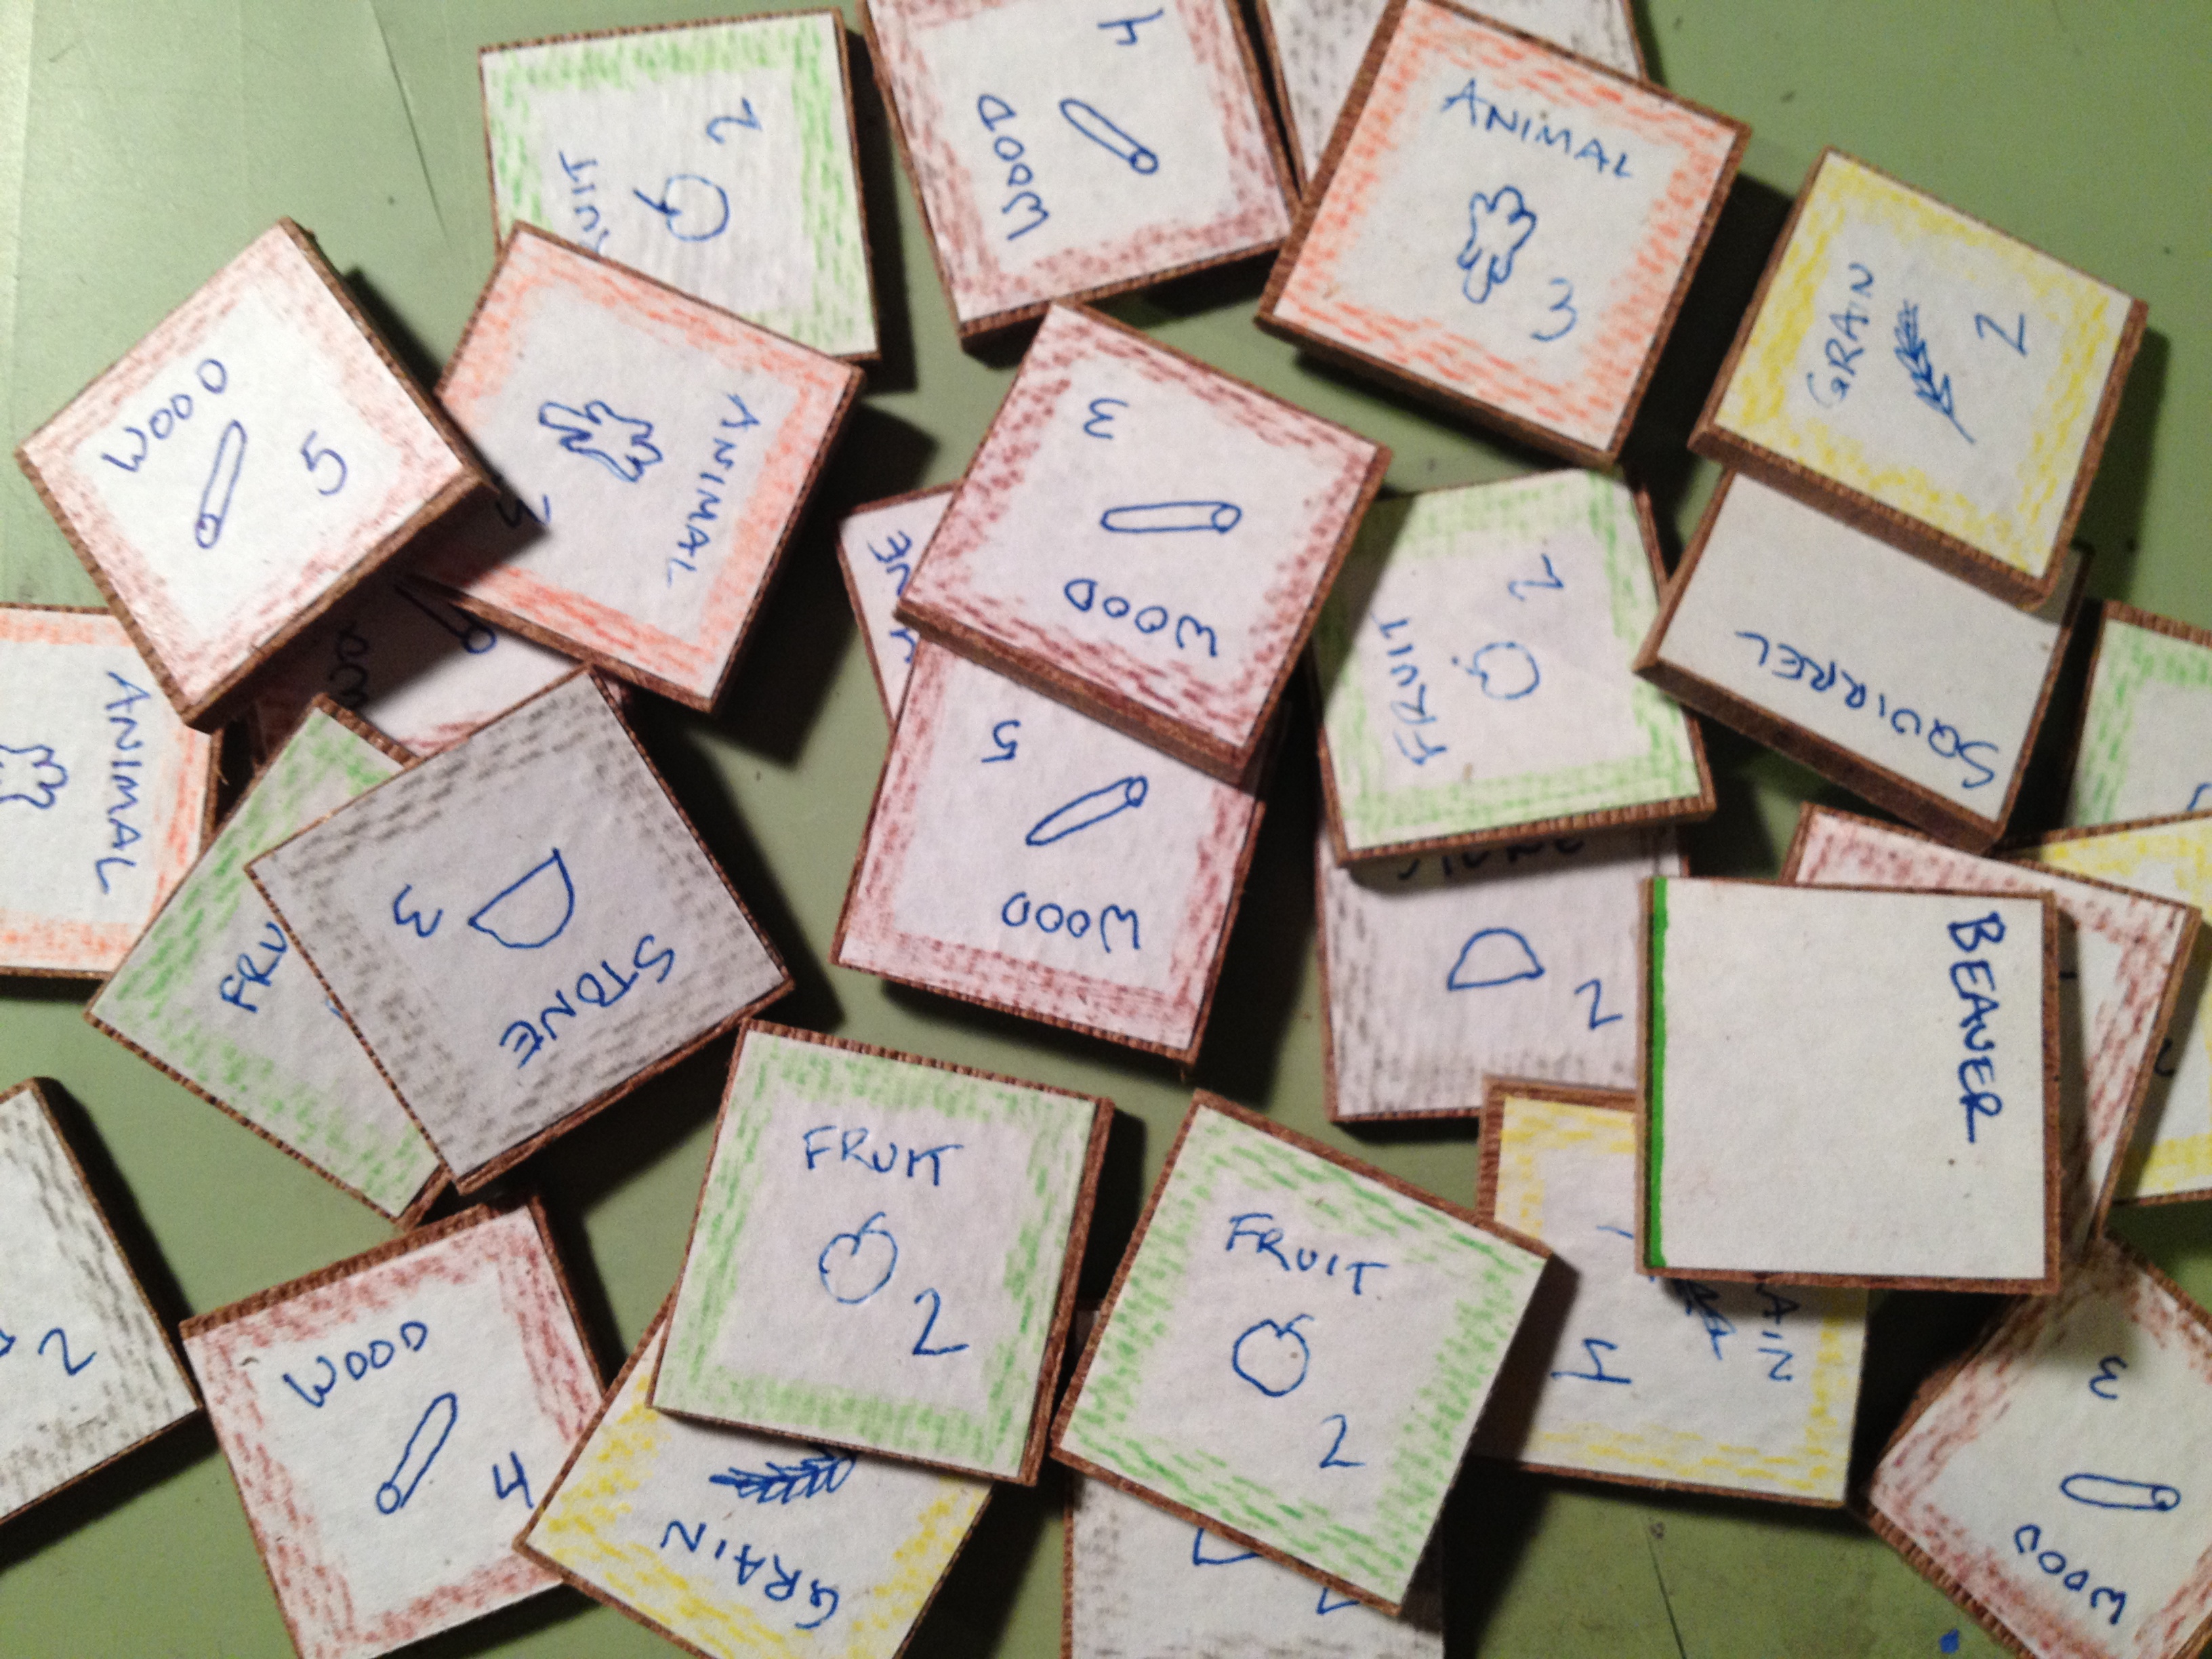
Wood tiles with hand drawn icons and colored pencil edges. Wow.
These tiles would represent different resources that could be available, AND the amount of that resource that the piece of land would produce… for the rest of the game. This included things like Wood, Stone, Fruit, Grain, and more.
Here is a lesson I learned when prototyping the territory tiles: Just buy chipboard components from someone like Printplaygames.com. For the cost you can get just about everything you would need to get your game to the prototype phase.
Did I make such a wise decision? Not even close. I actually bought a wood board and went to a friend’s house to use their table saw to cut 1″ square tiles. Then I cut out square pieces of paper. The paper got glued to the tiles. Then I drew little icons on each one and colored the edges to match the icon. Here’s a recommendation: Don’t do it like that!
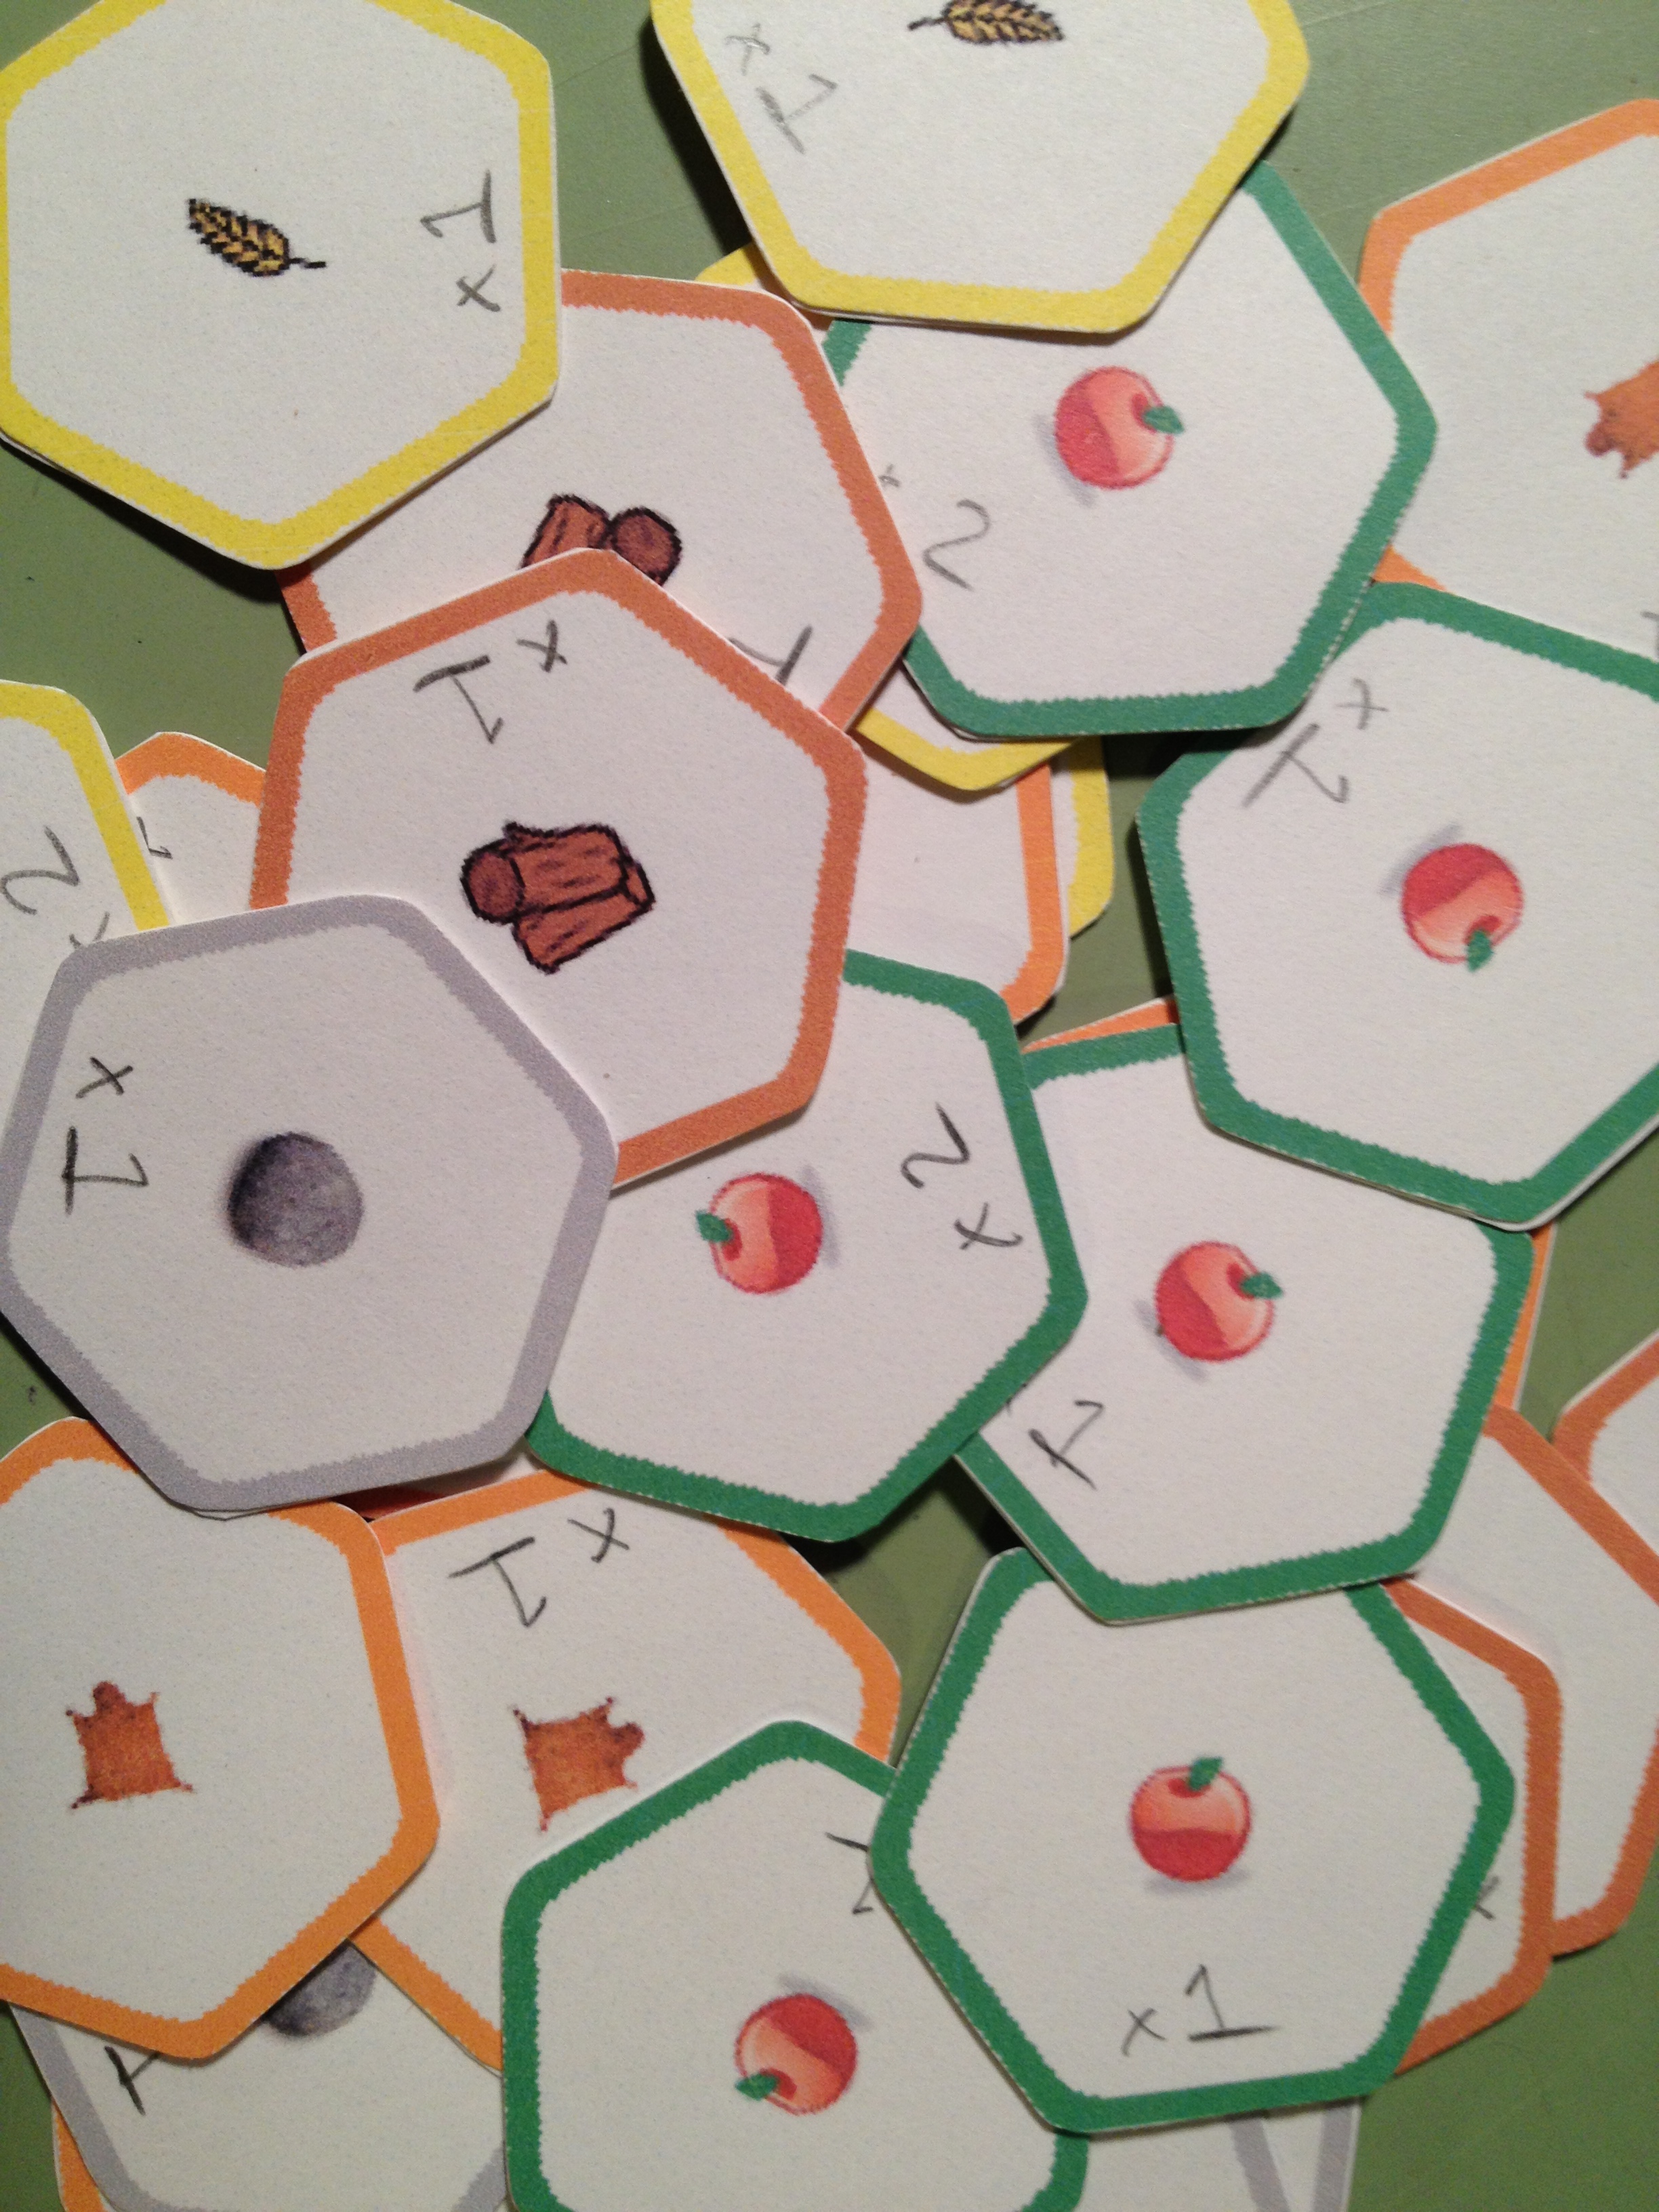
Hex punched, corners rounded, glued back to back. Aye!
Eventually I got to the point where a hex-based grid seemed like a better idea and I began to work toward a hex-based prototype. I used a computer aided drafting software called SolidWorks to render a hex grid that I could print out for the hex-based prototype. I don’t recommend using CAD software for board game design unless you’re making minis. The main problem is that the CAD software typically doesn’t allow you to save images in high quality. The downside of the change to a hex-based system was that all the effort I put into the wooden square tiles was now wasted. (I can say that it was wasted because it was never even used in a playtest).
The hex-based system didn’t change how the game was played. It just made things fit a little better and look neater & tidier on the board. It was at this point in my board game design career that I decided to purchase a hex-punch. I bought a Creative Memories Double Hex Punch off eBay for about $8. It turns out that that’s a crazy awesome price! Despite the price I recommend buying a variety of punches, especially circles. I just searched and found a few of the Creative Memories hex punches on eBay for about $37. Another free designer tip:
Punches can be your best friend!
Here is a link for punches from Fiskars. I would recommend starting on eBay, though.
Ugh. Looking back on all of this makes me wish I had been familiar with Inkscape at the time I was working on this design. All of the art and tiles could have been made with Inkscape so much more easily than what I was doing.
Well I now had my territory tiles made. Now it was time to add the other unnecessary ingredients in this poor game design…
The Event & Order Cards:
After reading the article about what makes a game good (Note: here’s the article I mentioned in last week’s Trading Post article, thanks to Neil Roberts who found the link – What Makes a Game Good?) I knew that I wanted to especially avoid monotony in the game design. I already had a random draw for territory exploration. But how else could I increase variability and replayability?
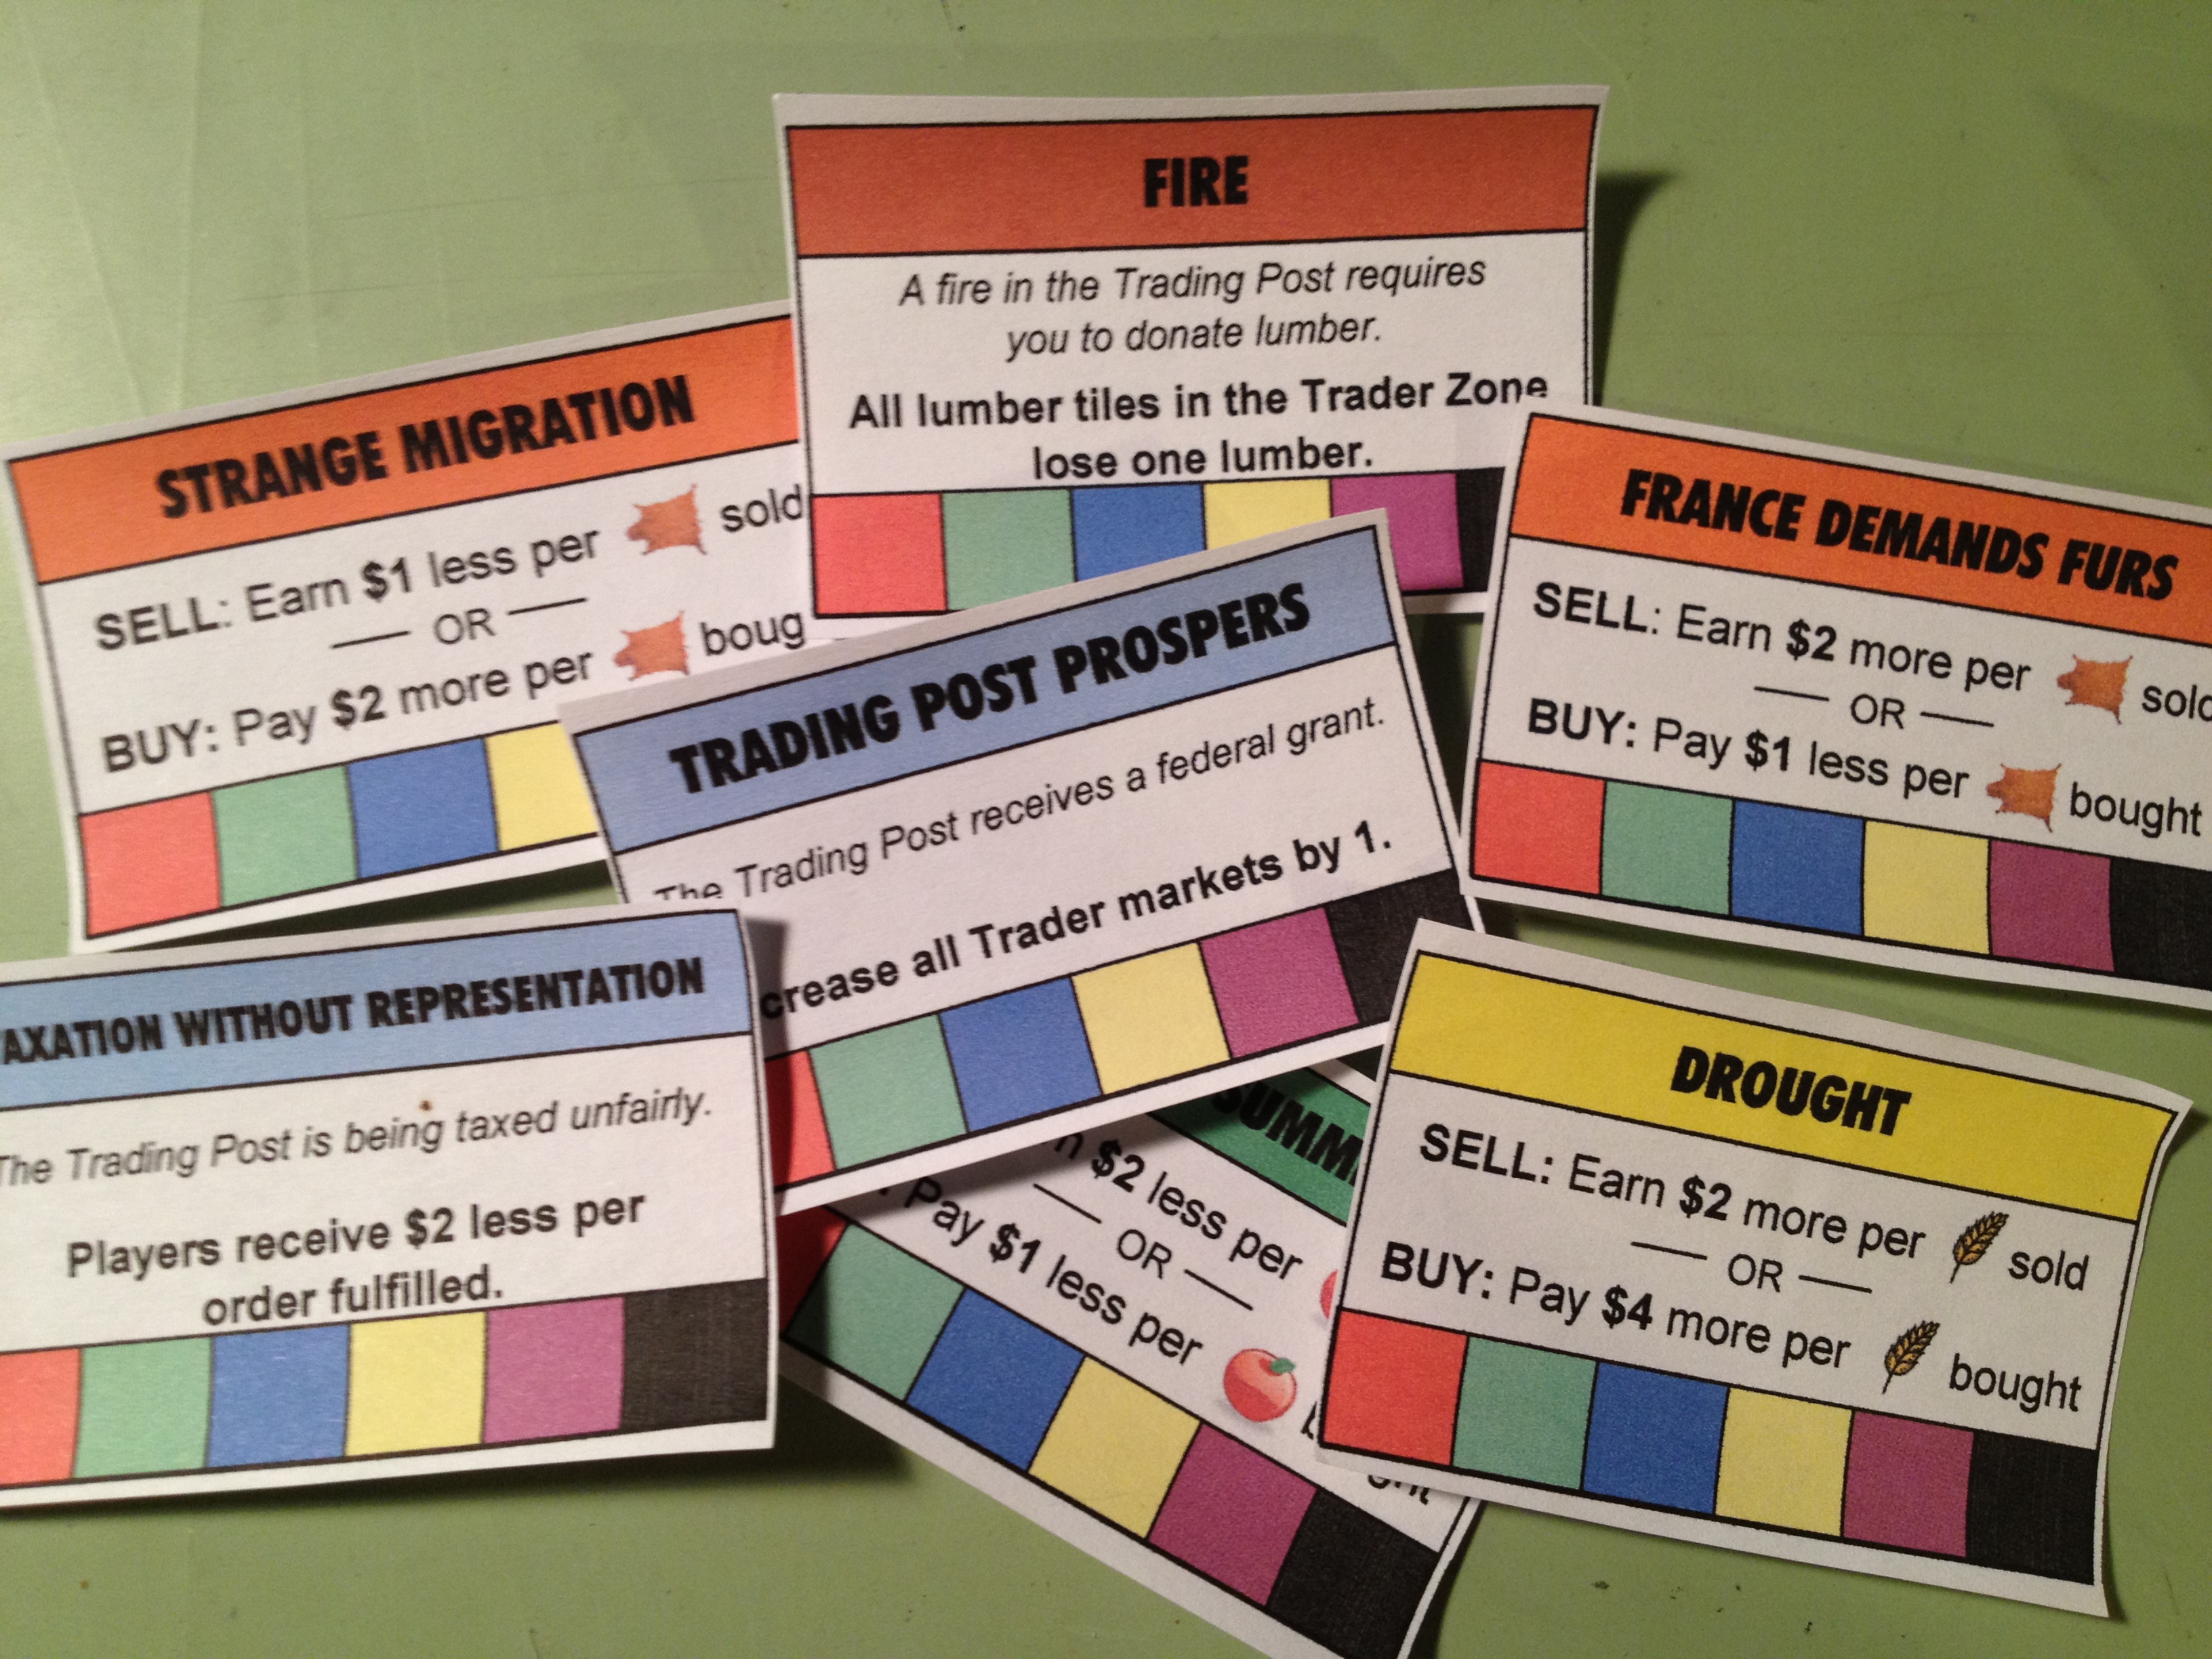
My poor attempt at adding replayability.
I came up with the idea that each “year” in the game would have something different going on. I called these “Event” cards. They typically affected how the market worked for different goods. But they also could positively or negatively affect all players. A few of the event cards are shown here on the right.
These were masterfully made in Excel. The bottom row of the event cards is a spot for players to put a cube of their player color when the card affected them to show that it had done so. Cards could only affect a player once. The top box on the cards is also color coded. The DROUGHT card in the image affects GRAIN and thus matches the yellow color of the grain. Pretty awesome, huh?
But this wasn’t enough! Another free designer tip:
Don’t add complications until the game needs it!
At the time I was designing Trading Post I hadn’t learned that lesson. So I added ORDER cards in a seemingly theme-less way to make each game different. I guess I was really worried that people would be bored with Trading Post after one or two plays.
Thematically the ORDER cards represented things the Trading Post needed during that year. That at least made sense. These things included blankets, hats, pies, buildings, flagpoles, and on and on. I struggled to make a list long enough of the sorts of things that a Trading Post might need. But eventually I got them all together and started making more “awesomeness” in Excel. Here’s a glimpse of the result:
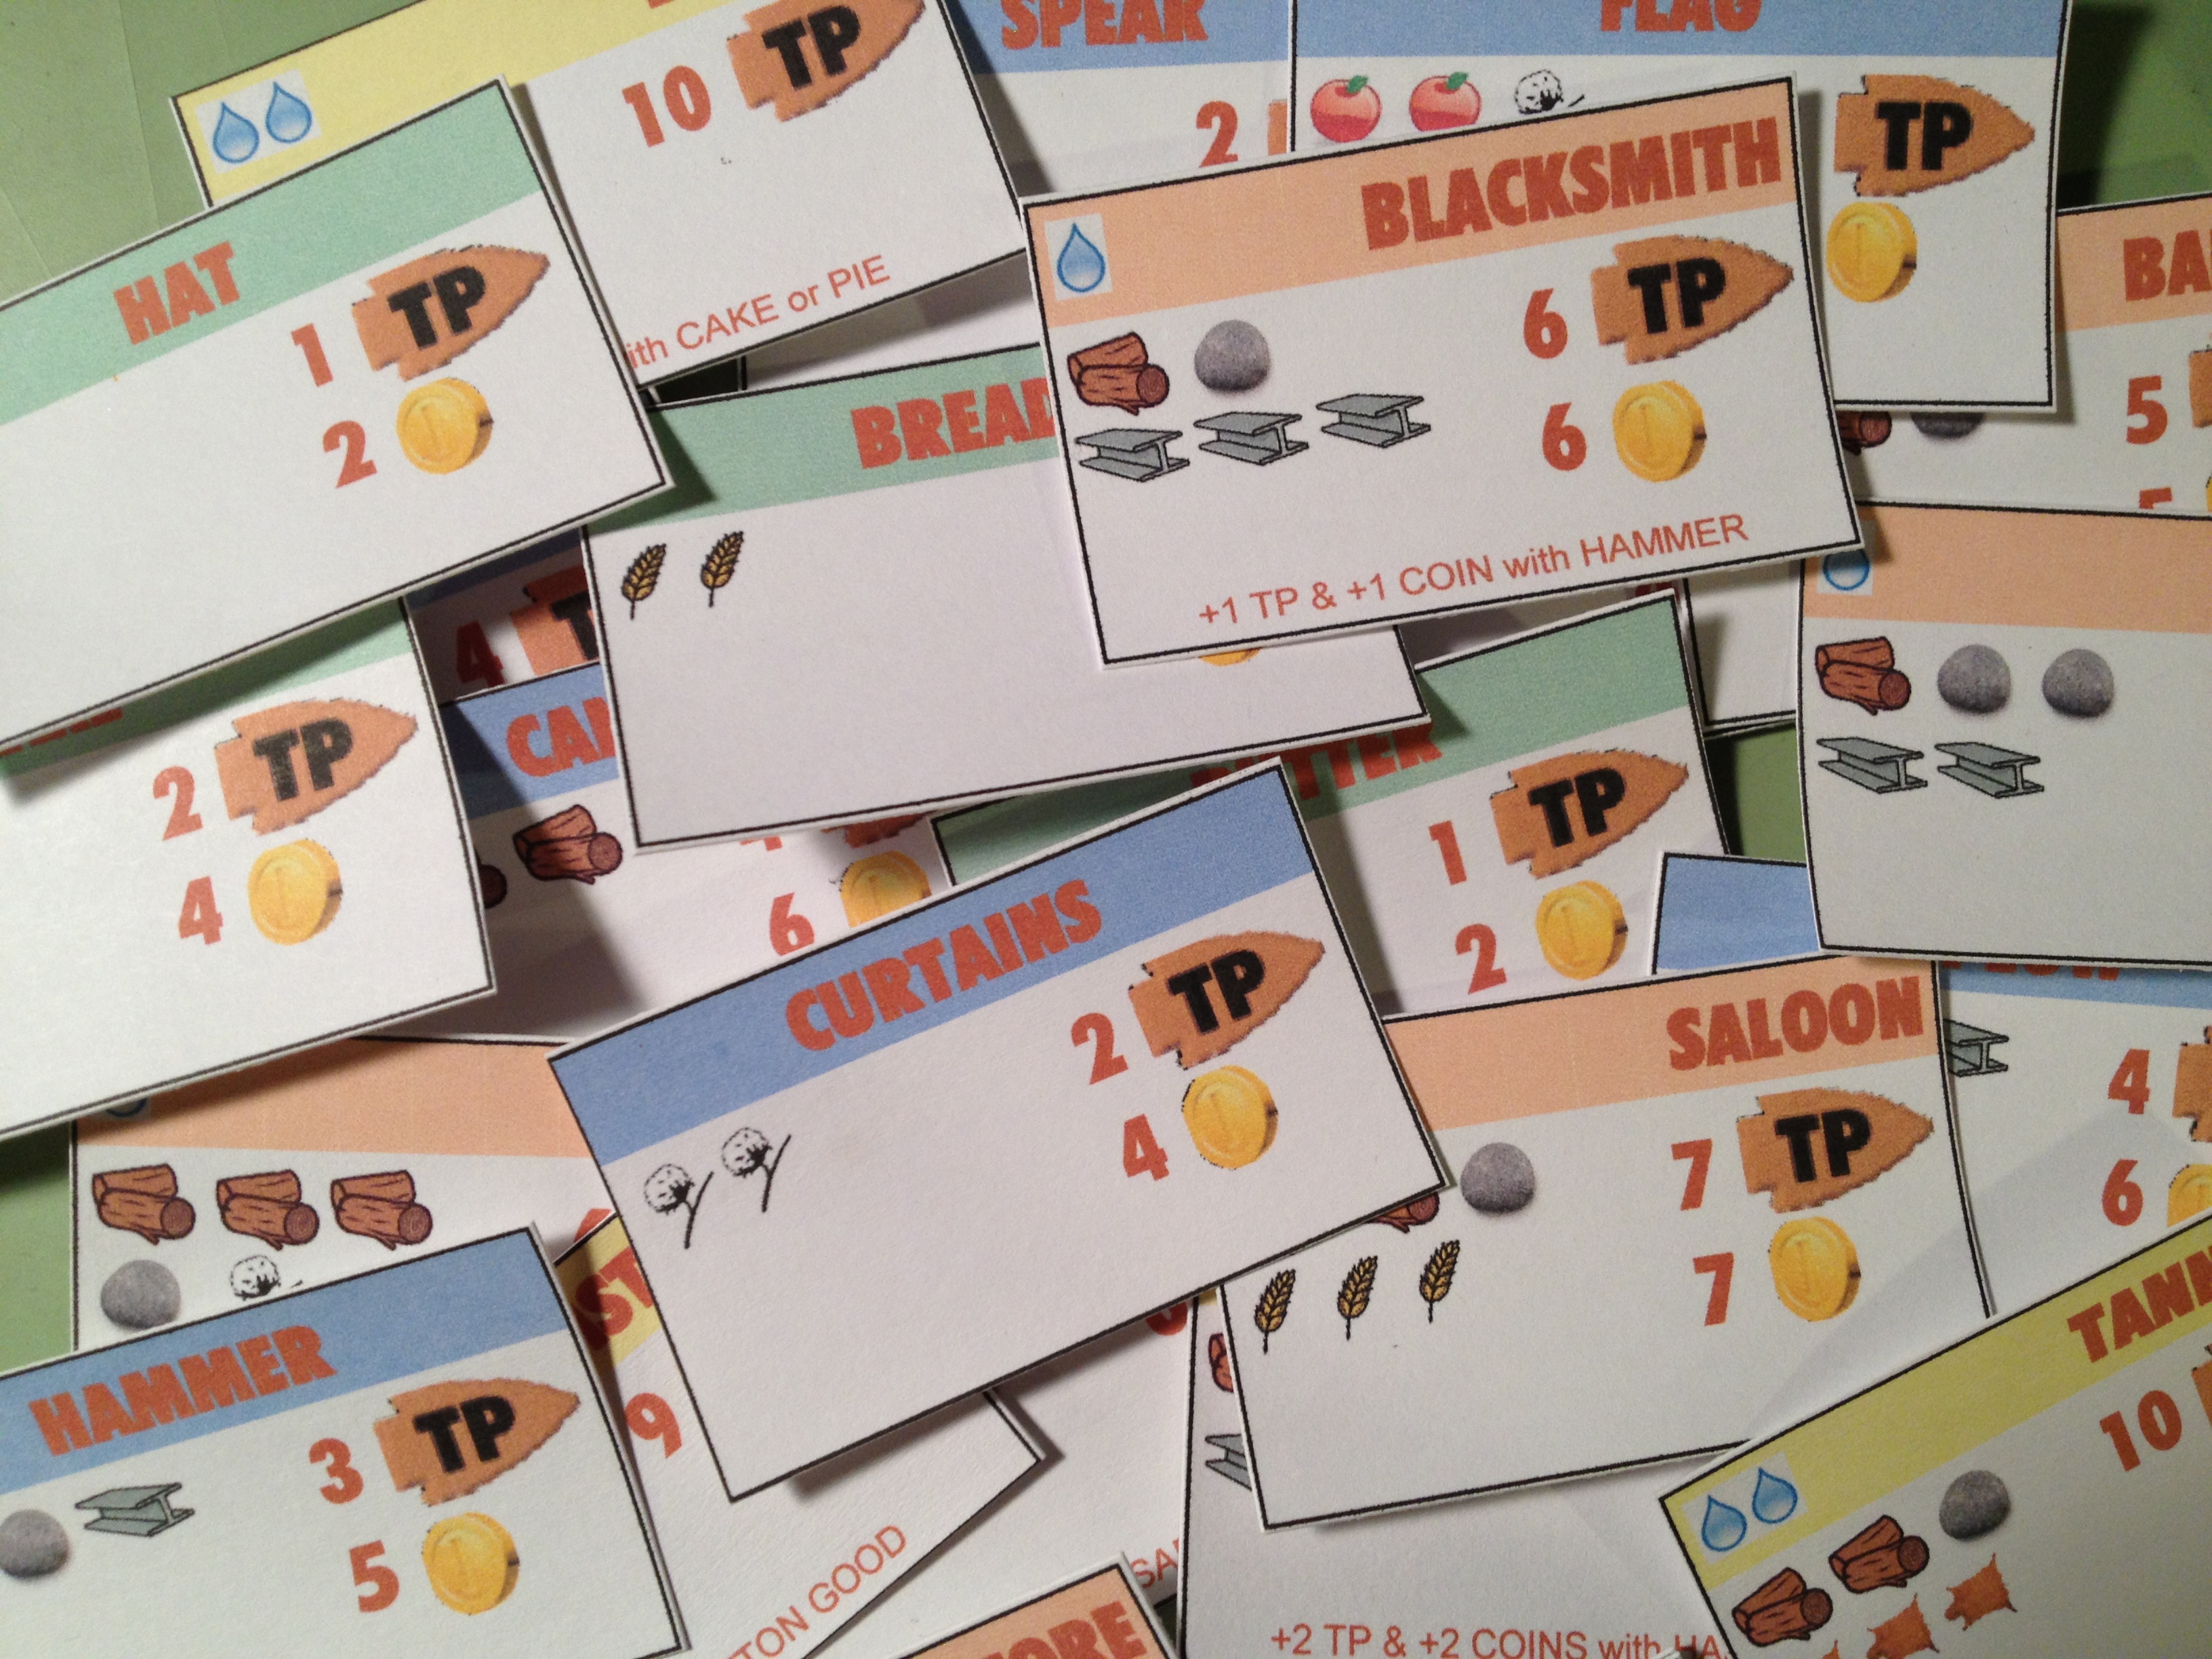
Trading Post Order Cards. Excel is NOT a graphic design tool!
So made a stack of about 50 order cards that would come out randomly, four per year. These would be available on a first come-first serve basis. The cost is shown on the left. In the image above, for example, the curtains would cost 2 cotton. The reward is on the right. In the same curtains example the reward was 2 Trading Points and 4 coins. I even added further complication by having some order cards provide a bonus if the owner already had fulfilled a prerequisite. In the image above an example is the BLACKSMITH. If you had fulfilled the HAMMER order card for the Trading Post and then fulfill the Blacksmith card you would earn an extra point and an extra coin. I suppose I added this to the design to produce a more guided decision tree to players.
In most of these images the way the prototype components were made was by printing on normal paper and glue-sticking them to 60lb. paper. The problem with this method is warping. And it was a big problem with the original Trading Post components. This is one reason that I have moved on to gluing stuff to matte board or chip board.
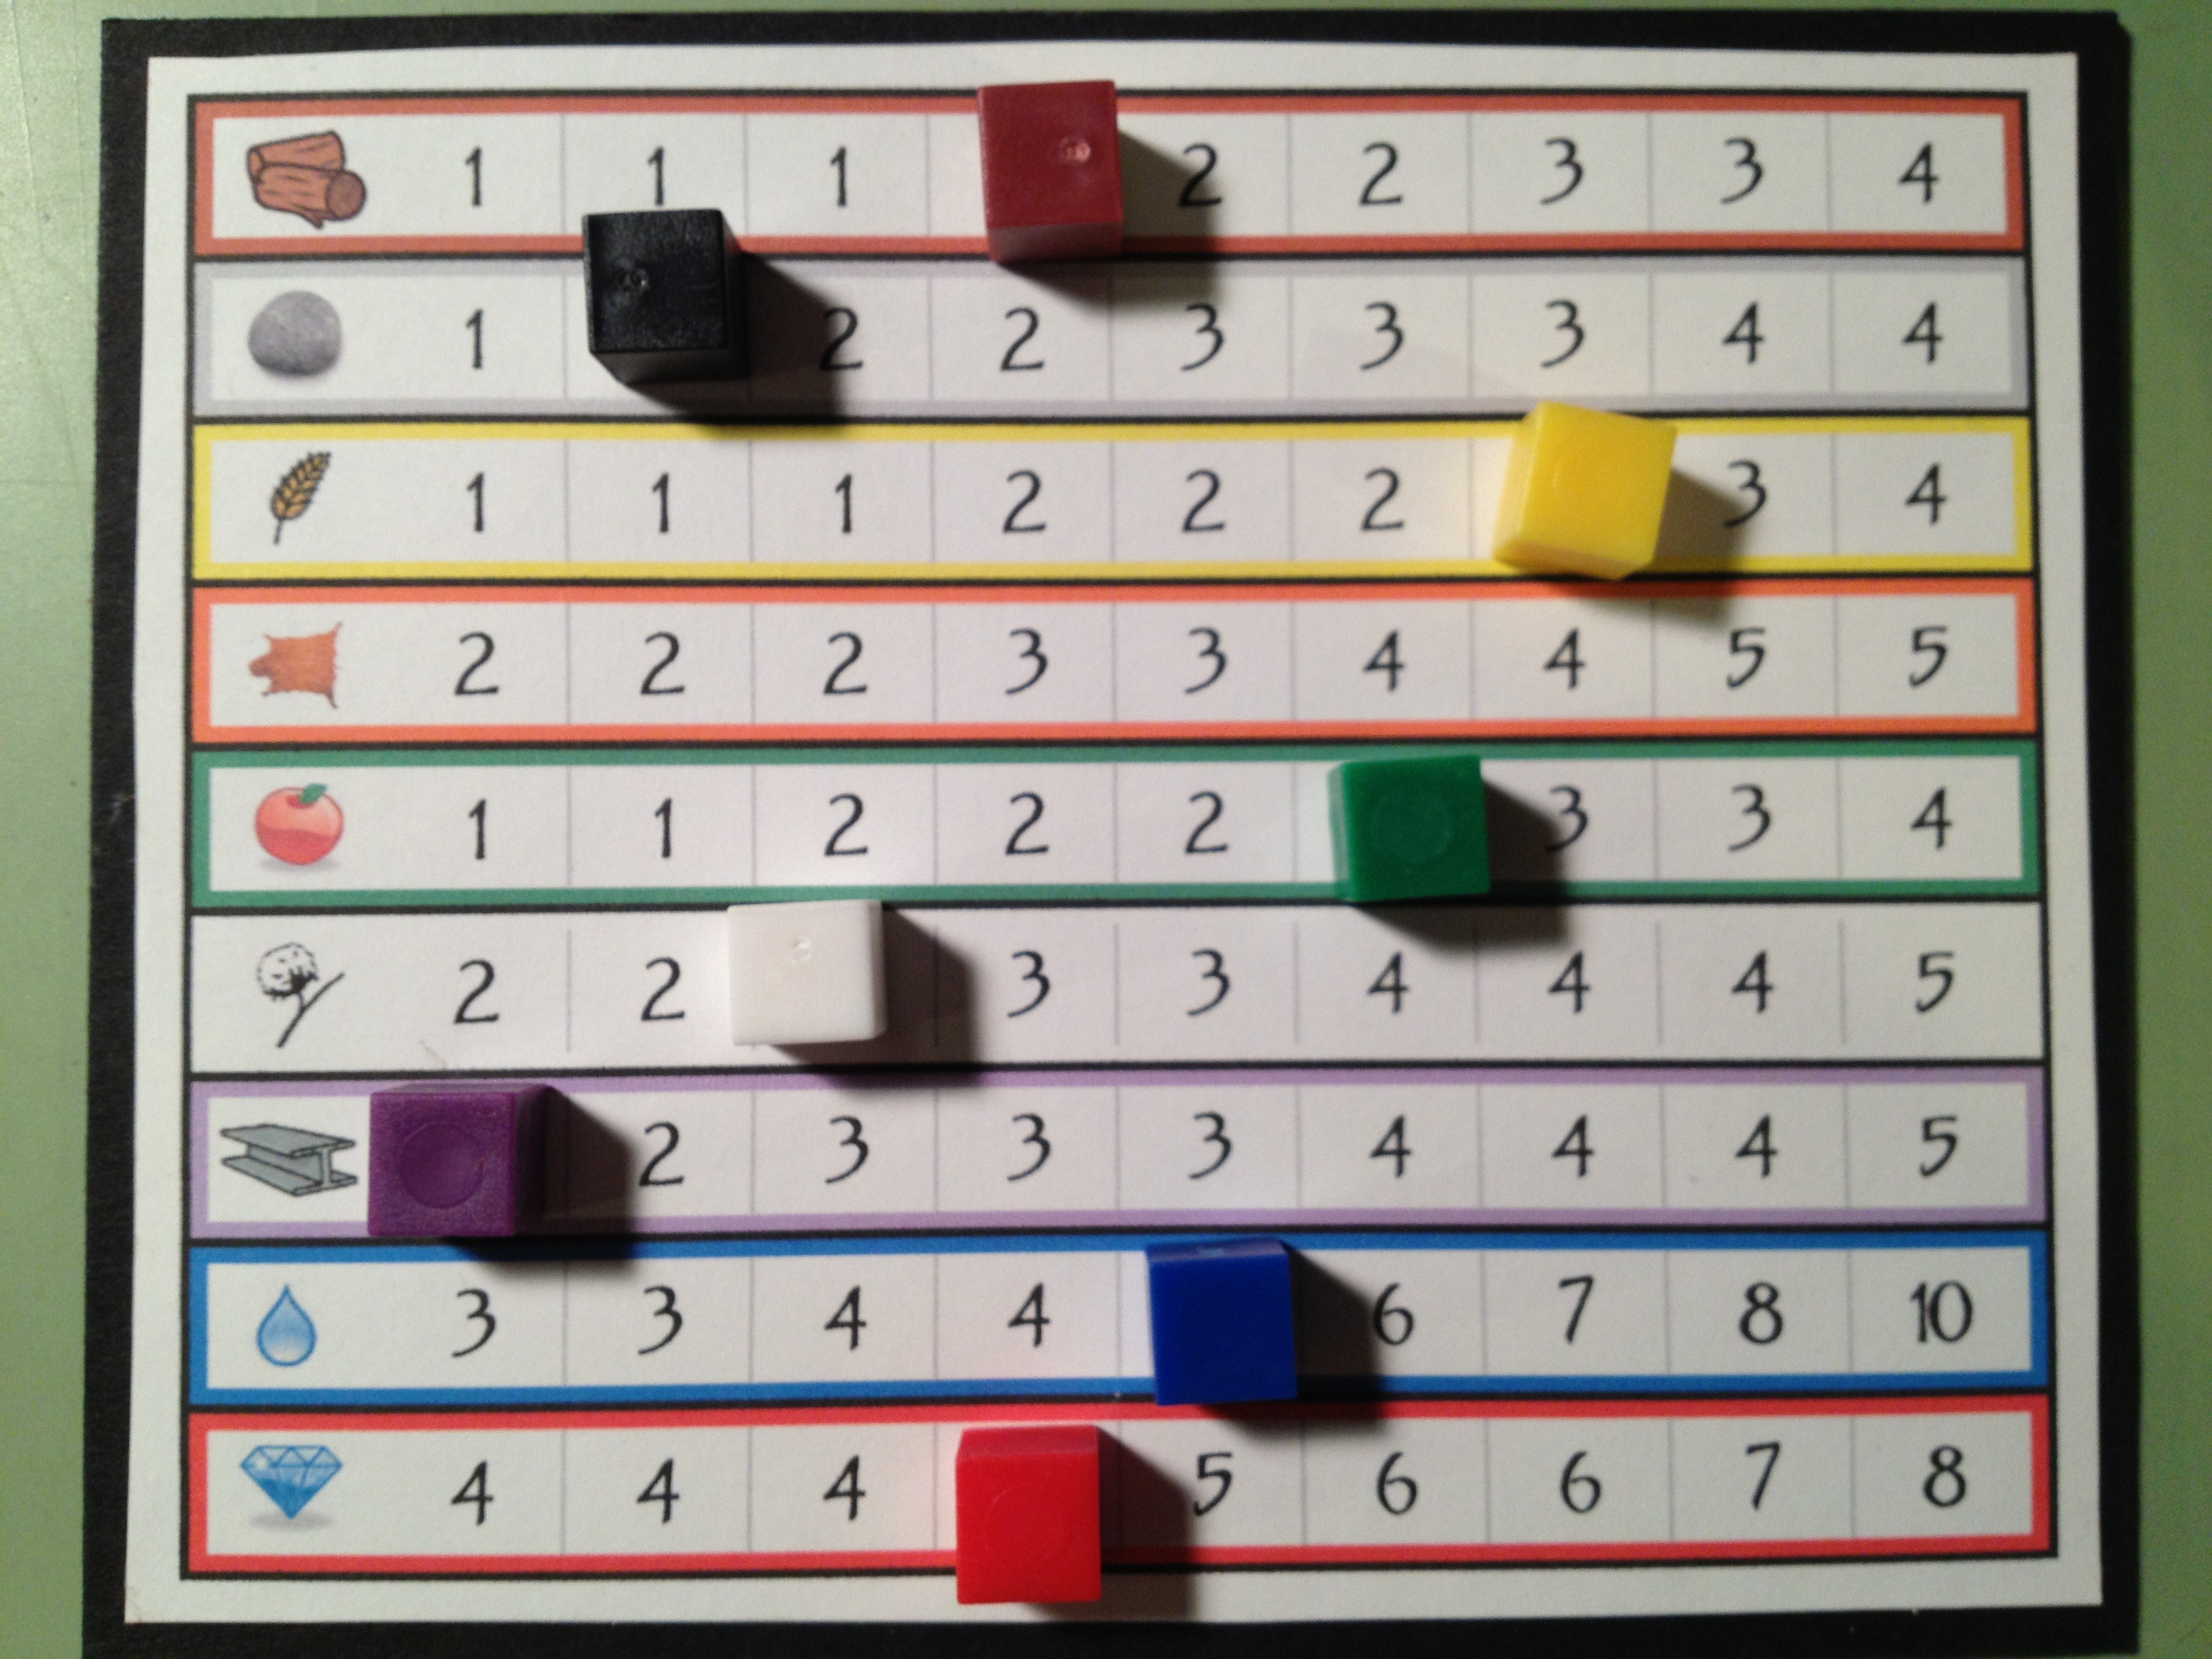
The market.
By this point in the design I had the board, the territory tiles, the event cards, and the orders. A market board was also built for the game to allow people to trade for different goods. This would be the driving economic factor of the game, but would also allow players to obtain goods that their randomly seeded territory did not produce. With all those components in place it was time to focus on what was in front of me… the player mat!
The Player Mats:
Since I knew that I wanted a main concept of the game to revolve around exploration I decided that upgrading your ability as an explorer would be critical. Thematically that meant going from a “trader” to a “trader with a horse” and eventually to a “trader with a wagon.” From early on in the design I limited the explorable zone for a “trader” to the first two rows out from the Trading Post. The idea behind this that fit the theme was that a man or woman could only walk, explore, and carry enough food for an expedition two rows out from the Trading post. By upgrading and purchasing a horse you’d be able to move faster and thus could explore more territory on the same rations. So when you purchased a horse you would be able to explore rows three and four away from the Trading Post. Finally, if you wanted to explore the outer most regions you would need to build a wagon.
So there is a side objective of all players in the game to be collecting the components they needed to be able to build their wagon. In the design I set it up so that you had to procure certain items. Once you had all these items you had a de-facto wagon. The wagon would allow you to explore the fifth row from the Trading Post.
I designed the player mats to show how far you could move and how much you could carry based on your status. And I included a Wagon Construction Area showing your progress toward a wagon. Here’s a look at the first and second versions of the player mats:

The top shows the original version. The bottom shows the cleaner, more user-friendly second version.
The cool thing, or at least what I thought was cool, was that in the second version you would actually be building your wagon by placing the pieces on top of the illustration.
One other thing to point out about how the game worked is illustrated in the second version of the player mats. There is a row for INCOME and a separate row for MONEY. Thematically the INCOME row represented any money earned during your turn. This would be like getting a paycheck. The way it worked was that after your turn, your income would be added to your money and then the income track would be set to zero. This means that any money earned on your turn isn’t available until the next turn.
I would say that through this whole prototyping process, which occurred in mid-2011, my favorite components were the player mats.
Overall Prototyping Experience:
The best possible tip I could provide to designers regarding prototyping would be this:
Just make something functional and test it. Only put in the effort to make it look good once you know it’s working.
Next week you’ll see that I don’t heed my own advice. But I’m inhibited by my desire to make things look good. And now that I know how to use Inkscape it takes much less effort to produce something that looks good.
Looking back at all the things I did for Trading Post I’ve realized that I wasted a lot of time. I built spreadsheets. I wasted hours using The Gimp to make that board. I added needless complexity, which then required me to make more components.
The game was only attempted to be playtested in its previous form twice. The effort to playtest ratio for this game is just ridiculous. So next week I’m covering my hiatus from the game, how I’ve advanced as a designer during that hiatus, and now how I’m going about redesigning the game. With that in mind I’ll leave you with one final image, which is a printout of a spreadsheet that I made so I could take notes on. This illustration sums up all the things that I am trying to avoid with the redesign!
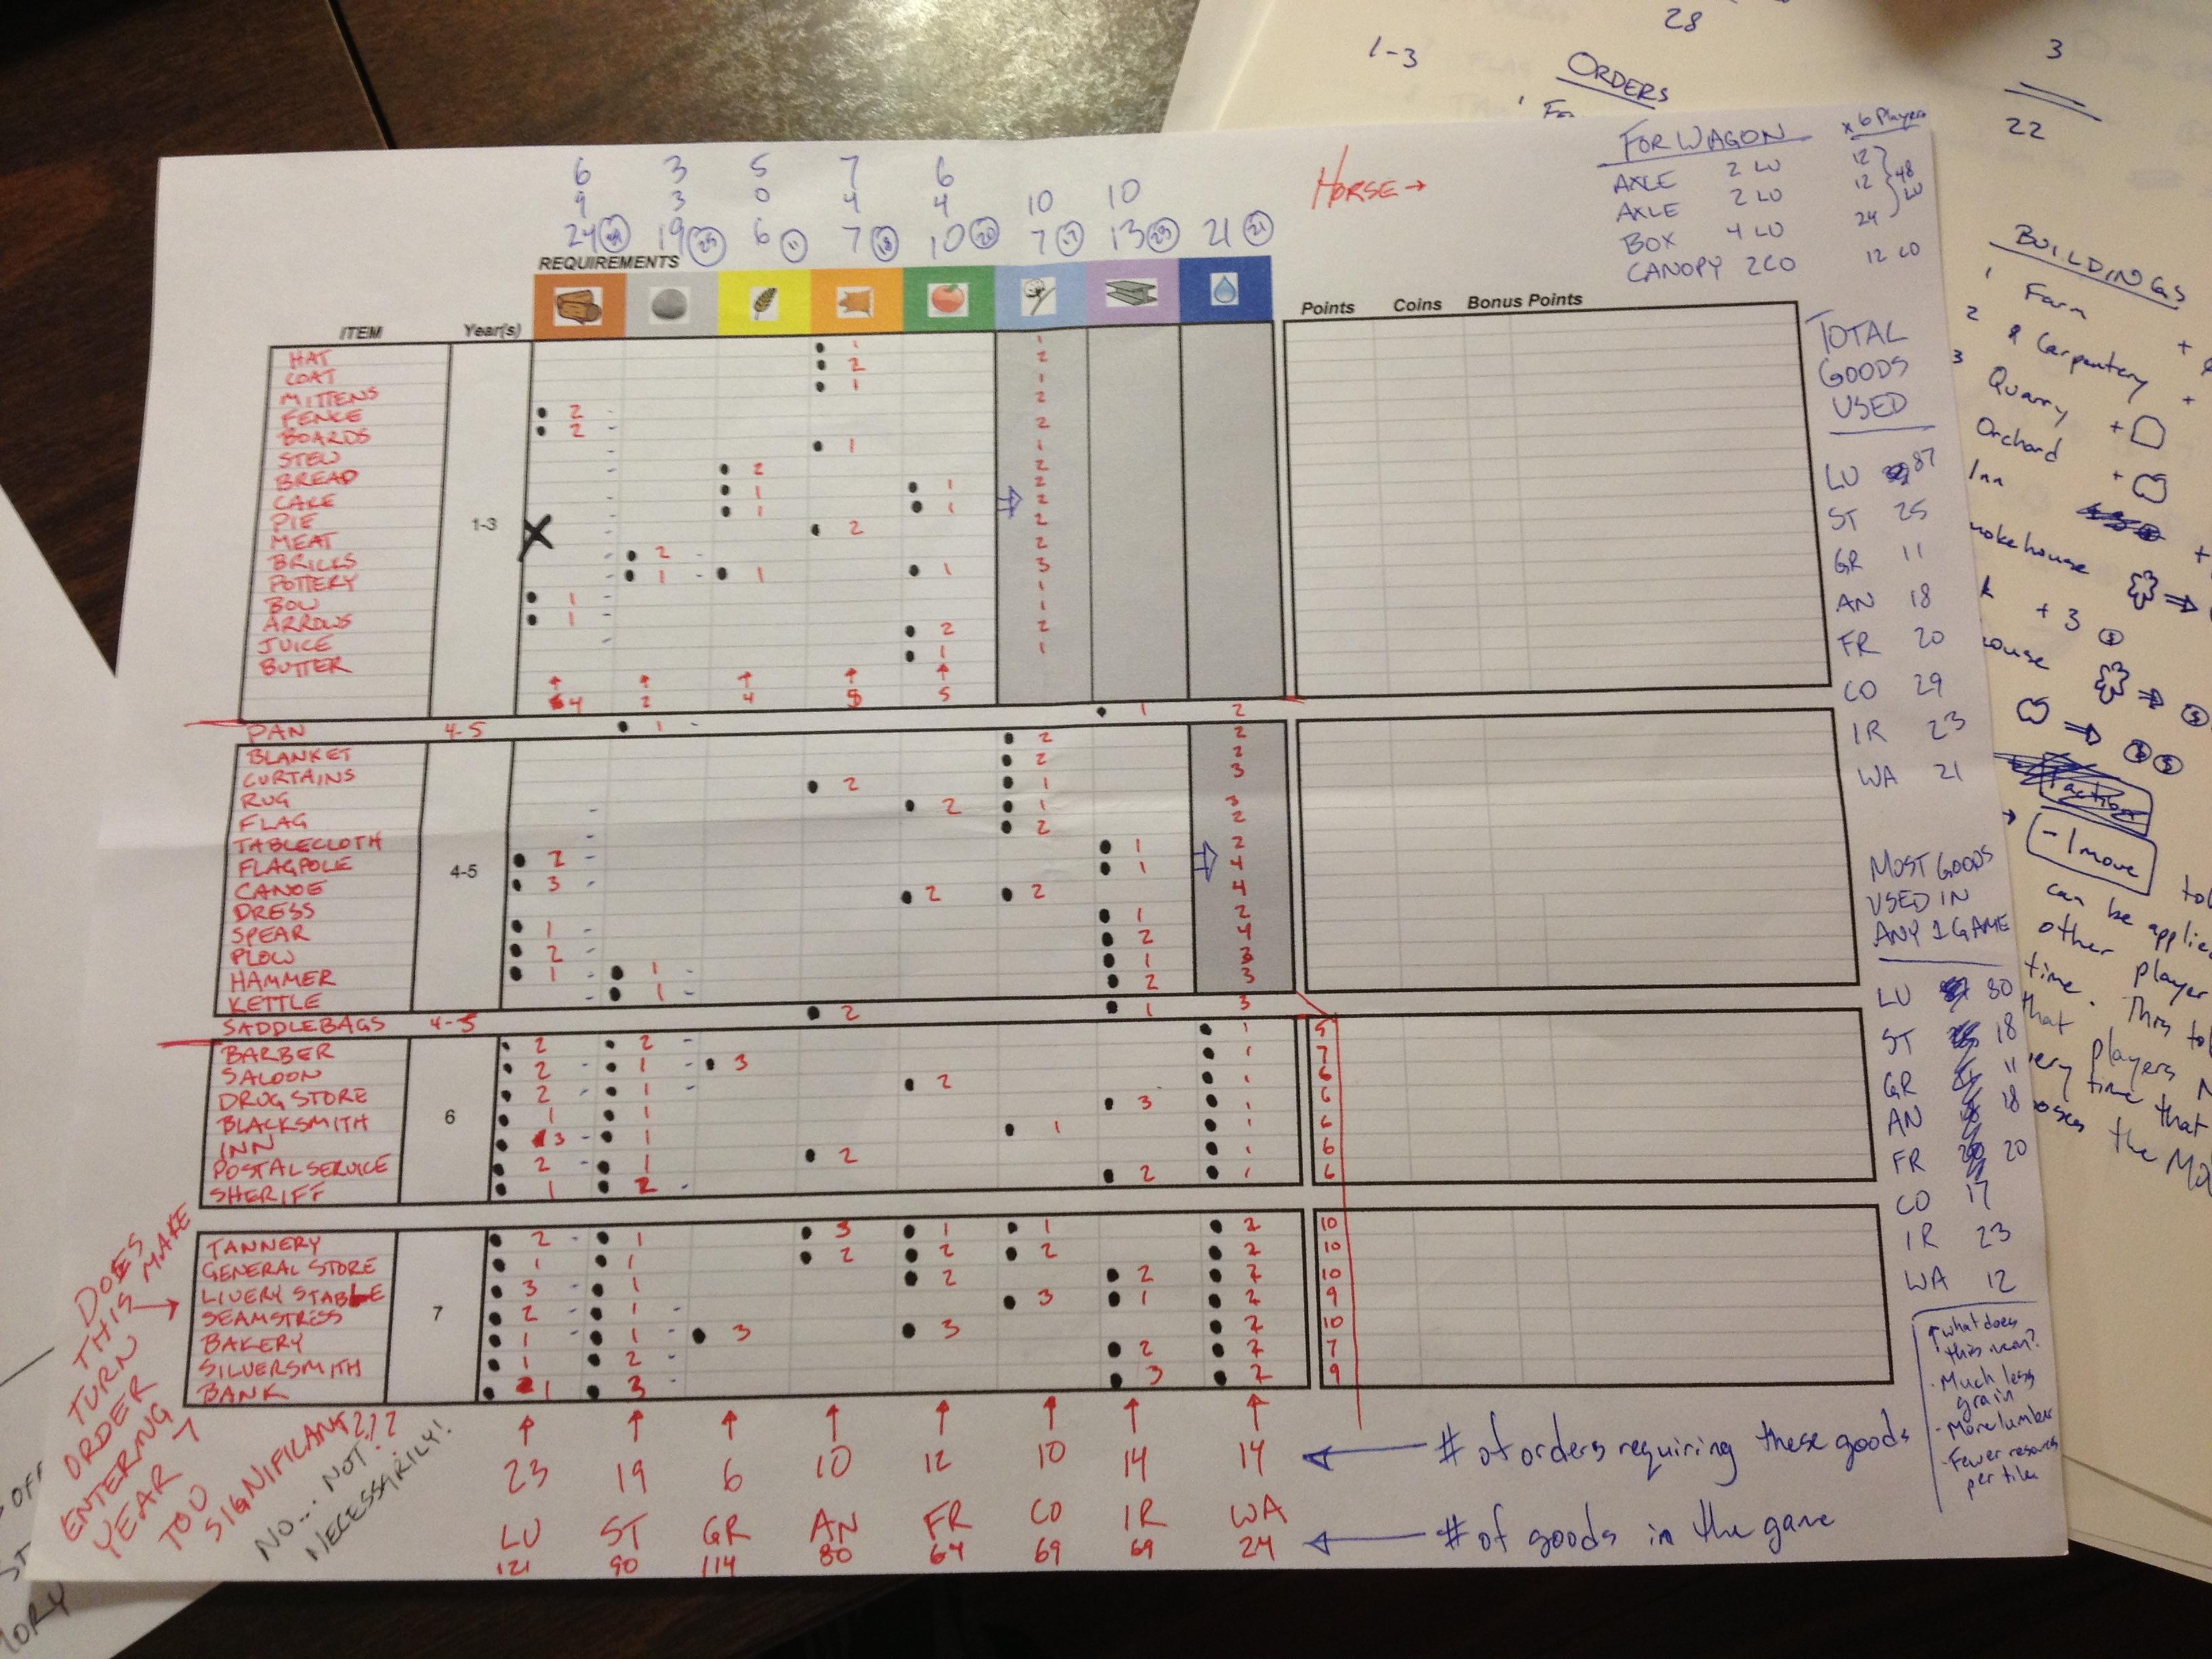
Wow. Just wow. Next week you’ll see dramatic improvements!
Thanks for reading. I’m happy to answer any questions you have about Trading Post and the things I’ve posted so far. Just share your comments below!
Prototyping Techniques Applied to Scoville
 While at Protospiel I heard a lot of kind words for the quality of my prototype of Scoville. So today I am sharing my prototyping process with you. I hope that it can help you make a quality prototype that you are confident about.
When I was first getting into board game design I was a little overwhelmed by what it took to make a prototype. I watched a few prototyping videos on BoardGameGeek.com. Those only made me shy away from the whole process. It can be intimidating. But today you can learn that it isn’t perhaps as daunting as you might think.
Overview of my Process
 First things first: you need a game concept. Assuming you’ve got a great idea in mind it’s time to start prototyping. Early on in my board game career I was designing a heavy Euro game. I waited to make a prototype until I had worked through all the details of the game. That was a mistake. It is my recommendation to make prototype components of your game as early as possible. For example: If you have an auction in your game, test it independently from the other mechanics. Test each mechanic individually and test them early on. There is no point to design an entire game only to find out that the individual parts don’t work.
Once the individual elements seem to work then you can try to put them all together to make a full game out of them. Here is a rule of thumb I try to follow:
Never add complications unless they are absolutely necessary.
This is a difficult thing to do. It is always easier to add another rule or add another component. But if you want to make a good game, focus on the innovative mechanic rather than all the little rules about the rest of the game. Keep it simple.
So I start with a concept. I usually write about 10 pages of notes and sketches about that concept. Then I’ll go ahead and start prototyping (this is what I’m covering today). Once I have a prototype ready then I’ll play test it at least 10 times. This will give me a solid amount of feedback. Only after testing 10 times will I apply any changes. Here’s another rule of thumb:
Don’t try to change things in the game on the fly, and don’t change more than one thing at a time.
Following this rule is critical, especially the part about changing more than one thing at a time. If you change more than one thing it can be difficult to know which of the things you changed made the game better (or worse). Change one thing at a time and test it profusely. So I apply feedback and adjust things after 10 play tests. Once the game has gone through the PROTOTYPE – PLAY TEST – APPLY FEEDBACK phase several times to the point where there are only very subtle changes then I get to the point where I am confident about contacting publishers about it. There is no point in pitching a game unless you’ve gotten it to the point where you are proud of your product and confident to show it off.
Getting Started: What do I need?
When making a prototype I usually begin with a spreadsheet. A spreadsheet allows you to create custom tiles or cards very easily. You can print them out yourself and turn them into quality prototype components. Here’s a list of everything I use(d) to create a copy of Scoville:
- Spreadsheet software
- Graphic Design Software (I prefer Inkscape, but The Gimp is also very useful)
- Paper (Plain paper for first prototypes, Glossy photo paper for pitch-able versions)
- Thick card stock – As thick as you prefer, though the thicker it is the more difficult it is to cut.
- Components: cubes/meeples/coins
- Circle Punch
- Paper Cutter (I have this one)
- Bingo chips
- Glue Stick
- Scissors
- Gerber Baby Food Containers – if you don’t have kids find some friends who do and beg them to save these for you!
Here is a picture of all the components that go into the game:
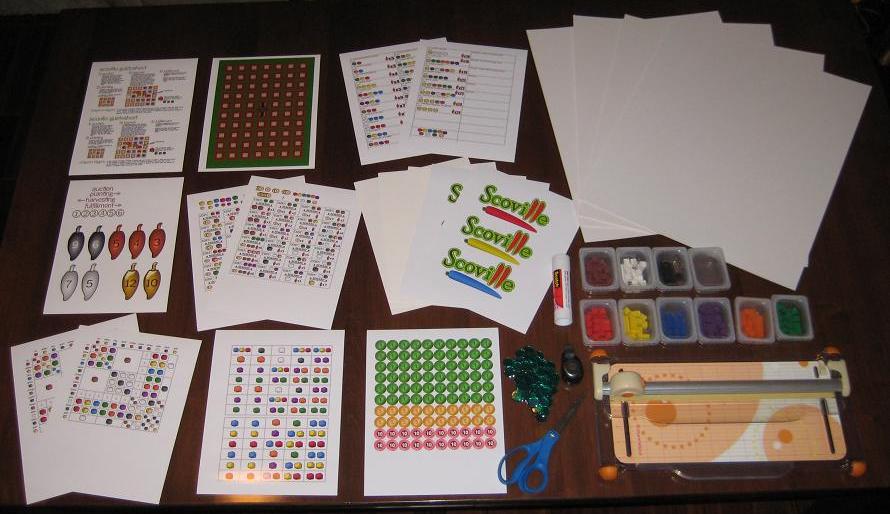
Scoville components fresh off the press!
That’s everything (except a box) I need to make a copy of Scoville. Let’s walk through the prototyping (physical creation) process.
Make it Rain! Or Something Like That
Assuming you’ve taken your concept and created artwork that suits you, it’s time to actually make something real for testing. What that means to me is that it’s time to print stuff out! Scoville has 13 pages of printing required for a full copy. The next step is to adhere those pages to the thick card stock. I like to buy the stuff that is as thick as standard board game chit board. This gives me the feeling like I am playing a real game when I test it.
So I use the glue stick and cover the back of the paper and then stick it to the card stock. Once I’ve got them all glued down I can start to cut them to size. Since the large card stock boards I buy are too big for my paper cutter I run a scissors through them to separate the difference components before using the paper cutter.

Cover with glue, adhere to card stock, coarse cut to separate.
Then I use the paper cutter to trim the fat and make them nice and clean. Shown here as an example is the first cuts done to the auction tiles:

I then go ahead and cut each tile out individually and end up with a pile of nice thick quality components:

My precious little auction tiles!
I continue this process for all of the components in the game.
Making Player Shields
Another part that seemed a little overwhelming to me was the production of player shields. But I found a nice, easy way to make them. If you don’t want pictures on them then just cut some paper and fold it. If you want pictures or logos then follow this procedure:
-
Easier to make than I thought.
Print the logos.
- Cut the logos to a rectangular size.
- Glue the logo centered on a sheet of thin card stock.
- Angle cut each edge so that it will lean when completed.
- Fold gently.

For Scoville I made the artwork on the shields include the player color. Making your own player shields rather than using shields from games you own can really spice up your prototype.
Making Money
One of the more tedious things in this process is making my own coins. I don’t have to make it as hard on myself as I do, but I prefer a really professional looking prototype.
It would be much easier to simply write a money value on the plastic bingo chips with a marker. This would make them more difficult to read and they wouldn’t look as nice.
So my process for making coins is this:
- Create the artwork.
- Insert the coin images into a document file.
- Print the document.
- Punch the coins out of the paper.
- Adhere them to the bingo chips.
Here is a tip for punching, if you use a circle punch like mine:
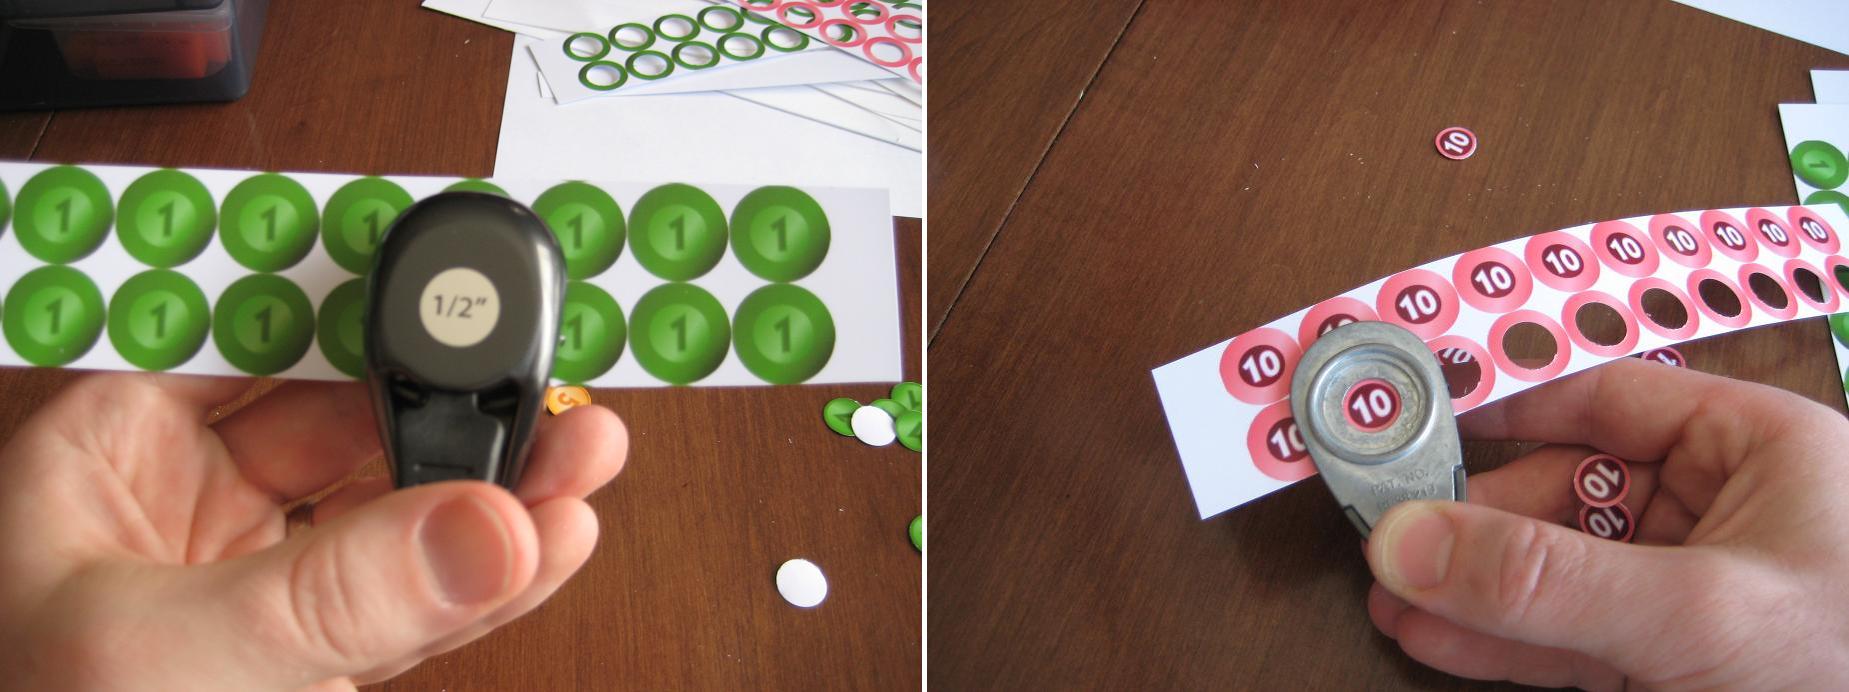
Flip the punch over for better visual alignment!
If you hold the punch like it seems it should be held then you have to rely on the little plastic bump guides on the side of it. Just flip the punch over and you can visually align the punch with the coin. This makes it so much easier!
Once you’ve got them all punched you can simply glue them to the bingo chips. I recommend watching something on TV that is really attention grabbing, so that it draws your attention from the tedium of gluing little circles to bingo chips.
If you don’t like the idea of gluing circles to bingo chips then go ahead and use the same thick card stock that you’ve been using. Just be aware that the circle punch may not punch through the thick card stock. That’s why I went with the bingo chips.
The Final Product
Once you’ve got all the components glued-punched-cut-etc. then it’s time to put it all together. Here is a before and after picture showing the reduction in volume for Scoville:
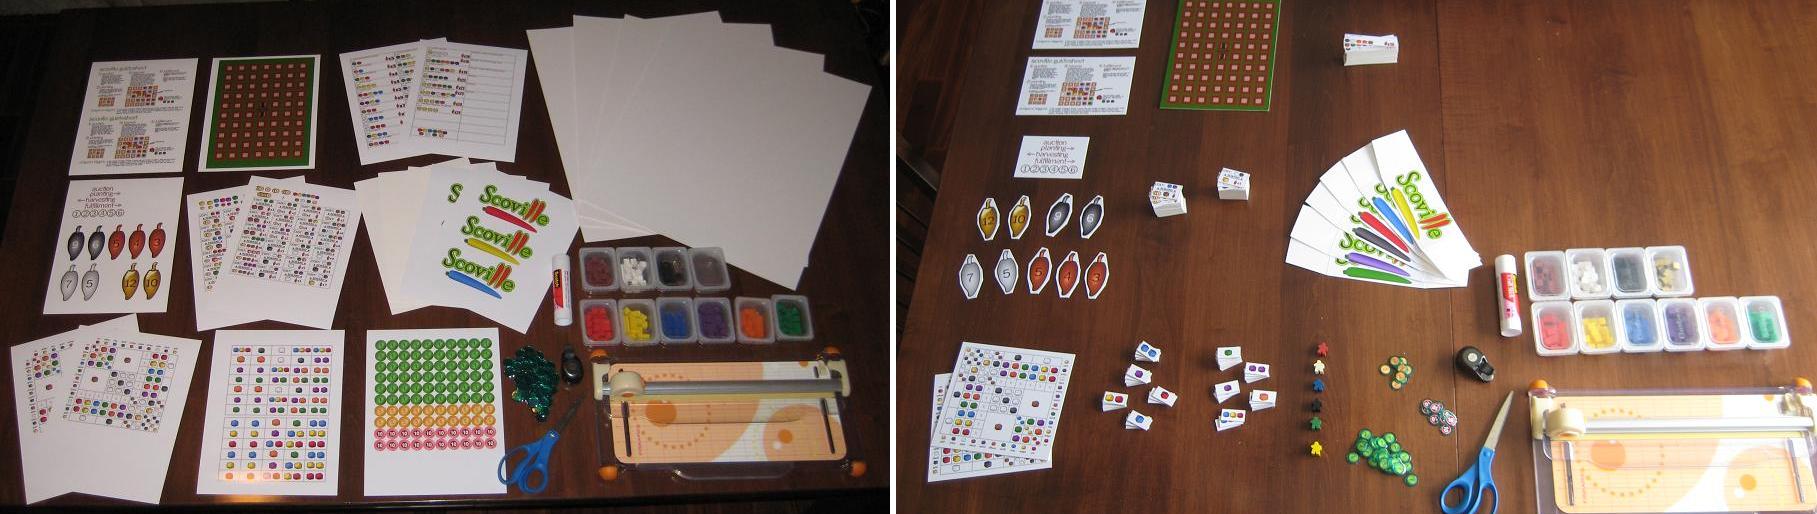
What looked overwhelming turned into a nice, quality prototype.
To continue with the theme of a quality, pitch-able prototype I like to use a nice container to hold everything. You can buy these at Target.com or you can find different colors in the store. They are only $5. I should also note that these fit into a Medium Flat Rate Priority box from the United States Postal Service. So it is pretty easy to mail one off to a publisher!
Now you’ve got your container so throw in the components, a couple copies of the rules, a business card, and you’re ready to pitch your game! Note, you do not need to have a high quality prototype to pitch a game. I am just a firm believer in making a good first impression. Here’s what Scoville looks like in it’s full prototype form:

This is the third copy of Scoville in existence! May the other two copies in the wild prosper and flourish!
How Much Is It Gonna Cost Me?
I mentioned earlier that you can make an high quality prototype that is also inexpensive. Here is a rundown of the costs for a full copy of Scoville:
- 13 sheets of glossy photo paper: $3
- Printer Ink (I buy cheap Non-OEM ink off Amazon): ~$2
- Glue Stick: $3.30
- 4-Pack of Thick Card Stock: $13
- Bingo Chips: $0.50
- Meeples ($0.14 each): $0.84 – I live near The Game Crafter so I can pick them up and avoid paying shipping costs
- Plastic Cubes (250): $7 – I bought a tub of 1000 cubes for $25 (shipping included) from EAI
So the total for a high quality prototype for Scoville costs me under $30. So maybe you wouldn’t characterize that as inexpensive. But when $30 can allow you to create a pitch-able high quality prototype that might catch a publisher’s eye, I don’t think $30 is too bad.
What techniques do you use? I wanted to point out that I did not write about making cards. Most people, when making prototype cards will purchase penny sleeves, insert their custom made cards, and make them thicker by dropping in a M:TG card. I don’t use cards in Scoville, so I didn’t include that.
I hope that you enjoyed this article. It has been a fun process for me to figure out some of the best ways to make a prototype. If you have any ways to make the process more efficient, please leave a comment so others can see!
