Blog Archives
Different Approaches to Game Design
I’ve been messing around with half a dozen designs lately and I seem to be stuck on each and every one of them. The only design that is making progress is a co-design with a friend of mine. So I’ve been thinking about mixing it up to try some different approaches to designing game. Today I wanted to present four approaches that you can use as a starting point. I am going to try each of these four approaches over the next month and see if I find inspiration.
Theme First
One of the most popular ways of starting out a game design is to choose a theme that you think is interesting.
This is a wide open way to design. You could choose to design about paratroopers rescuing chickens stranded on Antarctica. You could design about scuttlefish escaping sea urchins.
Going Theme First allows you to choose whatever you want the game to be about. Once you’ve chosen the theme you can then begin to consider the mechanics that might fit with the theme.
I personally like Theme First design. I like to picture myself immersed in the theme wondering what ways I can bring the theme together and make it feel like a grand experience.
Mechanic First
This is probably the other most popular way of designing a game. The designer might come up with a really interesting way to play a game. This could be a new component, a new way of using a component, a new combination of mechanics, or other things that haven’t been done before. Or you could pick a mechanic that has been done before and add a twist.
Once you’ve figured out your main mechanic and made it playable you can try to figure out what type of theme might fit with your mechanic.
This way of designing assures the designer that their game will utilize a gameplay mechanic that they like.
Scoring Condition First
This is a lesser used way of designing games. Some abstract games are designed with the scoring condition as the driver for the design.
This is essentially a specific variant of Mechanic First design, but with the end-game in mind. Designers choose how they want the scoring to work. Then they will fill in the design with the mechanics and slap on a theme if necessary.
This is something that I’ve been wanting to do but have not found a scoring condition that I like enough to build a game around.
Component First
This is a tough one to do because most designers don’t design around a “final product” type component. But there are times when a designer may make a game from the components that they have available.
When designing component first you would often choose a component or components that you really want in your game. Then you would choose a theme or mechanic that will work with those components.
This can be pretty awesome if you have a great component in mind. If you want to go with this approach it is probably best to be innovative and use either new components that haven’t been used in games before or to utilize existing components in new ways.

There are, of course, other ways to get started with a game design but I think these four ways are a great starting point to get you thinking about your game designs. If you have other ways that you think are important, please share them in the comments section. Thanks for reading and have a great Thanksgiving (If you are in the US) or a great weekend around the rest of the world.
Flavor Text: What’s the Verdict?

Flavor text on this card: “Ribbit”
Yesterday I solicited opinions on Twitter regarding flavor text:
I was interested in finding a consensus on whether or not it is worth the time to add flavor text to cards, or game components in general. I was pleased with the number and variety of responses the tweet received.
For those who do not know what flavor text is, here is a definition from Wikipedia:
Flavor text is the name given to text for action figure character backgrounds, playing cards, or within the pages of a role-playing game’s rulebook. While appropriate to the product’s or game’s story concept, it usually has no effect on the mechanics of the game, but instead serves to add realism or characterization to the item in question. Flavor text is often the last text on a card or on the rear of a toy card or package, and is usually printed in italics or written between quotes to distinguish it from game-affecting text.
Flavor text is used to full effect in Magic: The Gathering. Here is a page from Wizards of the Coast listing some favorite flavor text additions to cards (Thanks to Matt Loomis for the link). While the flavor text in the M:tG cards is typically used to describe the character on the card, I think there are other ways of utilizing flavor text. But before I get to that, let’s take a look at a few of the responses I received from my tweet…
All Those in Favor:
Adam Buckingham: “It’s fun, but I tend to ignore it mostly.”
Seth Jaffee: “I like flavor text, gives me something to read while waiting for others to go. But don’t bury game text in flavor text!”
Isaac Shalev: “I love it when it’s good. MTG is the best-in-show at it. Evocative, haunting, immersive.”
Thomas Eliot: “Enjoyable! I love the flavor text on Professor Pugnacious: it’s all thematically appropriate quotes”
Stephanie Straw: “Noooooo! I *love* flavor text! But if you do it, don’t just toss it on there. Make it LEGIBLE and allow it to add value.”
David Chott: “Thanks for reporting back! I like flavor text, but have been leaning against using it in Lagoon to reduce cognitive clutter.”
All Those Not in Favor:
I was surprised at how few negative responses there were. I thought more people would hate it and wish it didn’t clutter things up.
Alex Strang: “Usually distracting IMHO”
Grant Rodiek: “I’m generally against it mostly because most people are bad at writing. Being creative does not mean good at writing.”
Check out Grant’s awesome blog post about flavor text!
All Those Who Are Indifferent:
Nolan Lichti: “When it’s tiny, like in Ascension, I don’t mind, and it can be enjoyable. Just don’t sacrifice clarity of game play for it.”
Matthew Riddle: “I ignore it but it doesn’t bother me.”
Danny Devine: “I also always ignore it, but as long as its clear that its flavor text “italicized and tiny” I don’t mind it.”
Jason Smith: “rarely look at it except when I’m bored from waiting on other players to take their turn”
Chris (@copax): “I rarely look at it to be honest. I’d prefer larger iconography or more detailed “power” descriptions”
Chris Darden: “ignored”
64oz Games (Richard): “I think it depends a lot on the game. On a Euro style game I expect it to be ignored, but a more thematic one it could be read”
Rob Lundy: ignored… “Unless it’s funny…. like…. very funny”
Brian Henk: “I believe it can add some fun to the experience, but it’s not worth the complexity of more words on the cards.”
My Verdict: I Favor Flavor!
Based on the feedback I think flavor text can be used on game components, but that it should be done in subtle, non-distracting ways.
The M:tG cards include flavor text to immerse you more into the world of the game. That works really well. It is there for those who want to read it, and others can ignore it. And it occupies a portion of the card that would likely otherwise just be background art.
So I am in favor of flavor. I like it when subtle, creative, and clever information can be added to a game that further immerses you into the world of the game under the following conditions:
- It doesn’t distract.
- It doesn’t take long to read – keep it short!
- It adds to the game’s experience.
Thanks to everyone who responded to my tweet. I am planning on using flavor text for Quantum Orcas, but only on the backs of cards that do not flip during the game. Since I have the backs of those cards available I could easily slap on the logo or some artwork. But I decided that I would prefer some flavor text instead.
The bottom line for Quantum Orcas is that people can completely ignore it. And that won’t bother me at all.

The Monday Brews: 8-5-13
Another week has left us. And what a glorious week we have upon us. Just as we are gearing up for GenCon it turns out that I have a birthday this Friday! So of course this week will be a good one. I suppose I should try to get some playtesting in so that I’m not taking garbage to GenCon. But we’ll worry about that later.
Here’s a recap of my boards and barleys from the past week…
The Barley:
Capital Brewery Supper Club: This is an excellent beer to enjoy when you’re not worried about anything. Sit back, put your feet up, and realize this beer’s “not bad.”
O’So Big O: This was another decent beer to enjoy while relaxing. It had a little tanginess, but that didn’t hinder the enjoyment. This beer is from the wonderful town of Plover, WI.
Ben Franklin’s Honey: I again enjoyed some of my own homebrew. However, I have a big problem. I am almost out of my own beer and I don’t have a batch currently fermenting. We are approaching mission critical here. I’d better start brewing!
Here’s glimpse of a cooler I was able to rummage through at a party I attended this weekend. Some of the better beers were in a different cooler.

Some excellent Wisconsin beers. One not-so-excellent Wisconsin beer. And then there’s Corona.
Horny Goat Watermelon Wheat: Rule #1: No fruit in beer unless it’s a Lambic and it’s done correctly. Rule #2: If you’re using fruit in beer, please just not watermelon. Yeah… I didn’t care for this beer and won’t be having it again.
Pabst Blue Ribbon: Out of reverence for fellow game designers that I had the privilege to meet at Protospiel-Wisconsin, I hoisted a cold PBR this weekend. And I realized that it wasn’t that bad. I’d have another, especially if it was available at GenCon!
The Boards:
Unfortunately I didn’t get to play as many games as I had hoped. Here’s the three that I did manage to play:
Tsuro: My friend’s $1.20 thrift store find has made the table a bunch lately. And we got it out again this past week. This is a great filler game that doesn’t take much though, has minimal downtime, and is also fun to play. unlike last week we didn’t have a three-way tie for the win.
Guillotine: This is a fun card game where players try to get the most points over the course of three days. During each day different cards are placed on the table. On a player’s turn they can play a card from their hand, and then they must take the card closest to the guillotine. The card they played hopefully allowed them to put a better card in that spot so that they didn’t have to take a bad one. It’s a pretty fun game despite some dude’s butts on some of the cards.
The Settlers of Catan: We always have fun when we play this game, even with 6 players. When we play with 6 I get to use my two different versions and the table looks pretty funny. But it’s always a fun game, even if I know I’m going to lose after the initial placement phase. Here’s a picture of our setup:
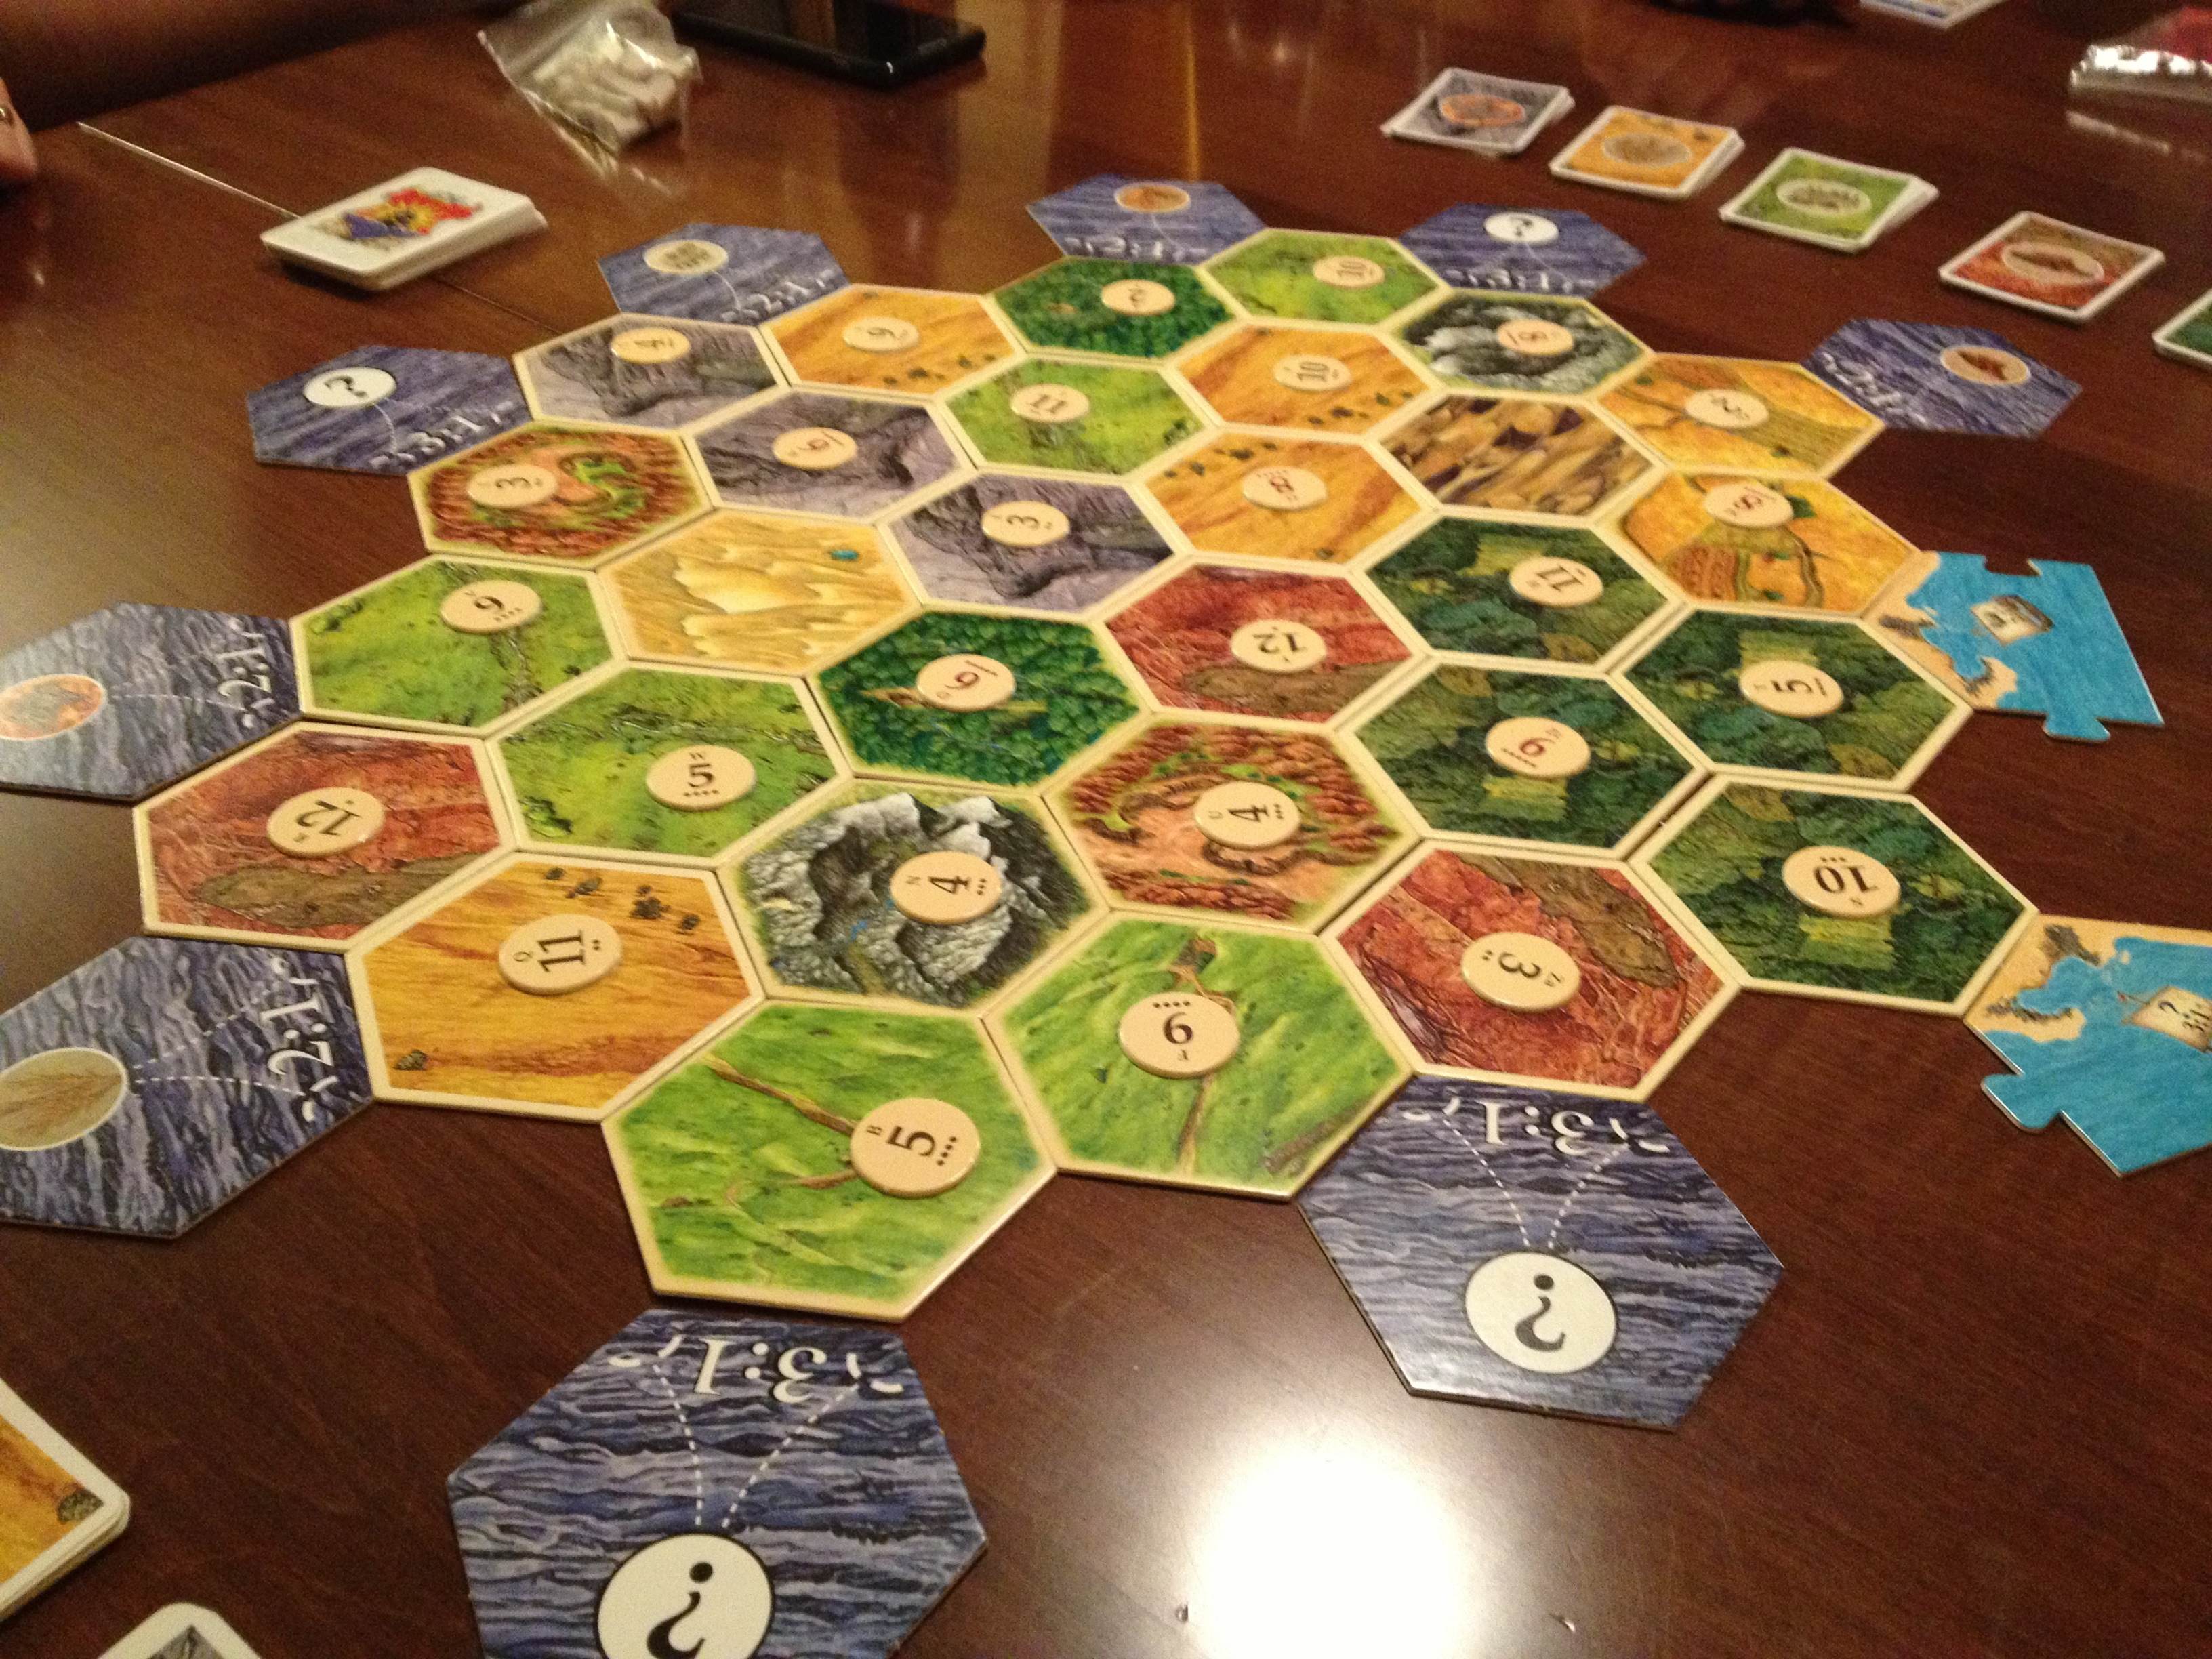
Mish-mash at its best! Excuse the blurriness.
***
Another week under the belt. What Barley or Boards did you enjoy this past week?
Prototyping Tools of the Trade
Tools of the Trade
One topic that seems to come up a lot is how to make board game prototypes. I’m not talking about coming up with a design. I’m talking about physically creating prototype game components. Game designers are constantly trying to make their components so that they can get right to the playtesting phase of game design.
Today I want to discuss the tools I use to create my prototypes. At this point you should already have your prototype artwork created if you’re going to be printing anything. Let’s assume it’s already been printed. Now it’s time to make it awesome!
Chits…
One common component that is particularly easy to make for prototypes are chits. These are typically just printed artwork glued onto matte board. But matte board can prove to be difficult to cut.
There’s two ways that I’ll cut my chits out of the matte board.
- Straight edge and utility or X-acto knife (not ideal)
- Rotary cutter (ideal)
What we are doing here is separating the chits from one another. When creating your artwork you should line up the edges of the components so that you only need to make one cut between them.
This will help you keep your fingertips!
The straight edge and knife approach is definitely NOT my approved method and I would never recommend it. However, a lot of people use that approach so I needed to mention it. One recommendation is to use a safety straightedge like the one shown here. You only have 10 fingertips so why not spend a few extra dollars and get a straightedge like this and make sure to not lose any fingertips!
I don’t like this method for a few reasons. The first is that you need a cutting mat to go underneath so you don’t scratch your table. The second is that the blade doesn’t always stay straight as you are cutting the matte board. And that can be really annoying.

Just get this thing instead!
My preferred method is to use a rotary cutter like this Fiskars 12″ Scrapbooking version. It is super easy to use, relatively cheap (especially compared to the $40 safety straightedge), and very reliable. And since most of us don’t have printers that print on anything other than 8.5×11 paper anyway, the 12″ Fiskars tool is perfect!
So I will print my prototype artwork on photo paper, adhere it to matte board, and then cut out the individual components using the rotary cutter. Just a heads up when using matte board though: you’ll likely have to roll the cutter back and forth a few times to cut all the way through. That’s still an easier process than trying to run a blade along the straightedge.
On the topic of matte board, I recently went to Hobby Lobby and purchase two huge packs of “matboard” for $6 each. I got a pack of 12″x12″ and a pack of 11″x14″. These are so cheap that I almost felt like I was stealing. They are just the leftovers from the framing department that were cut out from the boards used to mat pictures/paintings for customers. What a great way for Hobby Lobby to reduce their waste and provide a useful product. Here’s what I got for $12:
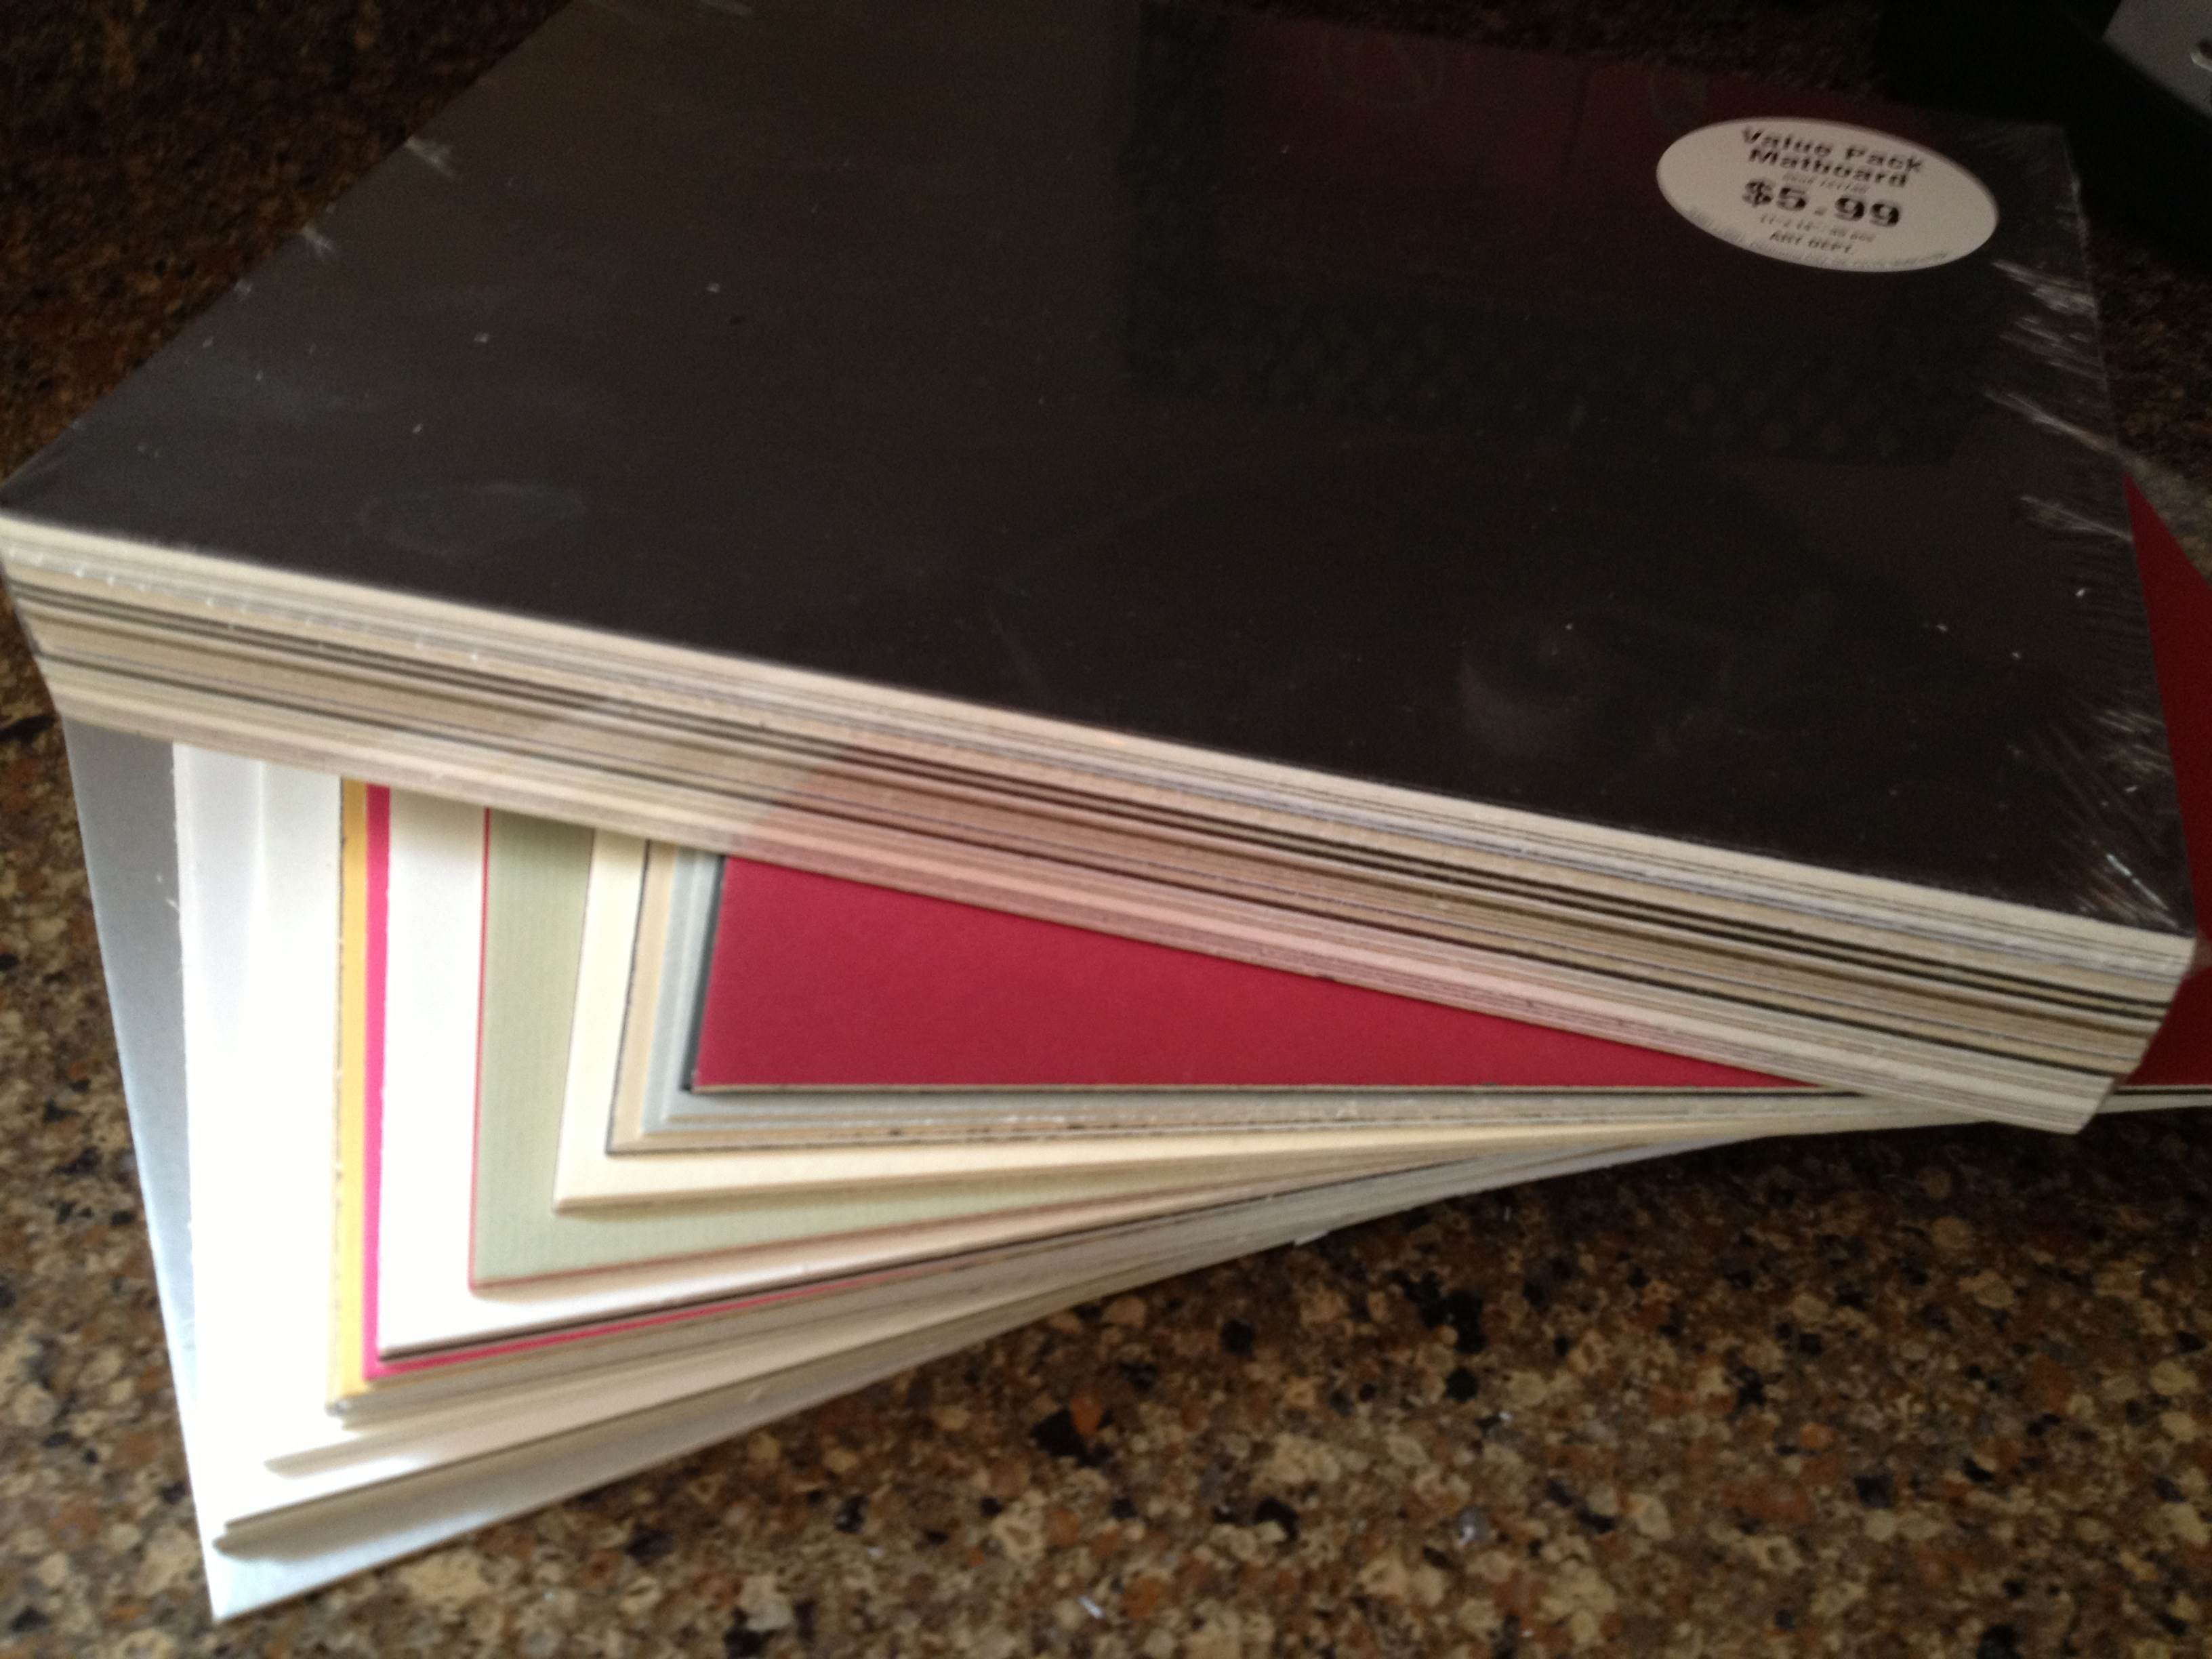
So cheap!
The other key tool of my trade is a glue stick. Some people will use standard glue, some will use spray adhesive. I prefer the glue stick to standard glue since it is simple to apply evenly. This is very helpful when trying to make sure that your components are completely glued down.
Now you know a great method for producing chits. If possible, keep them as rectangles rather than circles of hexes. But since we’re on the topic of circles and hexes let’s move on to another excellent tool…
Punches…
There are times when you don’t want rectangular components. Perhaps your game is a map building game with hex tiles. Or perhaps you require special discs for your game. If that’s the case, then I strongly urge you consider purchasing a punch.

The hex punches from Fiskars work great!
One thing to keep in mind when purchasing a punch is how thick of paper/board are you wanting to punch. Often these sorts of punches are used by scrapbookers who are only punching paper. That means they may not be able to punch through matte board. Sometimes you can only find out after you’ve bought the punch. Bummer.
Here are some recommendations, keeping in mind that I don’t know specifically how thick they can punch. OR you can just do a search for “hobby punch” and find one you’d like.
- Fiskars Squeeze Hex Punches
- Creative Memories Punches
- Older Creative Memories Hex Punches on eBay
- And don’t forget the Corner Rounder punch which can be helpful for cards that are printed on nice canvas/linen finish paper.
These can come in really handy. I use a circle punch when creating prototype coins. I have used a hex punch to create stickers for hex tiles. And here is my little tip for punching, which I mentioned in a prototyping article a long while back, but which is worth repeating.
When punching, flip the punch over so you can visually align the part that you want cut.
So now you’ve got the tools to cut out chits and punch out little bits of awesomeness! What about cards?
Sleeves…
Many game designers come across the need for cards in their game designs. I have made cards numerous times. Early on I would buy 60lb. paper and just cut out rectangles. But there is a problem with that. The edges of the rectangles can be slightly bent from cutting, which leads to great difficulty in shuffling the cards.

Mayday sleeves are convenient and cost effective!
The way to prevent that while also protecting the cards is to purchase card sleeves. These inexpensive beauties will be a little lifesaver by removing anguish from your prototypes. Plus, you can get awesome one’s like the one shown here with a kitten running through a field!
If you want a good go-to source for sleeves then look no further than Mayday Games. Here is a series of links to the sizes you may be looking for:
- Euro Cards (59×92 mm)
- Mini Euro Cards (45×68 mm)
- Card Game (63.5×88 mm)
- Standard USA Cards (56×87 mm)
- Magnum Ultra Fit for 7-Wonders (65×100 mm)
Those should offer some help. They definitely help with being able to shuffle your cards. The only downside is that when stacked they can be really slippery and your stack may tumble over.
Speaking of tumbling…
Dice…
Sometimes it becomes necessary for a game designer to create their own set of dice. Sure, you could always just make a cheat-sheet conversion table, but that can be a huge burden for your playtesters who would constantly have to recheck the sheet. So one of the tools of the trade is to purchase blank, sticker-able dice.

Just think of the potential here!
Look no further than Indented Blank Dice. The best part of their site is that they have labels that you can purchase and print on rather than having to buy blank label paper and try to cut/punch out your own labels and then peel them off.
Don’t buy blank label paper. Don’t cut/punch out stickers. Don’t try to peel them.
Just buy the sticker label paper and save yourself from the frustration.
So this concludes my little article about Prototyping Tools of the Trade. Next week I will be posting a follow-up article on Sourcing Components for Prototyping. It will cover where to purchase boards, bits, and more. So stay tuned!
Trading Post Part 3: Hiatus and Redesign
Redesigned Logo… Let’s just redesign everything!
I have a new game design I’m working on and today I am posting the third of 4 articles about it. This is the third article about the game from it’s creation to the present state. Here are the four articles in this series:
- 5-16-13: Origins of Trading Post
- 5-23-13: Early Prototying
- Today 5-30-13: Hiatus and Re-design
- 6-6-13: Path to GenCon
Today we’re looking at the current state of the game, and how I got there. In my opinion today’s article covers the most important details of game design. Let’s call it “distilling” and “skimming.” But first let’s look at why I took a break from the game.
The Hiatus, or “This game stinks… let’s take a break!”
 If you’ve read the past two articles on Trading Post then you’ve learned what I want the game to be like (week 1 – Origins), and you’ve learned how I don’t want to be (Week 2 – Early Prototyping). At its heart I want Trading Post to be a competitive game about exploration and development of a western Trading Post. I want the game to flow smoothly, create tense decisions, feel thematic, and be easy to teach/learn.
My previous version was none of those. I had spent a lot of time on this game. I thought I had something very thematic. But I realized that I had a big pile of garbage that didn’t work together. It had several things in it that felt like busywork rather than a game. And ultimately it was not any fun. That’s a huge problem. Remember that we are game designers and games are supposed to be fun!
So I decided to put Trading Post on the shelf. That must have been early in 2012. At the time it was a pretty easy decision because I really didn’t know how to move forward with the game. I could easily have abandoned the project overall.
During the hiatus I worked on a few other games. The most notable (at this point) was my card game Dam It! But I was working on another game with a level 1 friend. It used several of the same elements of Trading Post but in a more thematic and historical context. Ultimately I realized that Trading Post was a game I wanted to bring back. To resurrect.
So after having Scoville turn in to the PnP behemoth that it has I figured now would be a good time to try and bring back Trading Post from the dust in my basement.
A Fresh Start – Land Exploration
There were certain elements that I thought would be good to carry over from the first version of the game. And there were others that I knew I should ditch. I figured a good way to redesign the game would be to start with the elements I wanted and add from there. I could then completely ignore the bad things from version one.
My starting point was the land exploration portion of the game. I knew that this could be dramatically simplified. To get things more simple I decided that the game would have only four natural resources – Water, Lumber, Stone, and Gold. The previous version had more – Lumber, Grain, Animals, Fruit, Cotton, Steel/Iron, and Water. That was too many. And four would allow me to do what I want with the game.
So I set up a way to make things be as equal as possible, without forcing identical conditions on players. I devised a set of ten tiles that each player would have. Throughout the game, as they explore their territory, they would draw seven of the ten tiles. It was designed at that number so that no player would be without any of the resources. Here are the ten tiles from which each player draws when they explore:
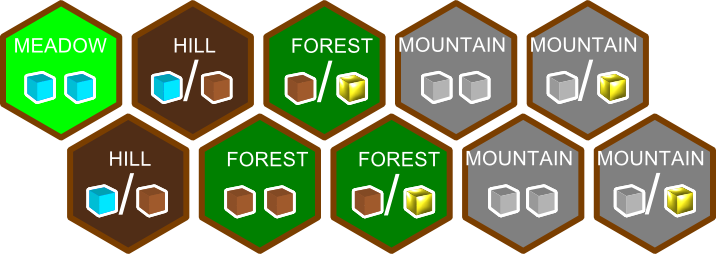
Each player has a set of these ten tiles, 7 of which will fill their territory.
Players will add these to their portion of land that the Trading Post has given them to explore. Each player starts with a Meadow (1 Water) and a Hill (One Water OR One Lumber).
With this design players will always have access to all of the resources. Sometimes players may end up with all four mountain tiles and thus a bunch of stone. Likewise players may end up with only one mountain tile and thus very little stone.
Here’s a look at the starting region for each player:

Each player starts with a meadow and a hill. Therefore they have access to water and lumber.
With the understanding that some players may have only one gold tile or stone tile while others may have four stone tiles or four gold tiles I knew that I’d have to design the game so that you can win under any of those conditions. That leads me to my next design element that has carried over from version 1… the buildings.
Building Buildings!?!
In the original version of the game the buildings only entered into the mix late in the game. They acted the same way as the Orders – that is, they came out four per year and you could fulfill them from the pool of face up cards. I didn’t like that.
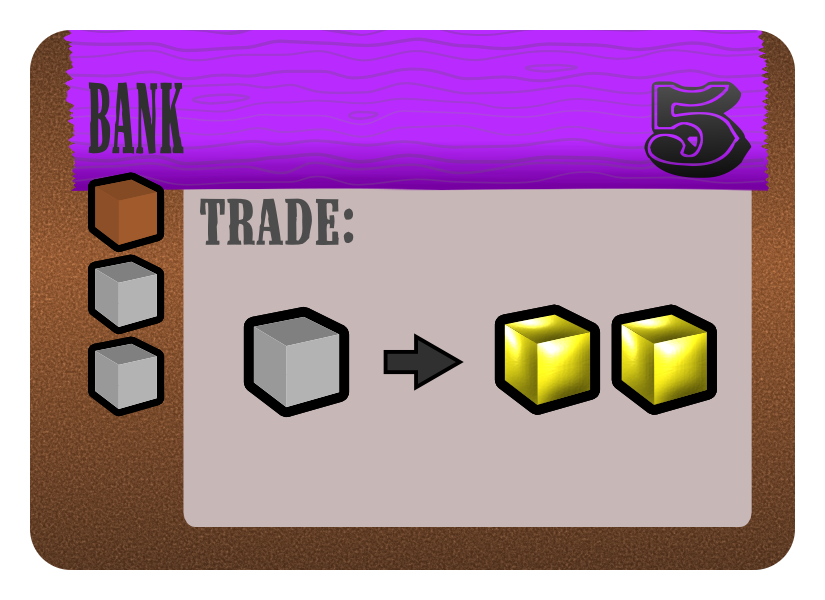
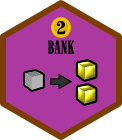
Bank costs 1 lumber and 2 stone. Can trade 1 stone for 2 gold. Builder earns 5 points when Bank is built.
So I decided to make buildings a more integrated part of the game by allowing them to be entered for some benefit to a player. Also, I decided that buildings should be available from the start of the game. Thematically the idea of building buildings is that you are developing the Trading Post so that it offers more to any guests that may visit. So buildings are a part of the game play from the get go.
There are 14 different buildings in the game. Each building offers players some sort of trading opportunity. Players can purchase buildings and build them on their land. Once they build a building they will earn points for building it, but will also cover up the natural resources that they could produce on that territory tile.
 When a player purchases a building they will take the associated hex for that building and place it onto a section of their territory that they have already prepared for a building. Note: preparing land is a separate action.
Whenever another player enters the bank tile, the owner is to be paid two coins as a sort of “trade fee.” These buildings will be critical to success in the game. You want to own them, but you also don’t want to give up the resources of the land that they are covering. It’s a sort of Catch-22. But that’s part of the fun of a game, right?
My objective with the design of the buildings was to utilize both stone and gold equally. This would aid the differing land resource conditions that I mentioned above. As an example, there is another building where you can trade one gold for two stone. Imagine owning both that building and the bank! You’d be able to create a huge supply of both stone and gold.
Now that I had redesigned the buildings in a much simpler manner that will be more integrated into the game play it was time to give players options for scoring points. And it made me ask the very important question that I seem to neglect until the late stages of game design: How do you win the game?
Let’s Get to the Point(s)!
I struggled a lot with how I wanted scoring to be handled in Trading Post. So far we’ve only discussed earning points via buildings. In the previous version of the game players could earn points from fulfilling orders. I wanted that element to remain in the game.
But I also wanted more opportunity for scoring. And I wanted that scoring to be hidden. This mechanic is the core of the famous game Ticket to Ride. In that game players play the game and attempt to complete routes from one city to another. They are the only person who knows the route. At the end of the game the routes are revealed and players score positive or negative points based on whether or not they connected the two cities.
You Can’t Order Me Around!
So I decided to distill my original set of Orders from the first version of the game. Maybe now is a good time for me to explain what I mean by distill. Here’s a definition of the word “distill:”
to extract the essential elements of; refine;
That is exactly what I’ve been doing with these game elements. I am extracting the parts of the elements that make sense and work as a game. You could also look at it like separating the wheat from the chaff. Version 1 had a lot of chaff and very little wheat. But the wheat that was there was very good wheat. I recommend to all game designers who have projects that they’ve shelved to try and distill them. This is a great way to get back to the core elements that you originally desired while removing the garbage that you added needlessly.
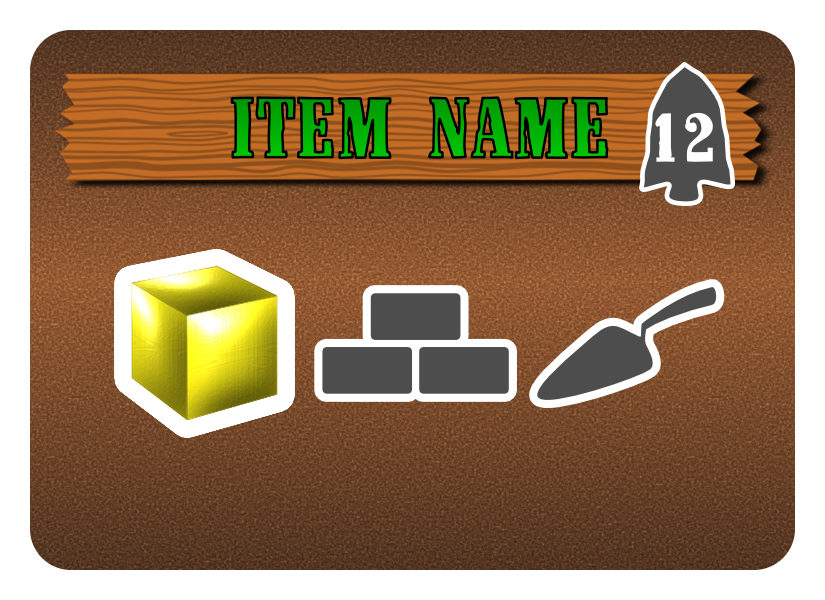
Fulfilling this order requires 1 gold, 1 bricks, and 1 trowel.
So I took the concept of orders and basically “Mathified” it. What I mean by that is I basically designed the orders to be different combinations of the resources used in the game.
Version 1 had a huge list like the spreadsheet that I showed last week. These were things like hats, pies, and musketballs. I decided that with the redesign I would ignore the naming of the items and just use the mathy combination of things.
So there are orders that cost 1 wood or 1 lumber or 1 stone or 1 gold. Then there are orders that cost any combination of two of those resources. Then there are orders that add in the secondary resources (hammer/nails/bricks/trowel). And it gets more complicated from there.
The design has a scale for how many points each order should be worth based on the costs. In the example shown the gold may be worth 2 and the bricks and trowel each worth 5 to get to a total of 12 points. So players are able to earn points during the game by fulfilling orders. (I know… that seems similar to Scoville. Oh well.)
You’ve Got a Hidden Agenda!
The other scoring I mentioned is hidden scoring. There are many games that have scoring conditions that are revealed at the end of the game. So I’m not doing anything groundbreaking here. But having hidden scoring conditions that only get revealed at the end of the game is a great way for players to never feel out of a game!
So I designed a set of scoring condition cards that have a two-fold purpose:
- Give players hope.
- Give players goals.
Hope is a big deal in board games. If a player doesn’t think they can win they may as well give up. I’ve seen players who know they can’t win start to help their favorite player win the game. I do not like that in a game. If a player has hope that they are doing a great job meeting their own scoring conditions then they have hope that they could pull it out in the end. Games like this include Stone Age, Archipelago, Ticket to Ride, and Suburbia to name a few.
Goals are also important. It helps guide a player’s strategy. It gives a player something to plan for. And it can help eliminate analysis paralysis. One of the newer games that has goals that definitely guide my strategy is 7 Wonders. In 7 Wonders each player has their own “Wonder” which is shown on a player mat in front of them. Each of these is different and provides some sort of bonus. The wonder that you receive can steer your strategy in the game.
I designed a deck of scoring condition cards to meet those requirements. These include having certain sets of buildings or certain combinations of fulfilled orders. So players can have hope throughout the game and never feel completely out of it. They may not be totally thematic, but I can give up a little theme for a better game. If players want to think of these scoring conditions more thematically then they can think of them as private commissions from the Trading Post.
Here are two examples of scoring conditions. The card on the left would award points to the player only if they managed to own two blue buildings and a green building. The card on the right would award different numbers of points based on how many orange orders they fulfilled.

Left: a “Buildings” scoring condition. Right: an “Orders” scoring condition.
But How Do You Play?
Ironically this is probably the one question to which I don’t know the answer. I am debating about having the game play several different ways. Options include:
- Role Selection a la Puerto Rico, Race for the Galaxy, Carson City.
- Turn based game play with players choosing one thing to do per turn.
- Turn based with an action point allowance system.
- Rounds where players each do action A, then action B, and so on.
I truly have not decided which is the best approach for this game. I may end up testing all four options and seeing which works best. Here are the things I am trying to design for in the game:
- Minimal downtime
- No runaway winner
- Tense decisions
- Ramping up of awesomeness
- Accessibility – Easy to learn, easy to teach, easy to play
So I’m going to choose the game play option that best fits those game design goals. I am initially leaning toward the role selection option but making it less about a role and more about providing a specific set of actions that a player can do. I’m not sure that makes sense.
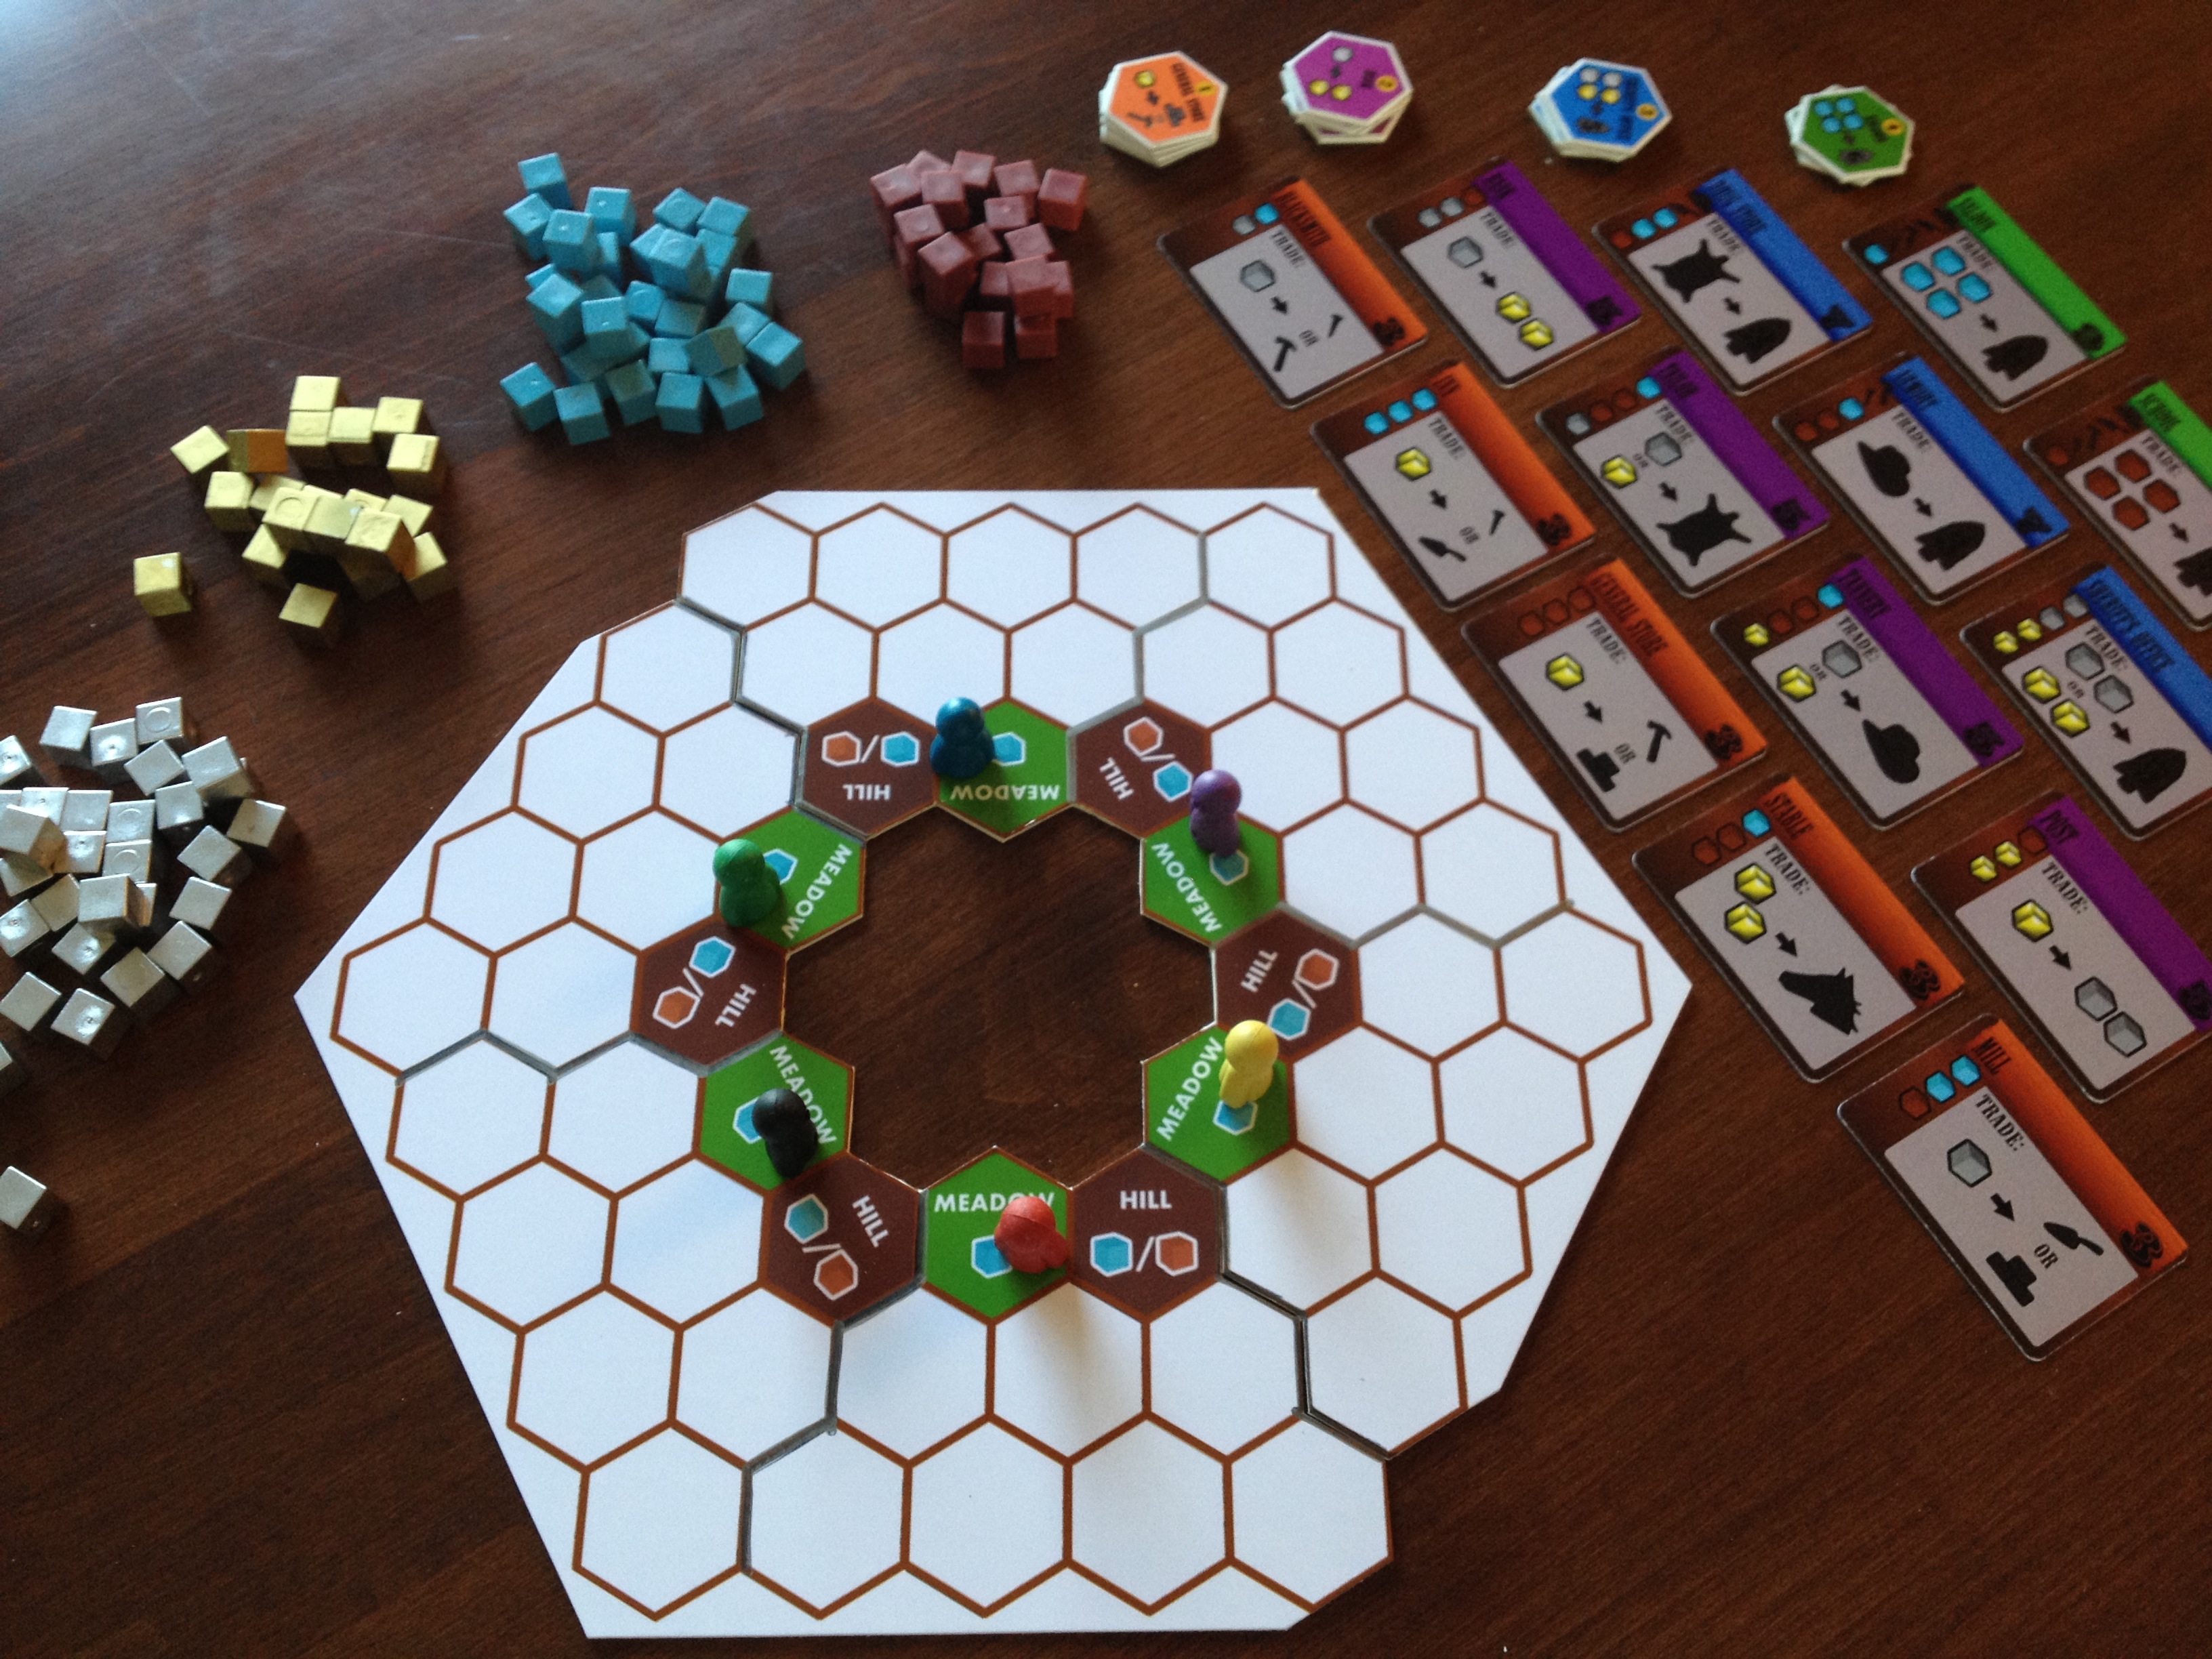
The current state of Trading Post minus half the components.
The bottom line is that I have several game play concepts within the game but I don’t have an overall picture of the game play. That’s what I’ll be discussing more in depth in next week’s article about my path to GenCon with Trading Post.
So next week I’ll cover the game play options for the game. I’ll also cover how to get this game ready to potentially pitch it to publishers at GenCon. Stay tuned! As usual, your comments are welcome. I’d love to hear what people think about this game design.
