Blog Archives
The Game Design Queue

What would you do with an extra hour each day?
Time only offers itself once. So you’d better use it as efficiently as possible. As every designer knows, it’s rare if you are ever working on only one project. I am just the same. I am currently working on four projects, not including Scoville.And I could certainly use a few more hours in the day. So I thought I’d give you a status update for each of the games currently in my “active” queue. My hope is that by writing this I’ll get a better idea of which game(s) on which I should focus my few game design hours per week.
And I’ve decided to set a goal: I want to have a playable and fun game by Christmas.
In the past I have set emotional goals, like “I want to send a game to a publisher by October.” How is that an emotional goal? It’s emotional because it has to do with making me happy versus making a good game. So this new goal is avoidably non-emotional. It’s all about the game. So I am going to attempt to spend the next three months hammering away at the stone to reveal a beautiful sculpture, and hope that it is a decent board game!
Let’s get started with last week’s Design Me game…

Quantum Orcas
I designed it last Friday and by Saturday evening it had already been through four playtests. I’m not sure what your typical Concept to Playtest timeline looks like but this isn’t my typical timeline. There are a few things that the game has going for it to have allowed for four playtests.
- It’s simple to prototype
- It’s simple to teach
- It plays in about 10 minutes
Quantum Orcas (Prototype)
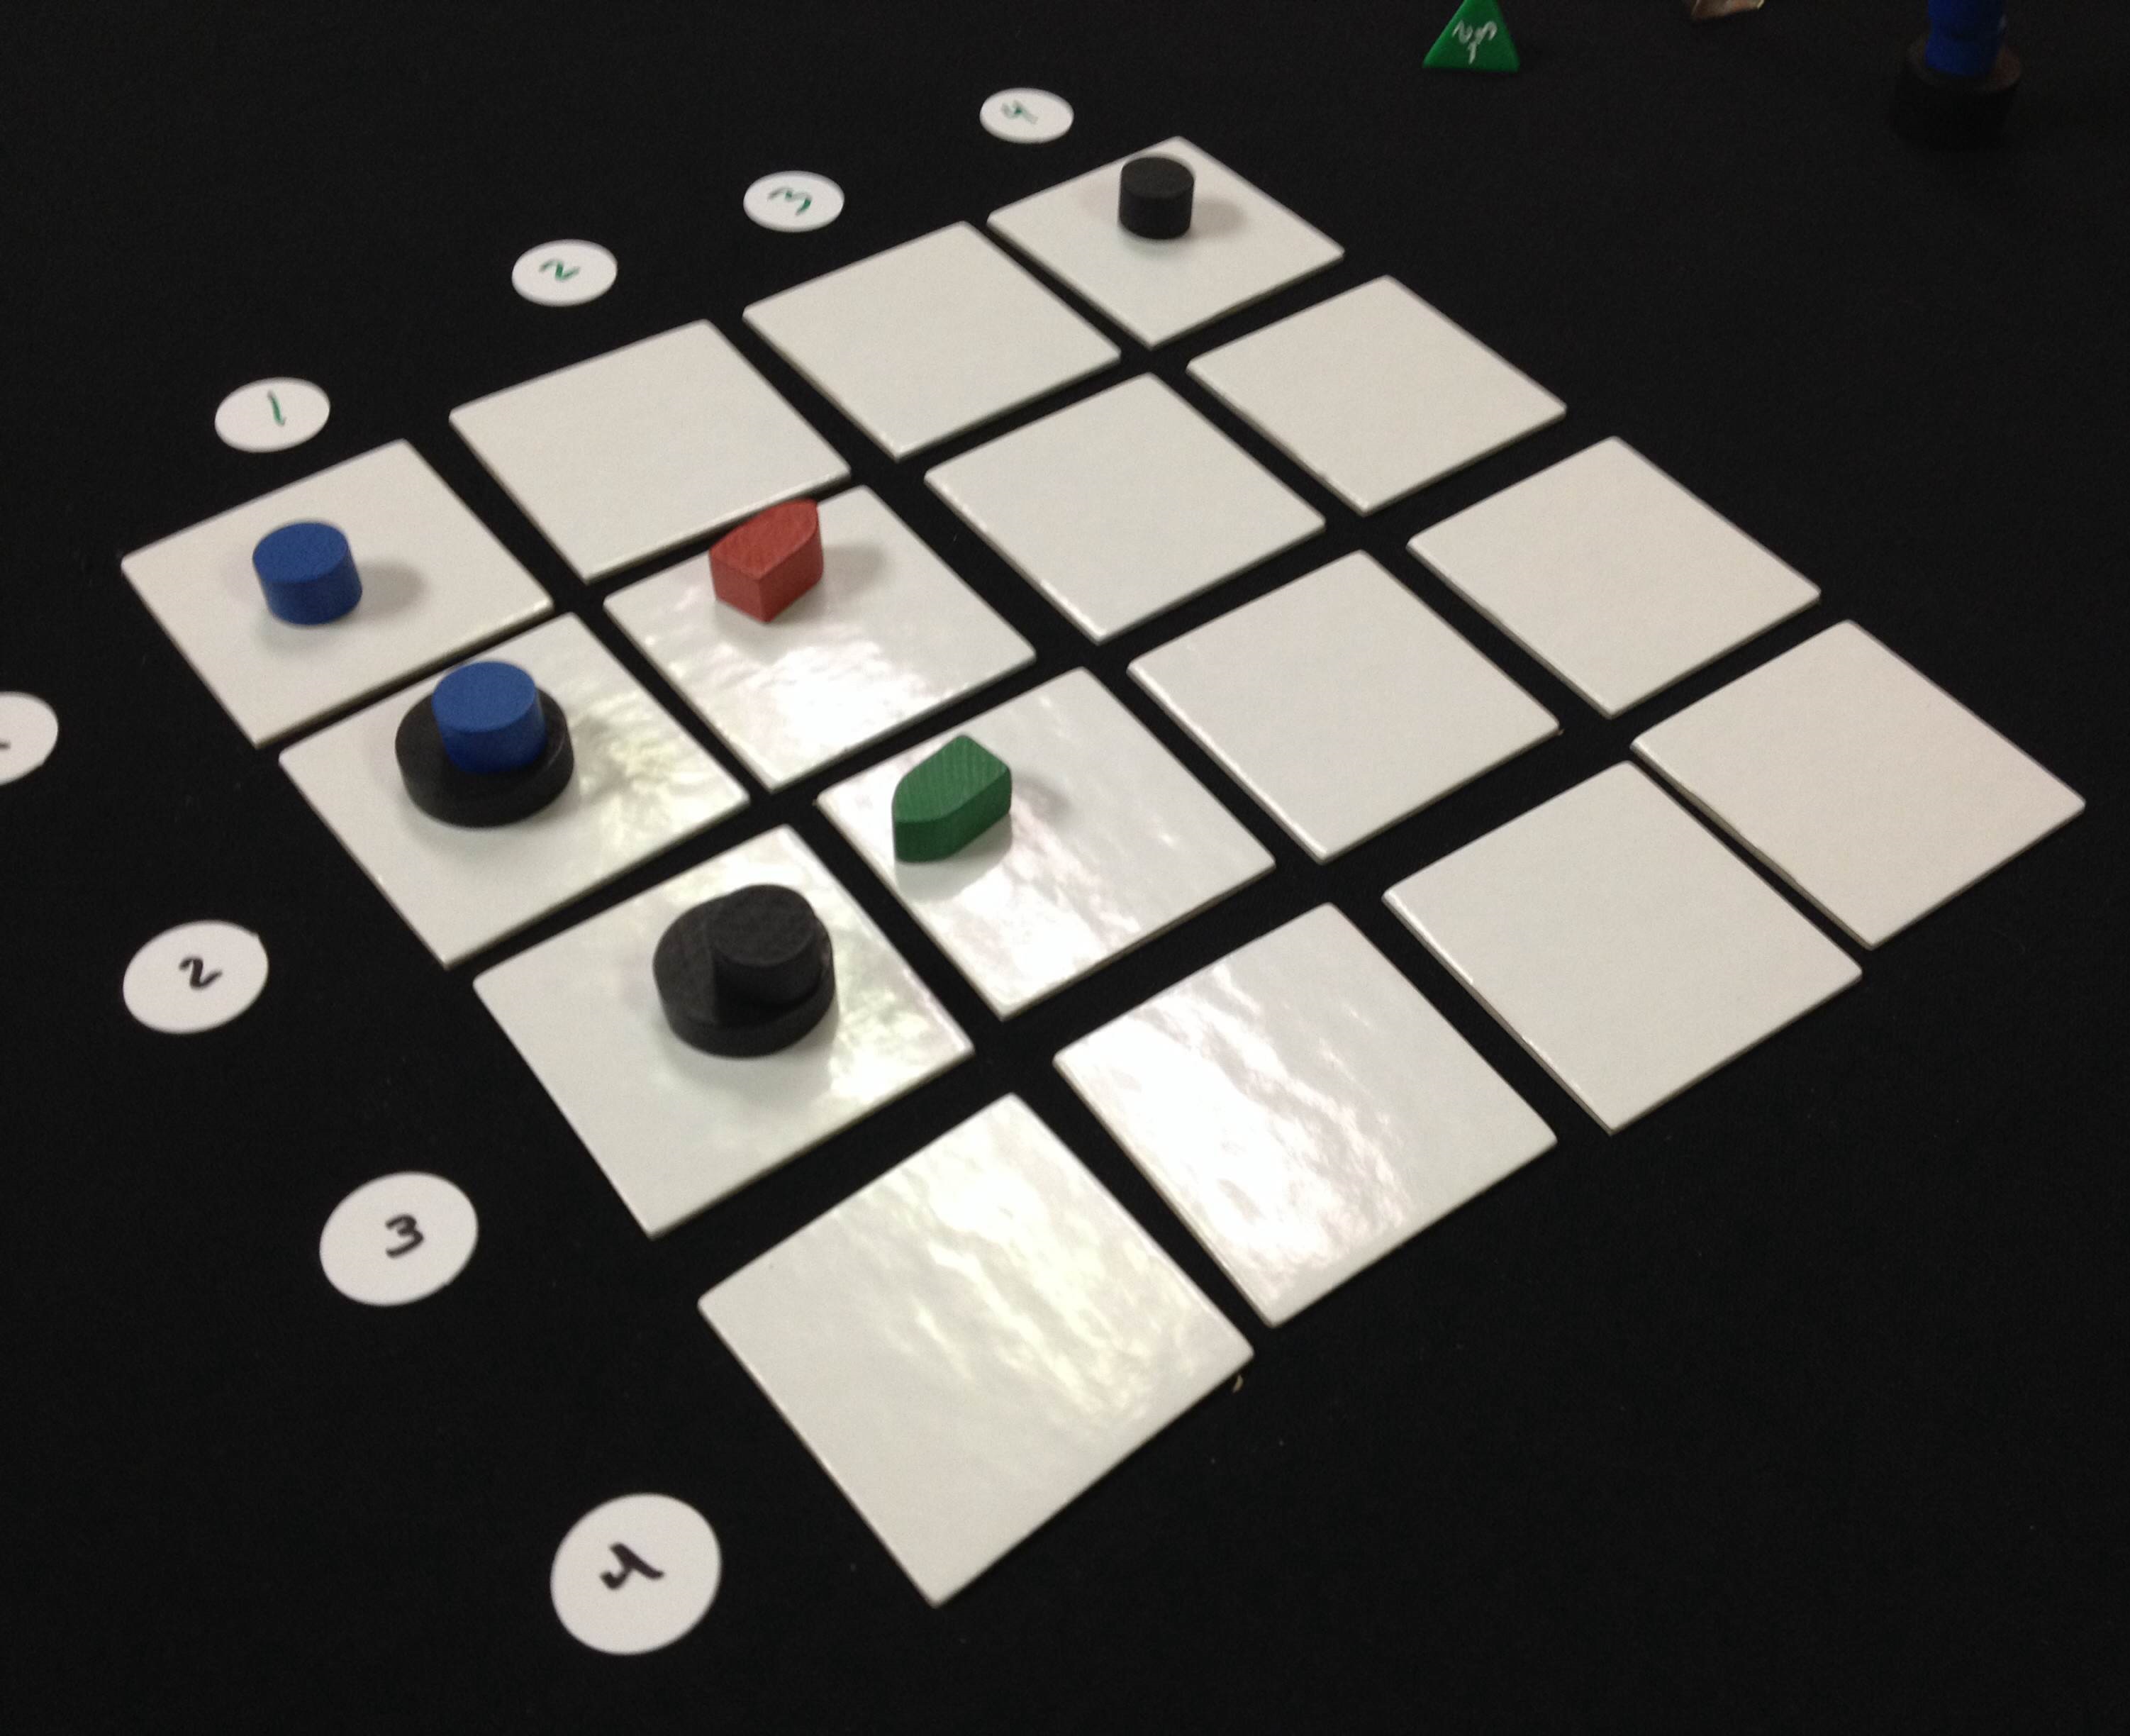
So when I arrived at Protospiel-Milwaukee last Saturday I snagged a few of the free components that The Game Crafter had donated and threw together a copy.
In the game you are a killer whale who can jump across time, which is represented by jumping across the 4×4 grid. The game lasts 8 rounds. Each round two new boats are placed randomly into the grid using two d4s. Then each player chooses one card, which represents a location on the grid, to jump to. If there are boats there, they can eat them. If there are multiple boats, then they’ll have to discard cards to eat them. There are a few other rules, but the player who eats the most boats wins the game.
I think I might be able to design this into a complete game by next week, let alone by Christmas. It could also easily be rethemed. In fact, during Protospiel-Milwaukee I did retheme it based on some components available there. Several people playtested it with the theme of Space Monsters eating asteroids. So maybe I’ll have the game be dual-themed. If you like the killer whale idea you could play on that side of the tiles. If you like the Space Monsters theme you could play on that side.
The bottom line is that this game was fun, plays quickly, and comes in a small box. That’s an awesome combination.
Conclave
![]() I’m not typically an area control/area majority kind of guy. However, Conclave is all about area control. In the game you represent one of the Preferiti, the cardinal’s on the short list to be the next pope. You are also representing a order of Catholicism, which can allow me to do some interesting things with the design.
I’m not typically an area control/area majority kind of guy. However, Conclave is all about area control. In the game you represent one of the Preferiti, the cardinal’s on the short list to be the next pope. You are also representing a order of Catholicism, which can allow me to do some interesting things with the design.
The current state of the game is that it isn’t very fun. While I think there are some interesting mechanics in the game, they just don’t seem to work together to make something that is fun. That’s not good.
But I have some ideas. Since the game revolves around holding the control of different tables, with varying numbers of cardinals sitting at them, then I can add in objectives to the game while keeping it reasonably thematic. The idea would be that the game can be won if a global victory condition is met, otherwise it will be won by a combination of points, which represent how well you manipulated the college of cardinals.
There would be both shared and secret objectives. Once a player completes a shared objective, they place a pawn on it and will earn those points at the end. When a played completes a secret objective it must be revealed. This card will remain in from of them and will be scored at the end.
So I have some good paths forward with Conclave. Now I just have to decide where it actually resides in my priority queue.
Trading Post
![]() Call me Ishmael, for I have discovered a white whale by the name of Trading Post.
Call me Ishmael, for I have discovered a white whale by the name of Trading Post.
Trading Post was my first experience with trying to design a really heavy game. I failed miserably. However, I love the theme and some of the core mechanics so I’d like to do a third complete reboot. Note, however, that the first two reboots were more like retrofitting rather than redesigning.
To redesign the game I want to achieve the following things:
- Make it more historic
- Make it focused on Trading, explicitly about trading furs for European goods.
- Make it fun.
- Make it complex.
So I sat down at the end of August and came up with what I think will be a really great game. The idea of the game is that you are a Trader working for a Trading Post. Your objectives in the game (read: “Ways to score points”) are to go on hunting excursions to collect furs, trade furs for goods, use goods to help build the Trading post. That’s the 10,000 foot view of the game.
There are a few other things going on in the game that I think are unique and interesting. There is a time-dependence for being able to do things in the game. For example, when you send furs to Europe, they have to ride on the boat, which takes time. There is also a concept of chopping wood and floating it down the river towards the Trading Post. So players would have to set themselves up to receive the large amounts of wood when they arrive.
Overall I’m pretty excited to be able to think about this game from a fresh perspective. It’ll be interesting to see how it comes along.
Brooklyn Bridge
This is a very recent game design of mine. As you can imagine, the theme is that of the Brooklyn Bridge. In the game you represent a crew of workers that are helping to build the bridge. It is similar to Stone Age in that you place workers in different areas of the board one location at a time. It is different from Stone Age in that one player cannot remove all their workers and take all their actions at once. Instead, players will remove their workers and take the actions one location at a time.
What that introduces is an interesting dichotomy about placing and removing workers. You might be able to get a good spot in the Materials office, but someone might beat you to building a section of the bridge. You might get lucky and not experience the bends when working in the caisson, or your worker might have to undergo a stage decompression.
This game will be a balance between obtaining goods and earning money. The goal is to contribute the most to the bridge and that will ultimately be the player who earns the most money.
As of today this is still a pretty rough concept. I’ve mocked up some tiles so that I can test a few things. I’m not sure this one (or Trading Post) could really be a full prototype by Christmas, but we shall see.
The Path Forward
So those are the four concepts currently in my active queue. This gives me enough variety and enough challenges to work on while not being overwhelming. But if I try to work on all four then I’m afraid none of them will be ready before Christmas. So I present my first ever poll, for which I am sure to get thousands of votes. Please vote for the game design you would most like to see fully prototyped:
Thanks for reading and voting! I’m hoping to bring you good game design updates over the next three months!
Sourcing Game Components: Dice

Just think of the potential game designs waiting in that pile!
Today is the final article in a series of four articles about where to find prototype worthy game components. Here is the list of articles from this series:
- Sourcing Cards: 9-5-13
- Sourcing Meeples: 9-12-13
- Sourcing Chits: 9-19-13
- Sourcing Dice: Today!
Before we get started I want to make one point clear: This article is not about standard dice or even RPG dice. You can find standard d6s and RPG dice at your favorite local game store. If you want standard dice visit your local store or local thrift store. Or if you want really nice standard dice then check out Chessex. This article is about where to find blank dice, or special dice, or even dice that you can write on!
And my disclaimer: I have not used dice in any of my game designs. While I know where to buy dice, I cannot speak to their quality, feel, or character.
As a reminder I want to give credit to the list that inspired me to write these articles. This list is much more exhaustive than mine since I am just highlighting a few of the major suppliers. But here’s the list so you can check it out yourself:
So today I present a few of the sources that I think are worth checking out…
Indented Blank Dice

They are just waiting for your awesome design!
When it comes to using blank dice for game design, look no further than Indented Blank Dice! These are six sided dice with indented sides.
Why indented sides? The sides are indented so that when you put a sticker on the side it won’t rub off or cause irregular rolls.
These are 19mm on an edge and the indented portion measures 1/2″ x 1/2″. They will also sell you sheets of labels on which you can print your game design’s custom icons. Here is their pricing for US and International:
| # | Option | Price |
|---|---|---|
| 1 | 25 Dice – Domestic US | $15.00 |
| 2 | 25 Dice – International | $35.00 |
| 3 | 50 Dice – Domestic US | $25.00 |
| 4 | 50 Dice – International | $45.00 |
| 5 | 125 Dice – Domestic US | $50.00 |
| 6 | 125 Dice – International | $70.00 |
| 7 | 250 Dice – Domestic US | $95.00 |
| 8 | 250 Dice – International | $115.00 |
| 9 | 1000 Dice – Domestic US | $300.00 |
| 10 | 1000 Dice – International | $320.00 |
Those prices seem a little expensive to me, but if you’ve designed the next Kingsburg, Alien Frontiers, or Macao, then you can probably justify the cost.
Each sheet of labels that they sell will handle 36 dice. Two sheets will cost your $6.
BlankDice.co.uk

They look similar to Indented Blank Dice, but they’re from Europe!
If you are a friend from across the pond, i.e., from Europe, then perhaps your first stop should be BlankDice.co.uk!
In addition to a nice assortment of indented six sided dice they also offer 8 sided indented dice. Here is the page for their six sided dice: BlankDice.co.uk – 6 Sided Dice
But here’s the kicker… If you were to purchase 25 of these at £0.20 each (to compare the pricing against the source above this one) you would find that it would cost roughly US$15.50 to ship to the US. That’s only $0.50 more than the above source. So if BlankDice.co.uk has a color that you desperately need, then maybe you could order from them instead.
Print & Play Productions
 They make the list again since they offer so much awesomeness! If you are looking to order a bunch of different components for your game prototype and you need dice as well, then consider ordering from Print & Play since you can get cards, chits, meeples, and dice all from the same source! Here are a few different dice options offered by Print & Play:
- 16mm Stickerable Blank Dice: $0.15 ea.
- 19mm Indented Blank Dice: $0.50 ea.
- Stickerable Polyhedral dice (d8, d10, d12): $0.99 ea.
- 16mm Translucent Dice (Red, Green, or Blue): $0.45 ea.
Side Note: I personally met the guy behind Print & Play productions at GenCon and I can safely say he’s an awesome guy. I would definitely feel confident when purchasing from him. And the fact that you can order basically all of the components you would need for your prototype from one source makes Print & Play pretty awesome!
EAI Education
 The EAI Education catalog is a fantastic one-stop-shop for game designers. You can order cards, dices, cubes, and more all from their online catalog at excellent prices!
If you do a search for “Dice” you’ll get 206 results. While they have way too many awesome options of standard dice, fudge dice, fraction dice, etc., here are some blank dice options that I think could be useful to game designers:
- Blank Dice – Set of 12: $1.99
- Blank Dice and Label – Set of 144: $26.95
- Dice Domes Deluxe (with foam dice): $13.95
- Magnetic Foam Write On/Wipe Off 1.5″ dice Set of 12 (Available in Classic or Bright colors): $8.95
- Magnetic Foam Write On/Wipe Off 3″ dice set of 36: $99.95
And if you need standard dice to compliment your game design, then you can believe that EAI carries what you need!
The Game Crafter
![]() The guys at The Game Crafter also offer black indented dice. If you choose “dice” from their parts selection you’ll get a bunch of standard dice as well as blank dice.
The guys at The Game Crafter also offer black indented dice. If you choose “dice” from their parts selection you’ll get a bunch of standard dice as well as blank dice.
They offer 8 different colors at $0.40 each, though if you order more than 9 of any color the price will drop to $0.38 each. These prices are better than some of the other sources listed above for indented blank dice.
But as I mentioned when writing about TGC for the Meeples article, if you are ordering components like these you still have to wait in their production queue. Since I live in the Madison area I think I should volunteer my time to fulfill component-only orders with no customization of cards or boxes or rules. That way, if you order stocked components only, the order would skip the custom production queue and be able to be mailed to you much more quickly. This isn’t a huge complaint and it doesn’t hold me back from ordering from TGC. It’s just something I think they could do a little better.
Amazon
The interwebs offer a bunch of sources for dice, but Amazon seems to have some good options. Here are a few that might be good for game designers:
- 25 Blank White 16mm Dice: $2.95
- 1 Inch Foam Color Resources Cubes Set of 102: $13.21
- Chessex Set of 6 Blank White Polyhedral Dice: $3.59
- Set of 100 Colored Blank 16mm Dice: $18.95
So perhaps Amazon will be your go-to source for dice.
***
And there you have it, folks! This is the conclusion of my series on sourcing game components. You should now know where to find all of the components you need. Thanks for reading along during this series. It has prompted me to desire a large order of components from all these different sources. I’d love to simply stock up on tons of stuff so that I can have the world of game components at my finger tips in case inspiration strikes! Good luck game designers!
Sourcing Game Components: Chits

Unpunched chits from Small World.
Today I’m posting the third article in a four part series about where to buy components for your game designs. Last week I posted about Meeples. The previous week I posted about cards. Today is about those obscure little components so nicely referred to as Chits. Here is a list of the four articles in this series:
- Sourcing Cards: 9-5-13
- Sourcing Meeples: 9-12-13
- Sourcing Chits: Today!
- Sourcing Dice: 9-26-13
First, a disclaimer: There is nothing quite like that fresh new board game smell when you pull off the shrink wrap and open a game for the first time. Then you have the awesome moment of getting to punch out the chits and that really makes you feel special. I love that!
Today, however, we are not talking about unpunched chits, but rather blank chits that you can use for prototyping your game design. These include circles, squares, hexes, and more.
As a reminder I want to give credit to the list that inspired me to write these articles. This list is much more exhaustive than mine since I am just highlighting a few of the major suppliers. But here’s the list so you can check it out yourself:
So today I present a few of the sources that I think are worth checking out…
SpielMaterial.de
If you are of the European contingent, then I would suggest starting with SpielMaterial.de. They have a very nice assortment of chits that you can purchase. Here is the link:
On their page you can purchase triangles, hexagons, squares, rectangles, diamonds, circles, and more. They seem like an excellent option for purchasing chits.
Print & Play Productions
 I have purchase hexagon chits from Print & Play in the past and have been very pleased. I like to buy the blank tiles with white on both sides. You can order them with your own artwork as well, so keep that in mind. Here is their page for “Counters”:
One of the nice things about Print & Play productions is that if you order the hex tiles, you’ll also receive the little rhombuses that were in between the tiles. And those could potentially be useful in a future game design! Available to you are triangles, circles, squares, rectangles, and hexes.
The Game Crafter
![]() While my go-to source for chits is Print & Play it is necessary to add The Game Crafter into the list as well. If you are ordering cards and meeples from The Game Crafter, then you might as well order some chits too! Here is a link to one of the chits they offer. Below the main area they link to similar items:
While my go-to source for chits is Print & Play it is necessary to add The Game Crafter into the list as well. If you are ordering cards and meeples from The Game Crafter, then you might as well order some chits too! Here is a link to one of the chits they offer. Below the main area they link to similar items:
They don’t have nearly the variety of SpielMaterial or Print & Play Productions. And you have to deal with the lead-time issue. But it sure is convenient if you can order all of your components from the same source.
Superior POD
![]() While blank counters are not available, Superior POD (Print On Demand) does offer printed square and hex tiles, but only of limited sizes. Here is the link:
While blank counters are not available, Superior POD (Print On Demand) does offer printed square and hex tiles, but only of limited sizes. Here is the link:
They only offer 2″ hexes, 1″ squares, and 5/8″ squares. So it’s pretty limited, but it appears that they might be mailed to you unpunched, which is sweet.
So there you go. I know this is a short list, but I think that’s because there just are not very many sources for board game tiles like these. If you know of other sources that have quality components available, please let me know and I’ll add them to this list.
Thanks for checking this out. I hope it helps you as you build your game prototypes!
Sourcing Game Components: Meeples

A Mash of Meeples!
Last week I posted the first in this series of four articles about sourcing components for your board game designs. That article was about sources for cards. Today I’m covering my go-to sources for meeples to use in games. Here’s the list of what I’m covering in this whole “Sourcing” series:
- Sourcing Cards – 9/5/13
- Sourcing Meeples – Today!
- Sourcing Chits – 9/19/13
- Sourcing Dice – 9/26/13
So that’s the list I’m working with. Those are probably the four main components you are likely to use in a prototype. When I refer to “Meeples” I am referring to the components that are used to mark your spot or location on the board or player mats. Meeples can mean different things to different people.
As I wrote last week I want to give credit to the list that inspired me to write these articles. This list is much more exhaustive than mine since I am just highlighting a few of the major suppliers. But here’s the list so you can check it out yourself:
I have picked a few of those sources to add to the ones I also use. And like last week I’ll start with The Game Crafter since they are my go-to source for these things.
The Game Crafter
![]() First things first: If you order pawns or anything that doesn’t have to be printed, you still need to wait your turn in the production queue. I recently placed an order for 30 pawns that cost a total of about $5 and I started out as #550 in the queue. The estimated ship date was October first. I know that they have the pawns just sitting over there. I bet I could drive over and simply ask if I could buy the 30 pawns and get them the same day.
First things first: If you order pawns or anything that doesn’t have to be printed, you still need to wait your turn in the production queue. I recently placed an order for 30 pawns that cost a total of about $5 and I started out as #550 in the queue. The estimated ship date was October first. I know that they have the pawns just sitting over there. I bet I could drive over and simply ask if I could buy the 30 pawns and get them the same day.

The avatar pawn
Here is their page for pawns: The Game Crafter – Pawns
I like to use the Avatar pawns. They cost 14 cents each and are not ugly. These have worked well for me in the past and I’m looking forward to getting my set of new pawns so that I have enough for a few more prototype copies of Scoville. They are just simple and easy. No need to get complicated for a prototype! But if you want to mix things up, this next source might be the right one for you…
Meeple Source

My favorite is the pirate with the peg leg!
I’ve never bought from Meeple Source, but after giving their site a long, drooling look I think they might serve me well in the future. They offer the following categories of meeples from which to choose:
- Standard Meeples
- Mega Meeples
- Mini Meeples
- Super Mega Meeples
- Character Meeples
- Camo Meeples
- Sets of Meeples
- “Misfit” Meeples
Wow. And if that wasn’t enough, you can also check out their Plush Meeples!
This site has a TON of meeples to offer and I’m afraid I should have listed them lower in this article because I feel there really isn’t any sense for you to continue reading. But please continue anyway!
SpielMaterial.de

Is that Gandalf the Red??
If you happen to be an awesome reader from Europe, I’m glad you’re here. If you are interested in meeples or pawns, then you might be interested in ordering from SpielMaterial.de. They are a European vendor of board game component awesomeness.
Here are some links:
They have so much to offer that it’s worth just browsing on their website. You might get inspired for a game design simply by looking at all the things they can sell you.
Boards & Bits
I have ordered from Boards & Bits in the past and was pleased with the service I received. Boards & Bits must have a HUGE warehouse to accommodate all the products that they carry. Their options go well beyond pawns and meeples. Their website isn’t the greatest since it is a little difficult to navigate, but they just offer so many things that I can easily look past that.
You will mostly find typical meeples and pawns at Boards & Bits. They don’t offer the painted meeples the way that Meeple Source and SpielMaterial do. But if you want a cheap source for prototype worthy pawns, then perhaps Boards & Bits is for you!
CraftParts.com

What a lovely little meeple family!
If you are only interested in little wooden people, then maybe you should check out Craft Parts. They offer a small assortment of wooden people figures that might work great in your prototype.
CraftParts.com – Little Wooden People
These components range in size from 1 1/8th inch to 3 9/16th inches. So these are quite a bit larger than your standard meeples. But maybe that’s what your looking for because you typically play games with giants. These will help those giants grab onto the pawns much easier!
***
So there are a few of the numerous online sources for meeples and pawns. If there are any major vendors that I have overlooked, please let me know and I will update this list. Thanks for reading!
Prototype Art: Cubes in Inkscape
Inkscape Logo of Squidy Awesomeness
There are a lot of you out there who are working on board game prototypes. Often those prototypes will utilize the ever popular cube. And that usually results in the cube being placed onto graphics such as cards or tiles or the board itself and then later on, in the rulebook. So today I wanted to give you a quick tutorial to show you how I make a cube for board game graphics using Inkscape.
You can create your own set of awesome looking Scalable Vector Graphics versions of cubes using the free Inkscape software. If you don’t have the software, you can download it from their website: inkscape.org.
Let’s Get Cubing!
Once you’ve downloaded and opened Inkscape you’ll see a plain canvas outlined in front of you. I like to leave it turned on, but you can turn off the “edges” if you visit the document properties under “File.”
What we are going to do first is click on the “Create 3D Boxes” icon on the left. Here is a picture showing what this should look like:
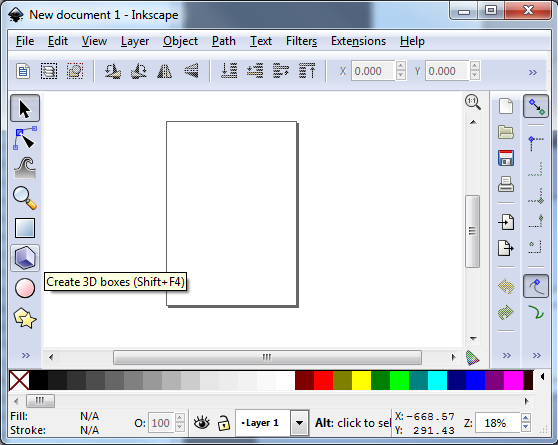
There… on the left… the icon that game designers love!
Click on the icon. Then click and drag within the framed region to create a generic box. It should look something like this:
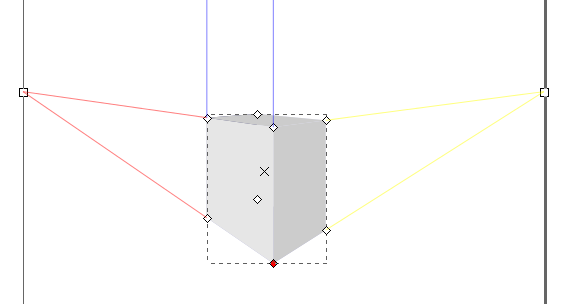
Great! You’re doing it!
You can see we’ve created a generic gray box. Now it’s time to make it look like a cube of awesomeness that you would be proud to include in your board game graphics!
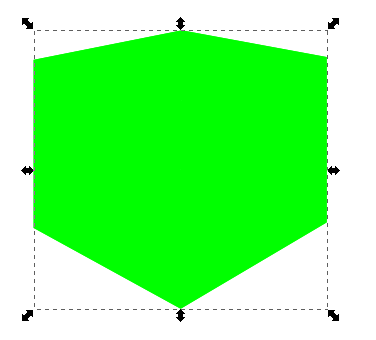
So the next thing you should do is “shape” the box to look like a cube. This can be done by clicking and dragging the little diamonds on the corners of the generic box. Go ahead and try it out. Once you’ve dragged then to the positions of your liking then you might end up with something like this:
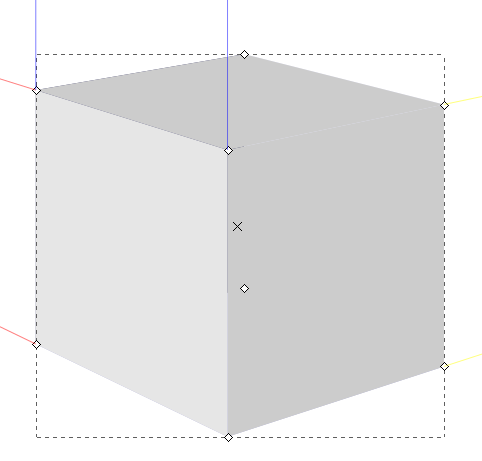
Our cube of awesomeness is started to be awesome!
Assuming you’re pleased with the shape of you cube it’s then time to make it look good. Normally you can just click on an object using the “Select and Transform” icon (it’s the black arrow on the left). Once you’ve selected the “Select and Transform” icon, click on the cube. Then you can change the color by selecting any color from the color row at the bottom of Inkscape. But that’s not the way I do it. Why? Because you end up with a flat monotone cube of ugliness rather than a sweet cube of awesomeness. Here’s what it might look like:
Our awesome turned ugly. Let’s fix that!
Don’t be afraid! We can transform that cube from ugly to awesome in just a few easy steps! First, we’ll want to use the “Edit paths by node” tool, which is right below the “Select and Transform” icon. This one looks like a quarter of a circle, with three nodes, and a black arrow. By clicking on this icon you can then go and choose a specific face of the cube. Once you’ve selected a face of the cube you can then change its color without changing the other faces. In this next picture I have changed two of the faces and have selected the top face:
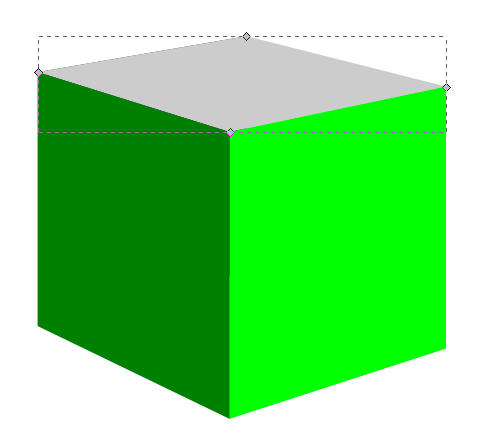
Looks like we’re back on track!
So I had selected the right face and made it a light green. Then I selected the left face and made it a dark green. Now with the top face selected I can choose its color, in this case an even lighter green. Now you should have something like this:
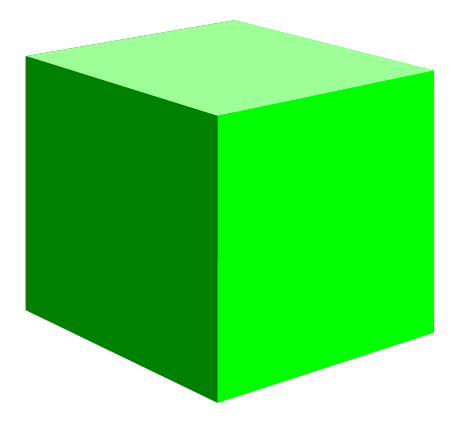
Not too shabby!
Alright!
Just a side note, if you have trouble selected the individual faces, make sure you’ve chosen the “Edit Paths by Node” tool rather than the “Select and Transform” tool.
So we’ve got a green cube with differently colored faces. What’s next? I found that sometimes the hidden faces will show through along the edges. So we can change their colors too. This is a little tricky though, so follow closely.
Go ahead and click on the left face. Then what you want to do is press the “left” arrow on your keyboard to move the face over. Don’t use your mouse to drag it since it will be almost impossible to easily put it back in the right spot. It should look something like this:
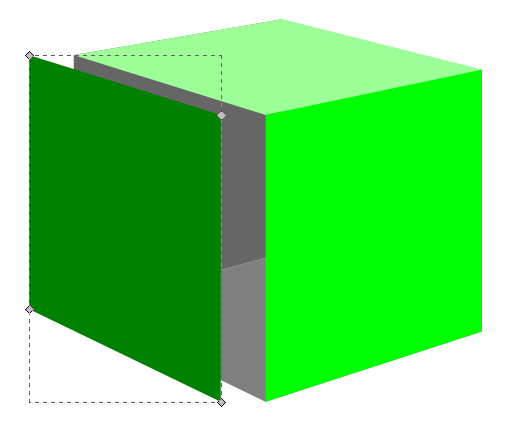
The hidden “ugly” faces show themselves!
With two of the three ugly faces exposed you can click on each one and change them to a color that matches your cube color. In this case I just choose a dark green for these two hidden faces. Then slide the moved left face back into place using your “right” arrow key. You can then move the right face or the top face to expose the third hidden side and change its color.
Now you’ve got your beautiful cube. You can call it quits right there if you want a nice simple cube. Just select the cube, click “File > Export Bitmap” and you can save it as a nice little .png file. And I also recommend saving the .svg file so that you don’t have to recreate the cube every time. But if you want to spruce it up a bit then keep reading!
Adding Awesomeness!
Sometimes cubes can look better with a border. There’s a very easy way to create one. With the cube selected click on “Filters > ABCs > Black Outline” to get something like this:

Oh boy! Things are looking good!
Pretty dec, right! (Note: dec is short for “decent,” all the cool kids know that!) Just be careful because the smaller your cube the larger the border will appear relative to the cube.
If you don’t want a black outline there are other options, but it’s slightly more complicated. With the cube selected you’ll want to click on “Object > Fill and Stroke.” That will open a panel on the right. “Fill” will color the main area of the object. “Stroke” will add a border to the object. We want to use Stroke. Taking our border-less cube and applying a simple black stroke will result in a cube like this (Note, on the Stroke Style tab you will want to choose the “Round Join” option):
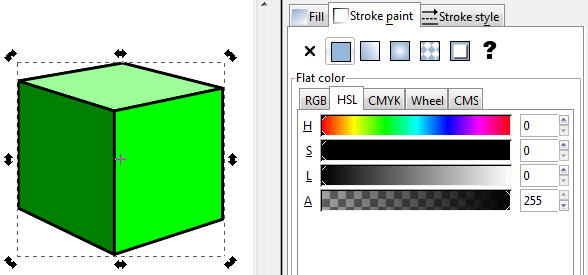
Not quite as awesome as I’d hoped!
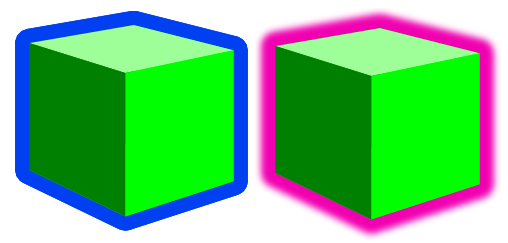
I am not a fan of the lines along each edge. It just doesn’t look that clean to me. So here’s my trick: duplicate the cube and apply a stroke to the copy in the back. To duplicate the cube make sure it is selected and then right click. On the pop up menu click “Duplicate.” This will create a duplicate directly on top of the original. Adding a stroke to the copy in back will show allow only the outside edges of the stroked cube to show past the unstroked cube. Then you can create cubes that look like this:
Awesomeness complete, even though these two examples look pretty ugly!
On the left is a duplicate cube with a blue stroke applied to the back copy. On the right is a duplicate cube with a blurred pink stroke applied to the back cube. One final note is that if you choose the duplicate cube option you will want to group the two together so that when moving them around you won’t have to constantly be lining them up.
Lesson Complete!
Now you know how to use Inkscape to create nice looking cubes for your board game graphics! If you are a starving artist and you have little computer skills then I have a special bonus for you. I am supplying a .svg file for all of you with a slew of cubes that you can use freely without crediting me, without paying me, and without worrying about getting sued. Feel free to use this file and the cubes wherever you want, however you want, and in whatever way you want so long as you use them for the greater good! Here is an image of the .svg file:

Go on… use this artwork freely! Make your prototypes look awesome!
To download it just click here: Google Drive > FreeUseCubesbyEdPMarriott.svg
Note, if you have trouble downloading the file from Google Drive you might want to allow third party cookies. You can read more here: http://productforums.google.com/forum/#!topic/docs/_pXrQmwkrGU . If you have further problems, please let me know!
And let me know how they work for you. Now get Cubing!
