Monthly Archives: April 2014

Monday Brews 4-28-14
Monday in Madison is rainy. Yesterday was rainy. Tomorrow will be rainy. Wednesday and Thursday will be rainy. And people wonder why Spring is my least favorite season. Oh well… at least we have board games to keep up happy during depressing weather like this.
So here we are starting another work week. While it’s dreary outside let’s look back and the Boards & Barley I enjoyed last week. That might brighten my mood.
The Barley:

So good! So smooth! So luxurious!
BARLEY SPOTLIGHT: Young’s Double Chocolate Stout
I enjoyed this on tap at a new local establishment in the glass shown in the picture. It is chocolatey, smooth, creamy, and delicious. I recommend you try it if you are a fan of any beer styles what-so-ever.
- Homebrew: Oatmeal Stout
- Hofbrau Original
- Lakefront Cherry Lager
- Lake Louie Warped Speed Scotch Ale
- Homebrew: Scotch Ale
The Boards:

Small tin, Big game!
BOARDS SPOTLIGHT: The Builders
I picked this up for several reasons. The artwork is awesome. The game has been getting a little buzz from Euro lovers. And it was only $18.
The Builders is a game about building buildings. Each turn you have three actions which you can use to hire workers, begin construction, send workers to build the buildings, or take money. Play continues until someone reaches 17 points from their completed buildings or tools.
This game plays quickly and includes a plethora of interesting decisions. I played it twice last week and I’m looking forward to playing it again!
- Glass Road
- Crokinole
- NEW! Unpublished Prototype
- NEW! Thebes – I love the theme of this one. Doing research and then visiting archaeological dig sites to search for artifacts is great! But the way this game manages the time aspect adds a very interesting concept. While I thought the artifact digging added a little too much luck, I found the game to be very enjoyable and I’ll play it again.
- NEW! Hab & Gut – I’m not normally a fan of stock market games. Money is a very bland theme for me. But this game, with it’s lingering concept of player elimination for the lowest charitable donor, and its hidden information market manipulation aspects made this a love-hate game for me. I wanted to know more information than I knew. I actually thought the design of this game was really clever. I would definitely play it again.

I didn’t do any design work last week. I really need to finish reading Words of Radiance so I can get back to spending my free time on game design. But that book is so good. What Boards & Barley did you enjoy last week?
Monday Brews 4-21-14
Welcome back to Boards & Barley! I hope you all had an enjoyable Easter weekend. It was a VERY slow week in terms of enjoying Boards & Barley. So today’s Monday Brews will be very short. Let’s start with the Barley…
The Barley:
 BARLEY SPOTLIGHT: St. Bernardus Abt 12 Quadrupel
I enjoyed this fine beer on tap from a new local establishment that has an outstanding list of beers on tap. Most of them are European beers. Many of those are beers I haven’t ever seen on tap. I will definitely be going back there to enjoy more awesome tap beers!
The Quadrupel was quite exceptional. But weighing in at 10% abv means it should be a slow drinking beer. I didn’t drink it slowly. It was too good to drink slowly.
The other beer I enjoyed last week was a Belhaven Scottish Ale on tap at the same establishment (another reason I should have enjoyed the Quadrupel a little slower!). I’ve enjoyed Belhaven from a nitro can in the past but to have it on tap (nitro tap!) was awesome. It’s such a smooth beer with an excellent flavor. Yum!
I did happen to have a New Glarus Spotted Cow while I was working on my garden bed last week, but Spotted Cow is not close to those other two tap beers.
The Boards:
 BOARDS SPOTLIGHT: Tessen
Tessen was the only game I played last week. The rest of my free time was spent on building my garden and reading Brandon Sanderson’s Words of Radiance, which is amazing.
I taught Tessen to my brother-in-law who after the weekend was over mentioned that he wanted to play it more. It’s such a fun, light, and quick battle game that has you feeling tense as you are trying to collect sets of animals. If you’ve never played it, go pick it up from Van Ryder Games.
Designer’s Corner:
Since the garden and Words of Radiance were so prevalent last week I didn’t really do much game design. However, I did sit down for a while and put together some good ideas for Brooklyn Bridge. One of the things I’m working on is how to make the tower more appealing to build.
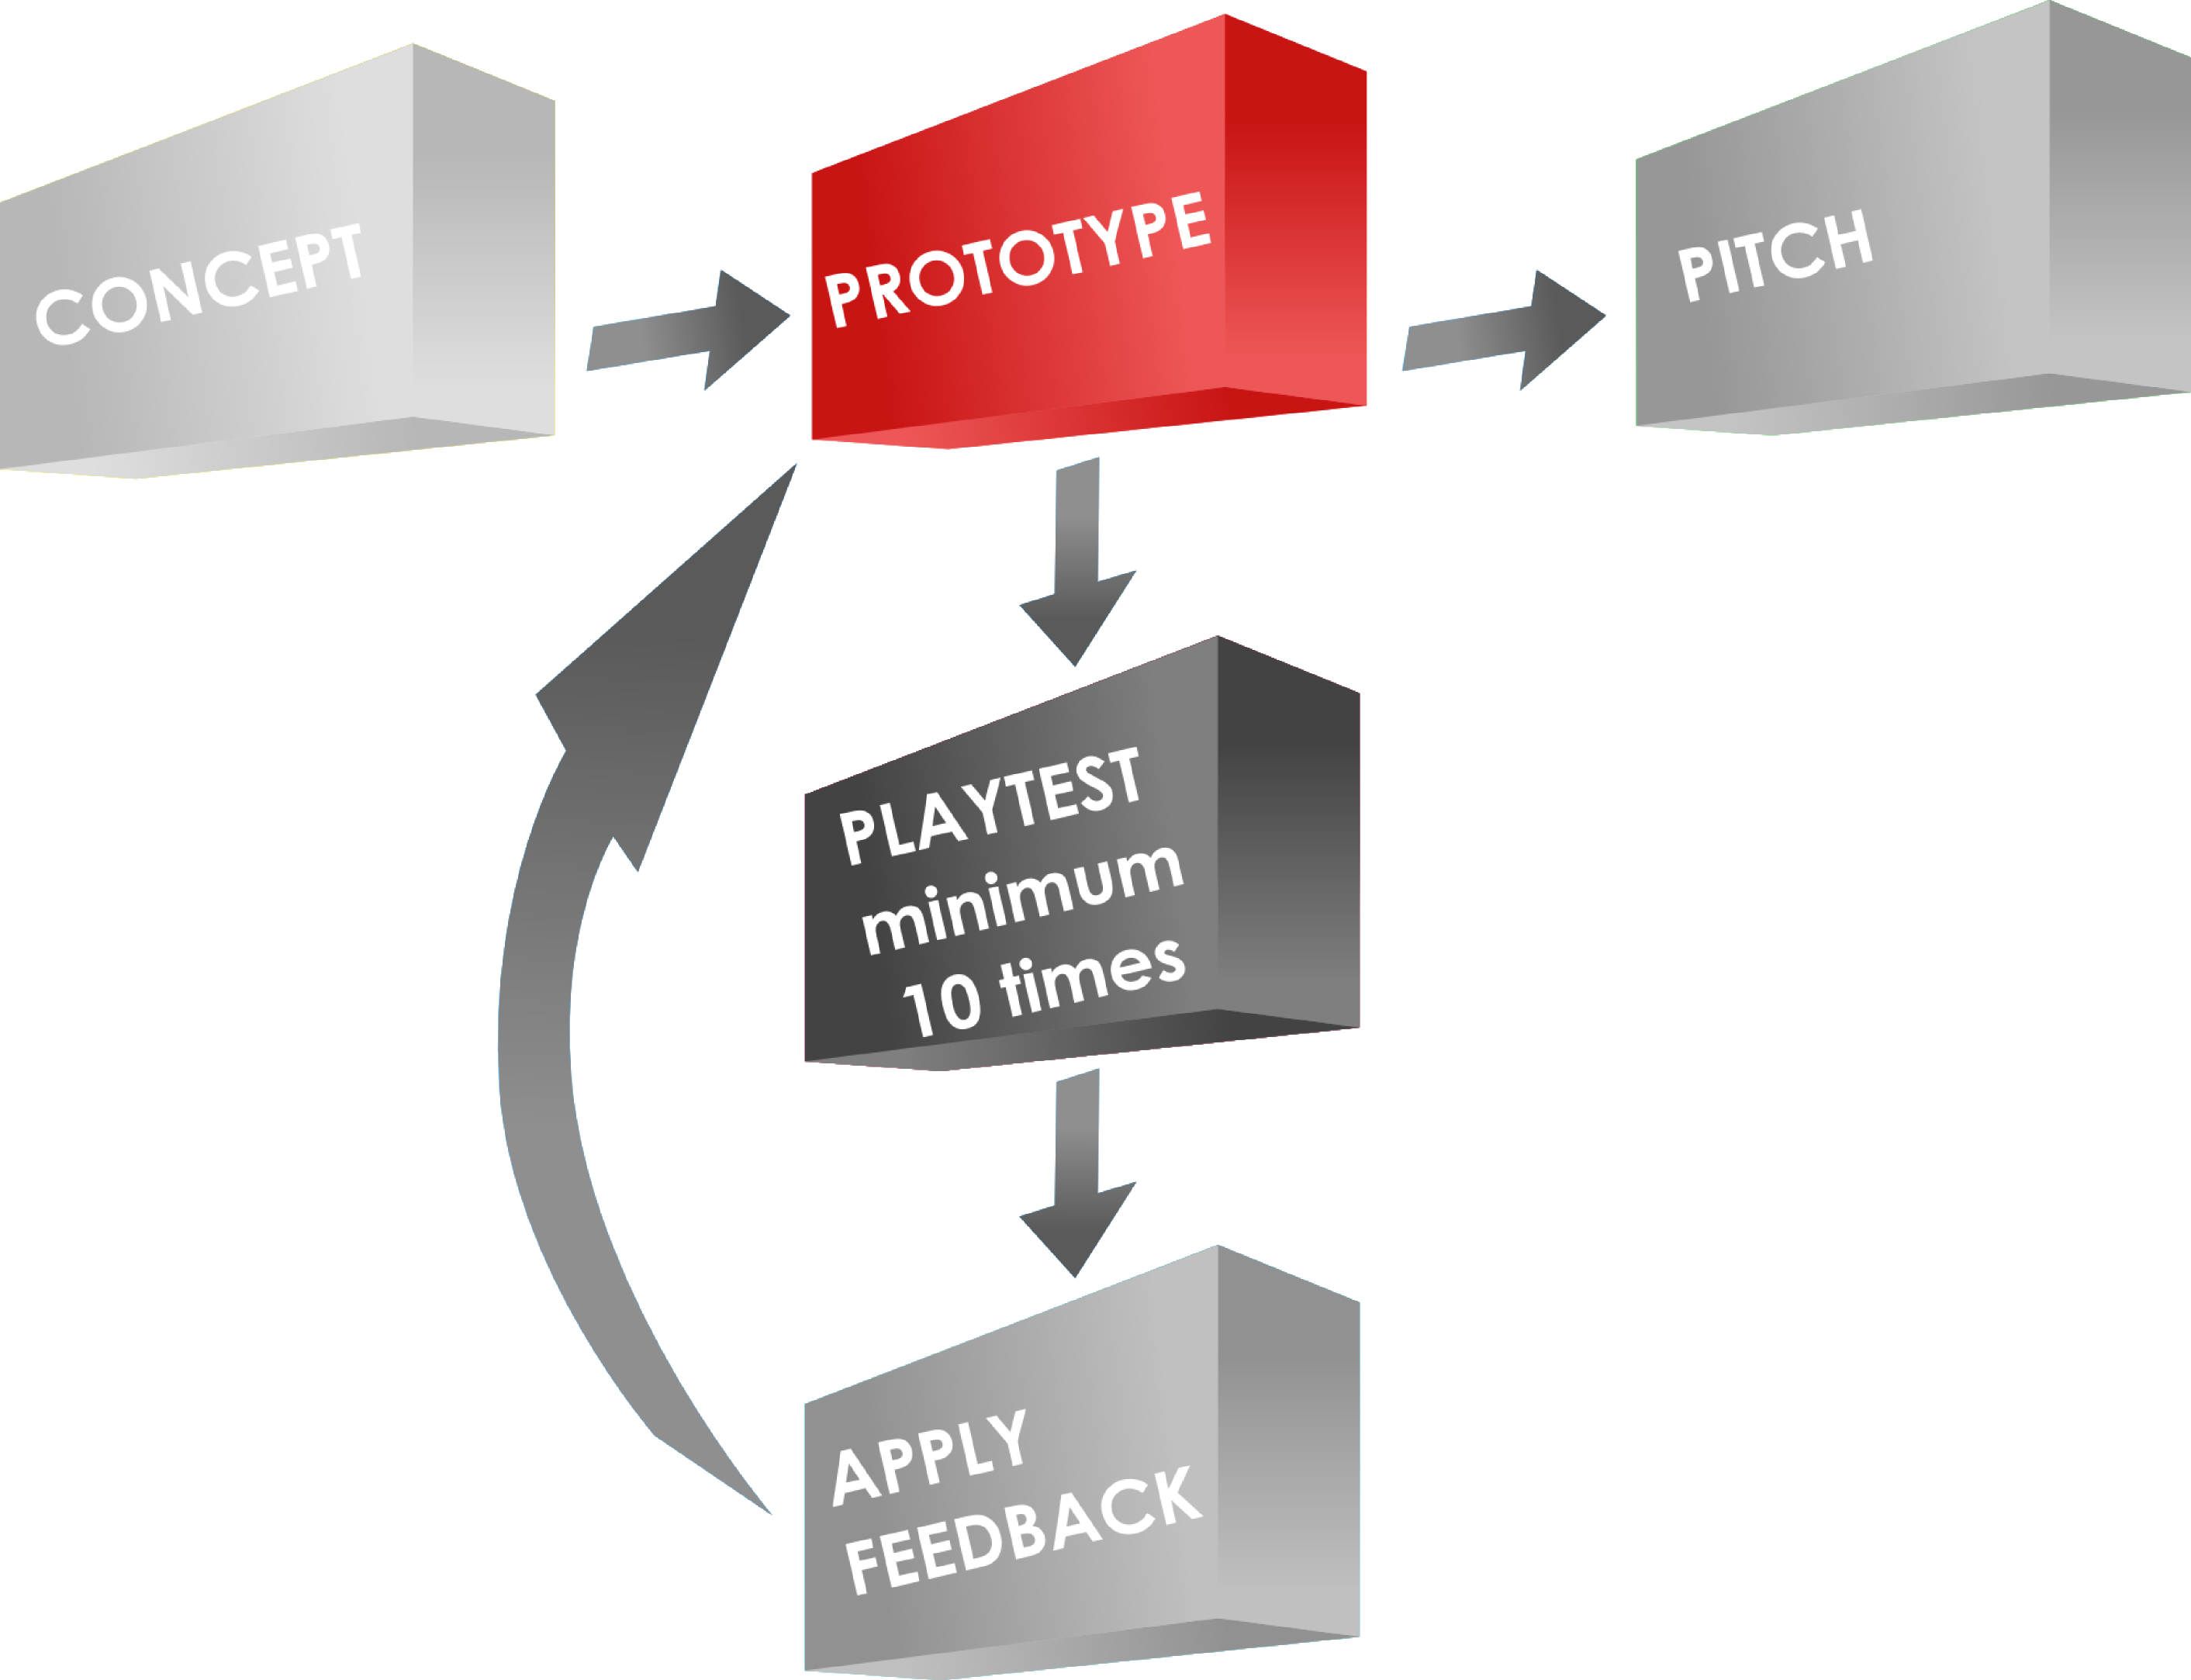
In the playtests that I’ve run so far it seems like it is VERY slow to develop. Players don’t seem to be incentivized enough to build the towers. And the whole point of the game is to build the bridge. SO I needed to come up with a better way to incentivize the actual building of the bridge. I think I figured that out last week. I’ve got a much better system in place that I’m hoping to try this week. Instead of having scoring bonuses for “area majority” in each section of the bridge I am switching it to physical rewards like an extra brick, money, or perhaps an advance token. This will also make the game move along more quickly. People will build. People will earn rewards. Rewards will help people build faster. And so on.
Hopefully I can revise my prototype this week and get it to the table.
And then I also hope I can work on Armada Galactica. I think this game has a potentially larger audience and it would be fun to design an awesome space-themed game. I’ll keep you posted.
***
So those are the very few Boards & Barley I enjoyed last week. What did you enjoy?
Prototype Art: Alignment in Inkscape
 I use Inkscape for all of my game design artwork. It is relatively easy to use and is vector based, so I can make things larger or smaller as needed without any loss in picture quality.
I’ve done a couple other Inkscape tutorials about game design artwork. You can check those out:
Today I want to focus on one specific tool within Inkscape: Alignment.
If you don’t have the software, you can download it from their website: inkscape.org.
Let’s Line Things Up!
The tool I find I use the most within Inkscape is the alignment tool. I use it for every piece of artwork or graphic design that I make in Inkscape.
When you are working in Inkscape and desire to line things up, look for this icon: 
Clicking that will open the Alignment options, which will look like this:

Control Panel of Alignment
Let’s run down what those options are. Here is a new version of that image:

Instead of running through each of those things listed above I am going to provide a couple examples. At the end of this article you will find a the Inkscape file that I used for these examples. Feel free to download it and use it to get familiar with the alignment tools.
Anchors Away!
When aligning things the most important thing is understanding which object is the anchor. The anchor is the object that will not move when the command is applied. You can choose the anchor with the options from the “RELATIVE TO” box at the top, which are the following options:
- Last Selected
- First Selected
- Biggest Object
- Smallest Object
- Page
- Drawing
- Selection
The three that I use the most are “Last Selected,” “First Selected,” and “Page.”
When selecting multiple items, if you chose the anchor last, then you should set RELATIVE TO to “Last Selected.” That way when you choose the alignment function, the anchor will appropriately stay put and the other objects will move.
Likewise, the “First Selected” option will cause the anchor to be the first object you select. Both of these options are nice because you can make sure you’ll know which object won’t be moving.
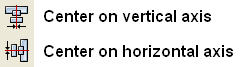
Using the “Page” option will align things with the page. The Page is represented by the black box in the middle of the canvas when opening a new document. I use this a ton when designing artwork for cards since it allows me to center things on the page. This one can come in very handy. You can align things to the center of the page by using these two alignment functions:
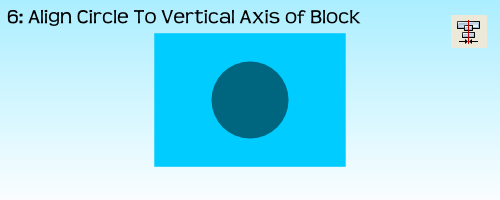
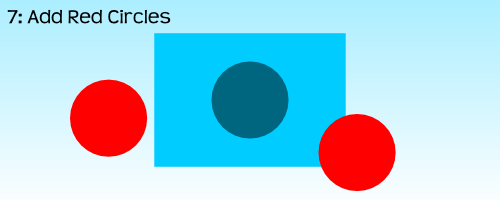
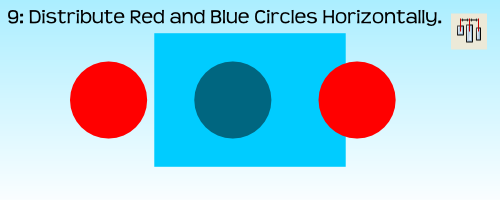
Alignment Examples
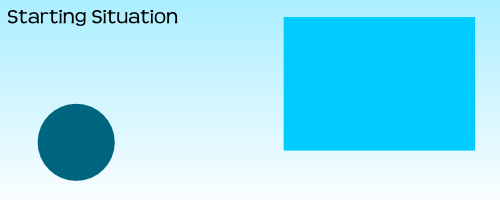
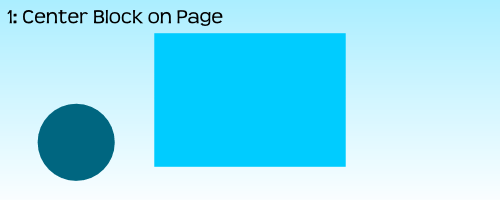
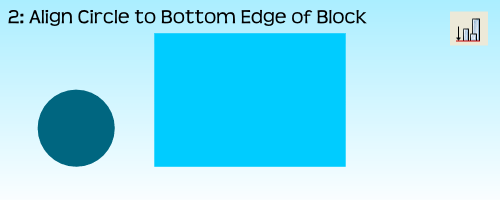
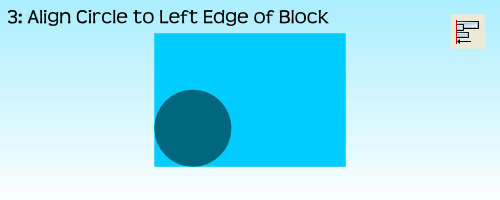
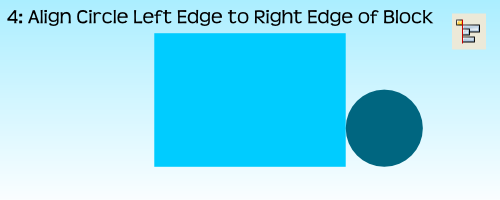
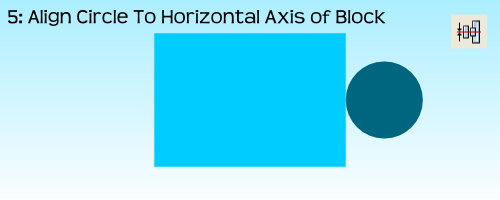
I’m going to use a circle and a block and show you how several of the functions work. After centering the block on the page I’ll be using the block as the anchor for the remaining alignments.

 For the very last example, step 10, I had to use the “Treat Selection As Group” option. If I had not used it the result would have been to stack all three circles on the vertical axis of the block:
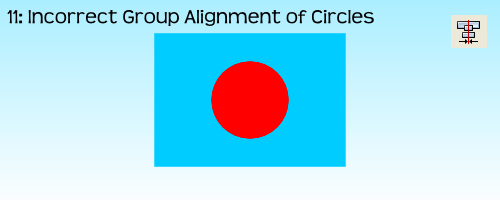
By treating the three circles as a group it allows for the whole group to be aligned without adjusting the relative locations of the objects in the group. Often I’ll just group objects myself before aligning them and then ungrouping them after the alignment. But feel free to do it however you like.
That’s Basically It
I have found that these alignment tools are very useful when making prototype artwork for my game designs. It allows you to consistently place things in the same spots. It allows you to make things line up correctly. And it allows Inkscape to help design your awesomeness!
Here is the file: BoardsAndBarleyAlignmentExample.svg
It is located in Google Drive and to get it to work you’ll have to download it. Please let me know if you have any questions. Thanks for reading.
Monday Brews 4-14-14
Happy Monday everyone. I hope all of you that attended PAX East of the Gathering of Friends had a great time. I attended neither, babysat Saturday evening, and played one game all weekend. But that’s okay.
Today is Monday so I present you with me recap of the Boards & Barley I enjoyed last week:
The Barley:
 BARLEY SPOTLIGHT: Wisconsin Brewing Co. Porter
I enjoyed this Porter at a dinner on Sunday evening with my wife for her birthday. The Porter is from the still new Wisconsin Brewing Co. I found it to be a very nice porter with characteristics one would expect from a porter. I would drink it again as it was easy to drink and enjoyable to taste.
They recently brewed a coffee porter that is only available on tap. I would definitely like to try it since I enjoy coffee flavored/infused brews.
- NEW! Founder’s Porter – I enjoyed this porter during Board Game Night. Not too much to say about it. It was decent.
- NEW! Saint Francis Gluttony – From a Milwaukee brewery that names their beers after the seven deadly sins. This was their Maibock. It was okay. I found it a little too sweet and not “Spring” enough.
- NEW! Penn Pilsner – It’s been a while since I had a straight up pilsner. This tasted like a pilsner, smelled like a pilsner, and was pilsner through and through. Yet I enjoyed it.
- Central Waters Mudpuppy Porter
- New Glarus Spotted Cow
The Boards:
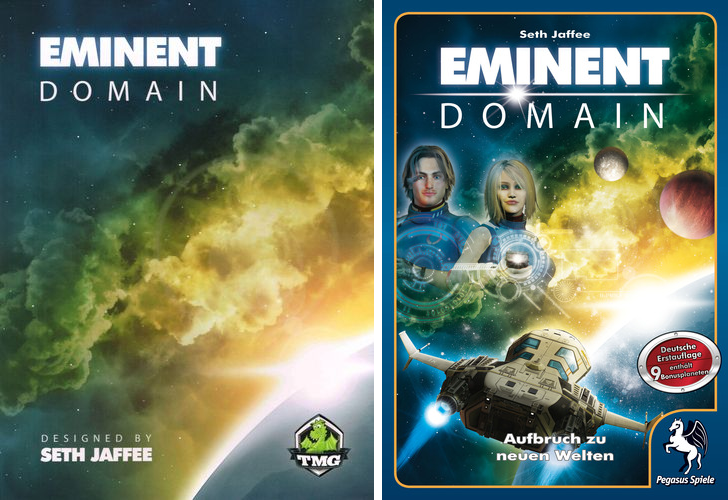
US (Awesome) and German (Ugh) box covers.
BOARDS SPOTLIGHT: Eminent Domain
Eminent Domain has become my favorite deck builder. That’s probably due to the deck building portion being subtle. There are planets to colonize or attack. There are new planets to survey. There are new for of research to develop. There are so many awesome elements in Eminent Domain that the deck building portion is somewhat of a side thought. But that’s not to say you don’t need to consider how you build your deck.
For those who are sick of Dominion and don’t like the theme of Trains, I highly recommend Eminent Domain!
- Unpublished Prototype
- Dungeon Roll
Designer’s Corner:
The only design efforts I completed last week were from the Design Me article where I designed a new tile placement via dexterity game called ManHunt.
This week I hope to compile and balance the abilities in Brooklyn Bridge as well as make some modifications to how the Tower is built. These will make the game more “Euro” in style, which I am fine with.
I also have the necessary components to prototype Manhunt, which I just might do.
So those are the Boards, Barley, and Design Efforts I enjoyed last week. What did you enjoy?
Design Me: Manhunt
It’s Friday and I haven’t exercised my brain lately. So today I am doing a Design Me challenge.
Design Me challenges are all about exercising your brain. Like soccer players need to practice when not playing games, so I believe designers should practice their design skills. A Design Me challenge is a great way to exercise your designer mind. So let’s exercise our minds using this combination of theme, mechanics, and victory condition from Boardgamizer:
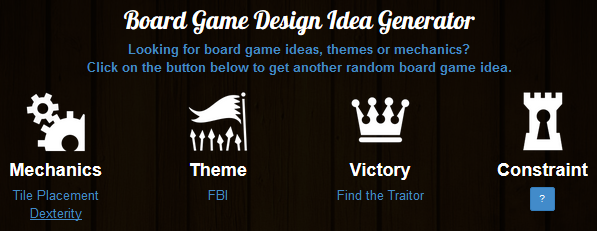
FBI tile placement with a dexterity aspect! Piece of cake!
If you have never checked out Boardgamizer, go do so right now! You just might be inspired for your next awesome game design.
MANHUNT
Manhunt is a tile (card) placement dexterity game for 2 to who knows how many players. Let’s say 8. So 2-8 players. Each player is given an objective card at the beginning of the game. On each card are two goals. The first player to complete both goals will win this fast-paced fun and interactive game!
Components
This game has very few components. They are:
- 8 Objective Tiles
- 46 City Tiles of varying terrain
- Manhunt tokens
- Objective tokens
- Rulebook
How To Play
 Deal each player one Objective tile. This represents that player’s victory condition. Shuffle the City deck and place it face down near the edge of the table. Flip one tile face up and place it in the center of the table. Then flip two more tiles and place them face up next to the deck.
On your turn you will either choose one of the two face up tiles OR you will draw a tile off the top of the deck. Then you will flip, drop, toss, or whatever you need to do to get the tile onto the table. However, you simply cannot place the card on the table.
No matter where the tile lands it becomes part of the city.
Of course you will want to try to do certain things. Let’s look at the tiles and then discuss some strategy:
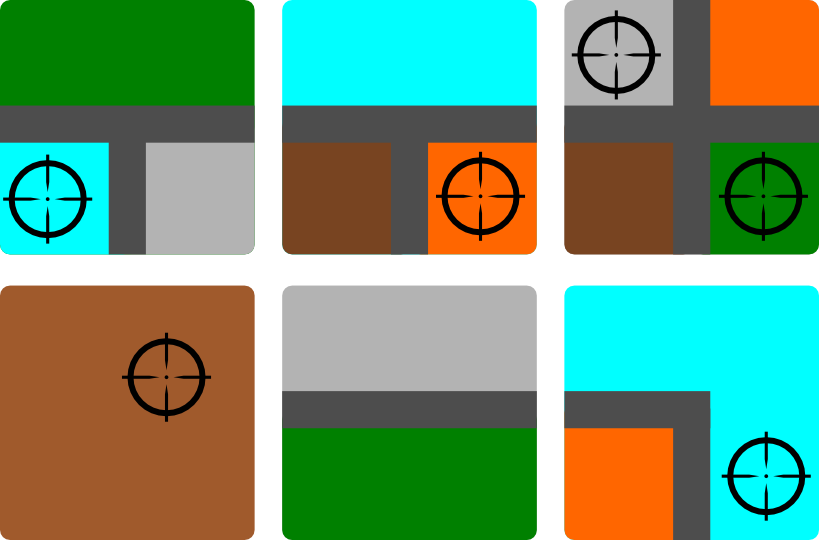
Some sample tiles. The lines that separate the colors represent roads.
Some of the objectives require you to earn Manhunt tokens. To earn a Manhunt token you you to get your tile to cover up a cross-hairs icon. For each icon that you cover you will earn 1 Manhunt token.
Some of the objectives require grouping colors together. So if you can get a group of four brown city sections together then you might meet your objective.
Some objectives could be to get roads together. If you can get three road sections to line up you might meet your objective.
When you complete an objective you should take an Objective token and place it onto your objective tile to indicate that the objective has been met.
So using roads, city sections, and cross-hair symbols you can have a slew of different objectives to meet. The first player who can meet their objectives from their tile will be the winner.
Design Thoughts?
I have successfully exercised my mind and created a tile placement dexterity game that I think could be a fun 10-15 minute filler. I have not played Jason Tagmire’s Maximum Throwdown but I imagine this is similar to that. Sorry, Jason, if this is a rip-off of that. Or I suppose this is similar to FlowerFall. If you think a game like this could be fun, then I suggest you check out Maximum Throwdown or FlowerFall.
Thanks for reading and don’t forget to exercise you designer mind!
