Blog Archives
Impossible!
No, the title doesn’t refer to your shock that there’s actually a new blog post on Boards & Barley. Instead it refers to a new abstract game design of mine.

Waterfall (1961). Photo Credit: mcescher.com.
When I was a child I found a small print of M.C. Escher’s Waterfall Lithograph in my dad’s at-home office. At first I thought it was kind of neat but after a few minutes I realized how truly awesome the artwork was. There is an impossibility in the physical concepts of a waterfall flowing uphill. But yet this artwork makes it actually appear possible.
M.C. Escher has long been an inspiration of mine. I love trying to wrap my mind around the 2D artwork that portrays 3D impossibilities.
So I decided to make an abstract tile placement game around that concept. It is based on an impossibility that occurs in the waterfall lithograph. That impossibility is known as the Penrose Triangle. While I’m not using it exactly, I am using the fundamental idea of the Penrose triangle. I’ll show you below.
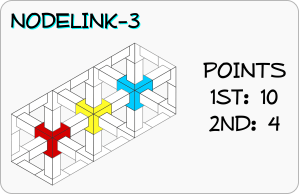
But first, because I have an illness where I must create a logo for any game design I am working on, here is the prototype logo:
![]()
The game is currently still in the concept phase. I have been trying to work out some “Euro-y” type scoring conditions but I’ll have to playtest it before I decide if they should be public goals or private goals, or a combination of both.
Here is an example scoring condition:
If players build a nodelink matching these colors then they will earn the points shown on the card. The first player to build such a nodelink would earn the 4 points while the second player would earn 4 points.
I currently have a bunch of different scoring conditions based on the nodes that will be built during the game. I’m looking forward to playtesting it and figuring out some of the balance about these cards.
The basic gameplay is simple. It’s sort of a mix between Carcassonne and Qwirkle. Players will play 1 tile anywhere that it fits onto the board. Nodes will be built up this way. Once a node is completed, it’s color is determined by whichever color is of a majority at the node.
There will also be one-time use bonuses that allow players to play more than one tile at a time. These should allow for players to make awesome moves in the game and have rewarding moments. My hope is that it also allows for some “take-that” type action where you can mess with something that other players are working on.
That’s the current status of Impossible. I will be bringing the prototype to Gen Con and I’m hoping to get it in front of some people. Thanks for reading and let me know if you have any questions.
Ziggurat: Building the Game
I designed Ziggurat the Thursday evening before Prototspiel-Madison in October. I prototyped it the Friday of Protospiel. It was played four times during Protospiel. And I am finally putting together the pieces to turn it into an awesome game!
So today I want to share a little bit about the game and the basics of how it plays. But first here’s a history lesson:
What is a Ziggurat?

Ziggurats are like the Sumerian equivalent of Egyptian pyramids. They are basically a huge brick structure with several levels. They served as the focal point of worship in those ancient cultures. Often it is believed that a temple was built atop the ziggurats.
And since I’d rather focus on the game rather than the history, here’s the Wikipedia link: Ziggurat
The Game…
The thrust of the game revolves around building the Ziggurat. As the design currently stands you have two options on your turn:
- Purchase resources (bricks, laborers, special abilities) from the courtyard marketplace.
- Spend bricks and laborers to build the Ziggurat.
One of my design goals is to come up with games that are accessible and easy to teach. Ziggurat is like that. The simplicity of limiting what actions can be taken makes the game accessible for non-gamers.
The region of interest, in terms of adding strategy, is to design compelling and interesting decisions into those two options. For example, when purchasing from the courtyard market, would you be willing to pay a higher price for a better card? Also, when building the Ziggurat, does the location where you are building matter?
These are the sorts of things I’m trying to design into Ziggurat. Let’s take a look at the prototype.
The Prototype…
I had previously obtained some components from The Game Crafter at a prior Protospiel event. It turns out that the components I had worked perfectly for what I wanted to achieve with Ziggurat. Here is a first look at the bare prototype:
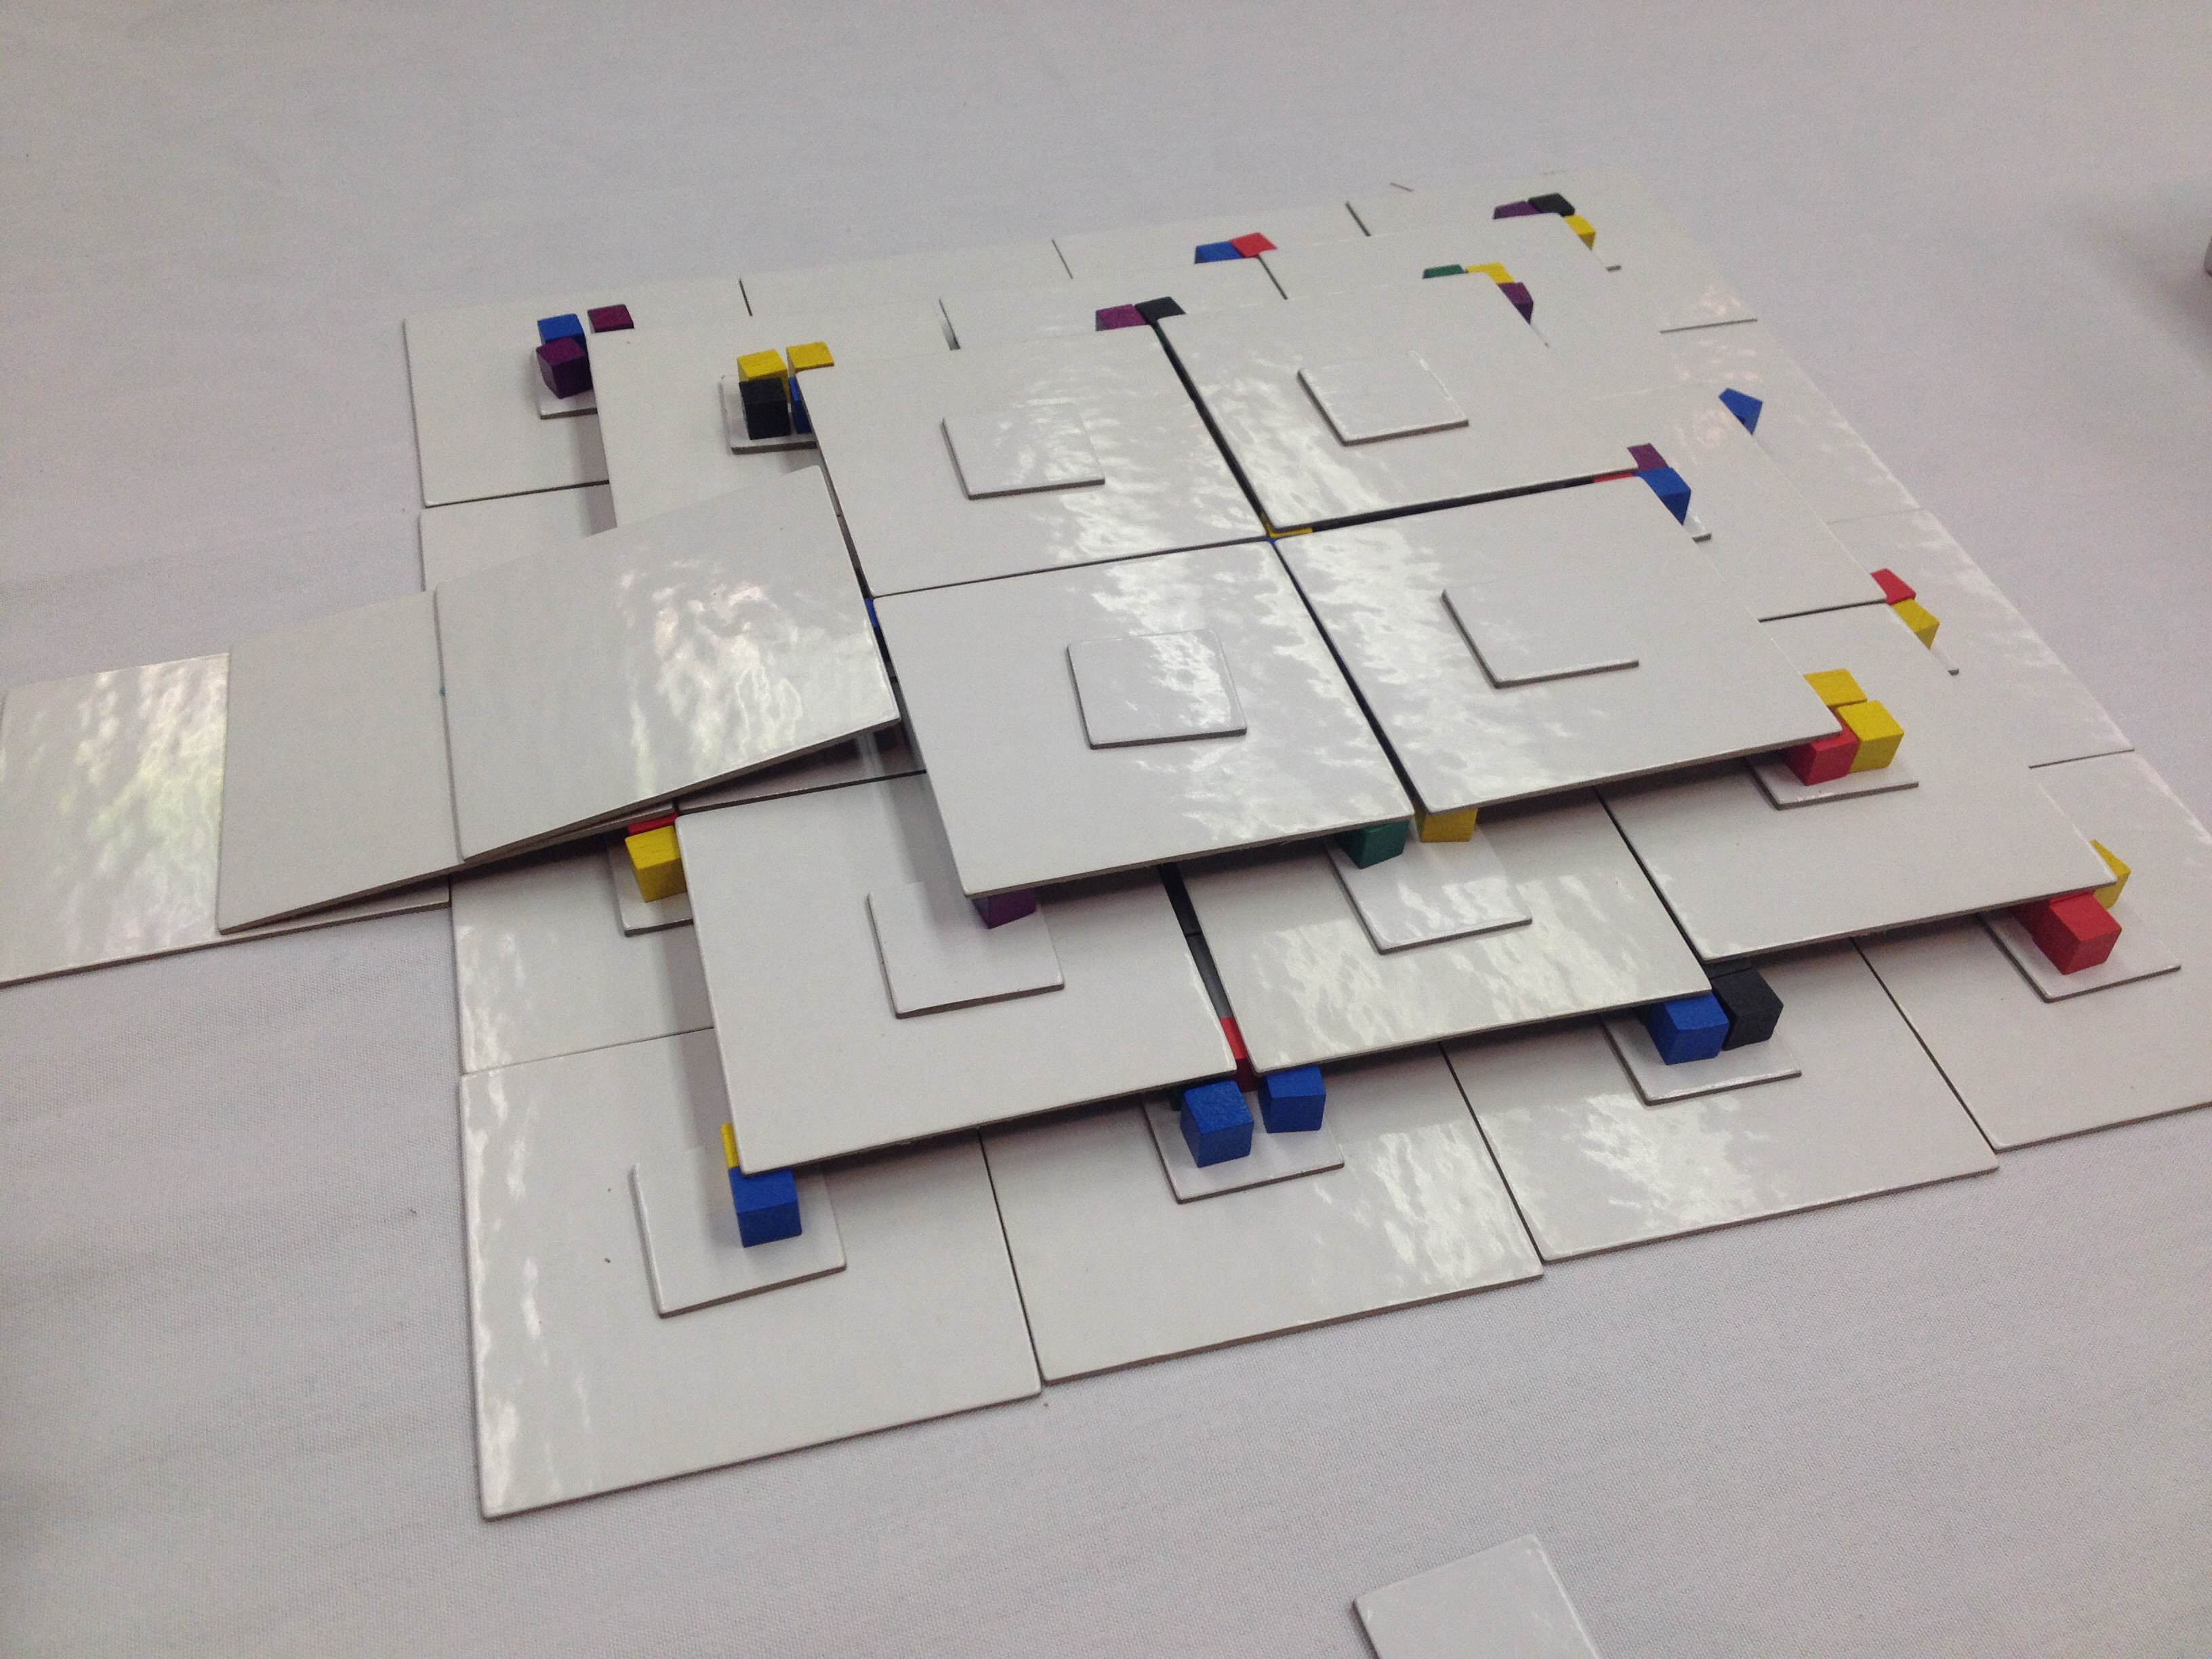
Bare bones prototype demonstrating the 3D nature of the game.
The Ziggurat is composed of three levels. On each level there are platforms that need to be built. Players will build the platforms by spending the appropriate resource and then placing one of their player cubes onto the platform. Once the first level is completed it will be scored. Then the large square tiles for the second level will be placed on top of it. Here is a look at the Prototype with more details on the tiles and platforms.
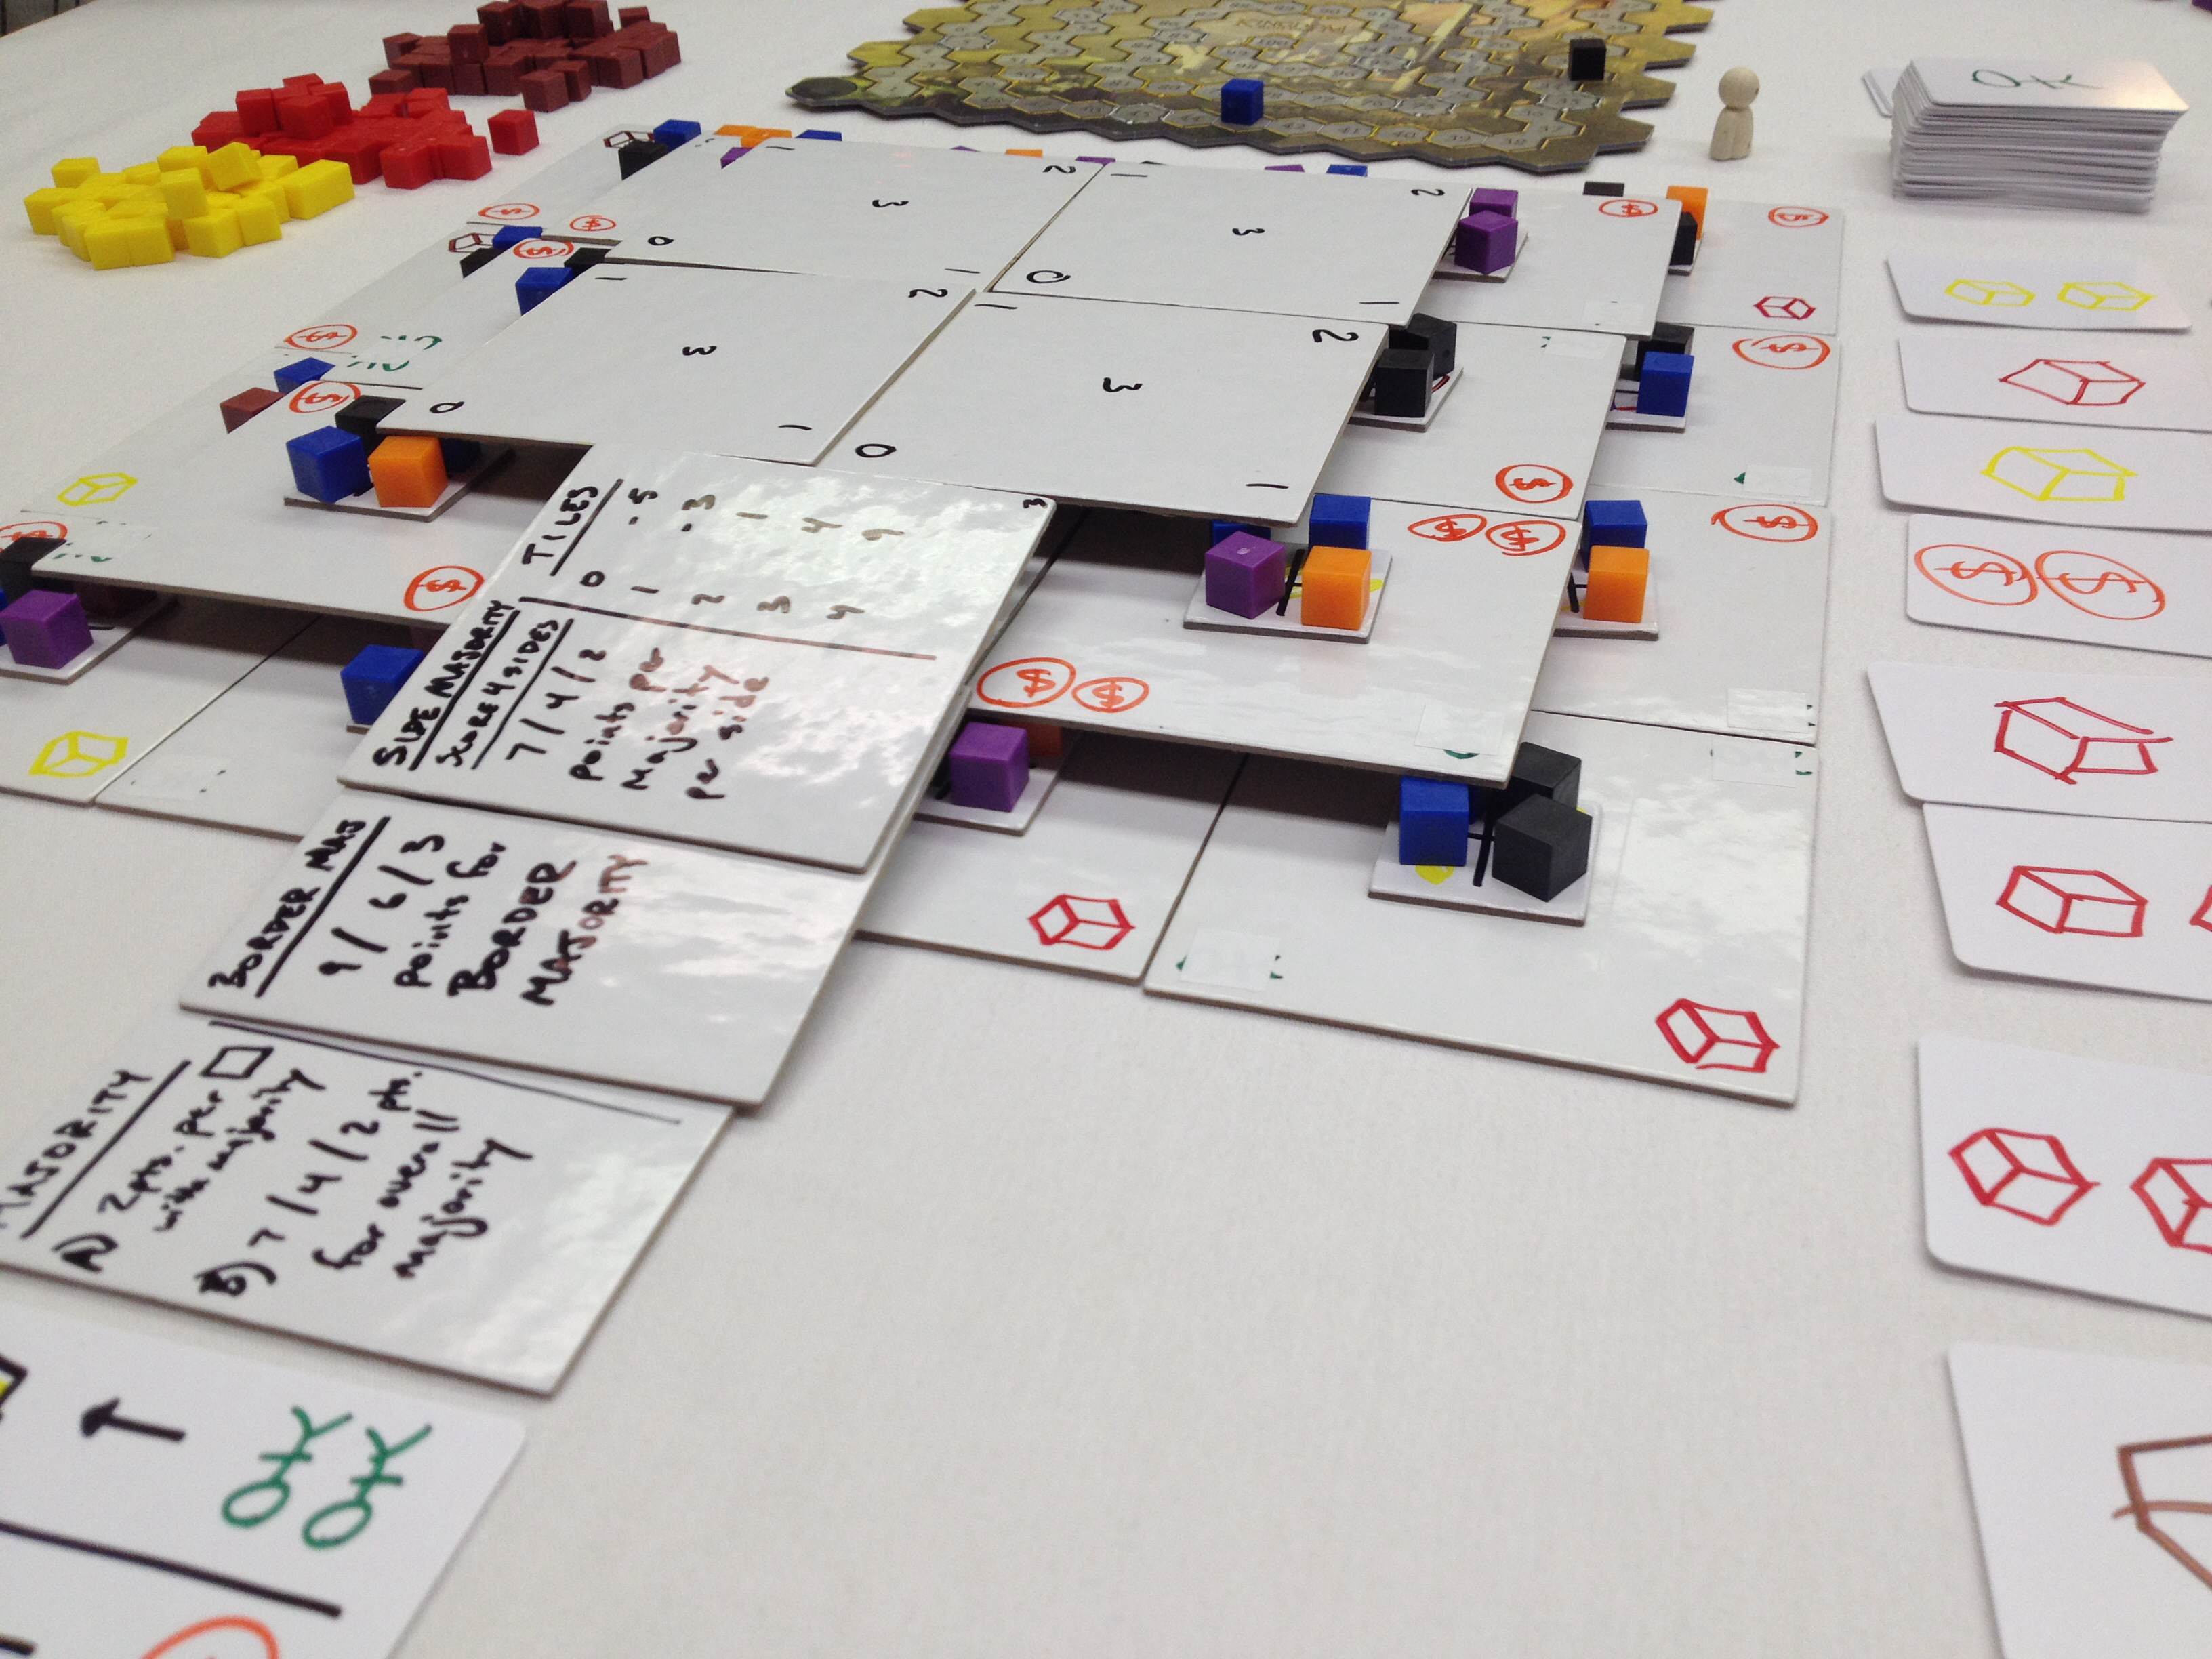
The Ramp lists what the scoring conditions are for the current game.
One thing of great importance in the game are the platforms. Each platform requires 4 cubes. When any given platform is completed, each player who helped build the platform will earn some reward. The rewards available are shown on the corners of the tiles. This is a way to ramp things up in the game and loosen the tightness of the resources. It also incentivizes building, which is the whole idea of the game.
Here’s another picture of Ziggurat at the end of a Protospiel playtest:
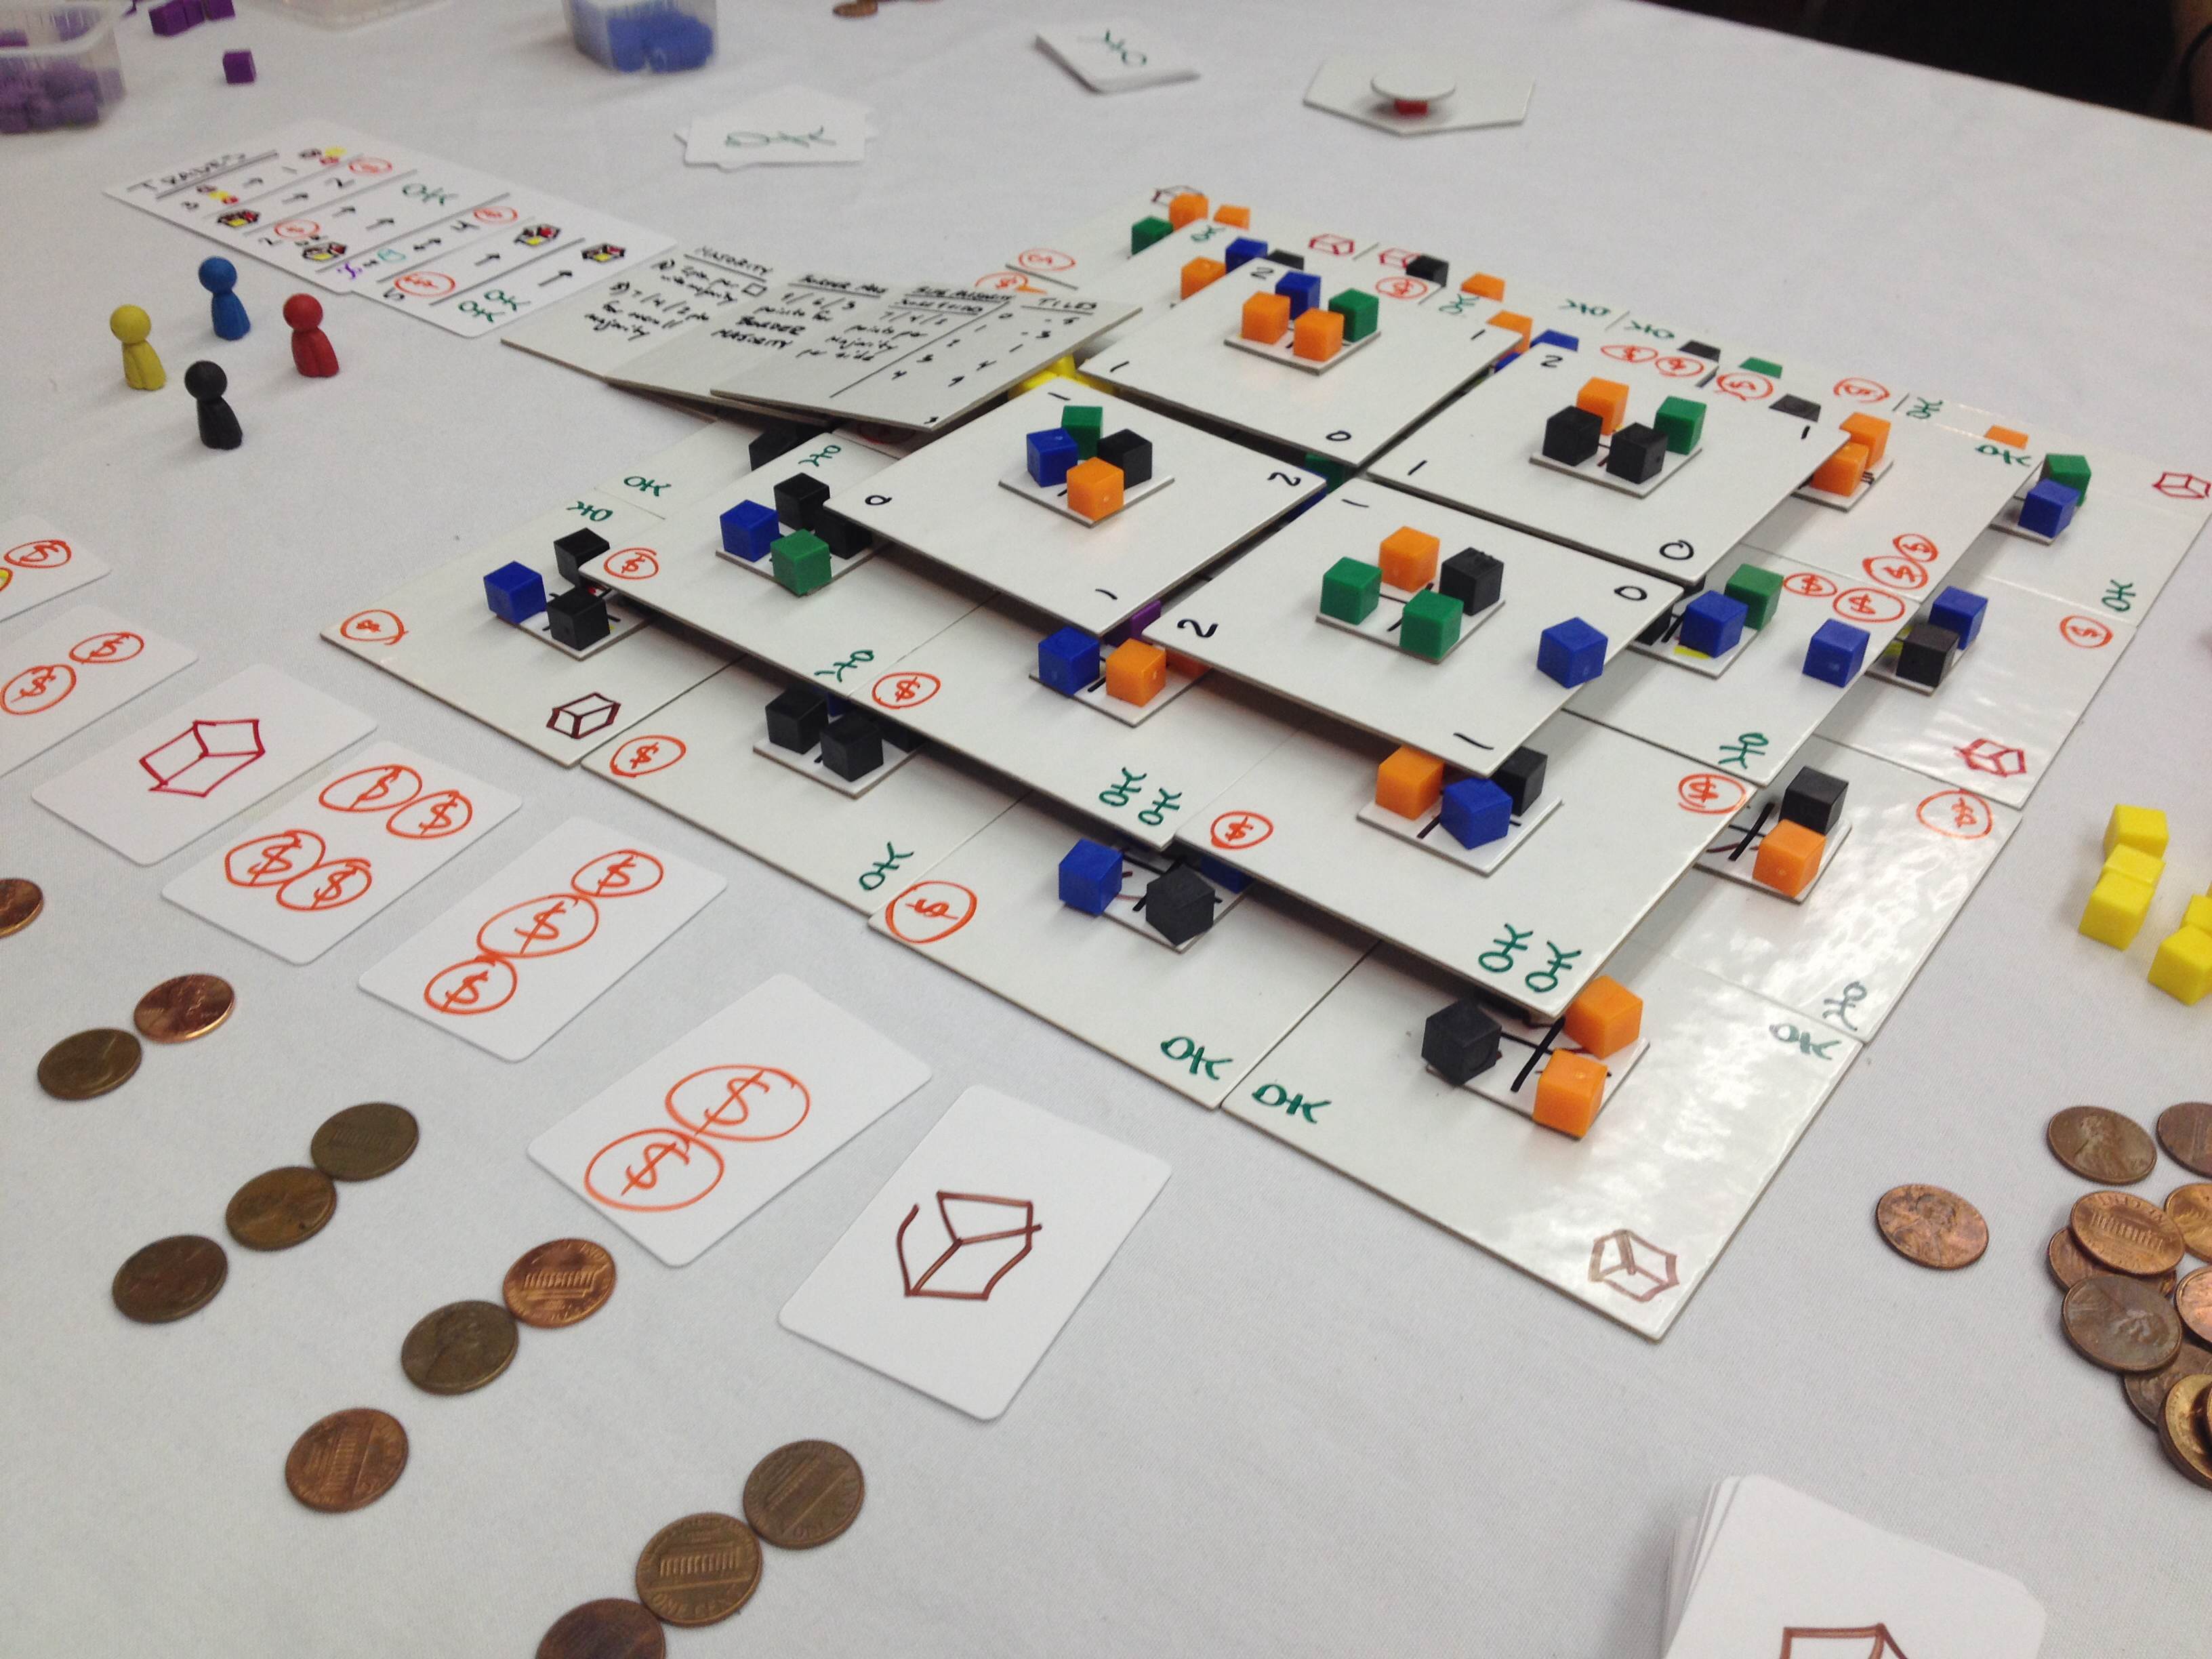
Ziggurat Completed! Time for final scoring.
In the bottom left of the image above you can see the courtyard market. In the current version of the game there are six cards in the market. Players may purchase up to two cards. The card at the end costs zero and the costs ramp up as 1, 1, 2, 3, 4. The image has different costs, which I have since adjusted.
The Latest Prototype…
I’m a sucker for creating decent looking artwork and graphics. I use Inkscape, which I recommend. I mocked up some cards and placed an order with TheGameCrafter.com. Here’s what they look like:

Each card represents a laborer OR the resources on the back.
With a deck made I decided it was time to upgrade the tiles and platforms as well. So I did. Here’s the final result which shows the current state of the game:
Not too shabby, for a prototype!
I have some big plans for the game. I want it to be slightly less singular in terms of your goals so I’ll be adding a few other paths to victory. But I solidly enjoy the game as it is.
Feel free to ask any questions. I’m excited to hear what people think and I’m just as excited about the future of the game. This one feels like Scoville did when I designed that. I think there’s a lot of potential here. Thanks for reading!
Sourcing Board Game Components: Cards
 This is the first in a series of articles that are meant to help aspiring designers and published designers alike. The goal of these articles is to simply list some of the sources for different components that we designers like to use in our game prototypes. While I have not used all of these different sources, I’ve done my research and feel confident that you’ll receive a decent quality production from any of these sources.
Today’s post is about sourcing cards for your prototypes. But over the next few Thursdays I’ll be posting articles about other components:
- Meeples
- Chits
- Dice
They won’t be dreadfully exciting articles, but I hope they can help you out as your on your way toward a high quality prototype. But first, my inspiration comes from this post:
That is a way better list than I’m going to make. But my sources seem to be some of the more mainstream sources. If there are component sources that you use, and like, that I have not mentioned in these articles, please let me know and I’d be happy to keep these articles up to date.
So let’s get to the sources I would use for cards… Note: The Game Crafter is my go-to source, and thus they are listed first.

The Game Crafter
![]() This is the one source that I have used. They have a large number of sizes available. They provide a template for each size. And overall I have never had any problems with my cards. They are not going to be the highest quality, linen finish, and all that, but they are great for putting together a quality prototype that you could feel confident pitching to a publisher.
This is the one source that I have used. They have a large number of sizes available. They provide a template for each size. And overall I have never had any problems with my cards. They are not going to be the highest quality, linen finish, and all that, but they are great for putting together a quality prototype that you could feel confident pitching to a publisher.
Here’s the details about sizing and pricing (click the link to go to the template page for each item):
| Printed Item | Cost Per Sheet | Cost Per Item | Items Per Sheet | Image Size (in pixels) | Finished Size (in inches) |
|---|---|---|---|---|---|
| Bridge Deck | $1.56 | $0.09 | 18 | 750×1125 | 2.25 x 3.5 |
| Business Deck | $1.89 | $0.09 | 21 | 675×1125 | 2.0 x 3.5 |
| Hex Deck | $2.29 | $0.19 | 12 | 1200×1050 | 3.75 x 3.25 |
| Jumbo Deck | $1.25 | $0.21 | 6 | 1125×1725 | 3.5 x 5.5 |
| Micro Deck | $3.99 | $0.07 | 56 | 450×600 | 1.25 x 1.75 |
| Mini Deck | $2.89 | $0.09 | 32 | 600×825 | 1.75 x 2.5 |
| Poker Deck | $1.56 | $0.09 | 18 | 825×1125 | 2.5 x 3.5 |
| Square Deck | $2.29 | $0.19 | 12 | 1125×1125 | 3.5 x 3.5 |
| Tarot Deck | $1.89 | $0.19 | 10 | 900×1500 | 2.75 x 4.75 |
When you upload files you can upload a bunch at once, or one at a time. When you are ready to have them printed, you’ll have to “proof” each one. When I order cards I usually go with the Mini Deck since you can get them for a pretty good price. They are also one of my favorite sizes for games in general. They are large enough to hold a lot of information, but small enough to not be a nuisance.
ARTSCOW
![]() My wife has used ArtsCow for a few scrapbooking things, so I can attest to the quality of those. However, I have not used ArtsCow for any cards. So take this for what it’s worth.
My wife has used ArtsCow for a few scrapbooking things, so I can attest to the quality of those. However, I have not used ArtsCow for any cards. So take this for what it’s worth.
On the ArtsCow page you can choose from custom playing cards, cards shaped like circles, and cards shaped like hearts. While ArtsCow doesn’t seem to have the game designer in mind with their products, I think people have had success with ordering customized cards.
The best option I’ve seen for custom double sided cards is the “Multi-Purpose Cards.” This seems like the best option for custom double sided cards from ArtsCow. They measure 2.5″ x 3.5″ and start at $10.99 for a 54 card deck, which seems quite high for 280 gsm matte paper. But like I mentioned, they don’t think like game designers.
Printer’s Studio
![]() I have not used Printer’s Studio for any cards, but I know people who have. Like ArtsCow most of their options for cards are decks of custom playing cards. But they do have a page for blank playing cards that can be fully customized as well.
I have not used Printer’s Studio for any cards, but I know people who have. Like ArtsCow most of their options for cards are decks of custom playing cards. But they do have a page for blank playing cards that can be fully customized as well.
Sizes include:
- Mini Size (1.75″ x 2.5″) starting at $4.39 for up to a 64 card deck
- Bridge Size (2.25″ x 3.5″) starting at $7.99 for up to a 54 card deck
- Poker Size (2.5″ x 3.5″) starting at $7.99 for up to a 54 card deck
- Tarot Size (2.75″ x 4.75″) starting at $1.89 for up to a 10 card deck
- Large Size (3.5″ x 5.75″) starting at $13.99 for up to a 54 card deck
Those prices seem a little high to me, but these are for 300 gsm card stock. Each card size also has an option for 310 gsm linen finish.

Print & Play Productions
 While I have not ordered cards from Print & Play, I have ordered hex chits. I was very pleased with their quality, so I would likely be pleased with the quality of the cards as well. But that’s not a guarantee.
Print & Play offers several sizes of blank or custom printed cards:
- 1.75″ x 2.5″ 270 gsm starting at $2.00 for 32 cards printed on both sides
- 1.75″ x 2.5″ 270 gsm starting at $2.25 for 78 blank cards
- 2.5″ x 3.5″ 270 gsm starting at $2.00 for 18 cards printed on both sides
- 2.5″ x 3.5″ 270 gsm starting at $2.00 for 52 blank cards
They also have an option for a letter size sheet of custom cards starting at $1.25 for double sided printing.
Other Sources: EAI / Amazon
If all you’re looking for is blank cards from which you can make a prototype, then perhaps EAI or Amazon is your best bet. Here are the details:
EAI: Single deck of 54 blank playing cards is currently $0.99 per deck (regular price = $1.55 per deck)
Amazon: 500 Blank cards for $13.50
***
So those are the sources that I am most familiar with for blank cards. The other option is to use something like nanDECK and create/print your own cards that you could then sleeve. I haven’t had much luck trying to use nanDECK, so good luck with that.
Please let me know if you use someone else. I’d love to add it to this list and make it more complete. Thanks for reading. I hope this list and the next three covering meeples, chits, and dice will be helpful to you as a designer!
Bonus Trading Post Post

My Trading Post Logos
Over the past four weeks I’ve been writing about a new game redesign of mine by the name of Trading Post. Since there has been a decent level of interest in the game concept I thought I’d write one more article about the game. So far I’ve covered the following:
- 5-16-13: Origins of Trading Post
- 5-23-13: Early Prototying
- 5-30-13: Hiatus and Re-design
- 6-6-13: Path to GenCon
- BONUS Today 6-13-13: More on Trading Post
Today I’m giving you some bonus material on where the game is at, how to make it better, and some other tasty morsels. But let’s start with how good I am at focusing on things other than actually designing this game!
I’m Good at Wasting Time (and Effort!)
One of my downfalls in life is my desire for perfection. Perhaps perfection is the wrong word. That paints me as someone with OCD, not that there’s anything wrong with that. Perhaps a better word would be aesthetics. I desire for things to look good.
At the end of May an article was posted on Example of Play called, “The Benefits of Crappy prototypes.” I will provide a rebuttal for that article next week, but I wanted to mention it today because I am not a believer in crappy prototypes. And this may be my downfall.
I love a good looking prototype. I love good game art. If you’ve read my board game reviews you’ll see that artwork is consistently mentioned as either a like or a dislike. I approach game design as though I’m reading a story. I like to be enveloped in a different world and escape this one for an hour or so. Artwork is a key way to get that experience across to the players.
What this means is that I spend way, WAY too much time in Inkscape making prototype artwork. The upside is this:
The downside is that I have four logos (as seen above) for a game that no one has yet even played! I just can’t help myself.
So I had a think about what this all really means. I was a little disappointed in myself for the artwork side of things when the game design part of it seemed lagging. But then I remembered the whole purpose:
Games, and game design, are supposed to be fun! Why else design games or play them?
So I’ve realized that though the artwork doesn’t specifically help a game design move forward, I’m having a lot of fun working on the artwork. Thus, I shall continue.
Solo “Playtest” #1
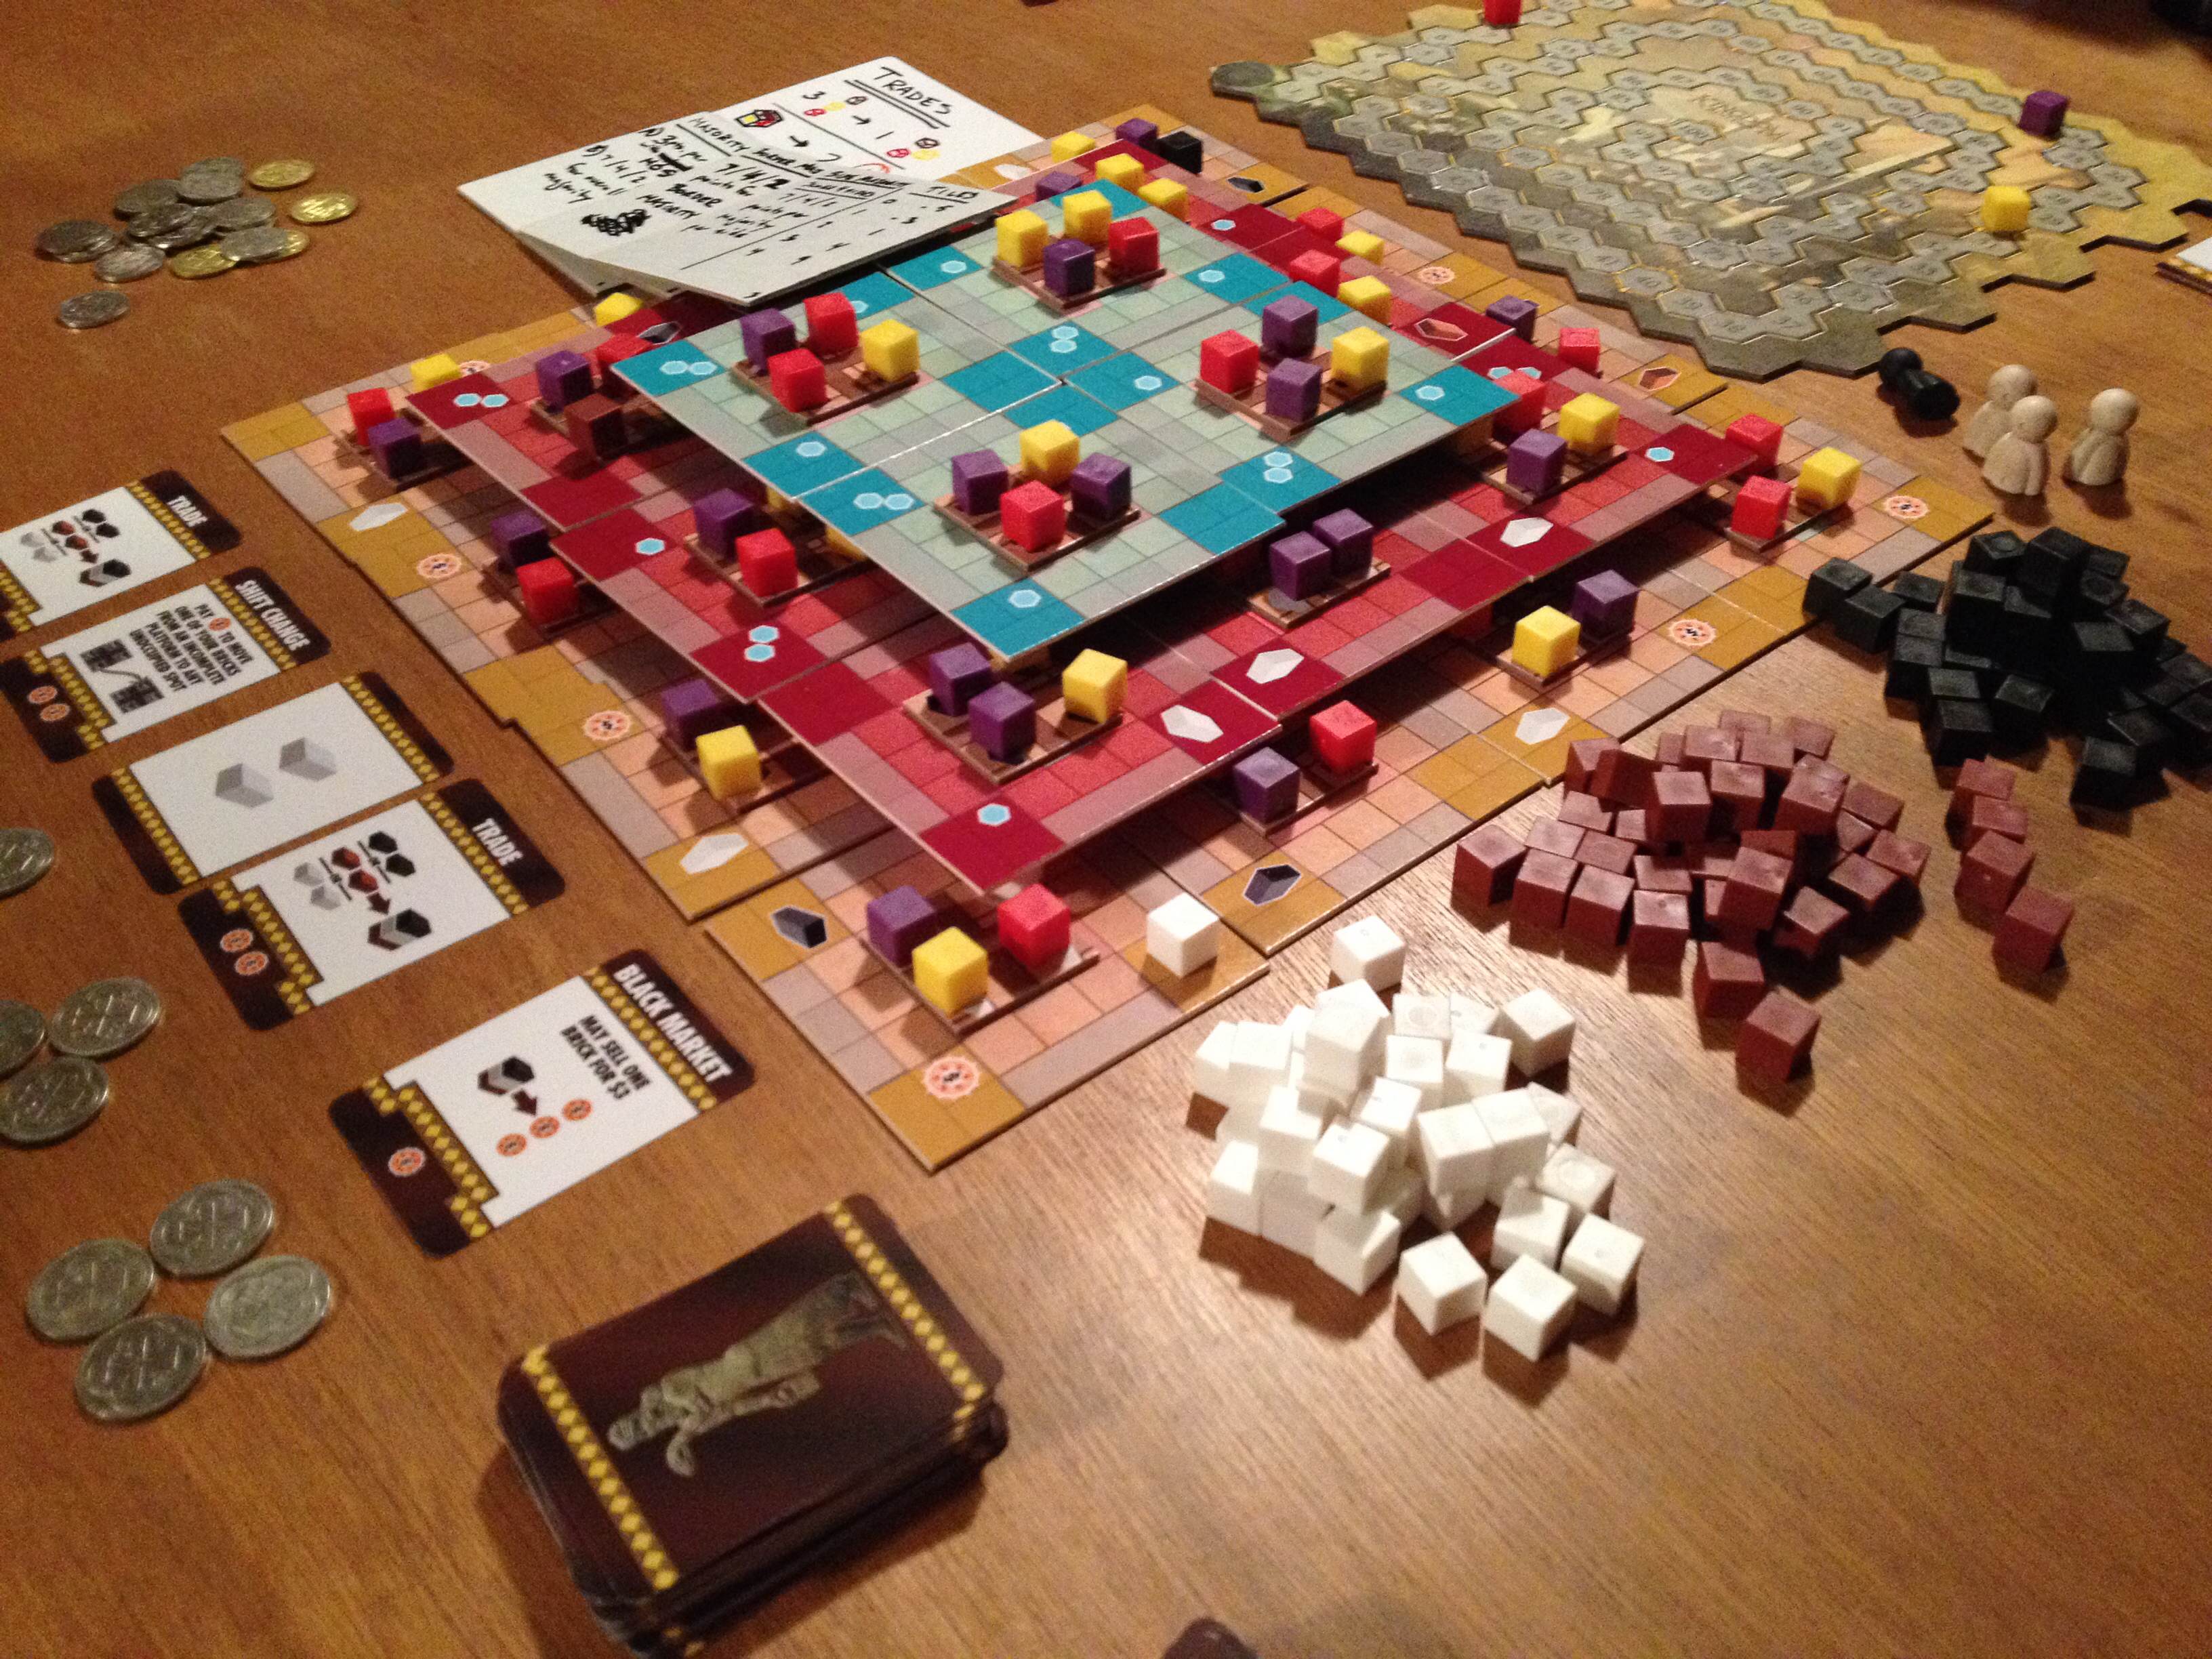
Last week I showed the picture of the game setup. I’m repeating the image here for easy reference:
Current Trading Post prototype. I think it at least looks cool!
Since this is an insight into the inner workings of my mind I am sharing the thoughts I wrote down while attempting to play the game for the first time.
First, some rules. On your turn you can take up to 3 actions. These can all be the same, or they can all be different. That’s up to you. The actions you can take are determined by the number of action points you have for each action. For example, if you had three points in the EXPLORE action track, then you could use all three actions on your turn to EXPLORE. After you have taken your 1, 2, or 3 actions, you must then move other action’s track cubes up in value. This is what I am calling a “Zero-Sum Action Point Allowance System.” (I would go with the acronym ZSAPAS, but I’m not going to use the term again in today’s article). Basically, for every action you take there is an equal an opposite reaction.
Here is a little game design nugget that you might enjoy:
During testing, if it seems like the first turn for all players is dictated, SKIP that first turn and make the result the new starting condition in the game.
What that means is that if all players have no choice (or only one beneficial choice) for what their first turn should be, fix it! Ever wonder why players start with 4 train cards in Ticket to Ride???
During the first solo playtest I made it 6 turns before I realized I wasn’t happy with the design. Here is the list of my chosen actions on this six turns:
- Explore/Harvest/Explore – Increased Fulfill/Trade/Trade
- Harvest – Increased Explore/Explore/Trade (I suppose you can always move up three action cubes – so much for “equal and opposite”)
- Explore/Explore/Trade – Increased Harvest/Harvest/Harvest
- Harvest/Harvest/Build (Stable) – Increased Explore/Explore/Explore
- Explore/Explore – Increased Harvest/Harvest/Harvest
- Harvest/Explore Quit.
After 6 turns I had been unable to fulfill any orders and I was only able to purchase one building. In Scoville players only have a total of about 7-10 turns. So after these 6 turns I realized that I have basically done nothing. At least nothing very fun. I need to adjust it so players feel a sense of accomplishment on each turn, or at least feel like they are setting themselves up for accomplishment soon.
Here are the notes I took at this point:
- Should the “Orders” be stacked? (What I meant here is that should the low level orders come out first, then the better ones, then the best, a la Power Grid Power Plants?)
- Should the highest valued Order card be replaced each turn that an order is not fulfilled?
- Should players always get to move their pawn 1 spot per turn without taking an action to do so? (Using the Explore action seemed critical and it was thus used very often. Then it had to be refreshed, so there were turns where I couldn’t move anywhere.)
- It takes too long to build even the basic buildings, which means it takes too long to get the man-made resources. How can this be sped up?
- Should players be able to complete a trade even if their pawn is not on a spot with another player or in the Trading Post (a la Settlers of Catan)?
- How do I make TRADING the focus?
That last point is a big one. Let’s talk about that…
Put the “Trading” in Trading Post!
Thus far in the design the trading aspect of the game has, for some lame reason or another, been the lesser focus of the design. I have always been more interested in the land exploration and development side of things. Why?
I don’t know. So I am going to switch over the focus of the game to actually put TRADING at the forefront. Sometimes I wonder how I get this far without realizing something so critical to the design. Which leads me to another game design nugget:
Designers should step back from their design every once in a while and pick apart every aspect. Ask yourself specific questions about each design decision and try to think if there is a better way!
One big example is when a level 1 friend pointed out that the black and white peppers in Scoville should cross-breed to silver/platinum/other grey color rather than gold. Color-wise it made sense. But since my original design was that they made gold I had simply stayed with it because I had never gone back and questioned why I did it that way. And I never asked myself if there was something better.
So the new thrust of the design for Trading Post is to bring trading to the forefront. Now I think that on every turn you will complete a trade at the start of your turn. This could then aid you when you choose your three actions for your turn. I’m imagining a “Trade Route” of trading cards on the table, which would still represent things the Trading Post needs. They could be set up like the races in Small World or the foraging trail in Morels or the buildings track in The Manhattan Project. In each of those games players can choose the first option(s) for free or pay to take one further done the path. This mechanic would work very well for the “Trade Route.” Or I could use a rondel for increased Euro-y awesomeness!
Another way that trading would become more integral, and increase player interaction at the same time, is to allow trading with other players no matter where you are located. Sometimes it’s easy to let thematic correctness run the show. But this is game design and we can fudge things now and then. Settlers of Catan is a very popular game that allows player to trade resources with other players no matter what. Now, explain thematically how that makes sense. What if your settlements and their settlements aren’t anywhere near each other on Catan? Well, if it’s good enough for Catan, then it’s good enough for this game!
The bottom line is that trading needs to be what makes this game special. If you want a game where exploration is the focus, then find some 18XX game.
How to Reboot…
A game is in there somewhere… I just have to find it!
So I am going to jump back a little and try to re-figure out how to play this game. Admittedly it wasn’t ever really set to begin with. But to make trading the focus will take some effort. I really think this can be a fun theme/game and so I will continue to work on it.
So it’s time to take some of the blank cards I ordered and put them to use. I’m excited to work on the Trade Route/Rondel idea and see how it changes the focus on the game.
Another thing I’ll probably change is that players should draw all their land from their set of ten land tiles as part of their setup. What this would do is drastically lower the exploration aspect of the game. Players would also be able to plan their moves more deeply and more intentionally. I like the sound of that.
Once I nail down how I want the trade route to work then I can put the pieces back together for how the rest of your turn would work. This should be pretty interesting and I’m going to take an open-source approach to this design. That means I’ll be posting about it for all of you to read. I hope to provide you with a designer’s perspective on making appropriate choices within the design process, and how to keep things simple. Trading Post posts likely won’t be weekly from here on out, but they will definitely pop up now and then as I work through stuff.
Thanks for reading and joining me on this ride!
Trading Post Part 3: Hiatus and Redesign
Redesigned Logo… Let’s just redesign everything!
I have a new game design I’m working on and today I am posting the third of 4 articles about it. This is the third article about the game from it’s creation to the present state. Here are the four articles in this series:
- 5-16-13: Origins of Trading Post
- 5-23-13: Early Prototying
- Today 5-30-13: Hiatus and Re-design
- 6-6-13: Path to GenCon
Today we’re looking at the current state of the game, and how I got there. In my opinion today’s article covers the most important details of game design. Let’s call it “distilling” and “skimming.” But first let’s look at why I took a break from the game.
The Hiatus, or “This game stinks… let’s take a break!”
 If you’ve read the past two articles on Trading Post then you’ve learned what I want the game to be like (week 1 – Origins), and you’ve learned how I don’t want to be (Week 2 – Early Prototyping). At its heart I want Trading Post to be a competitive game about exploration and development of a western Trading Post. I want the game to flow smoothly, create tense decisions, feel thematic, and be easy to teach/learn.
My previous version was none of those. I had spent a lot of time on this game. I thought I had something very thematic. But I realized that I had a big pile of garbage that didn’t work together. It had several things in it that felt like busywork rather than a game. And ultimately it was not any fun. That’s a huge problem. Remember that we are game designers and games are supposed to be fun!
So I decided to put Trading Post on the shelf. That must have been early in 2012. At the time it was a pretty easy decision because I really didn’t know how to move forward with the game. I could easily have abandoned the project overall.
During the hiatus I worked on a few other games. The most notable (at this point) was my card game Dam It! But I was working on another game with a level 1 friend. It used several of the same elements of Trading Post but in a more thematic and historical context. Ultimately I realized that Trading Post was a game I wanted to bring back. To resurrect.
So after having Scoville turn in to the PnP behemoth that it has I figured now would be a good time to try and bring back Trading Post from the dust in my basement.
A Fresh Start – Land Exploration
There were certain elements that I thought would be good to carry over from the first version of the game. And there were others that I knew I should ditch. I figured a good way to redesign the game would be to start with the elements I wanted and add from there. I could then completely ignore the bad things from version one.
My starting point was the land exploration portion of the game. I knew that this could be dramatically simplified. To get things more simple I decided that the game would have only four natural resources – Water, Lumber, Stone, and Gold. The previous version had more – Lumber, Grain, Animals, Fruit, Cotton, Steel/Iron, and Water. That was too many. And four would allow me to do what I want with the game.
So I set up a way to make things be as equal as possible, without forcing identical conditions on players. I devised a set of ten tiles that each player would have. Throughout the game, as they explore their territory, they would draw seven of the ten tiles. It was designed at that number so that no player would be without any of the resources. Here are the ten tiles from which each player draws when they explore:
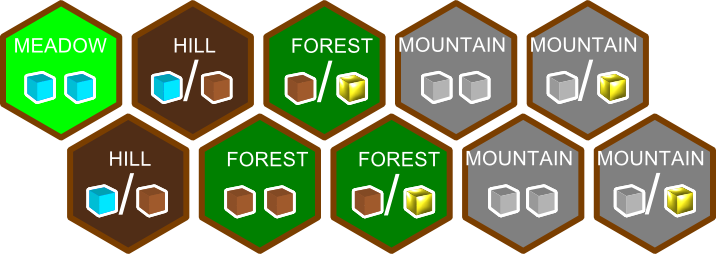
Each player has a set of these ten tiles, 7 of which will fill their territory.
Players will add these to their portion of land that the Trading Post has given them to explore. Each player starts with a Meadow (1 Water) and a Hill (One Water OR One Lumber).
With this design players will always have access to all of the resources. Sometimes players may end up with all four mountain tiles and thus a bunch of stone. Likewise players may end up with only one mountain tile and thus very little stone.
Here’s a look at the starting region for each player:

Each player starts with a meadow and a hill. Therefore they have access to water and lumber.
With the understanding that some players may have only one gold tile or stone tile while others may have four stone tiles or four gold tiles I knew that I’d have to design the game so that you can win under any of those conditions. That leads me to my next design element that has carried over from version 1… the buildings.
Building Buildings!?!
In the original version of the game the buildings only entered into the mix late in the game. They acted the same way as the Orders – that is, they came out four per year and you could fulfill them from the pool of face up cards. I didn’t like that.
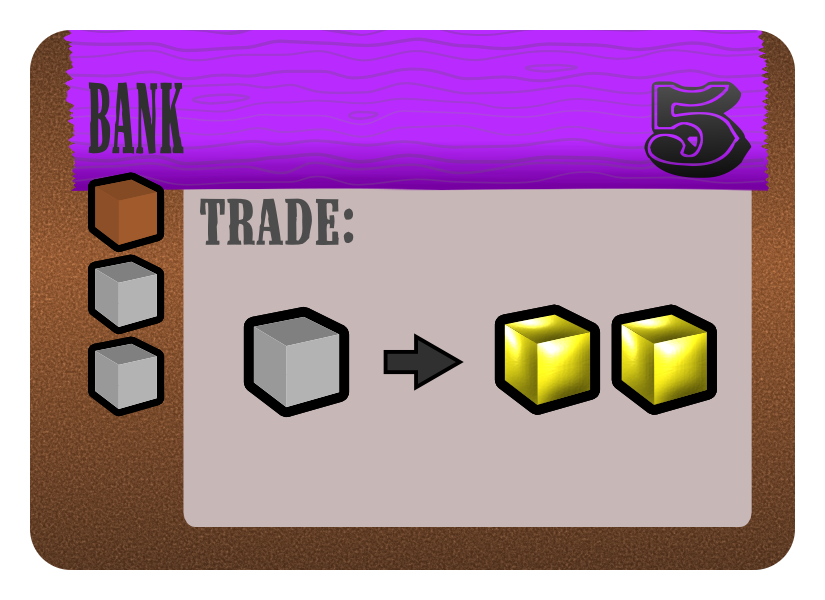
Bank costs 1 lumber and 2 stone. Can trade 1 stone for 2 gold. Builder earns 5 points when Bank is built.
So I decided to make buildings a more integrated part of the game by allowing them to be entered for some benefit to a player. Also, I decided that buildings should be available from the start of the game. Thematically the idea of building buildings is that you are developing the Trading Post so that it offers more to any guests that may visit. So buildings are a part of the game play from the get go.
There are 14 different buildings in the game. Each building offers players some sort of trading opportunity. Players can purchase buildings and build them on their land. Once they build a building they will earn points for building it, but will also cover up the natural resources that they could produce on that territory tile.
 When a player purchases a building they will take the associated hex for that building and place it onto a section of their territory that they have already prepared for a building. Note: preparing land is a separate action.
Whenever another player enters the bank tile, the owner is to be paid two coins as a sort of “trade fee.” These buildings will be critical to success in the game. You want to own them, but you also don’t want to give up the resources of the land that they are covering. It’s a sort of Catch-22. But that’s part of the fun of a game, right?
My objective with the design of the buildings was to utilize both stone and gold equally. This would aid the differing land resource conditions that I mentioned above. As an example, there is another building where you can trade one gold for two stone. Imagine owning both that building and the bank! You’d be able to create a huge supply of both stone and gold.
Now that I had redesigned the buildings in a much simpler manner that will be more integrated into the game play it was time to give players options for scoring points. And it made me ask the very important question that I seem to neglect until the late stages of game design: How do you win the game?
Let’s Get to the Point(s)!
I struggled a lot with how I wanted scoring to be handled in Trading Post. So far we’ve only discussed earning points via buildings. In the previous version of the game players could earn points from fulfilling orders. I wanted that element to remain in the game.
But I also wanted more opportunity for scoring. And I wanted that scoring to be hidden. This mechanic is the core of the famous game Ticket to Ride. In that game players play the game and attempt to complete routes from one city to another. They are the only person who knows the route. At the end of the game the routes are revealed and players score positive or negative points based on whether or not they connected the two cities.
You Can’t Order Me Around!
So I decided to distill my original set of Orders from the first version of the game. Maybe now is a good time for me to explain what I mean by distill. Here’s a definition of the word “distill:”
to extract the essential elements of; refine;
That is exactly what I’ve been doing with these game elements. I am extracting the parts of the elements that make sense and work as a game. You could also look at it like separating the wheat from the chaff. Version 1 had a lot of chaff and very little wheat. But the wheat that was there was very good wheat. I recommend to all game designers who have projects that they’ve shelved to try and distill them. This is a great way to get back to the core elements that you originally desired while removing the garbage that you added needlessly.
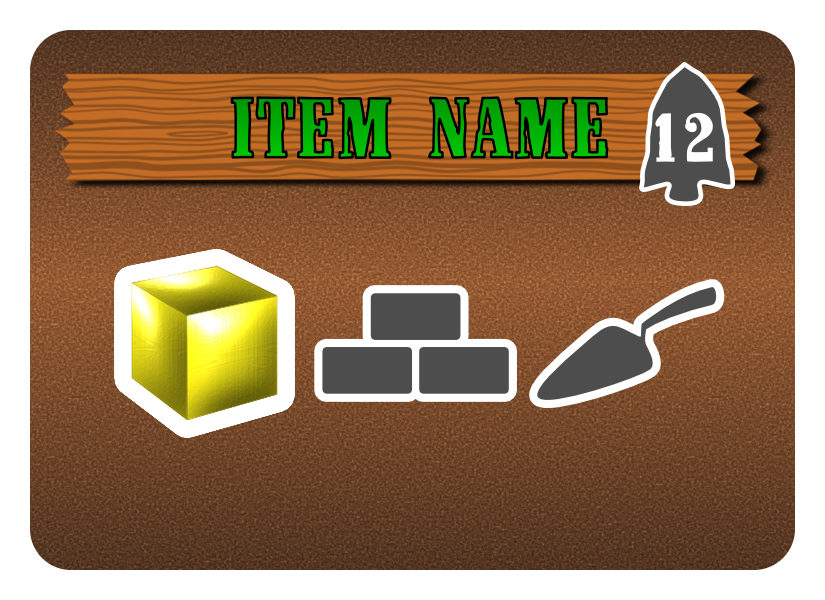
Fulfilling this order requires 1 gold, 1 bricks, and 1 trowel.
So I took the concept of orders and basically “Mathified” it. What I mean by that is I basically designed the orders to be different combinations of the resources used in the game.
Version 1 had a huge list like the spreadsheet that I showed last week. These were things like hats, pies, and musketballs. I decided that with the redesign I would ignore the naming of the items and just use the mathy combination of things.
So there are orders that cost 1 wood or 1 lumber or 1 stone or 1 gold. Then there are orders that cost any combination of two of those resources. Then there are orders that add in the secondary resources (hammer/nails/bricks/trowel). And it gets more complicated from there.
The design has a scale for how many points each order should be worth based on the costs. In the example shown the gold may be worth 2 and the bricks and trowel each worth 5 to get to a total of 12 points. So players are able to earn points during the game by fulfilling orders. (I know… that seems similar to Scoville. Oh well.)
You’ve Got a Hidden Agenda!
The other scoring I mentioned is hidden scoring. There are many games that have scoring conditions that are revealed at the end of the game. So I’m not doing anything groundbreaking here. But having hidden scoring conditions that only get revealed at the end of the game is a great way for players to never feel out of a game!
So I designed a set of scoring condition cards that have a two-fold purpose:
- Give players hope.
- Give players goals.
Hope is a big deal in board games. If a player doesn’t think they can win they may as well give up. I’ve seen players who know they can’t win start to help their favorite player win the game. I do not like that in a game. If a player has hope that they are doing a great job meeting their own scoring conditions then they have hope that they could pull it out in the end. Games like this include Stone Age, Archipelago, Ticket to Ride, and Suburbia to name a few.
Goals are also important. It helps guide a player’s strategy. It gives a player something to plan for. And it can help eliminate analysis paralysis. One of the newer games that has goals that definitely guide my strategy is 7 Wonders. In 7 Wonders each player has their own “Wonder” which is shown on a player mat in front of them. Each of these is different and provides some sort of bonus. The wonder that you receive can steer your strategy in the game.
I designed a deck of scoring condition cards to meet those requirements. These include having certain sets of buildings or certain combinations of fulfilled orders. So players can have hope throughout the game and never feel completely out of it. They may not be totally thematic, but I can give up a little theme for a better game. If players want to think of these scoring conditions more thematically then they can think of them as private commissions from the Trading Post.
Here are two examples of scoring conditions. The card on the left would award points to the player only if they managed to own two blue buildings and a green building. The card on the right would award different numbers of points based on how many orange orders they fulfilled.

Left: a “Buildings” scoring condition. Right: an “Orders” scoring condition.
But How Do You Play?
Ironically this is probably the one question to which I don’t know the answer. I am debating about having the game play several different ways. Options include:
- Role Selection a la Puerto Rico, Race for the Galaxy, Carson City.
- Turn based game play with players choosing one thing to do per turn.
- Turn based with an action point allowance system.
- Rounds where players each do action A, then action B, and so on.
I truly have not decided which is the best approach for this game. I may end up testing all four options and seeing which works best. Here are the things I am trying to design for in the game:
- Minimal downtime
- No runaway winner
- Tense decisions
- Ramping up of awesomeness
- Accessibility – Easy to learn, easy to teach, easy to play
So I’m going to choose the game play option that best fits those game design goals. I am initially leaning toward the role selection option but making it less about a role and more about providing a specific set of actions that a player can do. I’m not sure that makes sense.
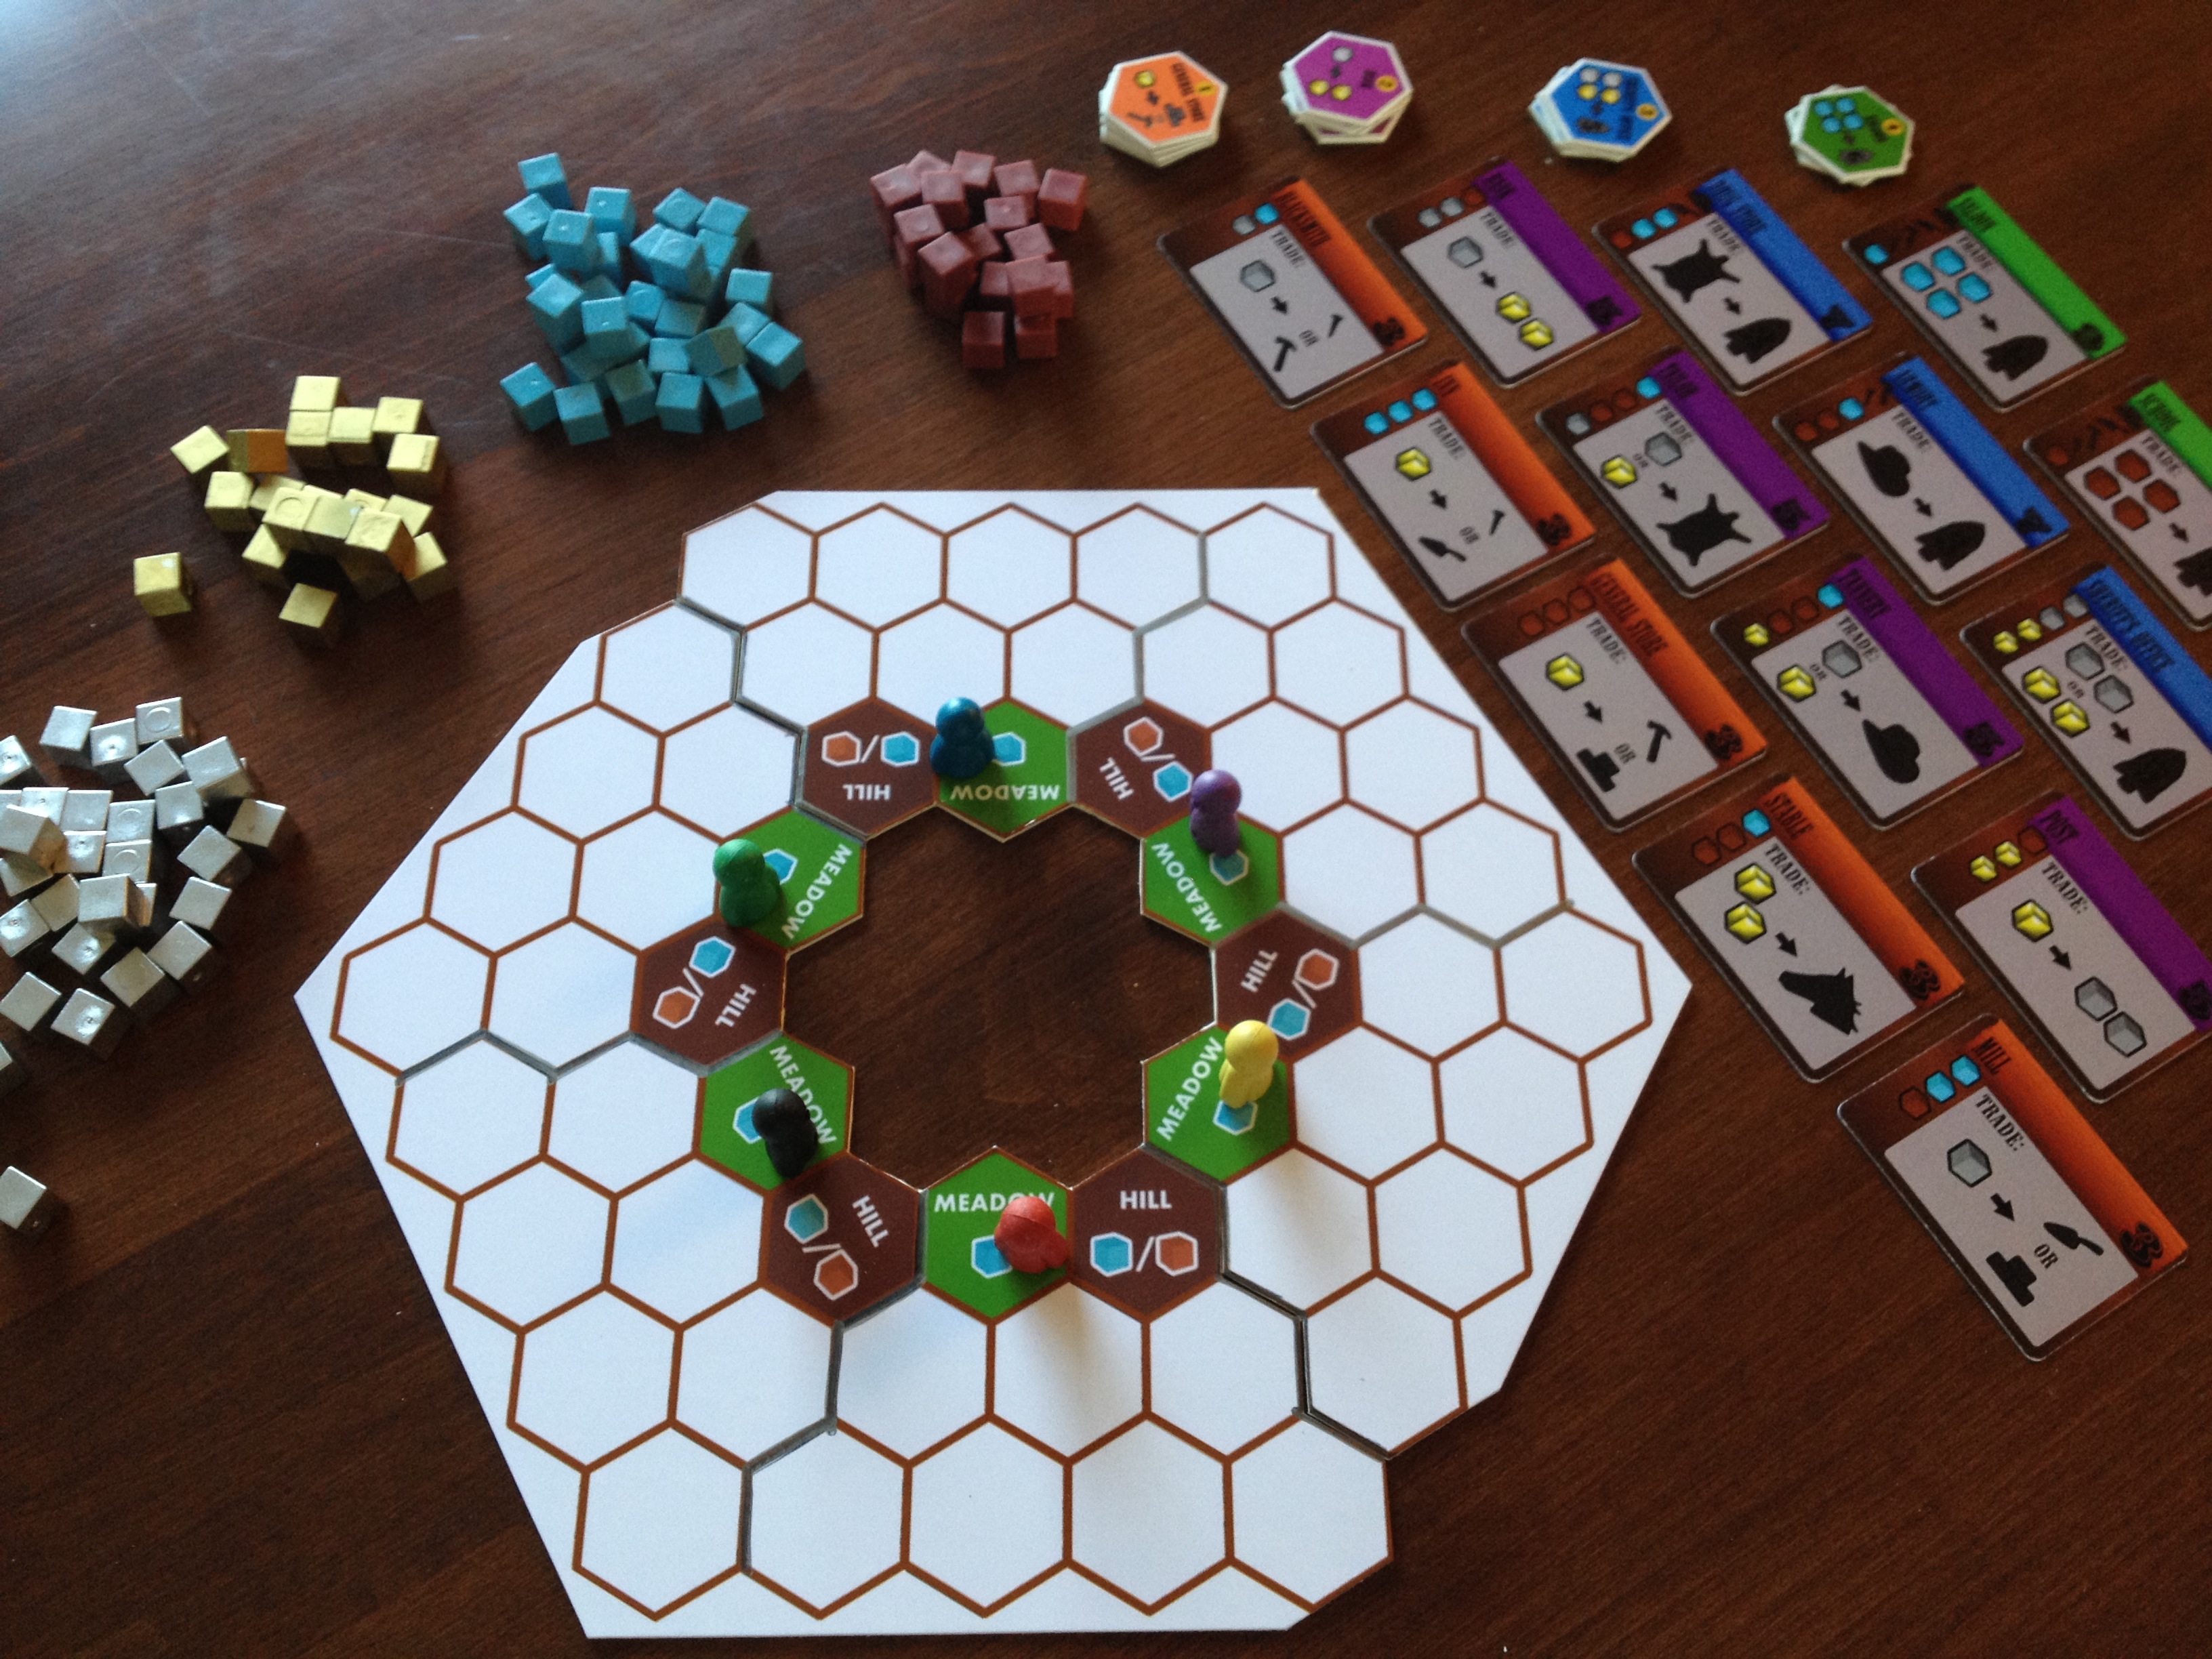
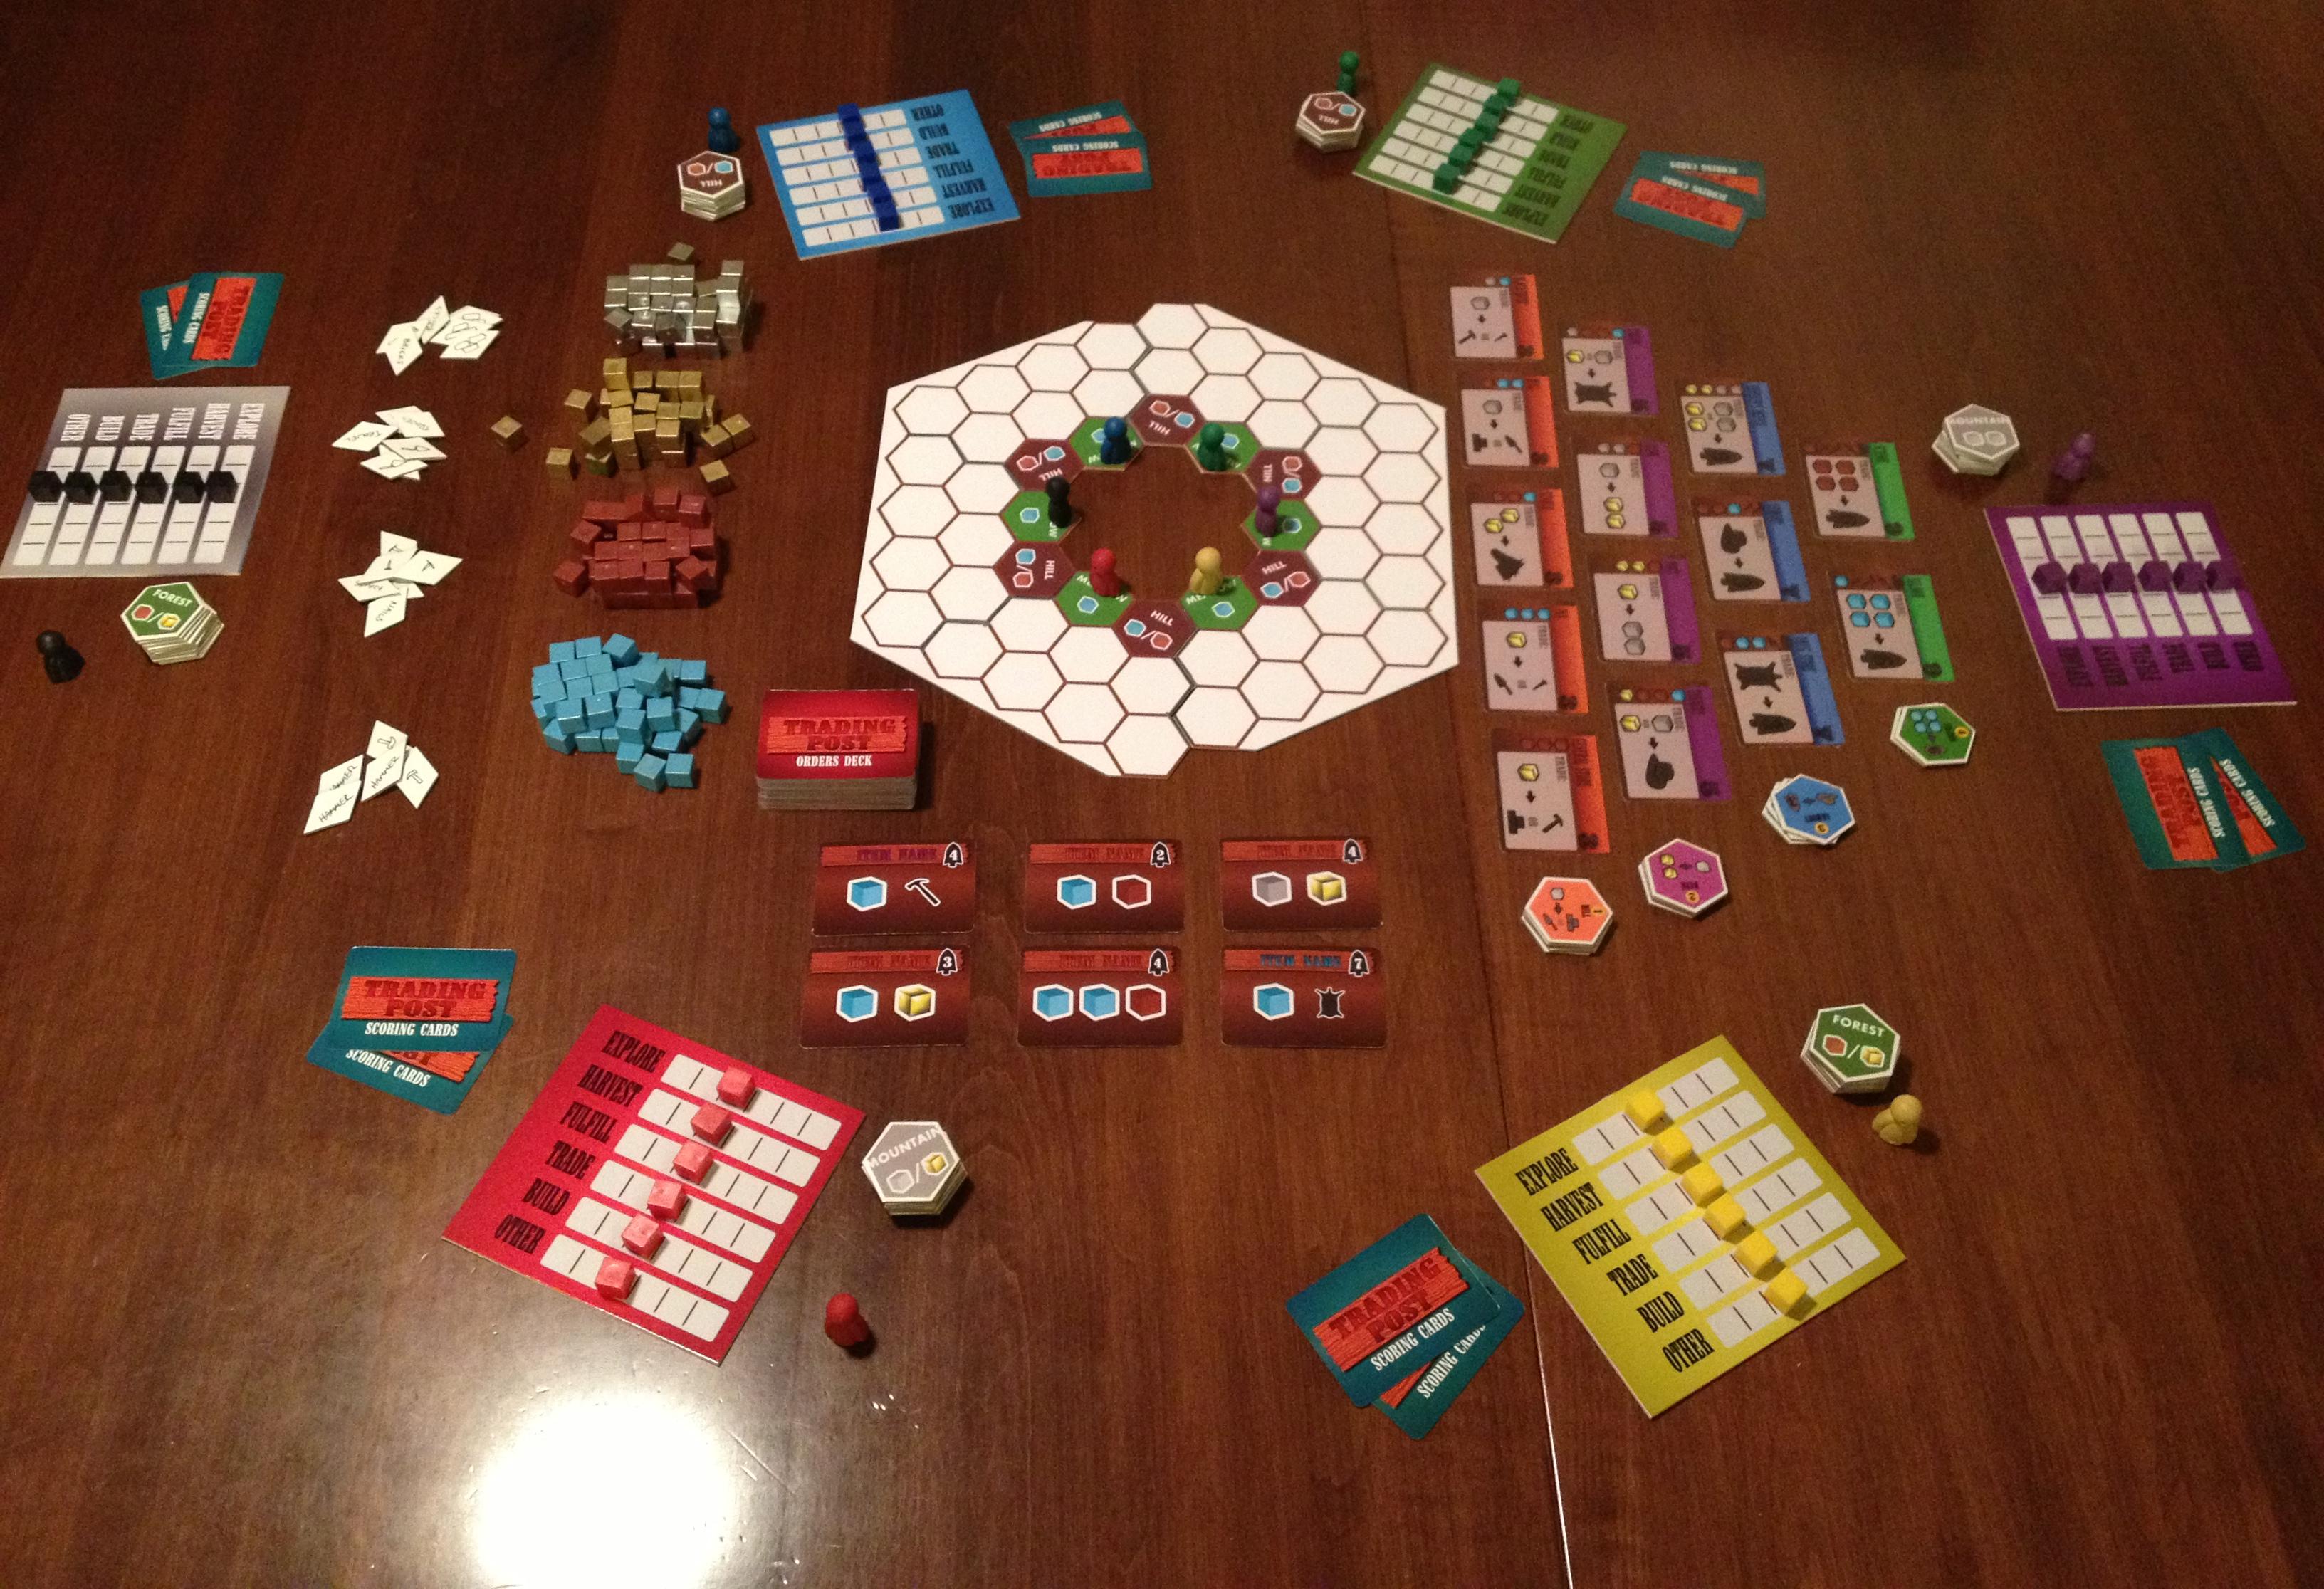
The current state of Trading Post minus half the components.
The bottom line is that I have several game play concepts within the game but I don’t have an overall picture of the game play. That’s what I’ll be discussing more in depth in next week’s article about my path to GenCon with Trading Post.
So next week I’ll cover the game play options for the game. I’ll also cover how to get this game ready to potentially pitch it to publishers at GenCon. Stay tuned! As usual, your comments are welcome. I’d love to hear what people think about this game design.
