Blog Archives

How To Make A Quad-fold Board
When designing games it often becomes helpful or necessary to have a quality prototype, which often includes a quad-fold board. There are easy ways to do it, like taping a few pieces of paper together. And there are more difficult ways to make them. I usually only make them when I would rather have it fold to fit in a box. Today I want to share my method for producing a decent quad-fold board for your game design purposes.
Components
Here are the components I use when making a quad-fold board:
- Matte board (I buy bulk scrap matte board at Hobby Lobby since it is so inexpensive)
- Photo Paper (I use Kodak Glossy Photo Paper)
- Glue Stick (Or adhesive of your choice)
- Tape (I prefer masking tape)
- Rotary Cutter (I use this one)


The methods in this article are based on the fact that I have a 12 inch rotary cutter that cannot cut through two pieces of matte board at the same time. If I could cut through two matte board pieces at a time then I would probably use a different method.
Methodology
My assumption here is that you already have artwork you’ve created. If you have the artwork ready, then here are the steps I follow to make my quad fold boards…
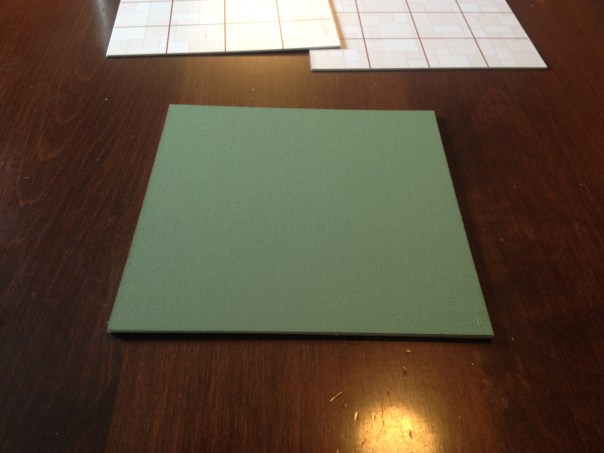
Print the Artwork
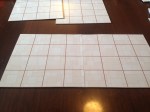
When I work with larger sized images I usually print them from either MS Publisher or MS Powerpoint. Publisher will require you make a larger template, but that is pretty easy to do. When you print this way you will print on several sheets of paper.
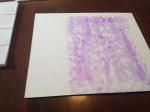
Once they are printed I will cut off the white margins for all the interior edges that will join up together. You can see an example of the cut photo paper above in the image with the glue stick.
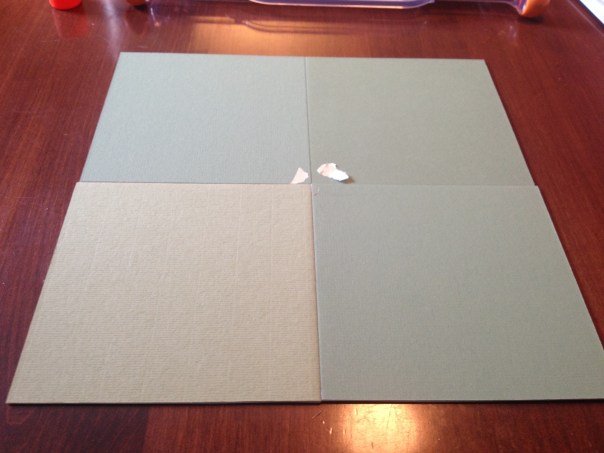
Glue the First Two Pieces
Depending on whether you want your board to fold with the artwork out (unusual) or inward (common) you will either have to do one or two of these procedures respectively.
-
- Place glue on most of the area except by the joint.
-
- Glue down the first piece, lining up the edges as best as you can.
-
- Repeat for the other half. Trim off excess areas before proceeding.
-
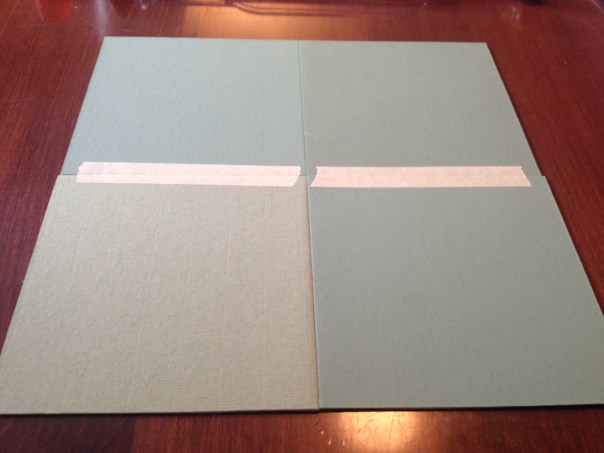
- Lift the non-glued portions. Tape the two pieces together.
-

- Apply glue to each and press down.
-
- Half of your board is completed!
As I mentioned earlier, you will do this once if you don’t care that your artwork folds outward. If you prefer your artwork to fold inward, then repeat this process with the other two pieces of your quad-fold board.
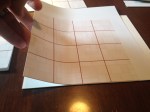
Before moving on I always like to check how smoothly the board folds. Here’s my example:
Completing your Board
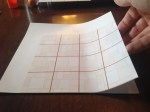
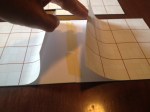
With a set of two pieces taped together you are now set to complete your board. This step is pretty simple. With all four pieces laid out, flip them all over together. Make sure they go into the correct places when flipped. You don’t want to flip them where they are but rather flip them and swap them horizontally. Before I start I put a piece of tape in the corners that line up in the middle of the board. This helps me know that I have the pieces together the right way.
With them in the correct locations, all you need to do is apply two more pieces of tape as seen here:
Completed Quad-Fold Board!
And there you go! You now know how to make a quad-fold board for your game designs. Just keep in mind that if you would prefer the artwork to fold inward then do the “Glue the First Two Pieces” process twice. Then flip them and use only one piece of tape on one of the seams.
Here’s is my completed board for this article:


And here is the quad-fold board I made for a high quality prototype of Scoville using Joshua Cappel’s artwork:


Another Option
If you are not equipped with printing capabilities or if you would prefer to not do this on your own, then feel free to utilize The Game Crafter as they can create a quality quad-fold board for you. You just upload your artwork in the correct size and pay a little money and they’ll make your board and mail it to you.
They have the following options available:
- Bi-fold Board (9 x 18 inches)
- Accordion Board (8 x 16 inches)
- Quad-fold Board (18 x 18 inches)
- Six-Fold Board (27 x 18 inches)

So how do you make your quad-fold boards? Do you use a different method? I’d love to hear if there is a better way (I’m sure there is).
Game Design: Starter Prototyping Tools
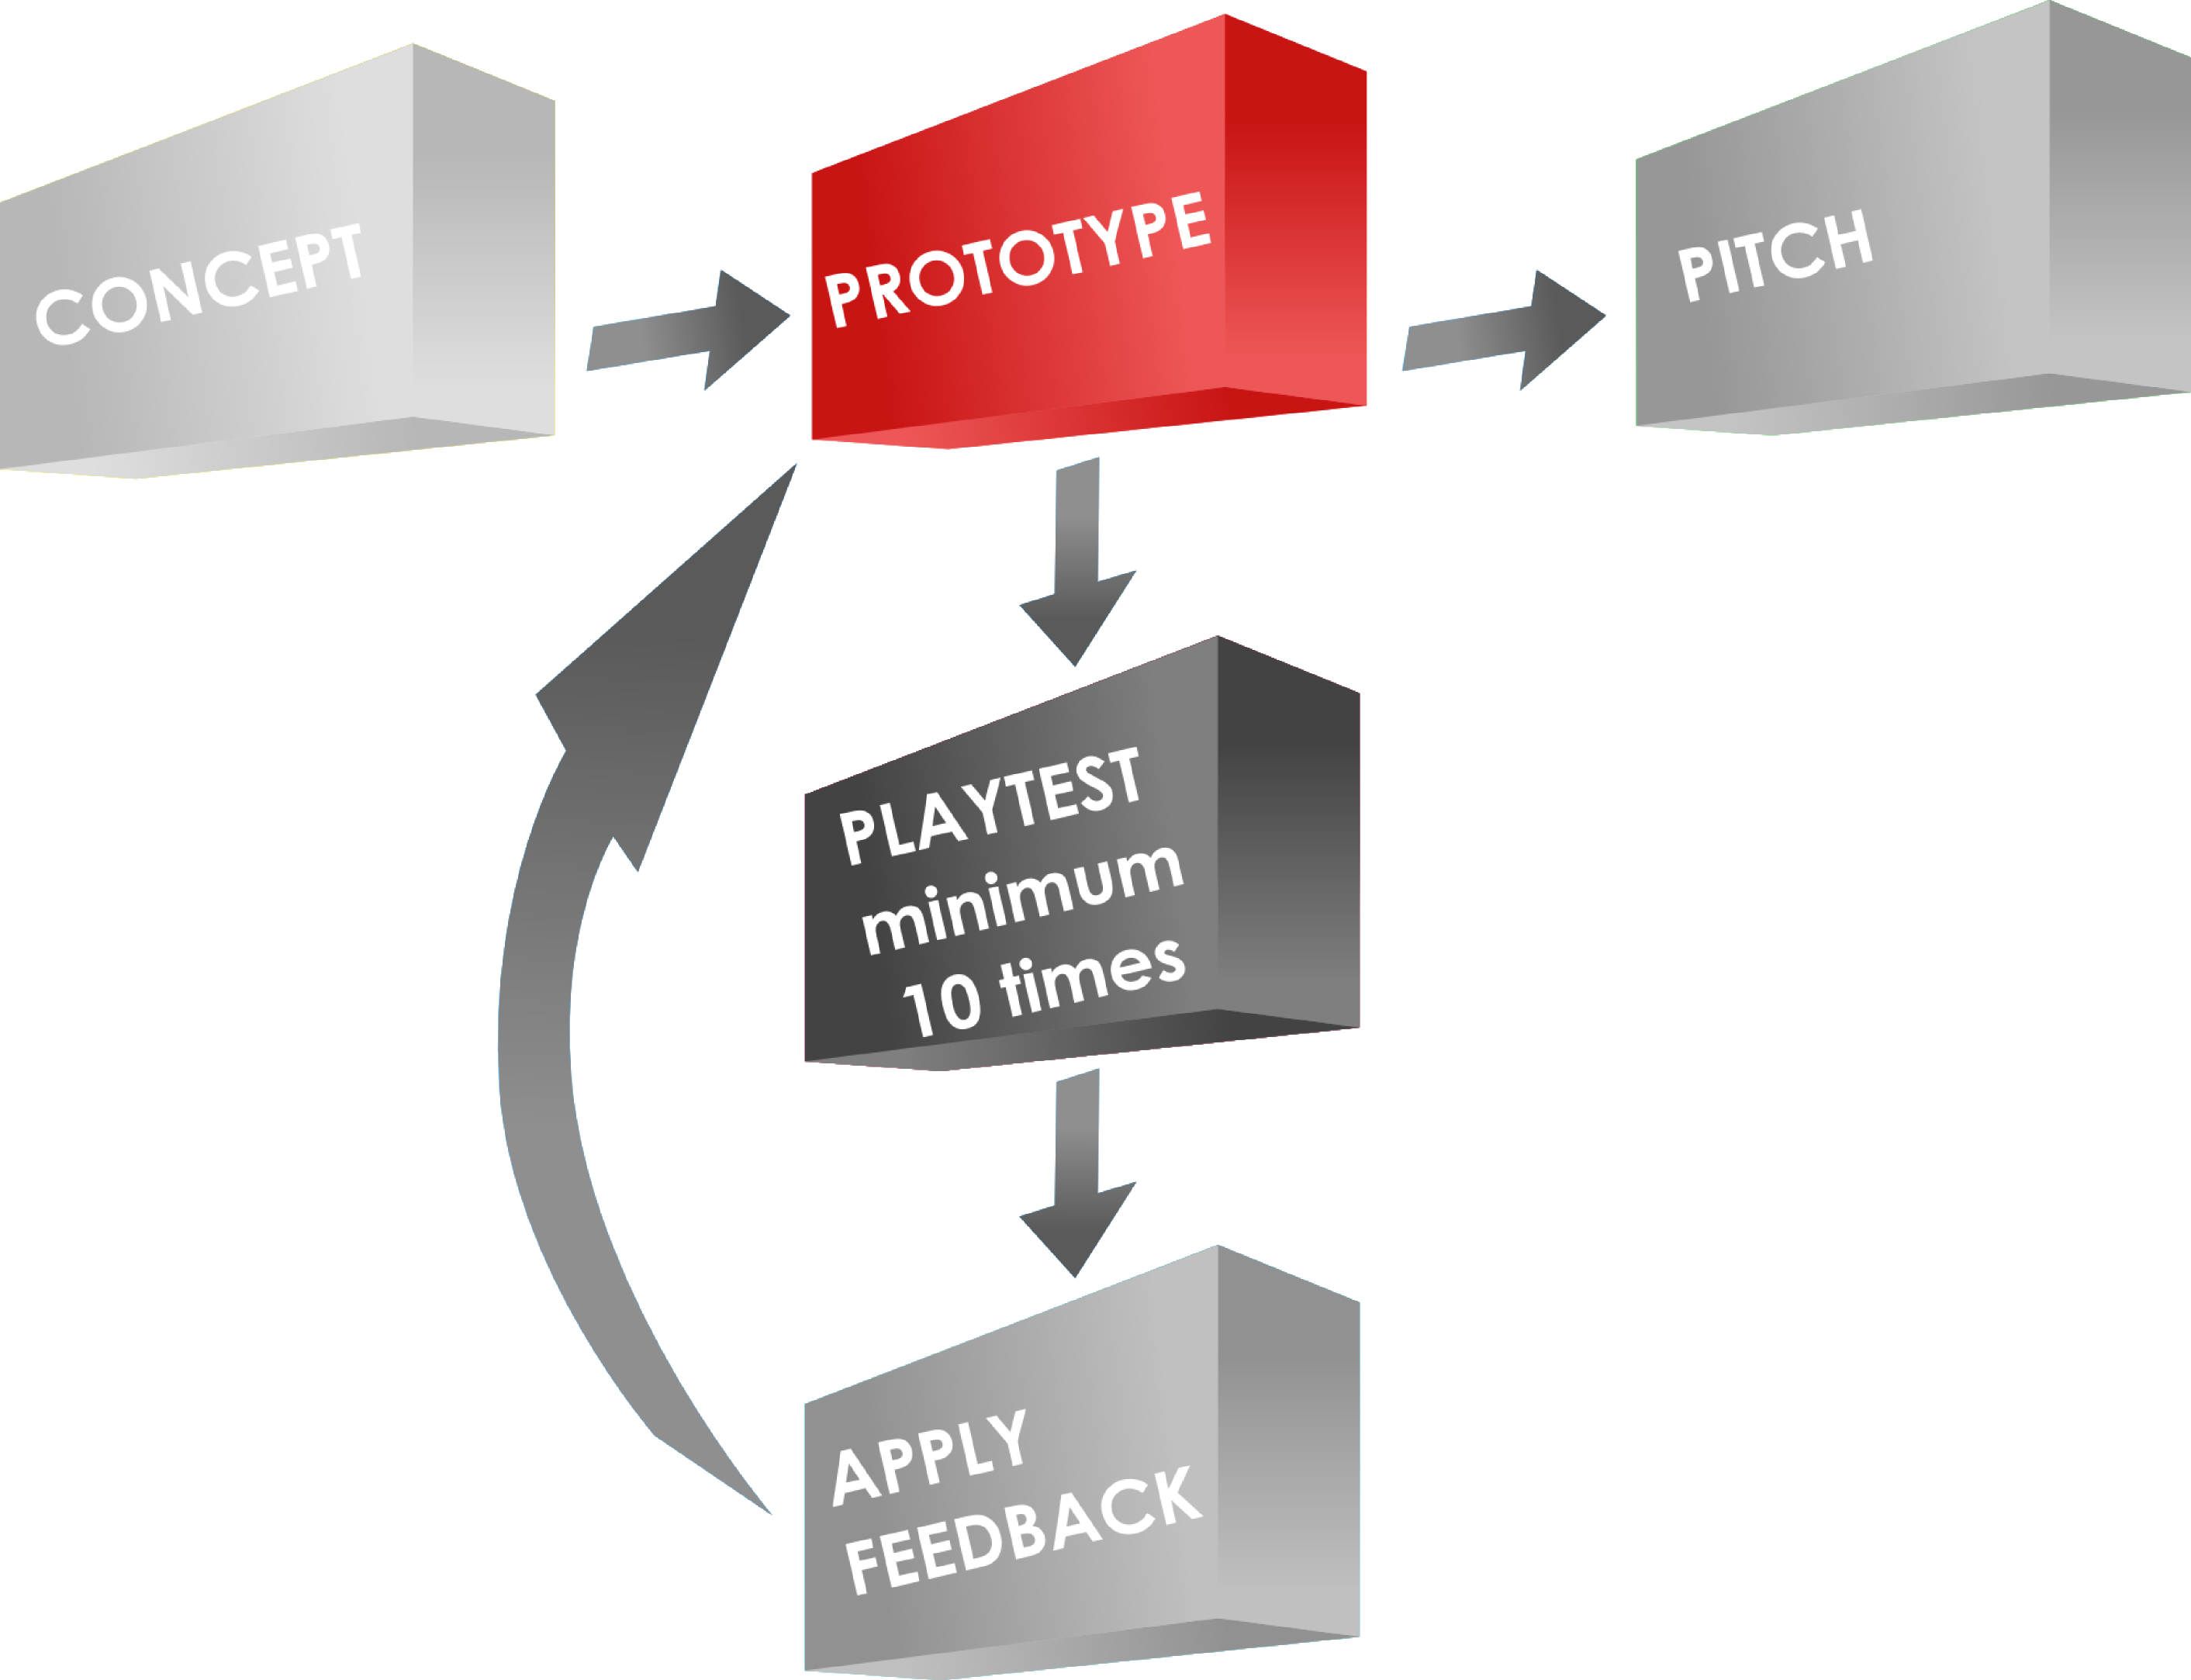
Game Design Process: Prototyping
I recently asked myself the following question: “If I were to start over with game design, which prototyping tools would I buy to get started?” I’ve made numerous prototypes and I’ve learned what to do and what not to do. So today I present a set of prototyping tools to help get you started as a game designer.
When I got started out I didn’t want to throw a lot of money at prototypes. This was because I had no idea if the prototypes would ever actually go anywhere. I was fortunate to have a wife who used to do physical scrapbooking. So I had some tools available to me that wouldn’t have otherwise been available.
Never-the-less, there are some key tools and resources that I think every game designer can utilize to make high quality prototypes at low(ish) cost and with relative ease. For the sake of this article I will assume that you can print on photo paper (I recommend Kodak 8.5×11 – 100 sheets).
Game Prototyping Resources
First, let’s cover where to get some basic resource type things. These are my go-to retailers for these items:
- CUBES: 1,000 1cm cubes from EAI Education for $16.95
- MEEPLES: Avatar pawns from TheGameCrafter.com for $0.15 each
- DICE: Buy a set of Tenzi dice! (Or search Amazon or eBay)
- CARDS: Blank Cards – Different Sizes – from TheGameCrafter.com
Game Prototyping Tools
Things that are not mentioned above include boards, tiles, tokens, reference sheets, rulebooks, and more. I generally use the same process to make all of those except a rulebook. I don’t typically make a rulebook.
To make my prototype components feel like high quality I purchase the following materials:
- Matte board remnants from Hobby Lobby for super cheap. You can get a stack of about 25 12″x12″ matte boards for about $6.
- Kodak Photo Paper (100 sheets for ~ $15)
- Non-OEM ink for my inkjet printer via eBay. (I bought 5 full sets of ink cartridges for ~$20)
- Glue Sticks – you’ll want to keep several on hand.
I often create artwork and then print it on the photo paper. I glue it down to the matte board. Then I break out my most highly recommended tool: The Rotary Cutter!
The Rotary Cutter

Easily worth the cost!
This has been my most-used tool for creating game prototypes.
I have a Fiskars rotary cutter similar to the one shown in the picture. You can buy it here:
It isn’t the best cutter. You can pay a lot more money for better cutters. But it does exactly what I need it to do for my prototypes. Other cutter options include:
There are more options than those, so if you don’t like those options feel free to do more thorough searching.
I use this tool to cut out the components that have been printed and glued to the matter board. This cutter works well enough for that.
Punches

Great for cardstock chits!
Other great tools for designers are punches. These are used to quickly create tokens and chits. When I create tokens and chits I usually prefer printing the artwork onto thicker stock paper so they are more rigid. 90lb or 100lb paper is usually a good weight.
There are a plethora of different punches out there, but for the sake of board games you’ll most likely be interested in circle and hex punches and corner rounders. Here are some options.
- Fiskars Squeeze Punches
- Fiskars Lever Punches
- Fiskars Corner Rounders
- List of Punches on Scrapbook.com
As before, go ahead and do some more searching to find the right product for you.
Sharpies

I am firmly in the Sharpie camp. I love them. They are bold, colorful, and extremely useful. Sharpies can be used to create prototype components rapidly, especially in the case where you own blank cards because you took my recommendation above.
By having a variety of Sharpies you become an unstoppable force of game design awesomeness!
I use them to create prototypes. I use them to mark up my prototypes. I use them to revise my prototypes. I use them to draw silly pictures for my kids.
Seriously, Sharpies are fantastic. I feel they are a must-have for any game designer, if for no other reason than to be able to practice your signature for the time when lovers of your games will ask for your autograph for their game box!
I feel like this article needs more tools in it, but those are the only tools I utilize on a regular basis. Are there prototyping tools that you use regularly? Post a comment and let everyone know which prototyping tools you prefer!
Prototype Art: Alignment in Inkscape
I use Inkscape for all of my game design artwork. It is relatively easy to use and is vector based, so I can make things larger or smaller as needed without any loss in picture quality.
I’ve done a couple other Inkscape tutorials about game design artwork. You can check those out:
Today I want to focus on one specific tool within Inkscape: Alignment.
If you don’t have the software, you can download it from their website: inkscape.org.
Let’s Line Things Up!
The tool I find I use the most within Inkscape is the alignment tool. I use it for every piece of artwork or graphic design that I make in Inkscape.
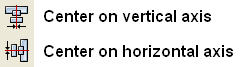
When you are working in Inkscape and desire to line things up, look for this icon: 
Clicking that will open the Alignment options, which will look like this:

Control Panel of Alignment
Let’s run down what those options are. Here is a new version of that image:

Instead of running through each of those things listed above I am going to provide a couple examples. At the end of this article you will find a the Inkscape file that I used for these examples. Feel free to download it and use it to get familiar with the alignment tools.
Anchors Away!
When aligning things the most important thing is understanding which object is the anchor. The anchor is the object that will not move when the command is applied. You can choose the anchor with the options from the “RELATIVE TO” box at the top, which are the following options:
- Last Selected
- First Selected
- Biggest Object
- Smallest Object
- Page
- Drawing
- Selection
The three that I use the most are “Last Selected,” “First Selected,” and “Page.”
When selecting multiple items, if you chose the anchor last, then you should set RELATIVE TO to “Last Selected.” That way when you choose the alignment function, the anchor will appropriately stay put and the other objects will move.
Likewise, the “First Selected” option will cause the anchor to be the first object you select. Both of these options are nice because you can make sure you’ll know which object won’t be moving.
Using the “Page” option will align things with the page. The Page is represented by the black box in the middle of the canvas when opening a new document. I use this a ton when designing artwork for cards since it allows me to center things on the page. This one can come in very handy. You can align things to the center of the page by using these two alignment functions:
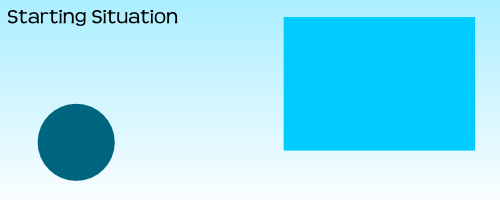
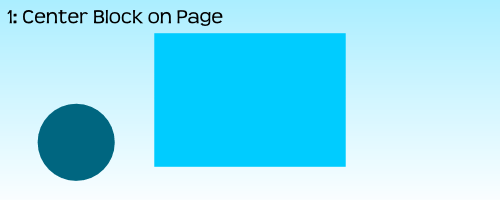
Alignment Examples
I’m going to use a circle and a block and show you how several of the functions work. After centering the block on the page I’ll be using the block as the anchor for the remaining alignments.
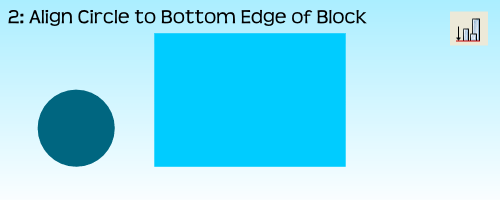
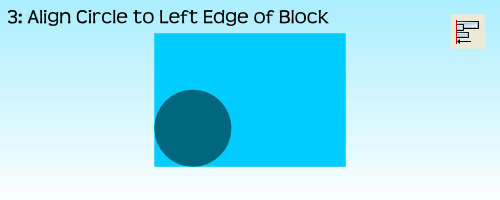
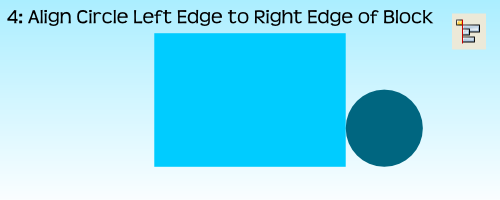
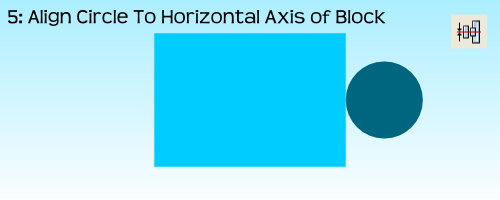
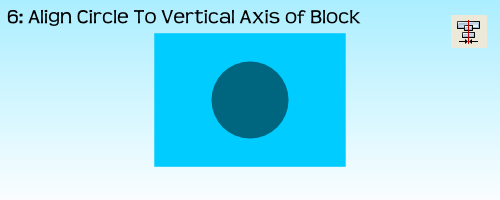

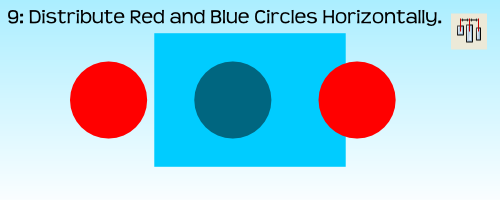
 For the very last example, step 10, I had to use the “Treat Selection As Group” option. If I had not used it the result would have been to stack all three circles on the vertical axis of the block:
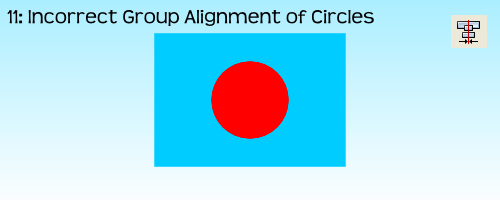
By treating the three circles as a group it allows for the whole group to be aligned without adjusting the relative locations of the objects in the group. Often I’ll just group objects myself before aligning them and then ungrouping them after the alignment. But feel free to do it however you like.
That’s Basically It
I have found that these alignment tools are very useful when making prototype artwork for my game designs. It allows you to consistently place things in the same spots. It allows you to make things line up correctly. And it allows Inkscape to help design your awesomeness!
Here is the file: BoardsAndBarleyAlignmentExample.svg
It is located in Google Drive and to get it to work you’ll have to download it. Please let me know if you have any questions. Thanks for reading.
Prototype Art: Icons in Inkscape
Inkscape logo of squidy awesomeness!
One of the things that can take your game design from playable to pitchable is iconography. Icons can really help put a nice polish on a game. There are a few benefits that icons can provide for your game design:
- Ease of viewing/understanding
- Beautification
- Language Independence
Those are a few and I’m sure there are more. So today I wanted to present a tutorial similar to my “Cubes in Inkscape” tutorial to help game designers with the creation of icons for their games.
This article will be focused on the software called Inkscape. It is a free Scalable Vector Graphics (SVG) software. Don’t worry too much about what that means, just know that it’s awesome. If you don’t have the software I recommend downloading it and using it for your game design art. Note: if you have Photoshop/Illustrator then I would recommend staying with that and skipping the rest of the article.
Also, if you love icons but just can’t figure out how to make your own, then head over to Game-Icons.net where they have over 1,000 free icons for your use. So let’s get started.
Let’s Get Iconizing!
So “Iconizing” isn’t really a word. But that’s beside the point. The objective for today is to teach you how to make icons that you can use with confidence in your board game designs. We are going to be making a barley icon. But you’ll hopefully be able to use what you learn here today to make any icons you might need for your game design.
Once you’ve downloaded and opened Inkscape you’ll see a plain canvas outlined in front of you. I like to leave it turned on, but you can turn off the “edges” if you visit the document properties under “File.” Here’s what it should look like:

We will be working with the “Create Circles, Ellipses, and Arcs” command for this article.
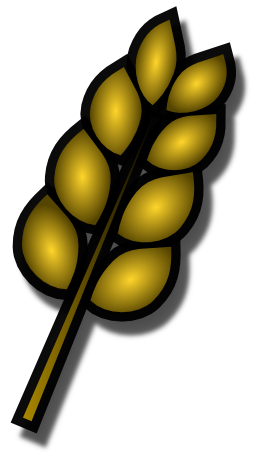
You’ll often want a web browser open as well. It is often beneficial to do a web search for the item you are looking to iconize. So here’s a snapshot of a web search page for barley:

Using a web search can give you ideas of how to iconize the item.

Barley, you’re about to be iconized!
After I’ve done a web search I like to copy and paste a picture or two into Inkscape as a starting point. In this case I’ll be using the photo on the right as my guide for creating a barley icon. So copy that picture into Inkscape if you want to follow along.
One thing to remember when creating icons is that we want them to be very clear and understandable. Sometimes icons represent things, like resources. Other times they represent actions, like “move an extra space.” We before we create the icon we need to know what we are going for. In the barley example we will simply use the icon to represent a barley resource.
So now that the picture is in Inkscape we can start our tutorial. I like to use a picture so that I can create the correct shape of something in Inkscape by overlaying that shape on the right part of the picture and making the edges line up. I won’t show that today since this image will be for reference only, but it is a useful thing to do. I may write about that in the future.
The icon of a barley begins with one circle…
Go ahead and click on the “Circles, Ellipses, and Arcs” command and click and drag a circle on the page anywhere you like. If you want to change the color, scroll along the color bar at the bottom. If you want to make sure it is a true circle, hold CTRL when dragging. If you hold CTRL and drag at a different angle then it will jump to an ellipse rather than a circle. Once you’ve dragged out the circle and chosen a color you might have something like this:
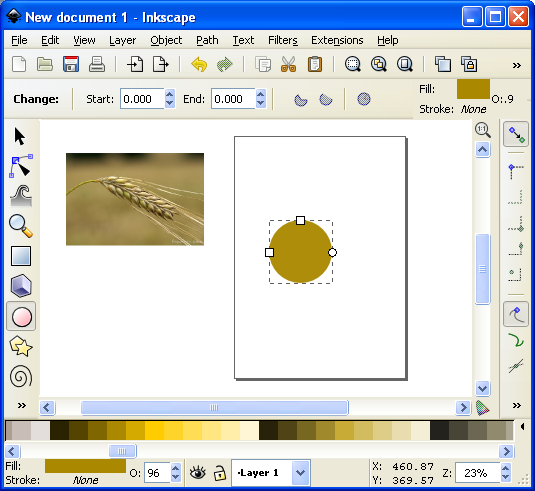
This circle will be one grain of barley.
The next thing we want to do is turn our circle into a Path. There are two ways to do this. The first is to go to the PATH toolbar at the top and click “Object to Path.” The second way to do this is to select the item and press SHIFT + CRTL + C.
 Then we want to use this command from the left toolbar. It is the “Edit Paths by Node” tool and is pretty awesome for what we want to accomplish today. Click on it and then click on our circle. Then your circle should look like this (note that I have zoomed in on the circle):

The dots around the circle are the nodes that we will edit.
What we do next is edit our circle by moving the nodes around. Across the top we have different options for editing the nodes. The tools that I utilize most often are these:
- Insert new nodes into selected segment
- Make selected nodes corner
- Make selected nodes smooth
I recommend playing around with each of those commands so that you become familiar with how node editing works.
So let’s take our circle and turn it into a barley grain. First click on the upper node. Then click on “Make selected nodes corner.” Then you can grab the little circles on the lines extending from the node and move them to wherever you like. Here’s what you might end up with:

By editing the nodes we can make the circle look like a barley grain.
Now go ahead and manipulate the other nodes. I “Cornered” the bottom node and angled up the right side. I moved the bottom node to the right. I moved the top node up and to the left. And I brought in both side nodes. Here’s my result thus far:

Okay. That’s pretty passable for a barley grain. Now we want to make more of them. But instead of following that whole process over and over we are simply going to duplicate this grain. You can duplicate the grain in two ways. The easiest is to simply push CTRL + D. That will make a new copy over the top of the previous version. Then if you click the arrow tool at the top of the left toolbar you can move the new barley grain. Do this about 5 times, line them up, and then you might have something like this (I’ve zoomed out a little):

We are getting there! Who’s excited??
Okay. It is starting to look alright. Let’s go ahead and duplicate the entire thing and mirror it using the “Flip selected objects horizontally” tool. Then you can rotate the whole selection with the arrow tool. You have to click on the selection so that the arrows on the corner of the selection turn into curved arrows. Then click and hold one of the curved arrows and drag to the angle you want. Note that when dragging, if you hold CTRL it will rotate at discrete angles. This can be really useful. After all of that we should have something like this:

Feel free to enjoy a nice brew while we are iconizing barley!
Now we’ve got most of the hard work done. You may desire to shrink a few of the barley grains near the top end. If you do, you can simply click on one with the arrow tool, then click and drag one of the corner arrows around the object you are shrinking. Note that when you drag the corner arrows, if you hold CTRL it will maintain the aspect ratio of the object. If you hold CTRL + SHIFT it will maintain the aspect ratio and resize it while also maintaining its position in reference to its reference point (shown by the plus sign, which can be moved). For the sake of the tutorial today we are not going to shrink any of the barley grains.
So far so good. But now we need the stalk. So we are going to use the “Draw Freehand Lines” tool from the left. With the tool chosen you should then set the tool to “Triangle In” at the top toolbar where it says “SHAPE.” Then starting at the bottom of the stalk click once. Then move the cursor to where you want the stalk to end and double click. A triangle line should be made that looks something like this:

We’re almost done!
You can change the color again by using the color bar along the bottom. And you can manipulate the shape by editing the nodes.
Alright. So I jumped ahead a little bit and did some of the things I’ve already mentioned. I changed the color of the stalk. I make it thicker by adding a “Stroke” to it (See below about adding a “Stroke”). I didn’t like how tall it was so I deleted two of the grains from each side at the top. I shrank two from each side and rotated them slightly. By simplifying all of this I was able to create a better icon for the barley:

It looks more “Icon-y this way.
So there you go. You’ve got yourself the tools to edit nodes, manipulate shapes, and make cool icons. Those are the basics and they can get you off the ground running. But if you want to add some awesomeness, then keep reading!
Adding the Awesomeness!
If you aren’t quite content with your icons there are a few things you can do to spruce them up. The first is to add a border around them. Remember above when I mentioned about adding a “Stroke”? Let’s start with that and see what kind of border we can come up with.
First, with the arrow tool selected, click and drag a box around all the components in the icon. They click on the “Group” tool to group them into one picture. Then go ahead and duplicate that new group. You will have two copies of the same icon. We will add a stroke to one and then place it behind the other. With one of the copies chosen, click on “Object > Fill and Stroke.” This will open a sidebar like this:

Now we can add awesomeness!
On the “Stroke paint” tab we want to set a solid color stroke. This is the solid blue square icon. For now just keep the black color that it should default to. Then on the “Stroke style” tab let’s go ahead and set the stroke to a value that makes it look nice. In this example the value was 20. You should have a nice big black border around the entire barley. Once you have the border, click on the “Lower Selection to Bottom (end)” command and it will send this copy of the icon behind the other copy, which has no stroke:
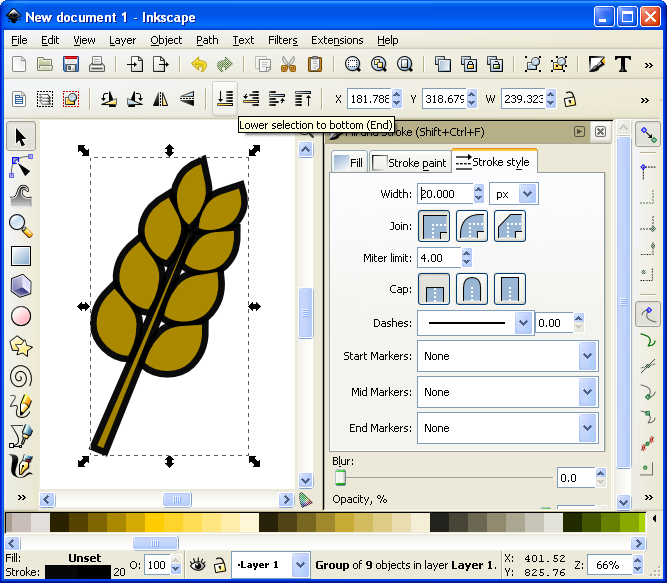
I think it’s really starting to be a nice icon!
Now we’ve got a really nice border. How else might we add awesomeness? We could add gradients to the grains and the stalk!
If you are content with the icon like that, then by all means leave it that way. I think it looks pretty good and icons like that will certainly help with the presentation of your prototype. But if you want to go another level you can add gradients. So let’s see what happens…
First you’ll want to ungroup that top level copy of the barley. We want to add gradients individually to the grains. With it ungrouped go ahead and click on one of the grains. Let’s choose the lower left grain for this example. Then you can click on the “Create and edit gradients” tool on the left toolbar.
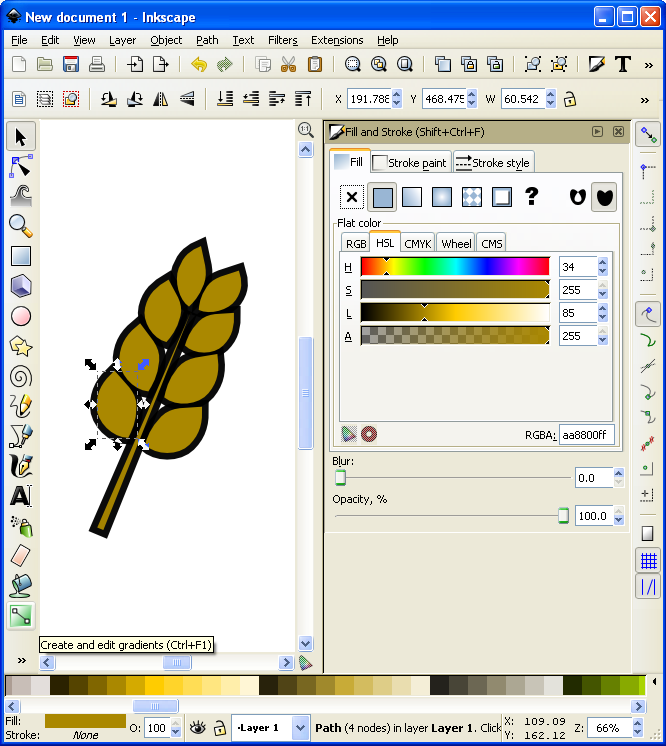
It’s about to get wild!
Then click and drag from one side of the selected grain to the other. You will want to play around with the gradient editor to familiarize yourself with the gradient editing options. The easiest are linear gradients. I recommend you start there. Otherwise a radial gradient could look nice. I’ve used one for the grains (each individually) here (Note that you could have applied a radial gradient after editing the first circle and then duplicated that for each grain of barley):
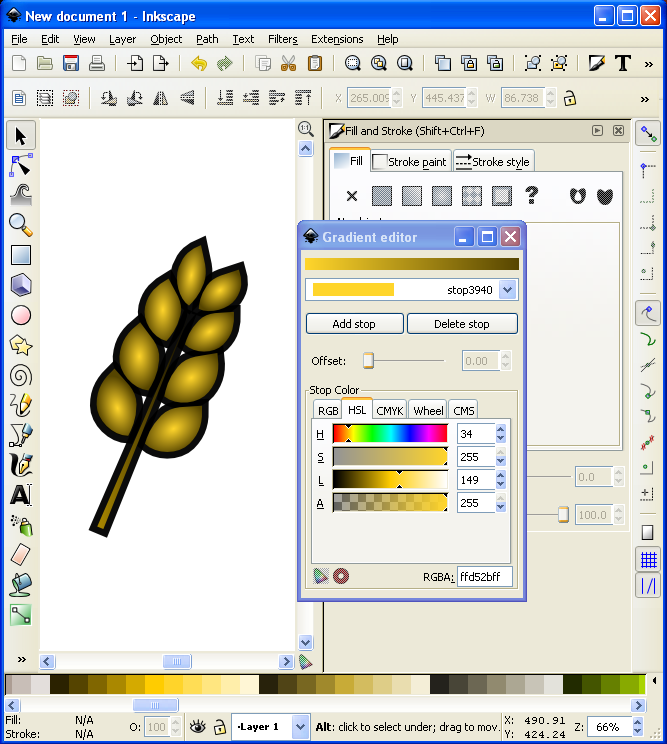
I might actually use this icon!
Alright… we have time for one more layer of awesomeness. What could it be other than a drop shadow??? Thankfully I don’t really have to teach you anything here since Inkscape makes it so easy! With the entire icon (both copies) highlighted go to “Filters > Shadows and Glow > Drop Shadow” and it will open a popup window. If you click on “Live Preview” it will show you what the drop shadow will look like.
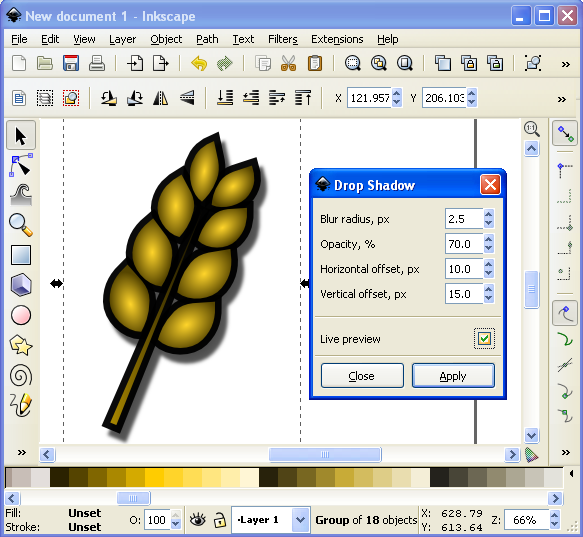
Now that’s what I’m talking about!
And there you have it. A nice and simple icon with three points of awesomeness!
Lesson Complete!
Here is my finished icon of barley, with radial gradients on the grains, a linear gradient on the stalk, a nice “Stroke” border, and a decent drop shadow:
Not too shabby!
That’s all I’ve got for you today. I hope that this article was able to equip you to add some high quality iconography to your game designs to help take them from playable to pitchable and give you confidence in front of the publishers! Please let me know if you have any questions. I would love to help you out. Thanks for reading!
Sourcing Game Components: Dice

Just think of the potential game designs waiting in that pile!
Today is the final article in a series of four articles about where to find prototype worthy game components. Here is the list of articles from this series:
- Sourcing Cards: 9-5-13
- Sourcing Meeples: 9-12-13
- Sourcing Chits: 9-19-13
- Sourcing Dice: Today!
Before we get started I want to make one point clear: This article is not about standard dice or even RPG dice. You can find standard d6s and RPG dice at your favorite local game store. If you want standard dice visit your local store or local thrift store. Or if you want really nice standard dice then check out Chessex. This article is about where to find blank dice, or special dice, or even dice that you can write on!
And my disclaimer: I have not used dice in any of my game designs. While I know where to buy dice, I cannot speak to their quality, feel, or character.
As a reminder I want to give credit to the list that inspired me to write these articles. This list is much more exhaustive than mine since I am just highlighting a few of the major suppliers. But here’s the list so you can check it out yourself:
So today I present a few of the sources that I think are worth checking out…
Indented Blank Dice

They are just waiting for your awesome design!
When it comes to using blank dice for game design, look no further than Indented Blank Dice! These are six sided dice with indented sides.
Why indented sides? The sides are indented so that when you put a sticker on the side it won’t rub off or cause irregular rolls.
These are 19mm on an edge and the indented portion measures 1/2″ x 1/2″. They will also sell you sheets of labels on which you can print your game design’s custom icons. Here is their pricing for US and International:
| # | Option | Price |
|---|---|---|
| 1 | 25 Dice – Domestic US | $15.00 |
| 2 | 25 Dice – International | $35.00 |
| 3 | 50 Dice – Domestic US | $25.00 |
| 4 | 50 Dice – International | $45.00 |
| 5 | 125 Dice – Domestic US | $50.00 |
| 6 | 125 Dice – International | $70.00 |
| 7 | 250 Dice – Domestic US | $95.00 |
| 8 | 250 Dice – International | $115.00 |
| 9 | 1000 Dice – Domestic US | $300.00 |
| 10 | 1000 Dice – International | $320.00 |
Those prices seem a little expensive to me, but if you’ve designed the next Kingsburg, Alien Frontiers, or Macao, then you can probably justify the cost.
Each sheet of labels that they sell will handle 36 dice. Two sheets will cost your $6.
BlankDice.co.uk

They look similar to Indented Blank Dice, but they’re from Europe!
If you are a friend from across the pond, i.e., from Europe, then perhaps your first stop should be BlankDice.co.uk!
In addition to a nice assortment of indented six sided dice they also offer 8 sided indented dice. Here is the page for their six sided dice: BlankDice.co.uk – 6 Sided Dice
But here’s the kicker… If you were to purchase 25 of these at £0.20 each (to compare the pricing against the source above this one) you would find that it would cost roughly US$15.50 to ship to the US. That’s only $0.50 more than the above source. So if BlankDice.co.uk has a color that you desperately need, then maybe you could order from them instead.
Print & Play Productions
 They make the list again since they offer so much awesomeness! If you are looking to order a bunch of different components for your game prototype and you need dice as well, then consider ordering from Print & Play since you can get cards, chits, meeples, and dice all from the same source! Here are a few different dice options offered by Print & Play:
- 16mm Stickerable Blank Dice: $0.15 ea.
- 19mm Indented Blank Dice: $0.50 ea.
- Stickerable Polyhedral dice (d8, d10, d12): $0.99 ea.
- 16mm Translucent Dice (Red, Green, or Blue): $0.45 ea.
Side Note: I personally met the guy behind Print & Play productions at GenCon and I can safely say he’s an awesome guy. I would definitely feel confident when purchasing from him. And the fact that you can order basically all of the components you would need for your prototype from one source makes Print & Play pretty awesome!
EAI Education
 The EAI Education catalog is a fantastic one-stop-shop for game designers. You can order cards, dices, cubes, and more all from their online catalog at excellent prices!
If you do a search for “Dice” you’ll get 206 results. While they have way too many awesome options of standard dice, fudge dice, fraction dice, etc., here are some blank dice options that I think could be useful to game designers:
- Blank Dice – Set of 12: $1.99
- Blank Dice and Label – Set of 144: $26.95
- Dice Domes Deluxe (with foam dice): $13.95
- Magnetic Foam Write On/Wipe Off 1.5″ dice Set of 12 (Available in Classic or Bright colors): $8.95
- Magnetic Foam Write On/Wipe Off 3″ dice set of 36: $99.95
And if you need standard dice to compliment your game design, then you can believe that EAI carries what you need!
The Game Crafter
![]() The guys at The Game Crafter also offer black indented dice. If you choose “dice” from their parts selection you’ll get a bunch of standard dice as well as blank dice.
The guys at The Game Crafter also offer black indented dice. If you choose “dice” from their parts selection you’ll get a bunch of standard dice as well as blank dice.
They offer 8 different colors at $0.40 each, though if you order more than 9 of any color the price will drop to $0.38 each. These prices are better than some of the other sources listed above for indented blank dice.
But as I mentioned when writing about TGC for the Meeples article, if you are ordering components like these you still have to wait in their production queue. Since I live in the Madison area I think I should volunteer my time to fulfill component-only orders with no customization of cards or boxes or rules. That way, if you order stocked components only, the order would skip the custom production queue and be able to be mailed to you much more quickly. This isn’t a huge complaint and it doesn’t hold me back from ordering from TGC. It’s just something I think they could do a little better.
Amazon
The interwebs offer a bunch of sources for dice, but Amazon seems to have some good options. Here are a few that might be good for game designers:
- 25 Blank White 16mm Dice: $2.95
- 1 Inch Foam Color Resources Cubes Set of 102: $13.21
- Chessex Set of 6 Blank White Polyhedral Dice: $3.59
- Set of 100 Colored Blank 16mm Dice: $18.95
So perhaps Amazon will be your go-to source for dice.
***
And there you have it, folks! This is the conclusion of my series on sourcing game components. You should now know where to find all of the components you need. Thanks for reading along during this series. It has prompted me to desire a large order of components from all these different sources. I’d love to simply stock up on tons of stuff so that I can have the world of game components at my finger tips in case inspiration strikes! Good luck game designers!
