Blog Archives
Game Design Starter Kit

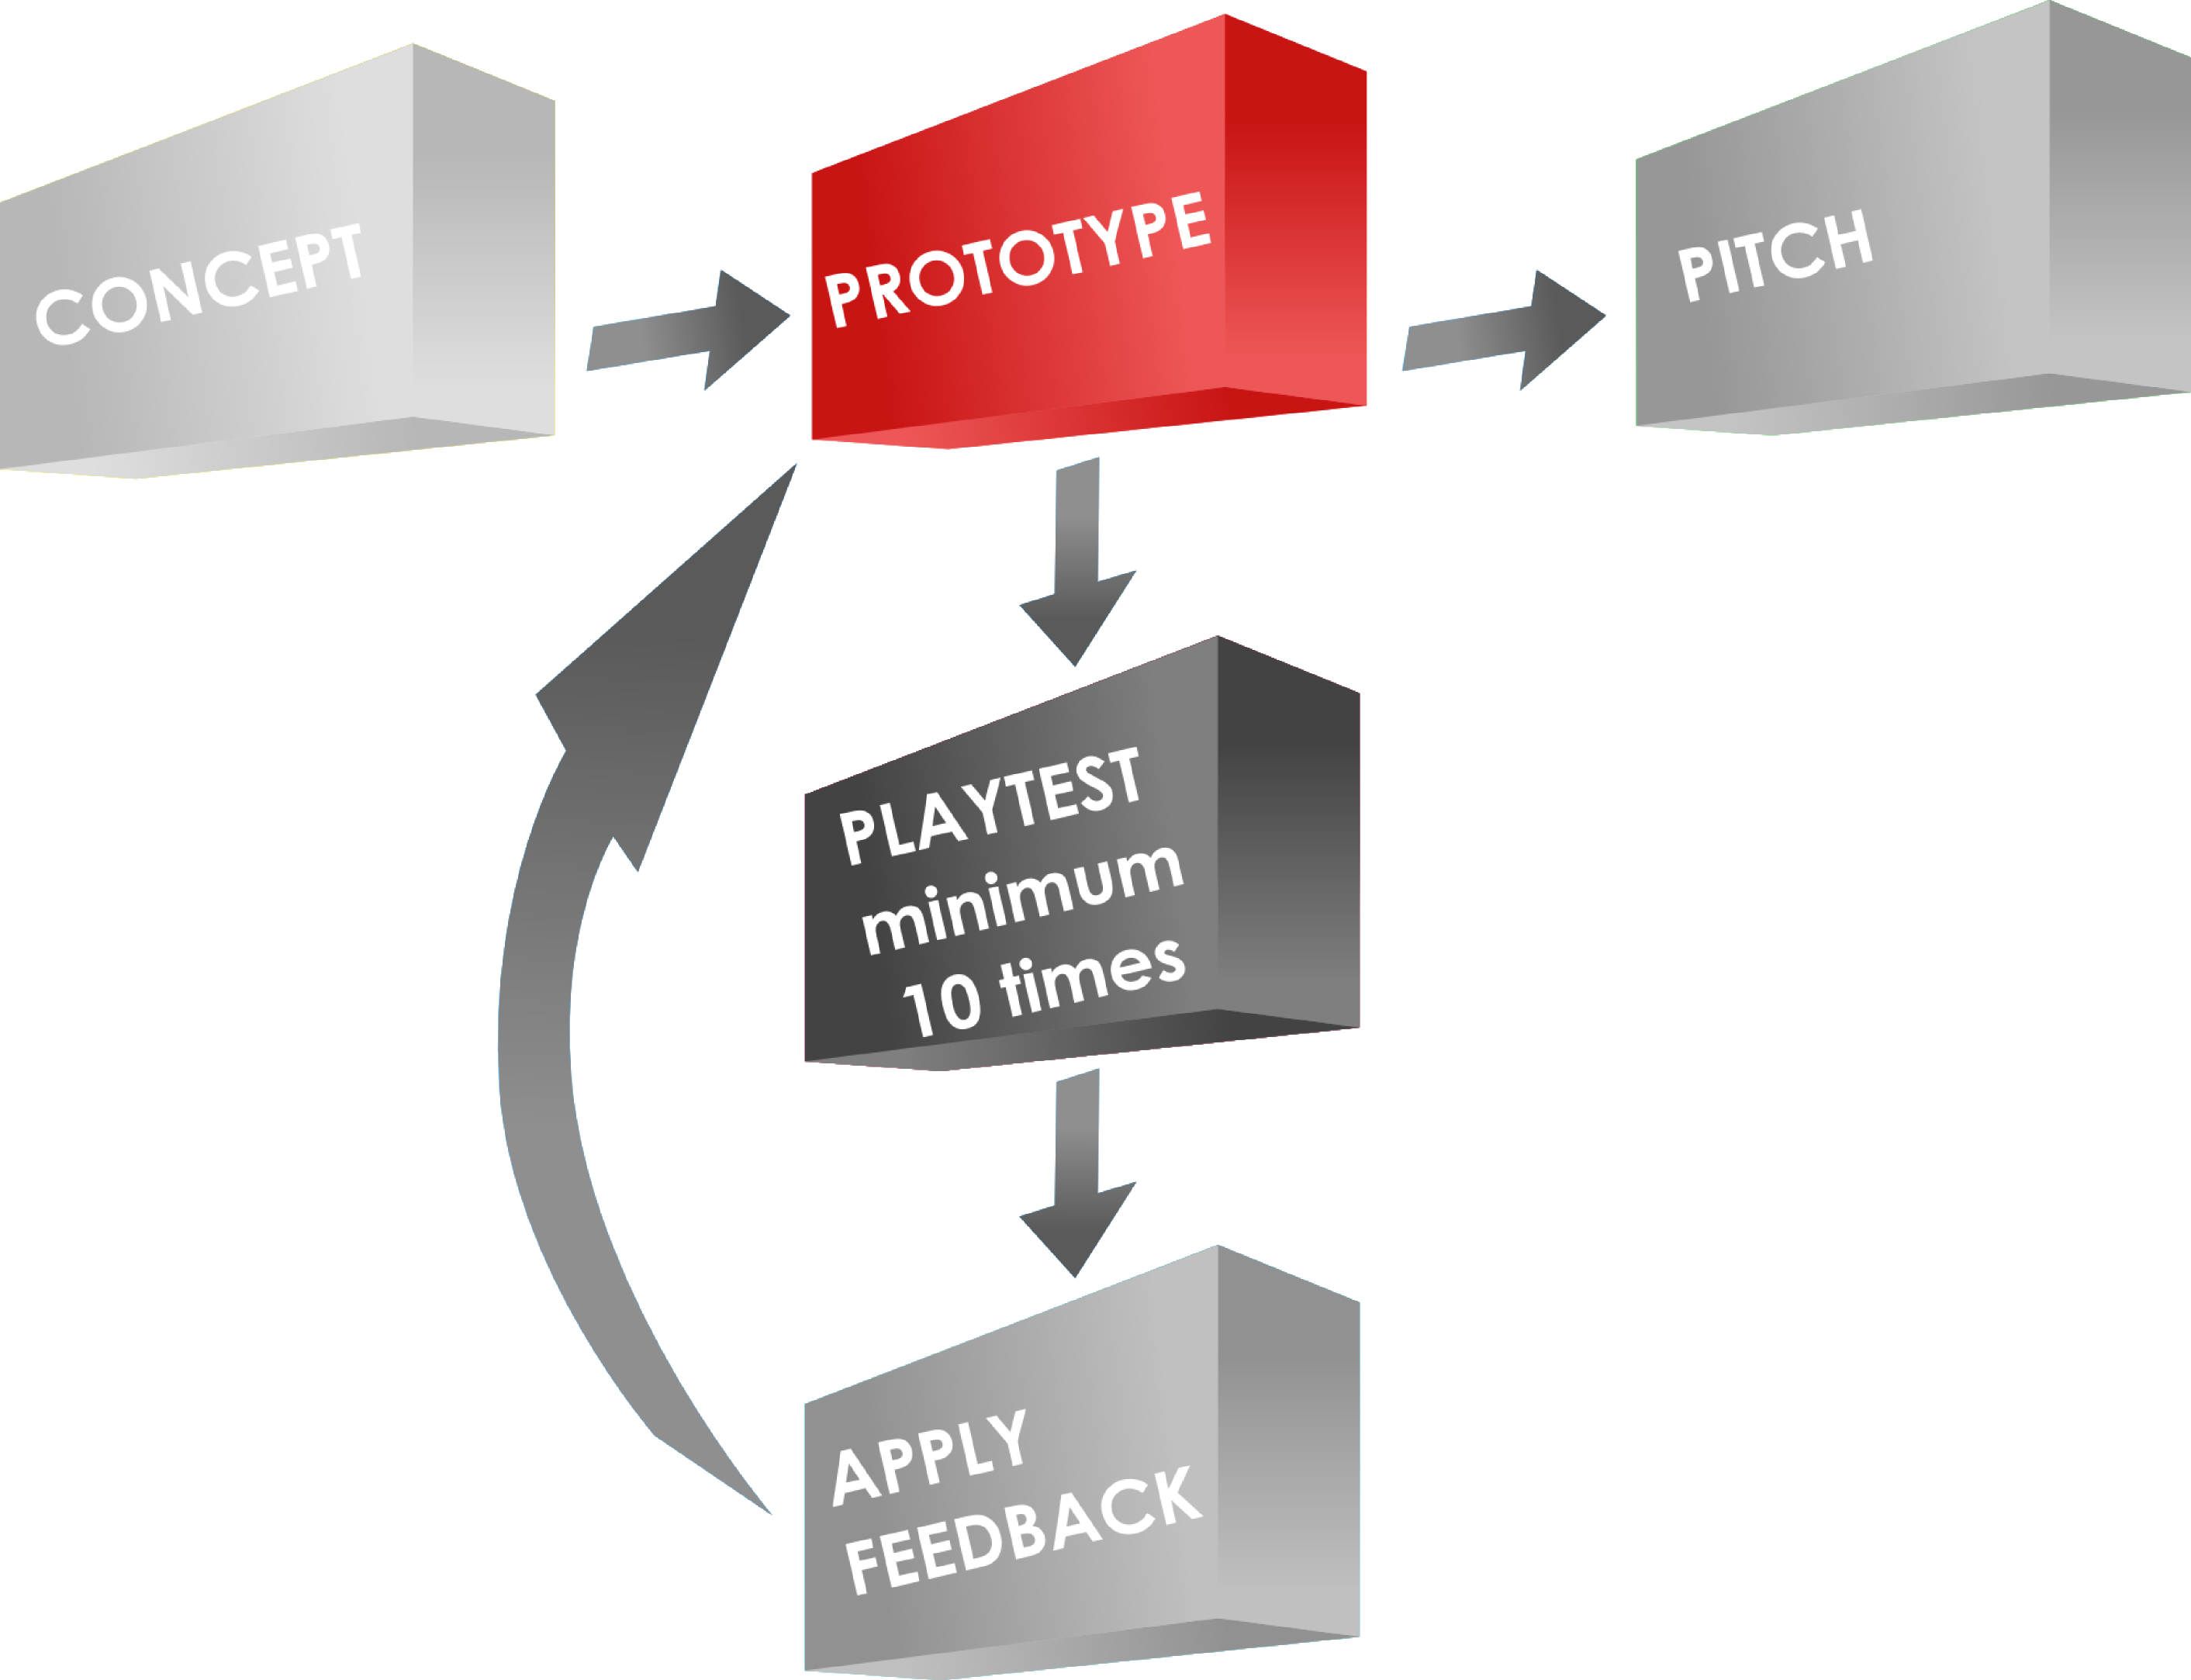
Move beyond the Concept phase!
One of the barriers to game design is a lack of components. If you had blank cards sitting around, you would be more likely to start designing a card game. If you had some dice, you might design a dice game. The point is that if you had game design components available to you, then you are much more likely to move your game designs from the Concept phase to the Prototype/Playtesting phase.
Today I am listing some of the items that I find most useful in putting together a prototype. The hope is that you can find what you need to move your game design along.
Getting to the playtesting phase is often the biggest hurdle, but it’s the critical step in determining if your game design has any potential.
Before I get to my recommendations, which are brief, I want to remind you of the series I wrote about sourcing game design components. These articles are much more thorough:
- Sourcing Components: Cards
- Sourcing Components: Meeples
- Sourcing Components: Chits
- Sourcing Components: Dice
So check those out and then come back here for the basics to get you from the concept phase to the playtesting phase of your game designs.
Here is my checklist of excellent items to have in case you are ready to move from concept to prototype. To make it easier for you I have provided two lists, one for Amazon, and one for EAI Education (my preferred source). This way you can choose one and buy everything you need from one place.
Amazon:
- 100 Assorted Blank 16mm Dice ($18.95)
- 500 Assorted 1cm Cubes ($15.56)
- 500 Blank Playing Cards ($13.50)
- 100 Assorted Mini Meeples 12mm ($25.00)
EAI Education:
- 144 Blank White Dice 5/8″ ($19.95)
- 1000 Assorted 1cm Cubes ($16.95)
- 54 Blank Playing Cards ($0.99)
- 30 Playing Pawns (These are ugly but they work) ($0.95)
With cards, dice, meeples, and cubes you are basically ready to roll out your game design prototype. Of course there are other things that you may want, but as for a Game Design Starter Kit I recommend these four items very highly! Please let me know if you have any questions.
Game Design: Starter Prototyping Tools
Game Design Process: Prototyping
I recently asked myself the following question: “If I were to start over with game design, which prototyping tools would I buy to get started?” I’ve made numerous prototypes and I’ve learned what to do and what not to do. So today I present a set of prototyping tools to help get you started as a game designer.
When I got started out I didn’t want to throw a lot of money at prototypes. This was because I had no idea if the prototypes would ever actually go anywhere. I was fortunate to have a wife who used to do physical scrapbooking. So I had some tools available to me that wouldn’t have otherwise been available.
Never-the-less, there are some key tools and resources that I think every game designer can utilize to make high quality prototypes at low(ish) cost and with relative ease. For the sake of this article I will assume that you can print on photo paper (I recommend Kodak 8.5×11 – 100 sheets).
Game Prototyping Resources
First, let’s cover where to get some basic resource type things. These are my go-to retailers for these items:
- CUBES: 1,000 1cm cubes from EAI Education for $16.95
- MEEPLES: Avatar pawns from TheGameCrafter.com for $0.15 each
- DICE: Buy a set of Tenzi dice! (Or search Amazon or eBay)
- CARDS: Blank Cards – Different Sizes – from TheGameCrafter.com
Game Prototyping Tools
Things that are not mentioned above include boards, tiles, tokens, reference sheets, rulebooks, and more. I generally use the same process to make all of those except a rulebook. I don’t typically make a rulebook.
To make my prototype components feel like high quality I purchase the following materials:
- Matte board remnants from Hobby Lobby for super cheap. You can get a stack of about 25 12″x12″ matte boards for about $6.
- Kodak Photo Paper (100 sheets for ~ $15)
- Non-OEM ink for my inkjet printer via eBay. (I bought 5 full sets of ink cartridges for ~$20)
- Glue Sticks – you’ll want to keep several on hand.
I often create artwork and then print it on the photo paper. I glue it down to the matte board. Then I break out my most highly recommended tool: The Rotary Cutter!
The Rotary Cutter

Easily worth the cost!
This has been my most-used tool for creating game prototypes.
I have a Fiskars rotary cutter similar to the one shown in the picture. You can buy it here:
It isn’t the best cutter. You can pay a lot more money for better cutters. But it does exactly what I need it to do for my prototypes. Other cutter options include:
There are more options than those, so if you don’t like those options feel free to do more thorough searching.
I use this tool to cut out the components that have been printed and glued to the matter board. This cutter works well enough for that.
Punches

Great for cardstock chits!
Other great tools for designers are punches. These are used to quickly create tokens and chits. When I create tokens and chits I usually prefer printing the artwork onto thicker stock paper so they are more rigid. 90lb or 100lb paper is usually a good weight.
There are a plethora of different punches out there, but for the sake of board games you’ll most likely be interested in circle and hex punches and corner rounders. Here are some options.
- Fiskars Squeeze Punches
- Fiskars Lever Punches
- Fiskars Corner Rounders
- List of Punches on Scrapbook.com
As before, go ahead and do some more searching to find the right product for you.
Sharpies

I am firmly in the Sharpie camp. I love them. They are bold, colorful, and extremely useful. Sharpies can be used to create prototype components rapidly, especially in the case where you own blank cards because you took my recommendation above.
By having a variety of Sharpies you become an unstoppable force of game design awesomeness!
I use them to create prototypes. I use them to mark up my prototypes. I use them to revise my prototypes. I use them to draw silly pictures for my kids.
Seriously, Sharpies are fantastic. I feel they are a must-have for any game designer, if for no other reason than to be able to practice your signature for the time when lovers of your games will ask for your autograph for their game box!

I feel like this article needs more tools in it, but those are the only tools I utilize on a regular basis. Are there prototyping tools that you use regularly? Post a comment and let everyone know which prototyping tools you prefer!
Coarse vs. Fine: Editing your Game

When Michaelangelo started carving David he didn’t grab his tiniest chisel and smallest hammer. He grabbed his big chisel and big hammer (I assume). Why? Because he needed to coarse cut the stone away to roughly the right size. Then once the bulk of the stone was removed he could use his fine tools to chip away slowly.
This Coarse Vs. Fine concept is the core of this quick article on game design.
When designing a game it is often easy to think of a lot of awesome things that could be in the game. I know there are people who put in everything but the kitchen sink into their game designs and then remove things as we go. This coarse/fine idea fits well with that design concept. There are others who start with a simple mechanic or a theme and then add things only when needed. This article doesn’t address that situation. I’ll cover that design realm another time. But for those of you who start big and remove the unnecessary components, keep reading!
The Stone

You must choose wisely… Not really.
When you start a game design you’ll choose a mechanic or a theme or both. This is like going to the quarry and picking out the stone you’ll start with for the sculpture. When picking the stone you want to make sure it is big enough, has the right grain structure, possesses the desirable color and so on. Similarly, when choosing the mechanic and theme you’ll want to make sure you’ve got a lot of different components that fit with the theme and mechanic.
So go ahead and make your choice. Once you’ve got your stone it’s…
Hammer Time!
This is where you design the game, prototype it, and play it.
Once you’ve played it there will likely be parts of the game that don’t work, are broken, don’t make any sense, or aren’t fun. Take the hammer to them!
Like making a sculpture, once the stone is in your workshop you typically sketch a little on the block and then start taking the hammer to it. It is time to take away big chunks of the stone that you know you won’t need. Don’t be afraid to remove those big chunks of stone.
Back in the game design world, this is where you remove those chunks of the game that were broken, didn’t make sense, or weren’t fun. Don’t be afraid to get rid of them.
If you have things that don’t make sense thematically… Hammer Time!
If you have mechanics that don’t work right… Hammer Time!
If mechanic X isn’t any fun… Hammer Time!
If you aren’t happy with something… Hammer Time!
The point here is to narrow the focus of the design. Take away the things that obviously don’t belong. If something is iffy, save it for later. Playtest it over and over until you feel you’ve removed all the big chunks. Then put away the hammer and grab the chisel.
Chisel Time!
I know that “Chisel Time” doesn’t sound as awesome as “Hammer Time” but it’s much more important in terms of game design and development. It’s easy to break away the big chunks of a game. But using your fine tools to craft something with elegance and class is very difficult.
Chisel Time is really where you move from game design into the game development realm.
Once you have finished with the hammer you are left with a block of mechanics, components, and concepts that closely resemble a final product. The nitty gritty down and dirty work happens in the Chisel Time phase. This is where you playtest, tweak, playtest, tweak, playtest, tweak, and on and on. You’re no longer removing large chunks from the design. Rather you are polishing the remaining elements to make them as streamlined and perfect as they can be.
So What?
The whole idea here is to give a perspective about how game design works. Relating game design to sculpting stone allows me to have the right mindset when I’m working on a game design. Early in the process it is important to put the elements together and make a prototype. You can’t take a hammer to it unless you know what you want to remove.
Once you’ve hammered away the big chunks then your mindset changes. You’ve got the mechanics you want. Now it is important to figure out how to balance the mechanics and the currency and the other elements in the game. You go from removing elements to refining elements. That’s a lot of work, but it is also one of the most rewarding parts of the design process. Just a couple weeks ago I had refined an element for Brooklyn Bridge and one of the players mentioned how it took it from “Good” to “Special.” That’s really what you’re looking for during Chisel Time.
How do you design games? Do you start big and remove things as you go? Or are you the opposite where you start with a simple element (mechanic or component) and then add the things that are needed?
Decision Space in Game Design

New Belgium Brewery offers a nice decision space! Photo via Flickr user quan ha @2009
Decision Space:
– the range of options at the decision maker’s disposal
That simple definition is from a paper titled Supporting a Robust Decision Space from the Association for the Advancement of Artificial Intelligence. It is a nice definition for what I mean by “decision space.”
Decision space is an important concept for game designers to consider when working on their designs. One of the best things a game can offer is a plethora of interesting decisions. One of the worst things a game can do is limit your decisions or take them away completely. There’s nothing worse in a game when it’s your turn and you only have 1 option. It’s as if you have become a robot just going through the motions.
Today I’m going to cover how game designers should consider Decision Space in their designs. At the forefront of game design is the notion that games are supposed to be fun. With that in mind, let’s cover 3 examples of Decision Space in your game can make it better.
- Unlimited Decision Space
- Limited Decision Space
- Tailored Decision Space
Some times it’s good to offer a lot of choices. Some times it’s good to limit a player’s choices. But the point of this article is that the decision space available to players is an important concept to consider in your game designs.
Unlimited Decision Space
Okay… first off, “Unlimited” is a bit of a misnomer. I do not believe there are any games with a truly infinite decision space. Rather, this is meant to point out situations where the decision space is so large that the players do not feel limited in any way. The world is their oyster, in essence.

Build as you see fit!
One great example of an unlimited decision space is the route-building aspect of the classic game Empire Builder. There is a huge map and you have your special little crayon. You can stare at the board and your cards for a long time while yielding the power of the unlimited. Where should you begin your route? Where should the route go? Should you cross the rivers/mountains or go around? How much track should you lay? There are a lot of decisions you could make about the route you want to build.
How is “Unlimited” Fun?
There is a nice liberty in having an unlimited decision space. Players often enjoy being able to choose freely, to mess up freely, to make an awesome move freely.
Consider utilizing an unlimited decision space in games where you want players to have full control and to be fully accountable for their decisions.
Limited Decision Space
Sometimes it is prudent to limit the decisions a player can make. These situations are common at the start of a game.

Starts “Limited,” ends “Awesome!”
Two great examples are Dominion and Eminent Domain. These are both deckbuilding games. In standard deckbuilding games you start with a very limited hand of cards. One your first few turns you will be limited in what you can do.
Limiting the decision space early in a game can be beneficial to help a player get used to how the game operates.
Another example of “limited” decision space comes from the popular game Ticket to Ride. In the game you have three options on your turn. You can draw more route cards, play trains to the board, or draw train cards. And even the choices within those options are limited. You can only play trains to the board if you have the right cards in your hand. You can only draw train cards from the face up cards or the face down pile.
How is “Limited” Fun?
One of the ways that Limited decision space can be fun is by adding tension to game. Using Ticket to Ride as the example again, players have tension due to the limitation. Maybe they just need one more green train to claim that big route. But perhaps another player has already built near the green route. Not that first player is hoping that the other player doesn’t take that green connection that they’ve been working on. But because the decisions are limited, the player has a slight feeling of helplessness.
Limiting the options on a player’s turn can also speed up the game. Sometimes (or perhaps often) the Unlimited decision space games tend to get into the Analysis Paralysis (AP) regime. Limited decision space games tend to decrease the amount of AP in games.
Tailored Decision Space
Tailored decision space refers to situations in games where the decisions you previously made will shape the decisions you have available in later turns in the game. Often games with tailoring offer multiple paths to victory where once a path has been chosen it is better to continue following that path than to start working on a different path.

How will you shape the countryside?
Some of the best examples that I can think of are Uwe Rosenberg’s games Le Havre and Ora et Labora.
In Ora et Labora players start with a plot of land that they are looking to develop. Throughout the game players will add buildings to the land that provide new actions. Then on their next turn, those previously placed buildings add to the decision space available for the player.
This is actually a common thing in engine building games. Engine builders are games where you build something and increase your skills/options/capabilities. In most of these games you can build something, that let’s you improve it, and then make it really awesome. All along the way you can either diversify and build a bunch of stuff that might be mediocre. Or you could possibly build one type of thing and make it really awesome.
The card game 7 Wonders also has a “tailored decision space” feel to it. In each of the three stages you can play cards to tailor your wonder in one of several different types of things. By adding resource production you can set yourself up for different types of things. For example, if you produce the manufactured goods (gray cards) then you can usually do pretty well with the science cards (green). So the cards you choose throughout the game will tailor the decision space that makes the most sense as you move your way toward victory.
How is “Tailored” Fun?
I think having a tailored decision space in games allows players to feel like they are really accomplishing good stuff throughout the game. In Scoville the field acts as a tailored decision space. Each round as new peppers are added you are creating new opportunities for breeding peppers. Each new spot opens up the number of decisions you can choose.
Tailored decision space is also a way that you can steer your strategy in a game. By choosing card A it might make card B much more attractive. Then by choosing card B it might make card C more attractive.
Why Should You Care?
As a gamer none of this really matters. Just find a game that you think is fun and play it.
As a designer, it can be worthwhile to consider the way decision space works in your game designs. Are you limiting players? Are you allowing them freedom of choice?
Decision space is an easy thing to neglect when designing a game. Normally we’ll pick a theme or pick a mechanic and start designing. But I wonder how things would go if a designer chose the type of decision space they wanted and then added a theme and mechanic after the fact.
What are your thoughts about decision space in games? Did I get it completely wrong? Does it make sense?
