Blog Archives
Game Design Process: Applying Feedback
 It’s time for another article on the Game Design Process. Today I am providing a guide for interpreting feedback and applying it in beneficial ways to your game design.
This is a critical area of the game design process. It is very important to listen to what your playtesters mention. There’s usually a reason they say the things they do. But understanding what they actually mean can be tricky. Let’s start with some basics.
Common Feedback:
Matt Loomis, fellow game designer and blogger who I had the privilege of meeting at Protospiel-Milwaukee back in March, recently wrote an article all about this topic. You can find it on his blog – TheMetaGame.blogspot.com.
If you are a game designer I recommend reading his article and following his advice. One piece of advice from the article that I have also mentioned is this:
If players start the game taking the same actions every game, start the game from there.
The point of that is that if everyone makes the same decision on the first or second turns, make that decision part of the game setup. Players should start the game making unique decisions. I totally agree with Matt!
Here are a few pieces of common feedback that should be understood and interpreted:
- The game takes too long. (They are bored)
- The game isn’t fun. (They are bored)
- The game felt like work. (The game isn’t fun – see above)
- The game was really slow. (Too much downtime, or not enough to do on their turn)
- I couldn’t do much on my turn. (Not enough unique options or too limited per turn)
- My decisions felt scripted. (Not enough unique options)
- I don’t like the art. (Get over it… it’s a prototype!)
- You should use such-and-such component. (Thanks. Hey, did you realize this is a prototype?)
Obviously some of these are just not helpful. But players are saying them for some reason or another. So let’s try to examine why playtesters say the things they say…
Advice from Chevee Dodd:
I pinged Chevee about advice for interpreting and understanding feedback. For those who don’t know him, please visit his website (cheveedodd.com). He is the designer of Scallywags and a few other upcoming games that are awesome. Here’s what he had to say:
Understanding feedback is a vital part of game design that many people don’t understand. When someone tells you that you should dramatically change your game because they don’t like an aspect of it, that is not bad feedback… they may have just not worded their concern properly. Take this feedback and look at it objectively. If they want you to toss out a portion of your game, or add in a whole new layer, ask yourself “Why?” It is often because they felt that their options were limited or their actions weren’t meaningful enough. So, maybe their suggestion is to add atomic cannons that shoot rainbow fireballs, blinding your opponents and making them discard their hands. It’s very likely that this is completely wrong for your game… but at the core, maybe there IS a need for you to be able to mess with your opponents hands and not having that is making the game frustrating. So, you add a little ability here that lets you discard a card at random from their hand and suddenly you’ve added a bit of control (through chaos) to the hand-management portion of your game.

Now that’s what I’m talking about!
That is some excellent advice! I think the atomic cannons shooting rainbow fireballs sound particularly awesome!
I think Chevee’s point is that sometimes playtesters will mention something while meaning something else. When players mention things like adding awesome cannons that let you do great things, they are probably suggesting it because they don’t feel like they are able to do great things. And that is an important point of applying feedback. Before we get into interpreting feedback I want to make a more global point about all of this…
Don’t Take It Personally:
You’ve invited people over to try out your latest and greatest game design. This is the one you think will make it big and revolutionize the board game industry. You can’t wait to get it on the table because you just know people are going to laud and magnify you for it.
And then they play it. And then they hate it. Uh Oh.
They slander it. They posterize it. They straight up say it was the worst thing ever. You start to feel angry and think to yourself, “These idiots… they have no idea how awesome this is.” You get upset and ask them to leave. You feel dejected. You feel like you’ve been rocked by a rainbow fireball. You start to wonder where things went wrong and why they don’t like you. Boom… that’s the problem – It’s not about YOU!
Here is my favorite advice for applying feedback:
They are not rejecting or criticizing YOU. They are rejecting or criticizing your GAME!
The same goes for praise. Just because someone might love your game doesn’t necessarily mean they like you. The bottom line here is that we are applying feedback to the game and not to the designer. The game is what matters at this point. Don’t let your emotions cloud your opinion of your playtester’s feedback. And don’t take it personally if they think the design seems broken. Often if players feel a design is broken, it’s because it is broken. Get over it and move on!
Interpreting Feedback:
Okay. So you did not take it personally and you are ready to interpret what your playtesters were really meaning when they said they hate your game.
Often playtesters do not think like a game designer. That’s why I recommend attending things like UnPub or Protospiel where you can get feedback from other game designers. You can often find other designers at your friendly local game store. But how can you interpret feedback from non-designers who may not know the best way to state what they actually mean? Let’s examine a few scenarios of a hypothetical game about boll weevils.

Please not boll weevils again.
Your game design has players developing a colony of boll weevils. Players will build a structure for the weevils, feed the weevils, and try to claim the best territory for the boll weevils.
During your playtest someone mentions that colonization seems too valuable. Another player mentions that they think you should have different abilities for the boll weevils. A third player mentions that they got to a point where no matter what they did it didn’t seem to help. Let’s examine these three pieces of feedback and interpret what they may actually mean.
#1: Colonization seems too valuable. (Balance is the issue)
In this case I could imagine the player falling behind another player who had chosen the colonize action. The best way to interpret this feedback is to understand that the player felt like the actions they chose were not as good as those of the colonizing player. In this case, as the designer, you may need to work on balancing the short-term/long-term benefits of taking one action over the other. Balance in a game is often a very difficult thing to get correct. The result is that you will often receive feedback that is directly related to balance without the playtesters mentioning the word balance.
#2: Add Different Abilities. (Lack of interesting choices is the issue)
The playtester that wants different abilities for their boll weevils is likely feeling that they cannot do enough on their turn, or that they cannot do anything interesting on their turn. They recommend adding abilities as a way to specialize their game and give them something more interesting to do. The key to understand here is that the player doesn’t feel like they can do enough interesting things. They want abilities so that they can turn dull decisions into decisions that require more strategy. When playtesters suggest adding things to a game it is often because they feel the game is lacking interesting choices.
#3: Nothing They Do Can Help. (Results of decisions are not apparent)
When players begin to complain that there is nothing they can do that will help them there could be several reasons. The first reason is that the game is about to end and they are so far behind that it does not matter what they do because they just cannot win. The second is that the game limits how much a player can do on a turn that each decision is so insignificant that it won’t matter. And a third reason is that players may not be able to understand how their decisions are effecting the game. Keep an ear open for any time players feel like their decisions don’t matter. This is a big deal. Games are supposed to be fun and if players decisions do not matter, how much fun could they be having? Players may say things like this when they are not having fun, or when they have lost interest. This will require taking a deep look at your game design and perhaps reworking a few things. As a designer it is critical to understand that you want every single decision that a player makes to have a significant effect on their opportunity to win the game.
Those are just a few scenarios out of an infinite playbook of playtester feedback. What I hope you have understood from this is that often playtesters will say one thing and mean something else. They may be very specific about what they think should change in a game while actually meaning something very vague.
So when playtesters offer feedback I recommend asking them why they suggested the change. Asking them why can open the conversation up to the real feedback that they are really trying to tell you. Ask them what is at the heart of their comment. This can be really useful.
Applying Feedback:
We’ve discussed interpreting feedback. Now we dive into applying that feedback. This can be difficult and tedious, but now that you understand what your playtesters were actually saying, you are ready to improve your game.
As shown in the graphic at the top of this article I prefer having ten playtests between changes in my games. Ten seems to be a good enough number where you can likely hear the same feedback from several different players. If, over the course of those ten playtests, you do hear the same feedback, then you likely know this is something that should be changed or adjusted. If you make sweeping changes between each playtest you’ll have no idea what part may or may not have improved the game.
The other thing I like to do with feedback is apply one change at a time. With Scoville, for example, several different people had mentioned that the brown cubes felt a little weird in the game. But it took several playtests to hear it from those several people. Later on other players said they loved that brown cubes introduce a way to mess with your opponents. Here’s the key:
Don’t let one person’s opinion of your game dominate how you change the design.
When multiple people mention the same thing then you know that something’s up. Then you can feel free to address that feedback.
So my two guidelines are these:
- Only apply one major change to the design at a time.
- Try to playtest each change at least 10 times before adding the next change.
Using these two guidelines should help you to understand which parts of your game design are awesome and which need some work.
***
So now you have a way to interpret and apply feedback. Get to the root of what your playtesters are saying. Apply the appropriate changes one at a time. You will be well on your way to creating a well polished gem of a game! Thanks for reading. Feel free to leave your feedback of this article below. I will try to interpret it correctly!
Bonus Trading Post Post

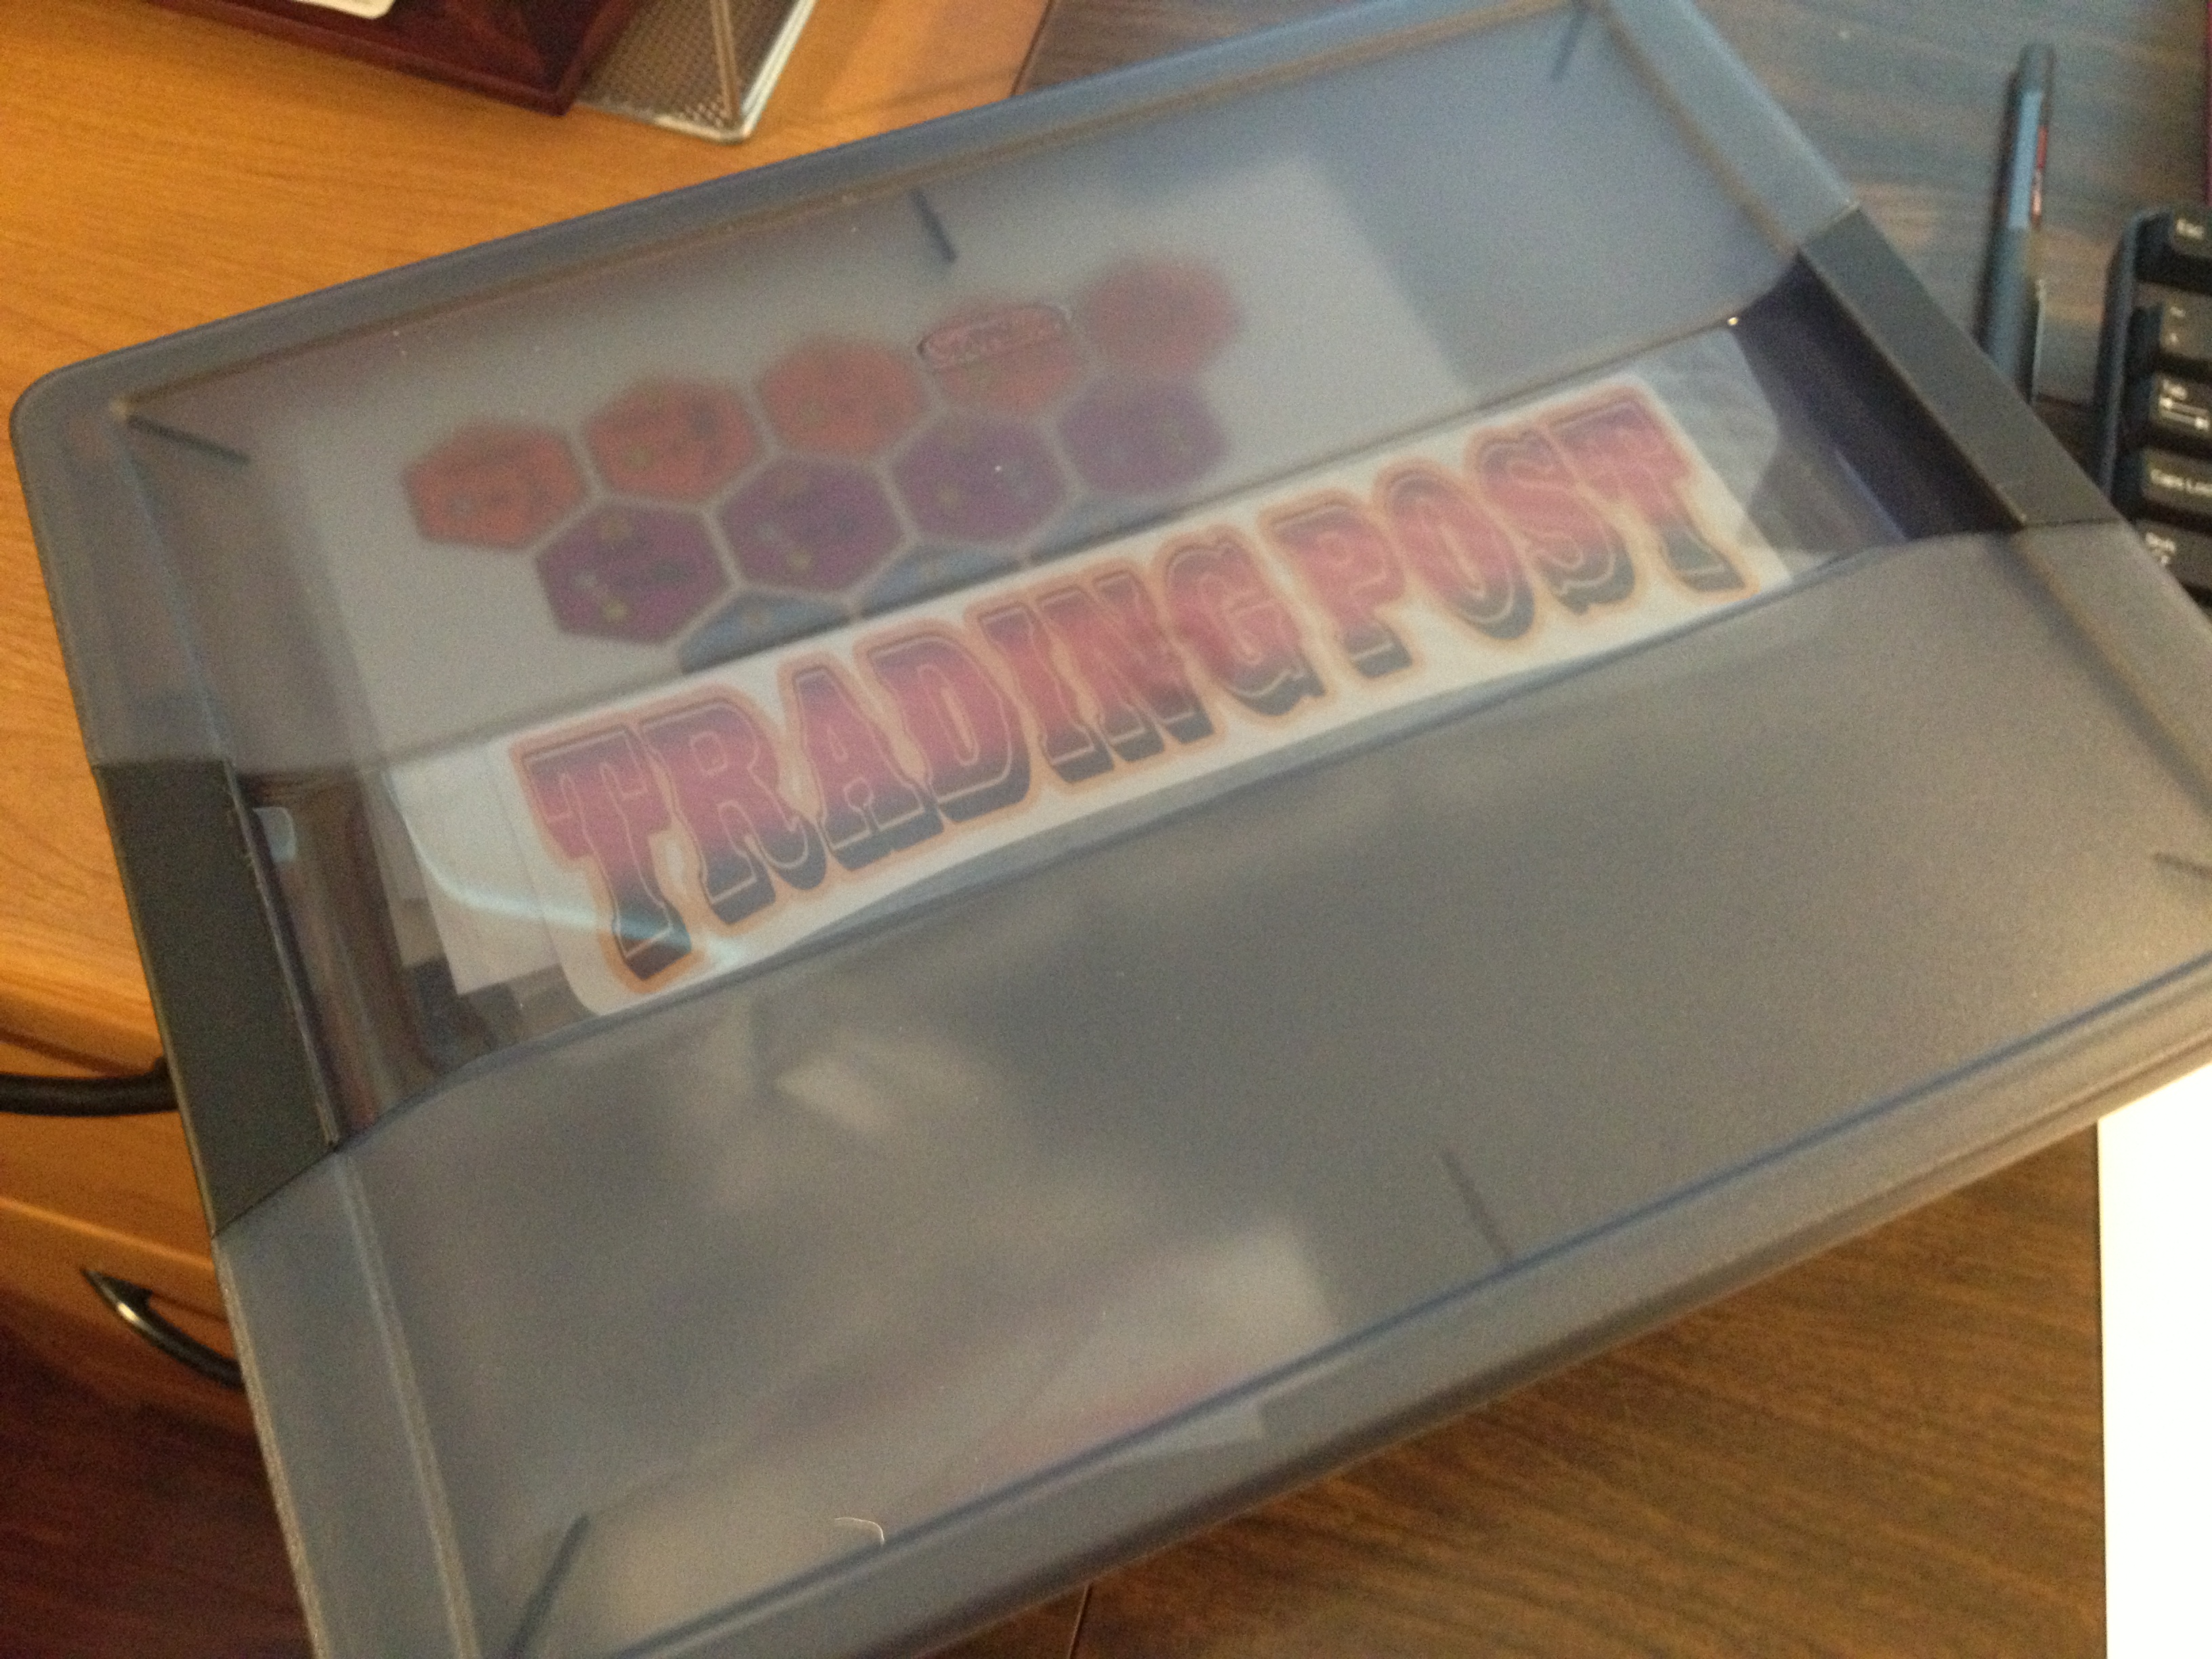
My Trading Post Logos
Over the past four weeks I’ve been writing about a new game redesign of mine by the name of Trading Post. Since there has been a decent level of interest in the game concept I thought I’d write one more article about the game. So far I’ve covered the following:
- 5-16-13: Origins of Trading Post
- 5-23-13: Early Prototying
- 5-30-13: Hiatus and Re-design
- 6-6-13: Path to GenCon
- BONUS Today 6-13-13: More on Trading Post
Today I’m giving you some bonus material on where the game is at, how to make it better, and some other tasty morsels. But let’s start with how good I am at focusing on things other than actually designing this game!
I’m Good at Wasting Time (and Effort!)
One of my downfalls in life is my desire for perfection. Perhaps perfection is the wrong word. That paints me as someone with OCD, not that there’s anything wrong with that. Perhaps a better word would be aesthetics. I desire for things to look good.
At the end of May an article was posted on Example of Play called, “The Benefits of Crappy prototypes.” I will provide a rebuttal for that article next week, but I wanted to mention it today because I am not a believer in crappy prototypes. And this may be my downfall.
I love a good looking prototype. I love good game art. If you’ve read my board game reviews you’ll see that artwork is consistently mentioned as either a like or a dislike. I approach game design as though I’m reading a story. I like to be enveloped in a different world and escape this one for an hour or so. Artwork is a key way to get that experience across to the players.
What this means is that I spend way, WAY too much time in Inkscape making prototype artwork. The upside is this:
The downside is that I have four logos (as seen above) for a game that no one has yet even played! I just can’t help myself.
So I had a think about what this all really means. I was a little disappointed in myself for the artwork side of things when the game design part of it seemed lagging. But then I remembered the whole purpose:
Games, and game design, are supposed to be fun! Why else design games or play them?
So I’ve realized that though the artwork doesn’t specifically help a game design move forward, I’m having a lot of fun working on the artwork. Thus, I shall continue.
Solo “Playtest” #1
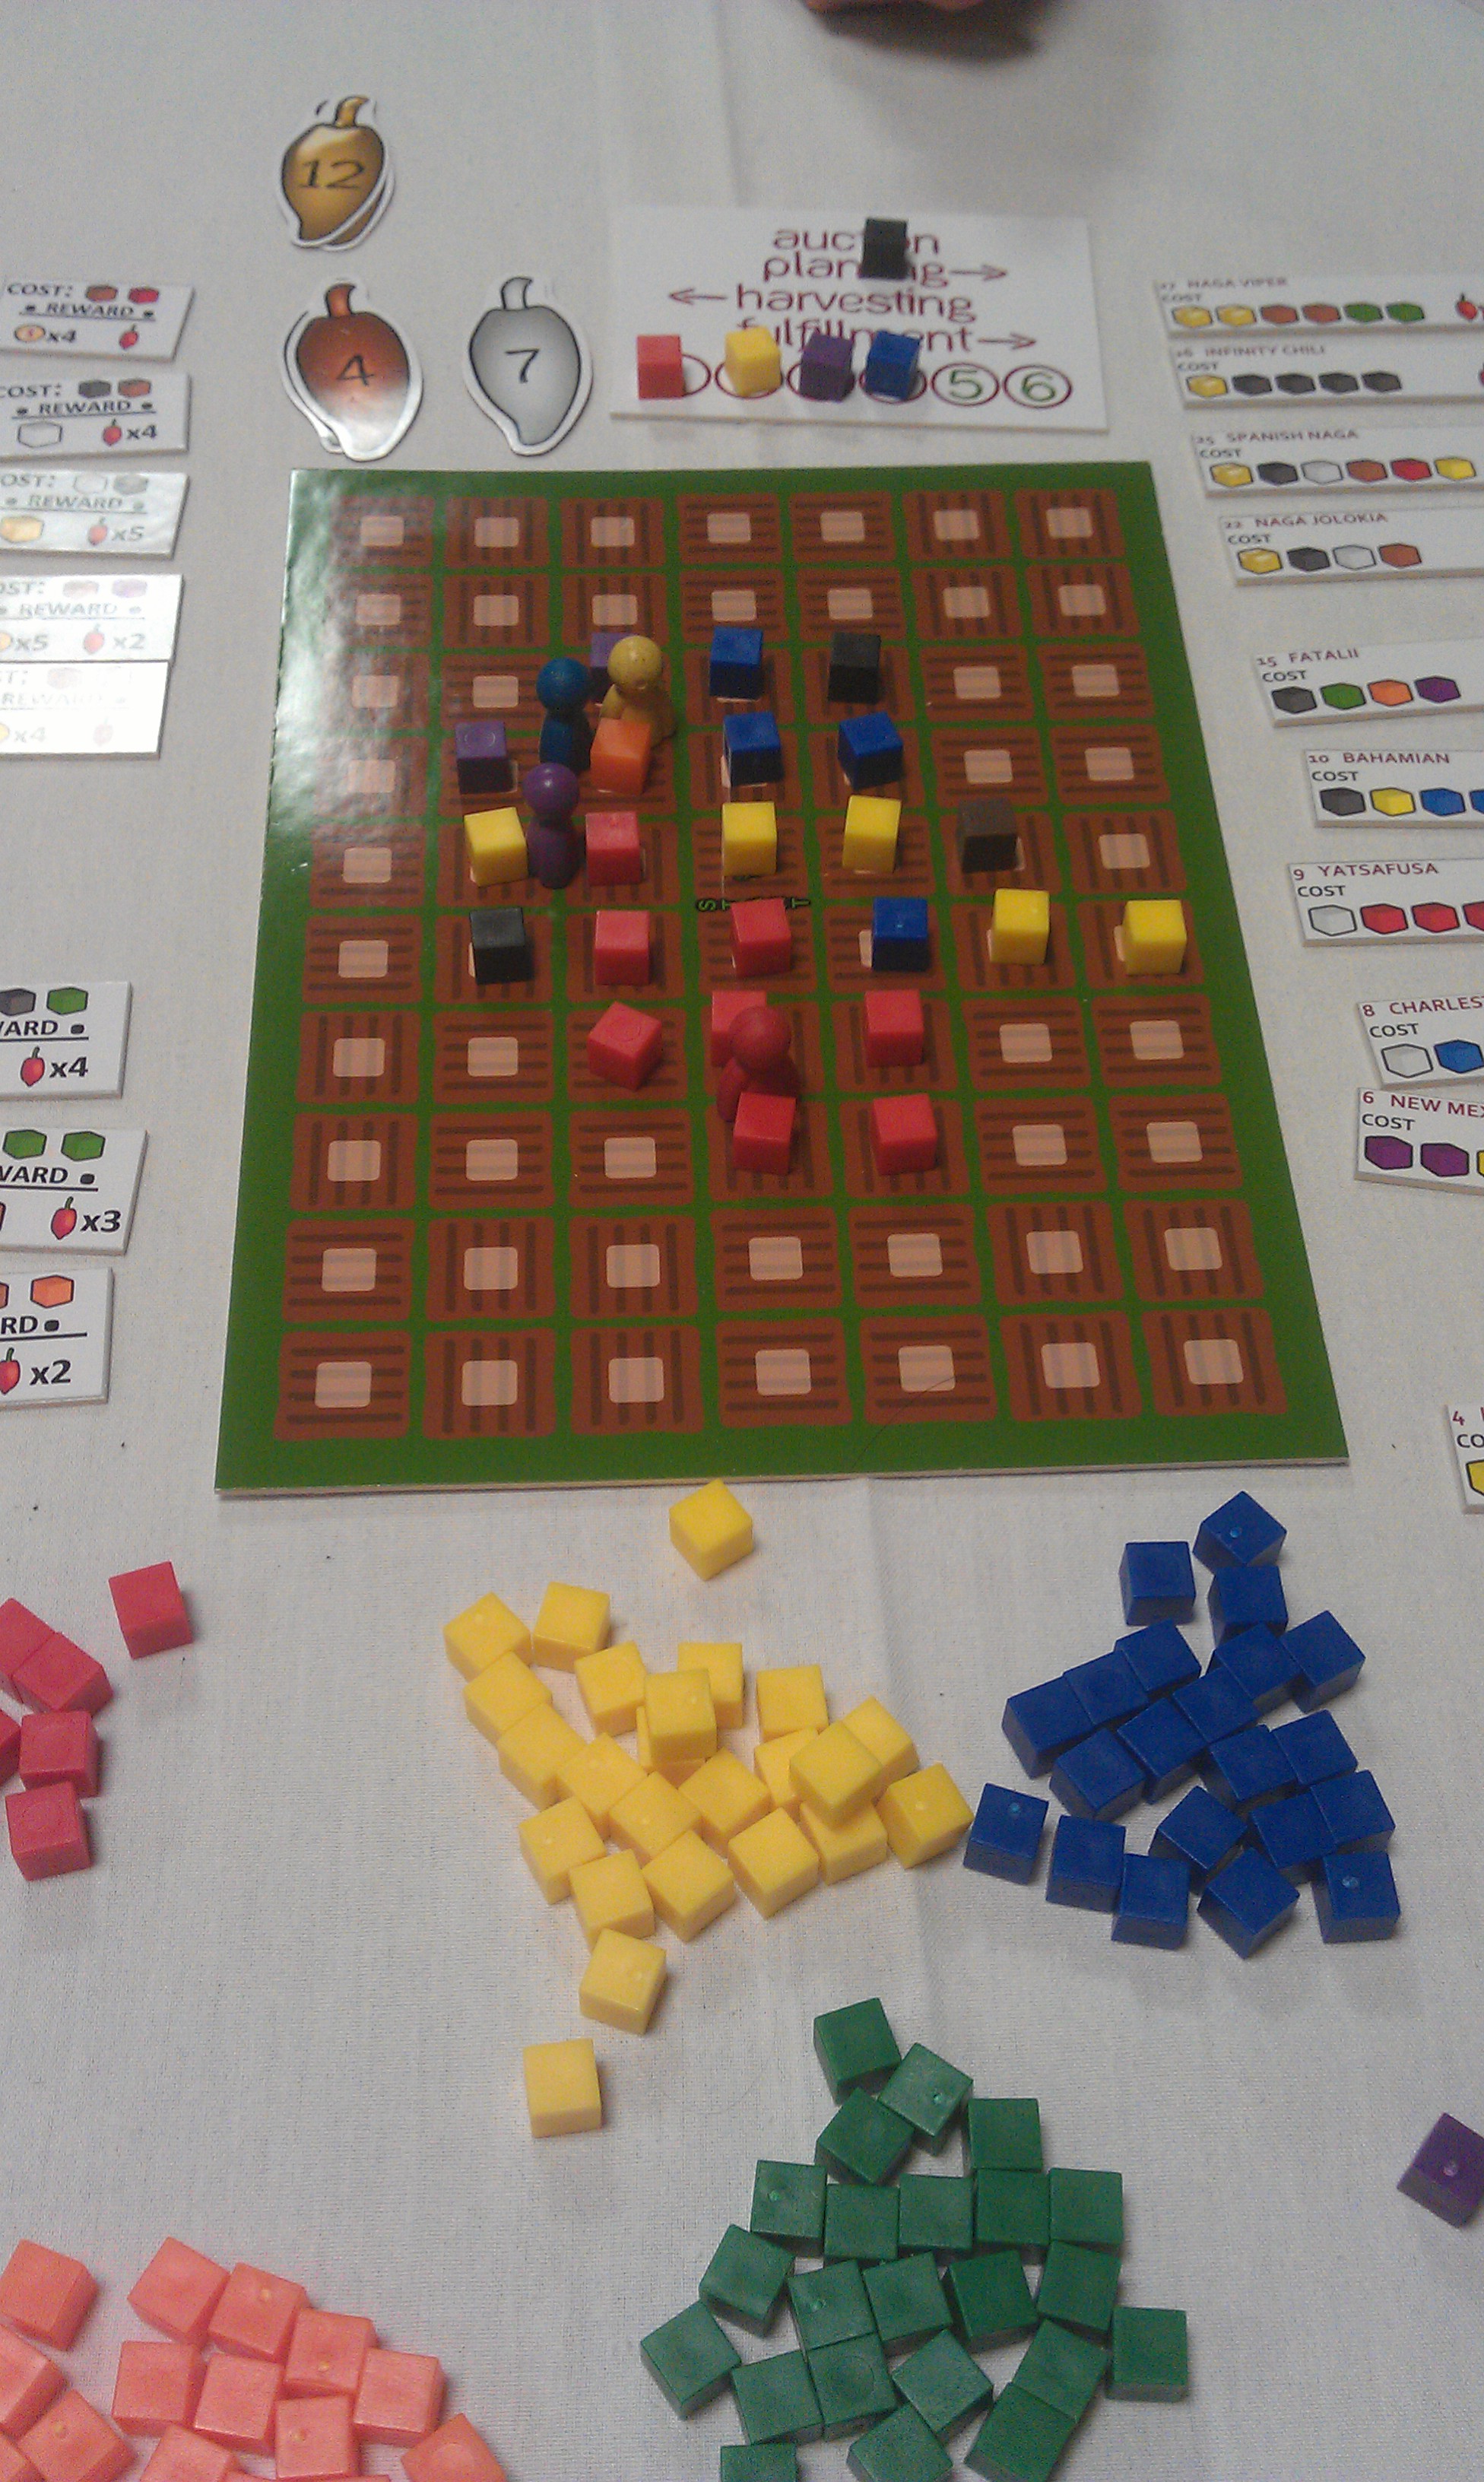
Last week I showed the picture of the game setup. I’m repeating the image here for easy reference:
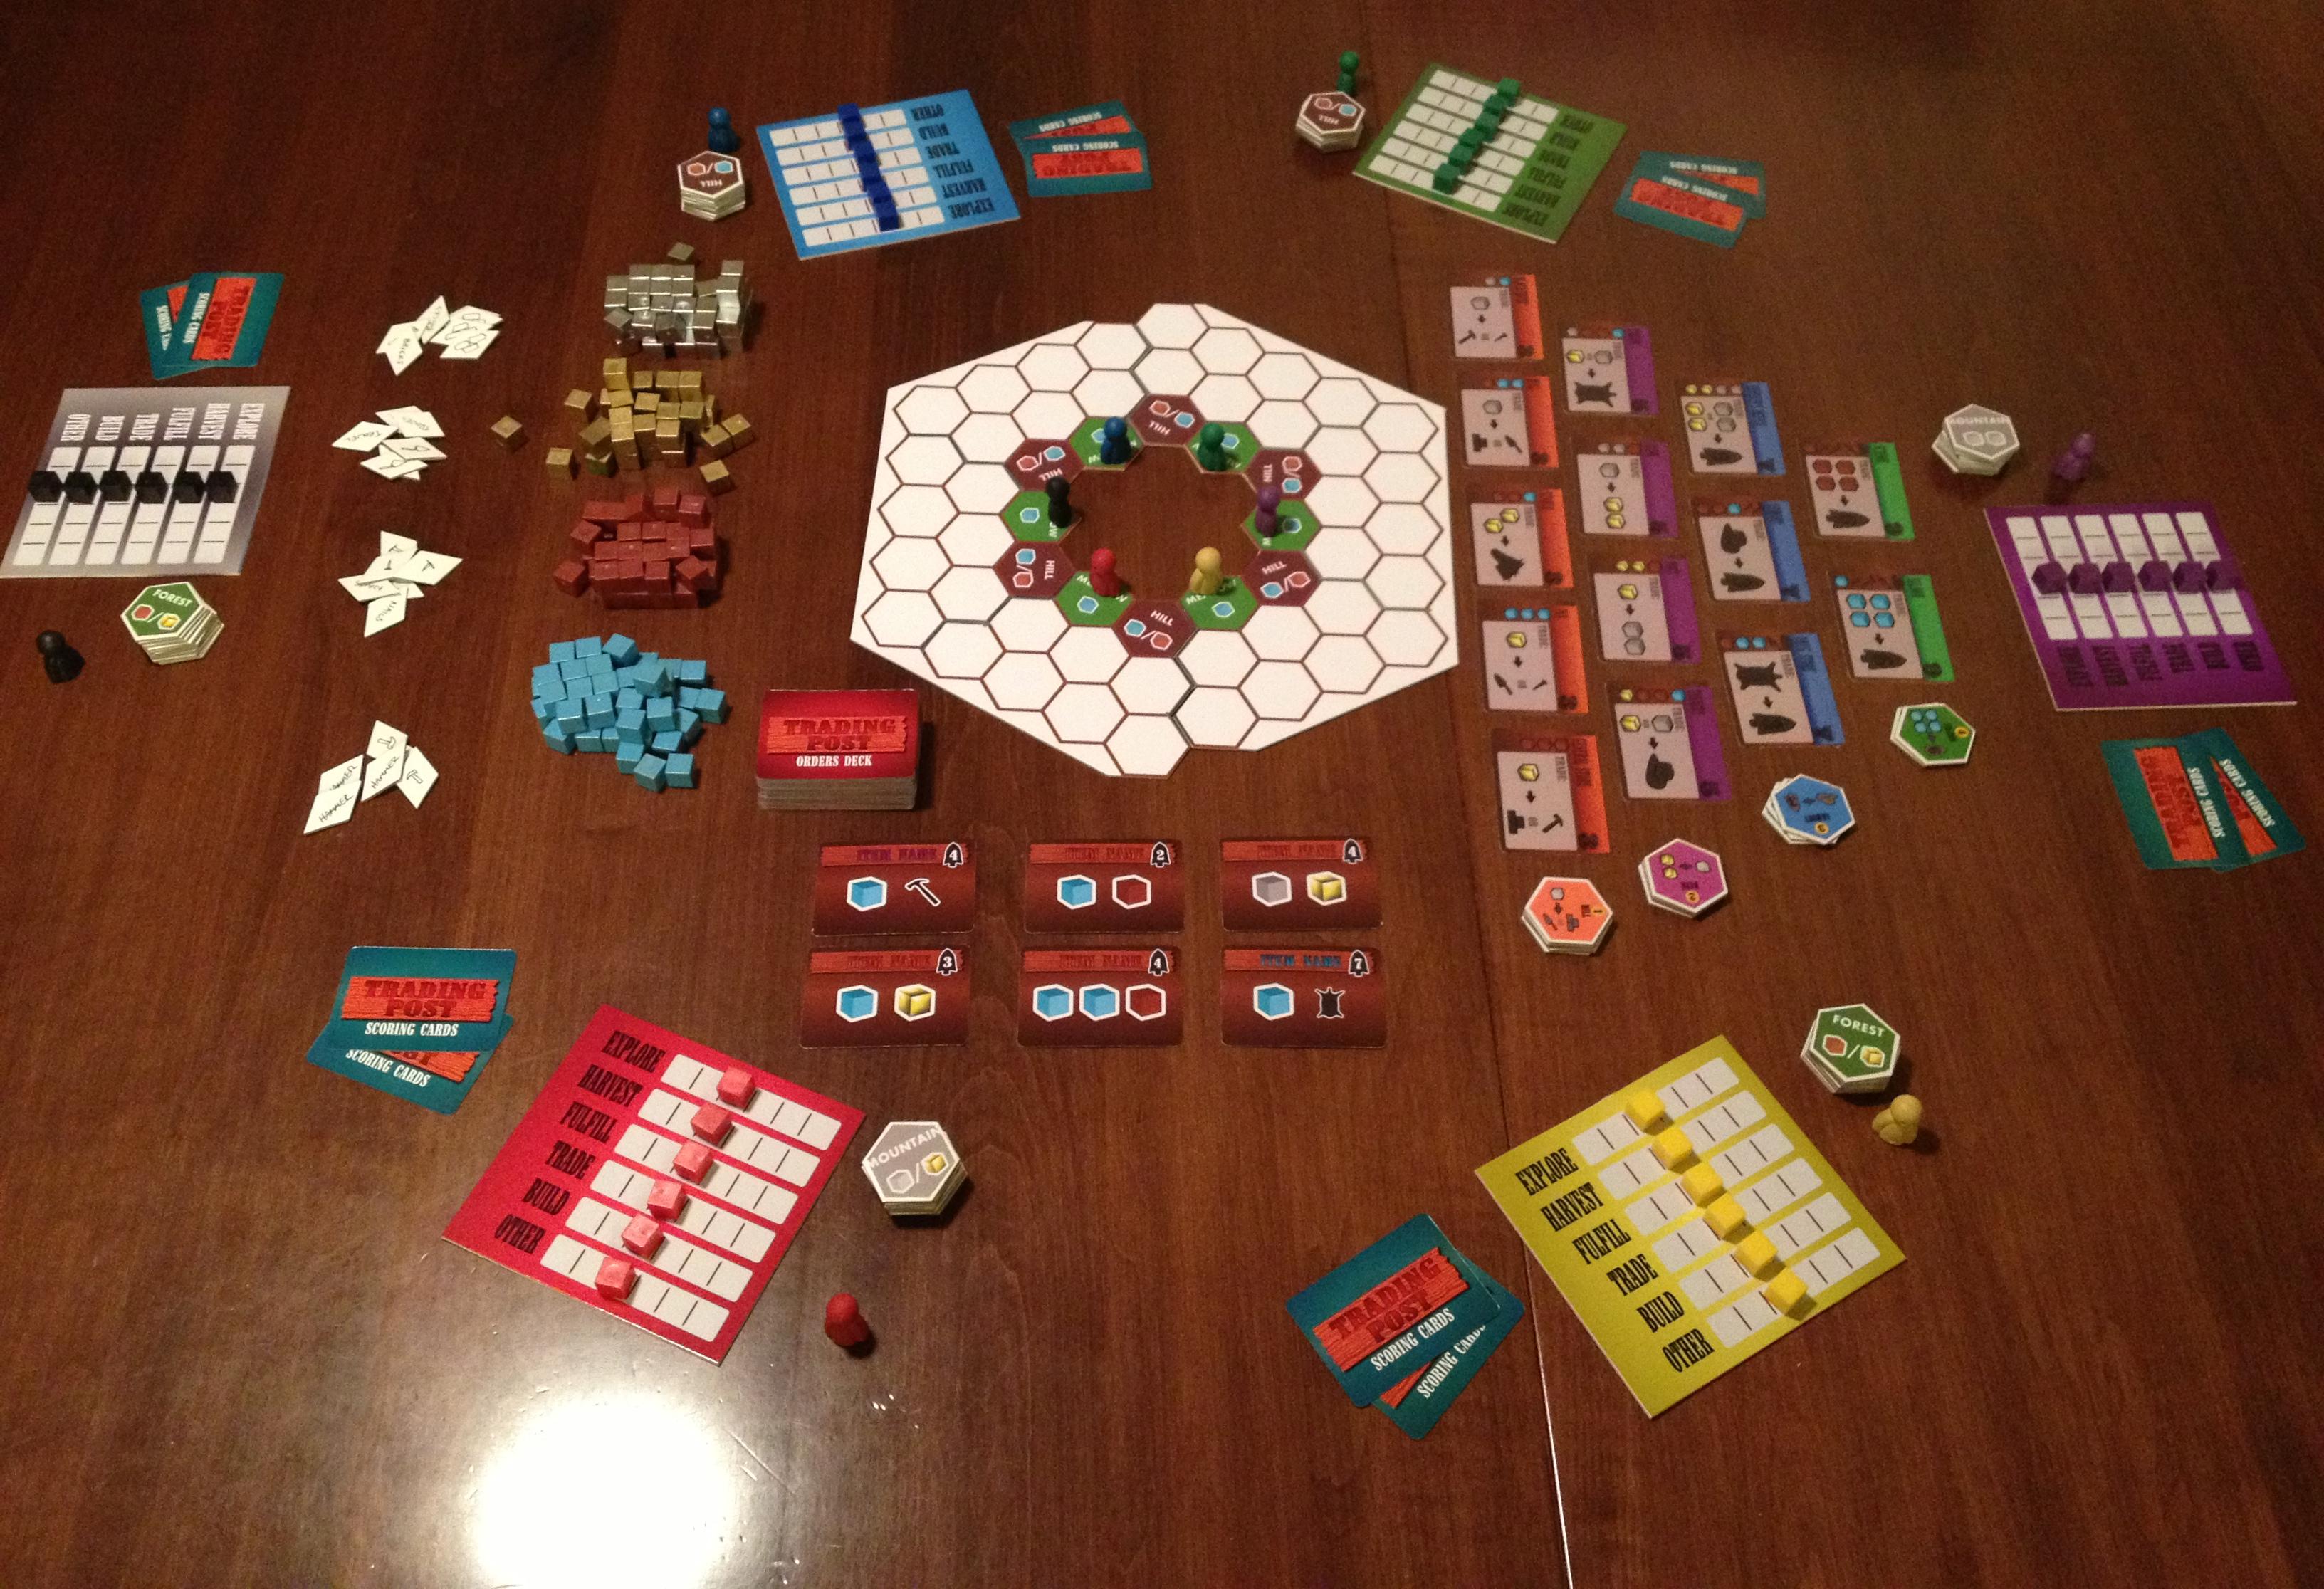
Current Trading Post prototype. I think it at least looks cool!
Since this is an insight into the inner workings of my mind I am sharing the thoughts I wrote down while attempting to play the game for the first time.
First, some rules. On your turn you can take up to 3 actions. These can all be the same, or they can all be different. That’s up to you. The actions you can take are determined by the number of action points you have for each action. For example, if you had three points in the EXPLORE action track, then you could use all three actions on your turn to EXPLORE. After you have taken your 1, 2, or 3 actions, you must then move other action’s track cubes up in value. This is what I am calling a “Zero-Sum Action Point Allowance System.” (I would go with the acronym ZSAPAS, but I’m not going to use the term again in today’s article). Basically, for every action you take there is an equal an opposite reaction.
Here is a little game design nugget that you might enjoy:
During testing, if it seems like the first turn for all players is dictated, SKIP that first turn and make the result the new starting condition in the game.
What that means is that if all players have no choice (or only one beneficial choice) for what their first turn should be, fix it! Ever wonder why players start with 4 train cards in Ticket to Ride???
During the first solo playtest I made it 6 turns before I realized I wasn’t happy with the design. Here is the list of my chosen actions on this six turns:
- Explore/Harvest/Explore – Increased Fulfill/Trade/Trade
- Harvest – Increased Explore/Explore/Trade (I suppose you can always move up three action cubes – so much for “equal and opposite”)
- Explore/Explore/Trade – Increased Harvest/Harvest/Harvest
- Harvest/Harvest/Build (Stable) – Increased Explore/Explore/Explore
- Explore/Explore – Increased Harvest/Harvest/Harvest
- Harvest/Explore Quit.
After 6 turns I had been unable to fulfill any orders and I was only able to purchase one building. In Scoville players only have a total of about 7-10 turns. So after these 6 turns I realized that I have basically done nothing. At least nothing very fun. I need to adjust it so players feel a sense of accomplishment on each turn, or at least feel like they are setting themselves up for accomplishment soon.
Here are the notes I took at this point:
- Should the “Orders” be stacked? (What I meant here is that should the low level orders come out first, then the better ones, then the best, a la Power Grid Power Plants?)
- Should the highest valued Order card be replaced each turn that an order is not fulfilled?
- Should players always get to move their pawn 1 spot per turn without taking an action to do so? (Using the Explore action seemed critical and it was thus used very often. Then it had to be refreshed, so there were turns where I couldn’t move anywhere.)
- It takes too long to build even the basic buildings, which means it takes too long to get the man-made resources. How can this be sped up?
- Should players be able to complete a trade even if their pawn is not on a spot with another player or in the Trading Post (a la Settlers of Catan)?
- How do I make TRADING the focus?
That last point is a big one. Let’s talk about that…
Put the “Trading” in Trading Post!
Thus far in the design the trading aspect of the game has, for some lame reason or another, been the lesser focus of the design. I have always been more interested in the land exploration and development side of things. Why?
I don’t know. So I am going to switch over the focus of the game to actually put TRADING at the forefront. Sometimes I wonder how I get this far without realizing something so critical to the design. Which leads me to another game design nugget:
Designers should step back from their design every once in a while and pick apart every aspect. Ask yourself specific questions about each design decision and try to think if there is a better way!
One big example is when a level 1 friend pointed out that the black and white peppers in Scoville should cross-breed to silver/platinum/other grey color rather than gold. Color-wise it made sense. But since my original design was that they made gold I had simply stayed with it because I had never gone back and questioned why I did it that way. And I never asked myself if there was something better.
So the new thrust of the design for Trading Post is to bring trading to the forefront. Now I think that on every turn you will complete a trade at the start of your turn. This could then aid you when you choose your three actions for your turn. I’m imagining a “Trade Route” of trading cards on the table, which would still represent things the Trading Post needs. They could be set up like the races in Small World or the foraging trail in Morels or the buildings track in The Manhattan Project. In each of those games players can choose the first option(s) for free or pay to take one further done the path. This mechanic would work very well for the “Trade Route.” Or I could use a rondel for increased Euro-y awesomeness!
Another way that trading would become more integral, and increase player interaction at the same time, is to allow trading with other players no matter where you are located. Sometimes it’s easy to let thematic correctness run the show. But this is game design and we can fudge things now and then. Settlers of Catan is a very popular game that allows player to trade resources with other players no matter what. Now, explain thematically how that makes sense. What if your settlements and their settlements aren’t anywhere near each other on Catan? Well, if it’s good enough for Catan, then it’s good enough for this game!
The bottom line is that trading needs to be what makes this game special. If you want a game where exploration is the focus, then find some 18XX game.
How to Reboot…
A game is in there somewhere… I just have to find it!
So I am going to jump back a little and try to re-figure out how to play this game. Admittedly it wasn’t ever really set to begin with. But to make trading the focus will take some effort. I really think this can be a fun theme/game and so I will continue to work on it.
So it’s time to take some of the blank cards I ordered and put them to use. I’m excited to work on the Trade Route/Rondel idea and see how it changes the focus on the game.
Another thing I’ll probably change is that players should draw all their land from their set of ten land tiles as part of their setup. What this would do is drastically lower the exploration aspect of the game. Players would also be able to plan their moves more deeply and more intentionally. I like the sound of that.
Once I nail down how I want the trade route to work then I can put the pieces back together for how the rest of your turn would work. This should be pretty interesting and I’m going to take an open-source approach to this design. That means I’ll be posting about it for all of you to read. I hope to provide you with a designer’s perspective on making appropriate choices within the design process, and how to keep things simple. Trading Post posts likely won’t be weekly from here on out, but they will definitely pop up now and then as I work through stuff.
Thanks for reading and joining me on this ride!
GDP: Playtesting Big Picture

Perhaps the most important step in the Game Design process!
First things first… should there be a space between the words “play” and “test”? Does it matter? I prefer them together so for the duration of today’s article I will refer to it as playtesting.
Today I am continuing a series of articles about my take on the Game Design Process (GDP). It’s Friday so there’s probably a few of you out there who will be playing games tonight. And I’m guessing a few of you will be playing unpublished games that need playtesting. So this article should be of some assistance today!
Let’s imagine the playtesting process as if we’re carving a sculpture into stone. (In fact, one could reasonably treat the entire game design process in a similar way). For this article let’s assume you’ve already chosen the stone you want to carve (this is equivalent to creating your CONCEPT and creating the first PROTOTYPE). As Michaelangelo said (notes in parentheses are mine):
Every block of stone (protoype) has a statue (refined/perfected game) inside it and it is the task of the sculptor (designer & playtesters) to discover it.
So today I’m going to cover how the playtesting process takes that raw stone of a prototype and carves it down into something that is beautiful!
Rough Cut that Stone! (Playtest #1)

What exciting sculpture is within, waiting to be found?
So you’ve chosen your concept, decided on your mechanics, and created your first prototype. It’s time to rough cut that stone.
Getting the prototype to the table is an exciting moment! You’re ready to try it out. Don’t let disappointment cloud your excitement. And don’t expect things to work perfectly.
The goal of playtest #1, like rough cutting a stone, is to get rid of the large chunks that need not be there. To put it in gaming terms, find what’s broken. If there are broken mechanics, either eliminate them or chip away at them. The more you chip away, the closer you’ll get to a beautiful game!
Playtest #1 should be a solo playtest. Don’t submit your friends to something that is likely to be a waste of their time. Note: it will not be a waste of your time. Playtest #1 is a HUGE step in the game design process. But do it by yourself.
When sitting down for your first playtest I recommend having some questions prepared in advance. These can be things like whether or not you think mechanic A is broken, or whether mechanic B doesn’t work quite right, or whether the cards are balanced enough. For games with a lot of depth/detail it’s important to ignore the small things during this first playtest and even the first ten playtests. Remember, we are looking at the big picture here. We’re rough cutting the stone. So go ahead and rough cut your game!
Shaping that Stone! (Playtests #2-10)
Here’s a rule of thumb I try to follow when playtesting:
Don’t change things on the fly while playtesting, never change more than one thing at a time, and make sure you have enough plays under your belt to be able to compare your changes to the previous form (10 playtests seems appropriate).
Following this rule means that playtests 2-10 will be run with the same rules/components/etc. Since you’ve already rough cut your game via Playtest #1, feel free to invite your friends over to try it out. By getting 10 playtests under your belt you’ll begin to get a feel for what the beautiful sculpture within the stone actually looks like. Those first 10 playtests should provide a lot of great feedback.
But don’t change anything during those first ten plays unless there are things which obviously don’t work or are broken. These sorts of things should have been cleared up during solo Playtest #1.
During Playtests 2-10 try to pay attention to what people are saying about the game, how they react to certain elements, and most importantly pay attention to any feedback that is mentioned by different players independently. The more people that mention the same thing, the more important that thing is.
Fine Shaping that Stone (Subsequent Playtests in increments of 10)
From here forward you are in the “Fine Shaping” realm of game design. This is a VERY important section of game design. This is were things really begin to look like a final product. The objective here is to take each element of the game and work on making it beautiful. Here’s a list of things to pay attention to during these subsequent playtests:
- What is your goal/objective with this game design?
- How well does each mechanic work?
- Does each mechanic do what I want it to do? (Note: this is different from the previous bullet)
- What portions of the game are players responding positively/negatively to?
- When implementing new things (every 10 playtests) how are players reacting differently from the previous version?
- How well are things balanced? Do players always make the same choices? Is there only one path to victory?
- Pay attention to Downtime, Kingmaking, Runaway Leader, Tension, Endgame Awesomeness.
Those are just some of the things I try to pay attention to when playtesting. But the point of emphasis is not to change things except for every 10 playtests. If you change things sooner than that you’ll likely not have a good enough understanding of your game to really be able to tell if it has gotten better or worse.
That’s also why it’s important not to change two things at once. If you change two things and the game gets worse, how will you know which one caused it? Sure, sometimes it might be obvious, but it’s still an unnecessary risk. Change one thing at a time every 10 playtests so that you get to know your game really well.
Smoothing that Stone
We’re getting to the fun point. You’ve rough cut the game, you’ve shaped it, and you’ve refined it. You’re almost there. Once you’ve done a lot of playtests it’s time to start thinking about finishing it off and making a high level prototype. This is where things get a little different from the sculpting stone analogy.
When sculpting a stone, once you remove a chunk of that stone it’s gone forever. But with game design you can always add material back into the game. I chose the stone sculpting analogy because I am a proponent of keeping the game design simple. Here’s a lesson I’ve learned along the way:
It’s easy to add complexity and detail. It’s very difficult to simplify down to the game you actually want.
By this point in the game design process with numerous playtests under your belt you should only have to be changing small details. You should be at the point where you can see the beauty of your work. There’s just small imperfections in it. So smooth them away with refining.
The “Final” Product

A masterpiece, just like your game design after numerous playtests!
You’ve done all the dirty work. You’ve chipped away, you’ve refined, you’ve smoothed it out. You’re all set to pitch the game (which is something I know nothing about!). Your beautiful product is “complete.”
Okay, the word “Complete” is an absolute misnomer unless you publish the game yourself exactly how it is. Unlike a sculpture, board games can continue to be worked on incessantly. My perspective is to get the game to a point where you are confident in sending it to a publisher, and then send it to a publisher! If they sign your game, they might change it from something like David into something like the Sistine Chapel but it will still be YOUR work of art!
This has been a sort of 10,000 foot view of playtesting. In the future I’ll write another article more focused on an individual playtest session. Thanks for reading!
Prototyping Techniques Applied to Scoville
 While at Protospiel I heard a lot of kind words for the quality of my prototype of Scoville. So today I am sharing my prototyping process with you. I hope that it can help you make a quality prototype that you are confident about.
When I was first getting into board game design I was a little overwhelmed by what it took to make a prototype. I watched a few prototyping videos on BoardGameGeek.com. Those only made me shy away from the whole process. It can be intimidating. But today you can learn that it isn’t perhaps as daunting as you might think.
Overview of my Process
 First things first: you need a game concept. Assuming you’ve got a great idea in mind it’s time to start prototyping. Early on in my board game career I was designing a heavy Euro game. I waited to make a prototype until I had worked through all the details of the game. That was a mistake. It is my recommendation to make prototype components of your game as early as possible. For example: If you have an auction in your game, test it independently from the other mechanics. Test each mechanic individually and test them early on. There is no point to design an entire game only to find out that the individual parts don’t work.
Once the individual elements seem to work then you can try to put them all together to make a full game out of them. Here is a rule of thumb I try to follow:
Never add complications unless they are absolutely necessary.
This is a difficult thing to do. It is always easier to add another rule or add another component. But if you want to make a good game, focus on the innovative mechanic rather than all the little rules about the rest of the game. Keep it simple.
So I start with a concept. I usually write about 10 pages of notes and sketches about that concept. Then I’ll go ahead and start prototyping (this is what I’m covering today). Once I have a prototype ready then I’ll play test it at least 10 times. This will give me a solid amount of feedback. Only after testing 10 times will I apply any changes. Here’s another rule of thumb:
Don’t try to change things in the game on the fly, and don’t change more than one thing at a time.
Following this rule is critical, especially the part about changing more than one thing at a time. If you change more than one thing it can be difficult to know which of the things you changed made the game better (or worse). Change one thing at a time and test it profusely. So I apply feedback and adjust things after 10 play tests. Once the game has gone through the PROTOTYPE – PLAY TEST – APPLY FEEDBACK phase several times to the point where there are only very subtle changes then I get to the point where I am confident about contacting publishers about it. There is no point in pitching a game unless you’ve gotten it to the point where you are proud of your product and confident to show it off.
Getting Started: What do I need?
When making a prototype I usually begin with a spreadsheet. A spreadsheet allows you to create custom tiles or cards very easily. You can print them out yourself and turn them into quality prototype components. Here’s a list of everything I use(d) to create a copy of Scoville:
- Spreadsheet software
- Graphic Design Software (I prefer Inkscape, but The Gimp is also very useful)
- Paper (Plain paper for first prototypes, Glossy photo paper for pitch-able versions)
- Thick card stock – As thick as you prefer, though the thicker it is the more difficult it is to cut.
- Components: cubes/meeples/coins
- Circle Punch
- Paper Cutter (I have this one)
- Bingo chips
- Glue Stick
- Scissors
- Gerber Baby Food Containers – if you don’t have kids find some friends who do and beg them to save these for you!
Here is a picture of all the components that go into the game:
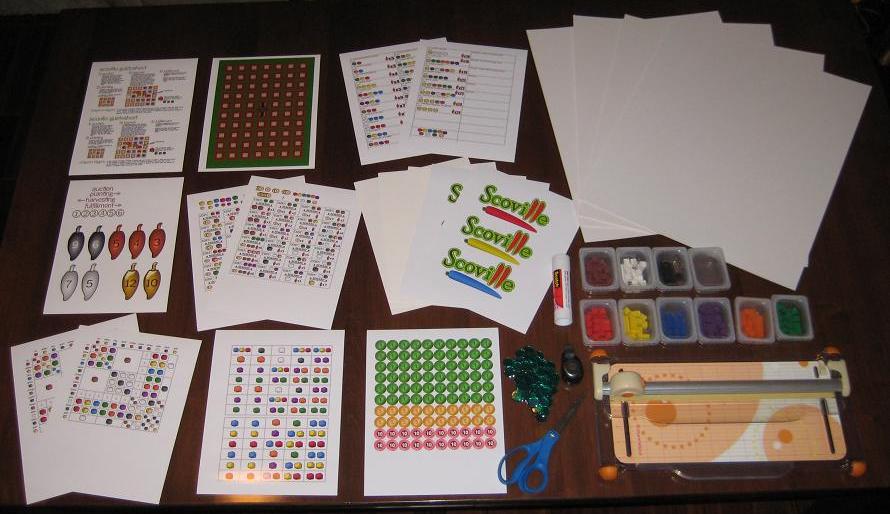
Scoville components fresh off the press!
That’s everything (except a box) I need to make a copy of Scoville. Let’s walk through the prototyping (physical creation) process.
Make it Rain! Or Something Like That
Assuming you’ve taken your concept and created artwork that suits you, it’s time to actually make something real for testing. What that means to me is that it’s time to print stuff out! Scoville has 13 pages of printing required for a full copy. The next step is to adhere those pages to the thick card stock. I like to buy the stuff that is as thick as standard board game chit board. This gives me the feeling like I am playing a real game when I test it.
So I use the glue stick and cover the back of the paper and then stick it to the card stock. Once I’ve got them all glued down I can start to cut them to size. Since the large card stock boards I buy are too big for my paper cutter I run a scissors through them to separate the difference components before using the paper cutter.

Cover with glue, adhere to card stock, coarse cut to separate.
Then I use the paper cutter to trim the fat and make them nice and clean. Shown here as an example is the first cuts done to the auction tiles:

I then go ahead and cut each tile out individually and end up with a pile of nice thick quality components:

My precious little auction tiles!
I continue this process for all of the components in the game.
Making Player Shields
Another part that seemed a little overwhelming to me was the production of player shields. But I found a nice, easy way to make them. If you don’t want pictures on them then just cut some paper and fold it. If you want pictures or logos then follow this procedure:
-

Easier to make than I thought.
Print the logos.
- Cut the logos to a rectangular size.
- Glue the logo centered on a sheet of thin card stock.
- Angle cut each edge so that it will lean when completed.
- Fold gently.

For Scoville I made the artwork on the shields include the player color. Making your own player shields rather than using shields from games you own can really spice up your prototype.
Making Money
One of the more tedious things in this process is making my own coins. I don’t have to make it as hard on myself as I do, but I prefer a really professional looking prototype.
It would be much easier to simply write a money value on the plastic bingo chips with a marker. This would make them more difficult to read and they wouldn’t look as nice.
So my process for making coins is this:
- Create the artwork.
- Insert the coin images into a document file.
- Print the document.
- Punch the coins out of the paper.
- Adhere them to the bingo chips.
Here is a tip for punching, if you use a circle punch like mine:
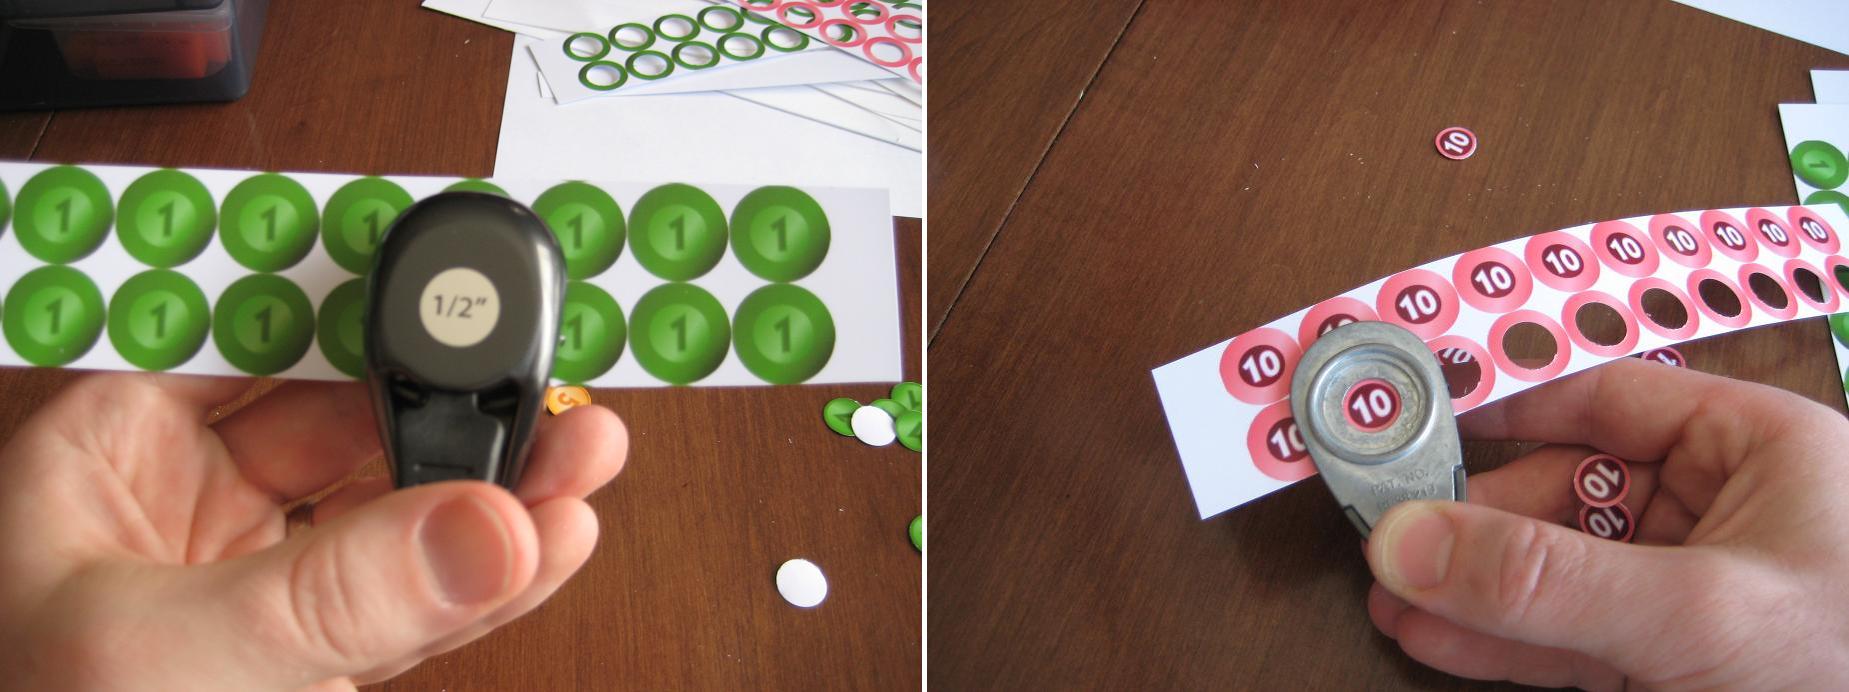
Flip the punch over for better visual alignment!
If you hold the punch like it seems it should be held then you have to rely on the little plastic bump guides on the side of it. Just flip the punch over and you can visually align the punch with the coin. This makes it so much easier!
Once you’ve got them all punched you can simply glue them to the bingo chips. I recommend watching something on TV that is really attention grabbing, so that it draws your attention from the tedium of gluing little circles to bingo chips.
If you don’t like the idea of gluing circles to bingo chips then go ahead and use the same thick card stock that you’ve been using. Just be aware that the circle punch may not punch through the thick card stock. That’s why I went with the bingo chips.
The Final Product
Once you’ve got all the components glued-punched-cut-etc. then it’s time to put it all together. Here is a before and after picture showing the reduction in volume for Scoville:
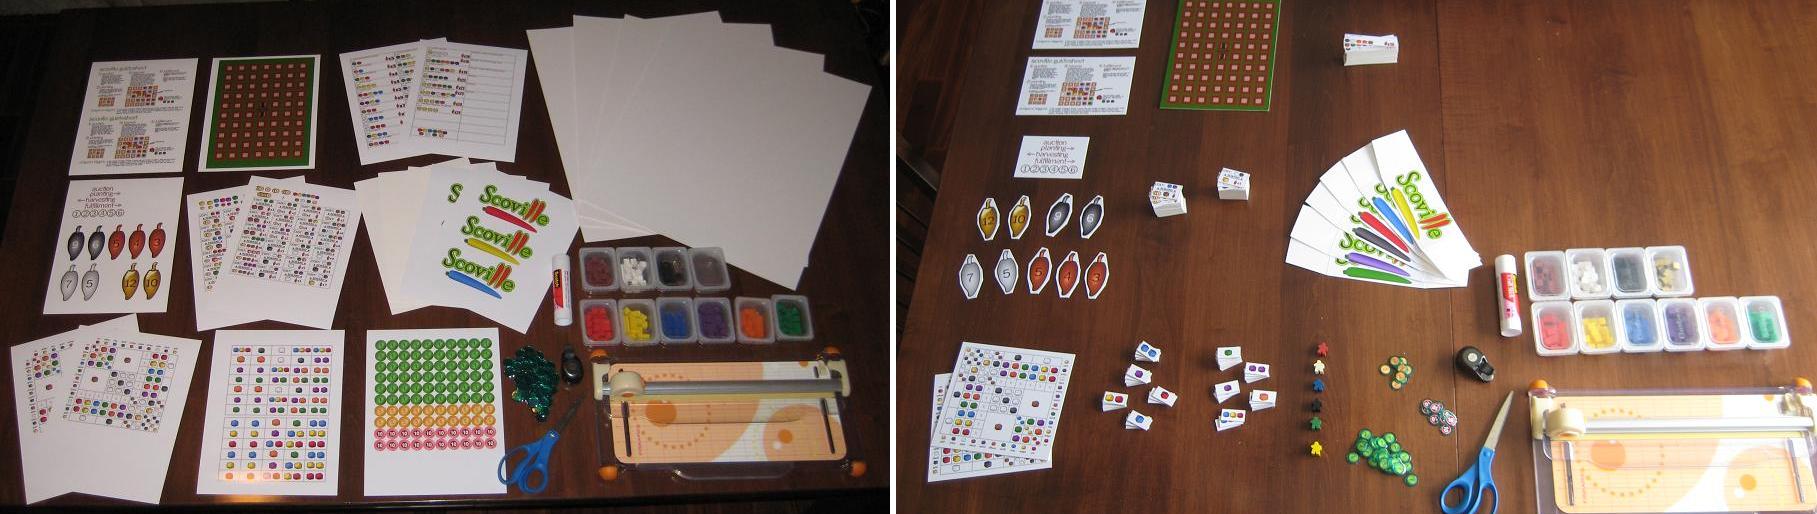
What looked overwhelming turned into a nice, quality prototype.
To continue with the theme of a quality, pitch-able prototype I like to use a nice container to hold everything. You can buy these at Target.com or you can find different colors in the store. They are only $5. I should also note that these fit into a Medium Flat Rate Priority box from the United States Postal Service. So it is pretty easy to mail one off to a publisher!
Now you’ve got your container so throw in the components, a couple copies of the rules, a business card, and you’re ready to pitch your game! Note, you do not need to have a high quality prototype to pitch a game. I am just a firm believer in making a good first impression. Here’s what Scoville looks like in it’s full prototype form:

This is the third copy of Scoville in existence! May the other two copies in the wild prosper and flourish!
How Much Is It Gonna Cost Me?
I mentioned earlier that you can make an high quality prototype that is also inexpensive. Here is a rundown of the costs for a full copy of Scoville:
- 13 sheets of glossy photo paper: $3
- Printer Ink (I buy cheap Non-OEM ink off Amazon): ~$2
- Glue Stick: $3.30
- 4-Pack of Thick Card Stock: $13
- Bingo Chips: $0.50
- Meeples ($0.14 each): $0.84 – I live near The Game Crafter so I can pick them up and avoid paying shipping costs
- Plastic Cubes (250): $7 – I bought a tub of 1000 cubes for $25 (shipping included) from EAI
So the total for a high quality prototype for Scoville costs me under $30. So maybe you wouldn’t characterize that as inexpensive. But when $30 can allow you to create a pitch-able high quality prototype that might catch a publisher’s eye, I don’t think $30 is too bad.
What techniques do you use? I wanted to point out that I did not write about making cards. Most people, when making prototype cards will purchase penny sleeves, insert their custom made cards, and make them thicker by dropping in a M:TG card. I don’t use cards in Scoville, so I didn’t include that.
I hope that you enjoyed this article. It has been a fun process for me to figure out some of the best ways to make a prototype. If you have any ways to make the process more efficient, please leave a comment so others can see!
Scoville Protospiel Recap

I had the privilege of attending my first Protospiel this past weekend in Milwaukee. Protospiel is a convention for game designers to bring prototypes and get feedback from other designers. So I took my game Scoville along and got some awesome feedback! I think that I’ll focus this recap on my game rather than provide opinions of the games I played that are unpublished. That would not be fair to the designers even if I really enjoyed their games since all the games I played are still in progress. So rather than posting a drawn out chronological recap of the weekend I will just post the drawn out highlights for the play tests of Scoville.
I was fortunate to have Scoville played five times and was pleased to play 8 other games by other designers. Protospiel is an awesome thing for a designer to attend!
Here’s a little background about my Protospiel expectations and goals…
Protospiel: First Contact
Coming to Protospiel I had two goals: 1) validate whether or not Scoville is any good and 2) connect with people who know what they’re talking about. A secondary goal was to leave a copy of the game with Grant Rodiek for inclusion in the Prototype Penpal Program. That was something I could always do later on, but I thought it could be cool to send a copy off with him.
I also had some expectations about the feedback I might receive. I knew that I wanted to adjust the auction phase of the game. So I to see the same feedback about it that I had seen from my prior play tests. I was also a little uncertain about the quality of my prototype (that thought was quickly vanquished!). Thanks to everyone for the kind words about the quality of my prototype. I’ll post an article sometime about how I make prototypes.
So if I received validation and made some connections then I would have considered this weekend a success. Let’s see how it went.
Scoville Play Test #1
Getting to the convention at 8:15am on Saturday allowed me to get my game set up right away since few people were there. I got four people to give it a go and they seemed to really enjoy it. I won’t explain the game much here since I’ll be writing a post all about the game itself. Here are the suggestions that I received after the game:
- Beware of color blindness (Cool apps: Color Blind Vision (Android: FREE) and Colorblind Vision (iOS: $2.99)).
- Stage II orders seem to provide too many points.
- If everyone bids zero in the auction, flop the player order.
- Put endgame trigger scenario onto the guidesheet.
- Tiebreaker should go to the player with the most coins.
- The game was described as a “Euro with luck but no dice.”
- There should be no randomly chosen player order at the start of the game.
- During fulfillment there should be the option to pay for becoming the first player.
That’s a lot of great feedback. The game uses 10 differently colored cubes so I have been aware of the color blindness issue. There are several solutions for this. The biggest takeaway from play test #1 was that I received the auction feedback I was expecting. My plan would be to test a new auction mechanic on Sunday.
One player, who happened to be the winner by a lot, wanted to try a strategy that I am aware of but have not yet seen attempted. Since peppers can be sold for coins based on how many of that color are planted in the fields there is a strategy that you can plant a pepper of a certain color in each round and harvest that same color each round without doing anything else. I have done the math in my head and I do not believe that this would be a winning strategy (at least I hoped not because that would make the game broken). More on this below.
Scoville Play Test #2
After working on Protospiel goal #2 of making connections and meeting some awesome people, they were willing to give Scoville a try. During this second play test there was more bidding and jostling of player order. I think that was the reason that the auction was not mentioned in the post-game discussion. This play also resulted in much closer scores than the first play. Here are the suggestions I received:
- Peppers should be worth something at the end (that are currently worth nothing in the endgame: Use Them or Lose Them!)
- The artwork on the fields should somehow better illustrate where the player pawns can be placed.
- The game was described as a “medium to heavy Euro.”
So I received quite a bit less feedback from play #2. But the fact that I still didn’t receive any feedback about how anything seemed broken meant that perhaps Protospiel goal #1 (validation) was starting to become apparent.
Scoville Play Test #3
Later Saturday night a prominent figure in the board game reviewing business was able to play Scoville. So with three other players I got play test #3 going. In terms of rounds this was the shortest game I have seen. The game lasted 6 rounds. The players again seemed to enjoy the game and nothing seemed broken to them. They did mention the auction as the weak point of the game, so I received good feedback about that that I could implement on Sunday. Here’s the suggestions:
- Possible Trademark issue with the names of peppers used on the recipe tiles.
- Turn order needs adjusting. Option 1: Flop the order. Option 2: Purchase your spot.
- Perhaps just get rid of the reverse order for the harvest action.
- Brown peppers seem too valuable.
I want to point out that the brown peppers are somewhat of an enigma in the game. They don’t breed with anything except the best peppers. They take up space on the map. But they are used quite a bit in the recipes. I had not received feedback that browns were too valuable before this. The normal feedback on the brown peppers is that they seem pointless. So this was interesting feedback from a fresh perspective.
I was also pleased, in a bittersweet way, to hear the same feedback on the auction mechanic. I now knew that I could incorporate a revised auction mechanic on Sunday and expect good things.
I was intrigued by the suggestion to remove the reverse player order for the harvest. My first thought was “absolutely not.” What that would lead to is either huge bids during the auction or rounds of the game where one player can make a huge jump in points. I’ll have to examine this further.
Scoville Play Test #4
Sunday morning I was able to play Scoville for the first time during the weekend. I had not played in the previous play tests. And this time it was just a two player game. I have tried to design the game such that it scales well from 2 to 6 players. There are no AI players necessary and the game feels nearly exactly the same with 6 players as it does with 2.
Since it was now Sunday I was going to implement the new auction mechanic: Bid for Player Order. Now during the auction phase players would be bidding for turn order. Whoever bids the most gets to choose their spot in the turn order. The next highest bidder gets to choose the next spot, and so on. This way, if a player wanted to become the first harvester they could bid high and then choose the last spot, which would allow them to harvest first.
The new auction in the two player game seemed to work, but I suppose that this new auction mechanic would work even better with more players. What the new auction mechanic provided was a way to earn the first harvester spot. That is critical to strategy in the game.
Here are the suggestions I received:
- Are points balanced on the Order tiles?
- Change the artwork on the Cross-Breeding table for the cross-breeds that result in two peppers.
The points on the Order tiles may be slightly unbalanced, but not to the point of brokenness. These can be easily revised, which I may do depending on analysis of the scoring for the first 25 play tests. The artwork suggestion is an excellent one that I will definitely change.
Scoville Play Test #5
The attempt to break the game. He ended up red-faced!
The final play of Scoville included the big winner from play #1. He wanted to test the coin building theory and see if it could potentially provide a winning strategy. I welcomed him to try it but made sure that the other players were initially unaware of his proposed gameplay. It was a great final play and I was happy to see that the new auction mechanic really worked well with four players. Here are the suggestions:
- Don’t call it “harvesting, call it “breed-vesting.”
- Check out the game Santiago since there is a similar “fields” mechanic (uh oh… worried about this!)
- The different parts of the game were described by one player as Resources (Auction), Tactics (Orders), and Strategy (Recipes).
The first thing to discuss was the auction. Of note is that this game had the highest average bidding per round of all 5 play tests during the weekend. I think this is due to players now having two things to bid for (first player spot or last player spot) rather than for just moving up in player order. The thing of note was the compliment someone gave to the auction saying that the auction was a good mechanic for the game. This brought the game full circle over the weekend. Previously the auction was described as the weak point of the game. Now it was “good.” I’ll take that!
The other thing that was validated from this final play test was that the game was not broken in that attempting to get coins by planting and harvesting the same color did not result in a winning strategy. The player was going full steam ahead from the get-go with that strategy and came in last place (though could have finished in third place). I was pleased that the game wasn’t close to being won by that strategy. Overall it was a great play test.
Overall Scoville Analysis
Perhaps the best part of the analysis is that people really seemed to enjoy the game. While my goal was to validate whether or not it was any good, I came away from Protospiel very humbled by all the kind words people had for the game. Let’s dig in a little bit and check out the scoring breakdown:
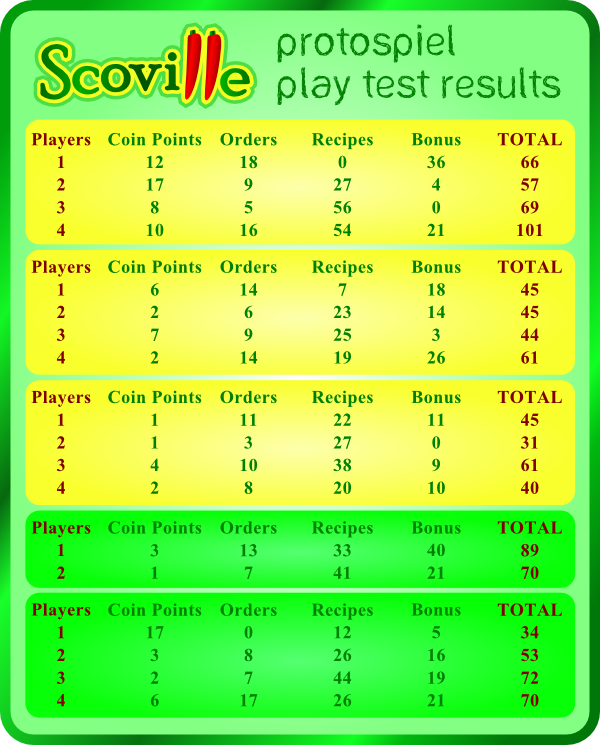
Some further analysis revealed that the number of coins bid during the game varied quite a bit. In terms of coins bid per round the numbers were 2, 6.14, 7.66, 1.38 (2-player), and 7.85 per game. The highest average was the 4-player game with the new auction, though this wasn’t unexpected.
Overall it was apparent that people had fun when playing the game. That’s the most important thing to me as a designer. There are some things that I would like to continue to develop leading up to Gen Con that I mentioned to the players. But I want to avoid the situation where I am needlessly adding complexity. That would steal from the simple elegance of the mechanics currently in the game.
Thank you to all 16 players who play tested my game. I really appreciate the feedback. It was an awesome weekend! And special thanks to Grant Rodiek for humbly accepting a copy for the Prototype Penpal Program. I know that I can expect some awesome, honest feedback!
