Blog Archives
2014 Year in Review
You’ve probably been seeing this sorts of articles all over the interwebs. If so, thanks for reading mine as well.
First things first, my wife and I had our third baby this year. That means I didn’t accomplish as much as I wanted. And that’s still the case. I’m lucky to have signed Scoville when I did since we were sort of “between kids.” Since we had our third my homebrewing and board game design endeavors have faded.
But I’m not one to make excuses. Having our third child was our biggest accomplishment of 2014. However, this blog isn’t about babies and being a daddy. It’s about beer and board games. So let’s start with the Barley and see what I actually managed to accomplish…

Barley Review
My goal for homebrewing in 2014 was 6 batches of beer. In that list was a pumpkin ale, an IPA, and a lagered Oktoberfest. I did none of those.
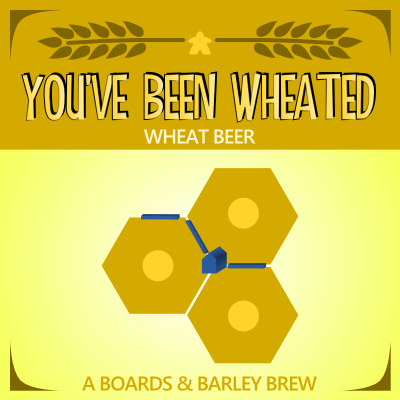
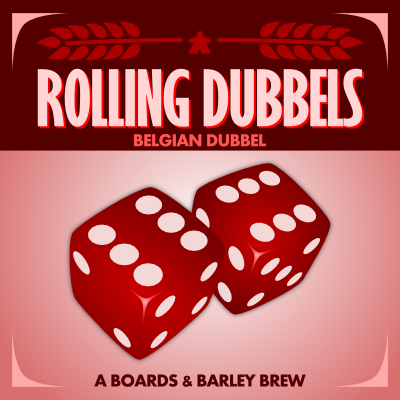
I ended up brewing three batches, one of which is sitting in a carboy waiting to be bottled. The brews were a brown ale called “Nobody Plays Brown,” a hefeweizen called “You’ve Been Wheated,” and the third is a Belgian dubbel called “Rolling Dubbels.” For each I created a beer label, which was quite fun to do. Here are the labels:

The brown ale and hefeweizen are currently in corny kegs in my basement refrigerator. I have a very generous neighbor who has loaned me a bunch of brewing equipment including the kegging stuff. The dubbel is sitting patiently for me to devote an evening to bottling.
Overall I’m a little disappointed that I didn’t brew more. That’s something I’ll try to remedy.
On the consumption end of brewing I had a pretty successful year. I began using UnTappd and have been able to have a great record of the brews I’ve enjoyed. In 2014 I logged 107 distinct beers. That’s a new brew every 3.4 days… not too shabby.
So despite the lack of homebrewing I’d say that it was a successful beer year. It’s unlikely I’ll be able to log 100+ new unique beers in 2015, but I’ll try my best.
Boards Review
 Obviously the highlight of my 2014 from a board game perspective was the successful Kickstarter campaign that Tasty Minstrel Games ran for my first published design, Scoville. It raised over $106,000! It was amazing to watch all that support come in during the campaign and I cannot thank all you backers enough.
The next highlight was getting to play Scoville with a final production copy at Gen Con. Punching out the little peppers, holding the pepper shaped bits, and planting and harvesting on the nice thick board with my close friends was a great memory.
On the design front, I didn’t sign any games in 2014. But I blame that on the fact that I didn’t really design any games in 2014. The biggest effort was for The Grand Illusion. This is a game where you are a street performer trying to work your way up to having a big time show in a theater where people come to watch you perform a grand illusion. Thematically it was my favorite game to work on. I love the theme of Victorian era magicians competing over audiences. My efforts for The Grand Illusion included making several prototypes, ordering a deck of cards from The Game Crafter, and playtesting it about a half dozen times. The end result was that it felt like it was lacking. So I shelved it.
Otherwise the only other thing of consequence from 2014 was a new design called Ziggurat. This is a resource management game where players are trying to be the best contributors to build the ziggurat. This game has one of those unique elements which sets it apart. It has been played about a dozen times now. While it plays through to the end, plays smoothly, and players are generally positive about it, it too feels lacking. It currently struggles from a “One path to victory” mentality and is devoid of any catch-up mechanisms. To alleviate that I want to add some private scoring conditions as well as allow scoring via different paths. This will make the game more “Euro-y” as well as more enjoyable. I’m hoping that Ziggurat will become my next signed game and I have big plans for it in 2015.
2015: Year of the Ziggurat
Unlike beer consumption, which I track with UnTappd, there is no app to track board game plays. Please don’t tell me to use the Board Game Geek site to track my plays as I do not care for that interface. I’ve documented the games I played all year in my Monday Brews articles. However, I do not feel like reading through all of them and trying to figure out how many games I played, let alone how many unique games. It was a lot. But I have one favorite…
2014 Game of the Year – Five Tribes
 When my friend Ben and I were in the exhibit hall at Gen Con we wandered past a demo of Five Tribes by Days of Wonder. We were immediately in awe of its beauty. The game simply looks fantastic. As we stood and watched the demo we quickly realized that this would be a good game, and a game we would like to own. Ben went to the counter and asked if they had any left, which they did not. However, he was told that they would have something like 50 or 100 copies the next morning when the exhibit hall opened.
So Ben got in the hall and in line as early as he could and was fortunate enough to snag a copy. His copy has since been played more than any other game by our gaming group.
The game not only has beautiful artwork, but it also has excellent wooden components. The palace and oasis pieces are particularly nice. Days of Wonder has a really excellent game with this one.
HONORABLE MENTION:
Istanbul: This game is clever and interactive. Players move their merchant around the markets in Istanbul trying to purchase or earn rubies. By making clever use of their assistants they create opportunities to earn those rubies. I love that the game is pretty easy to learn and understand while simultaneously creating interesting and deep decisions.
Moon Yeti Games
![]() The final thing of note for this 2014 Year in Review is that three friends and I decided to begin a board game publishing company. We will be Moon Yeti Games and our plans are to publish great games with beautiful art and high quality components.
The final thing of note for this 2014 Year in Review is that three friends and I decided to begin a board game publishing company. We will be Moon Yeti Games and our plans are to publish great games with beautiful art and high quality components.
The highlight of 2014 for Moon Yeti was that we gave away about 100 copies of our first game, Mutiny, at Gen Con. Adam Buckingham designed a 4-card social deduction and back-stabbing game to go on the backs of our business cards. We played it a ton and settled on a design, had them printed, and gave them away at the convention. That was pretty awesome.
Moon Yeti is currently developing a version that goes up to 8 players. We hope to have it for sale through our website over the next few months.
For more information, check out moonyeti.com. Thanks for reading and I wish you a fantastic 2015!
Newton’s Oatmeal Stout
 On Boards & Barley I tend to focus on the Boards side of things. But today is a Barley day! Why? Because I just bottled my oatmeal stout and I feel like writing about it.
Most of you probably don’t know this, but there are many scientific discoveries that were made by brewers. In fact, it was a brewery in London during the sewage problems of the 1800s that provided insight into the bacteria problems in the water. The people at the brewery were not getting sick because they only drank beer, which had undergone a boiling process. Those around the brewery were getting sick from the unsanitary water that was plagued by rotten sewage. But enough about that.
Oatmeal Stout
What is a stout beer? Stouts are dark, sometimes bitter beers that are brewed with roasted barley and malt. The barley is often roasted to the point of charring. This provides a “burnt” type of flavor that can often taste like coffee or chocolate. These beers can be all over the map in terms of hoppy-ness. But the main character of a stout beer in the roasted flavor.
An oatmeal stout is a variant of a stout beer that is brewed with steeped oatmeal added to the steeping grains. The addition of the oatmeal gives this variant a sweeter, smoother finish. Also, these have a more mellow character than a standard stout. The roasted character, however, remains in the beer. Some popular oatmeal stouts include Samuel Smith’s Oatmeal Stout and Young’s Oatmeal Stout.
My Beer: Newton’s Oatmeal Stout
Way back on September 11th, in honor of our awesome country, I brewed beer. It was my first time brewing a beer while using the steeping grains. Basically the steeping grains add about 30 minutes to the brewing process. You put a bunch of crushed grains like barley and malt into a sack and soak it in hot water for about 20-30 minutes. Then this becomes the base liquid for the boiling wort.
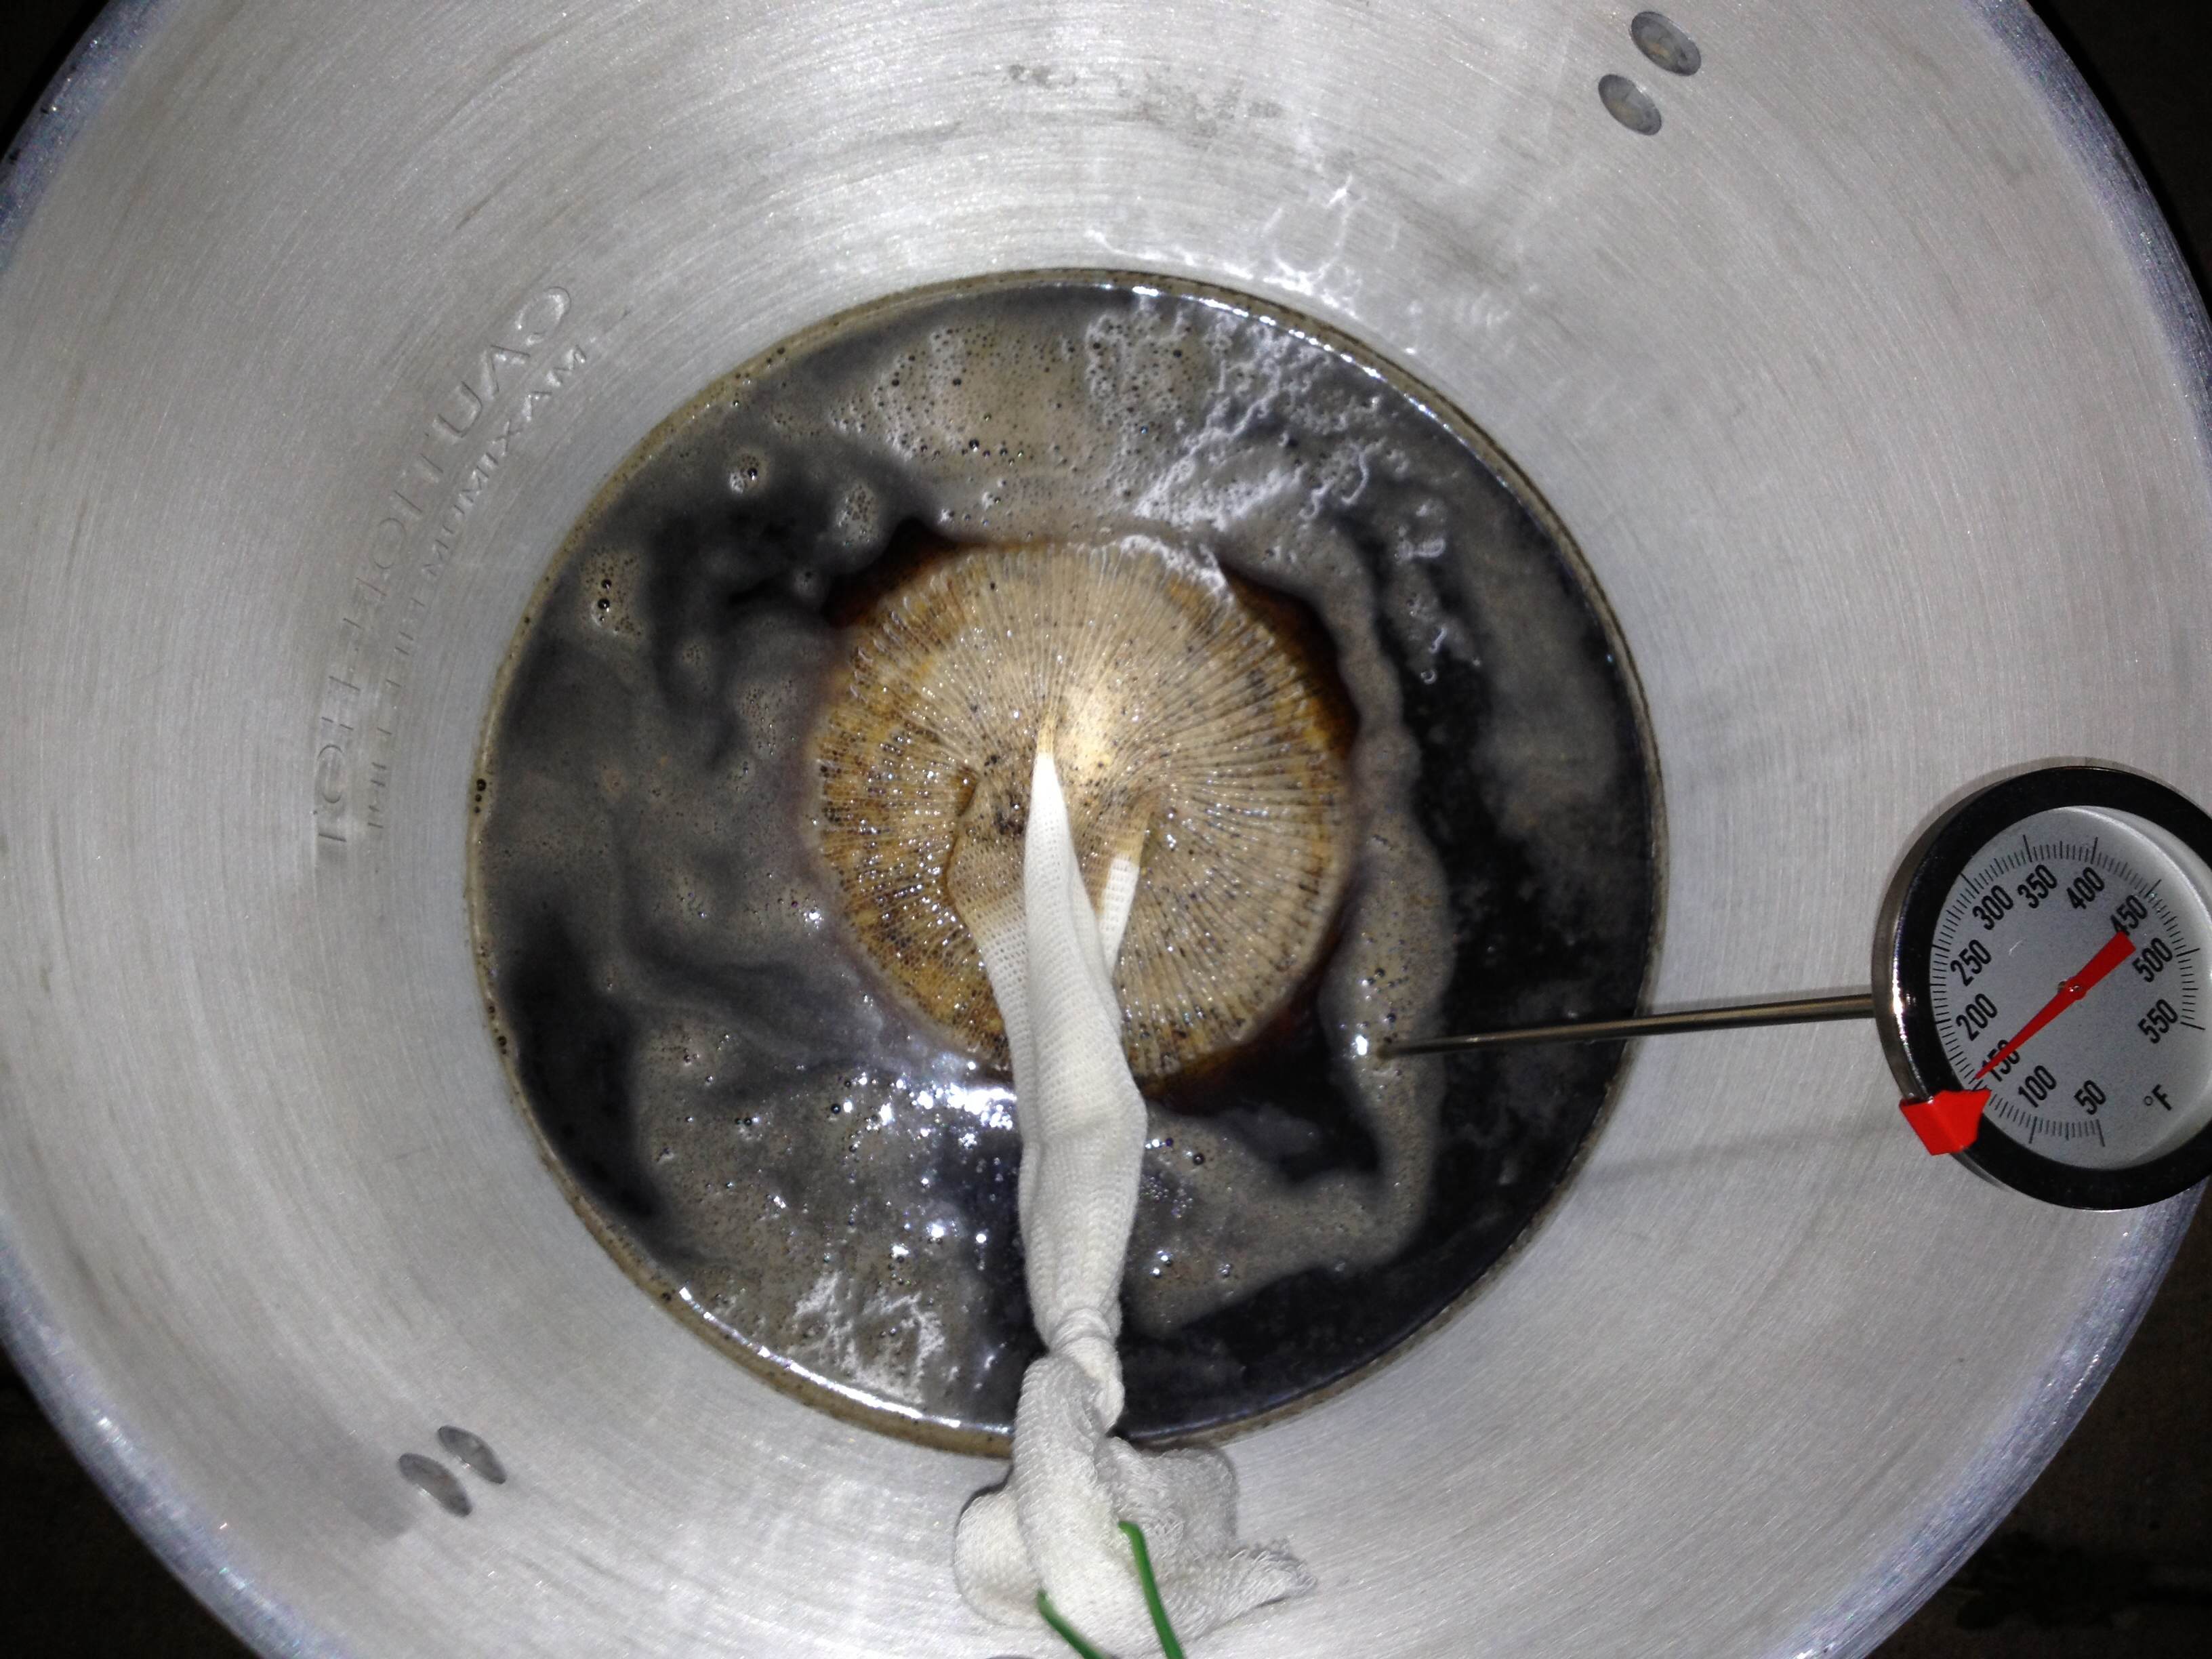
The sack of steeping grains sits nicely while providing beautiful character to my beer!
After you’ve steeped the grains, which is rather like steeping a tea pack in hot water, though on a much grander scale, then you can begin to brew the beer. The kits I have used have said to bring a gallon of water up to 170 degrees and use it to rinse the grains. So I simply pour the gallon over the grain sack and catch the water in the boiling kettle.
The wort boils for about 45 minutes, during which time the hops are added. After 45 minutes you’re basically done. You bring the beer down to about 115 degrees and add in enough water to bring it to about 5 gallons. Next you pitch the yeast, which is a fancy way to say you add yeast to the liquid. Then seal it up with an airlock and you’re good to go!
The original or starting gravity of my stout was 1.047. This isn’t a very high gravity, but stout beers aren’t known for being high gravity beers.
After a week in the fermenter I transferred the beer to a glass carboy. I let it ferment and age in the carboy for about three weeks and this past Sunday I bottled it.
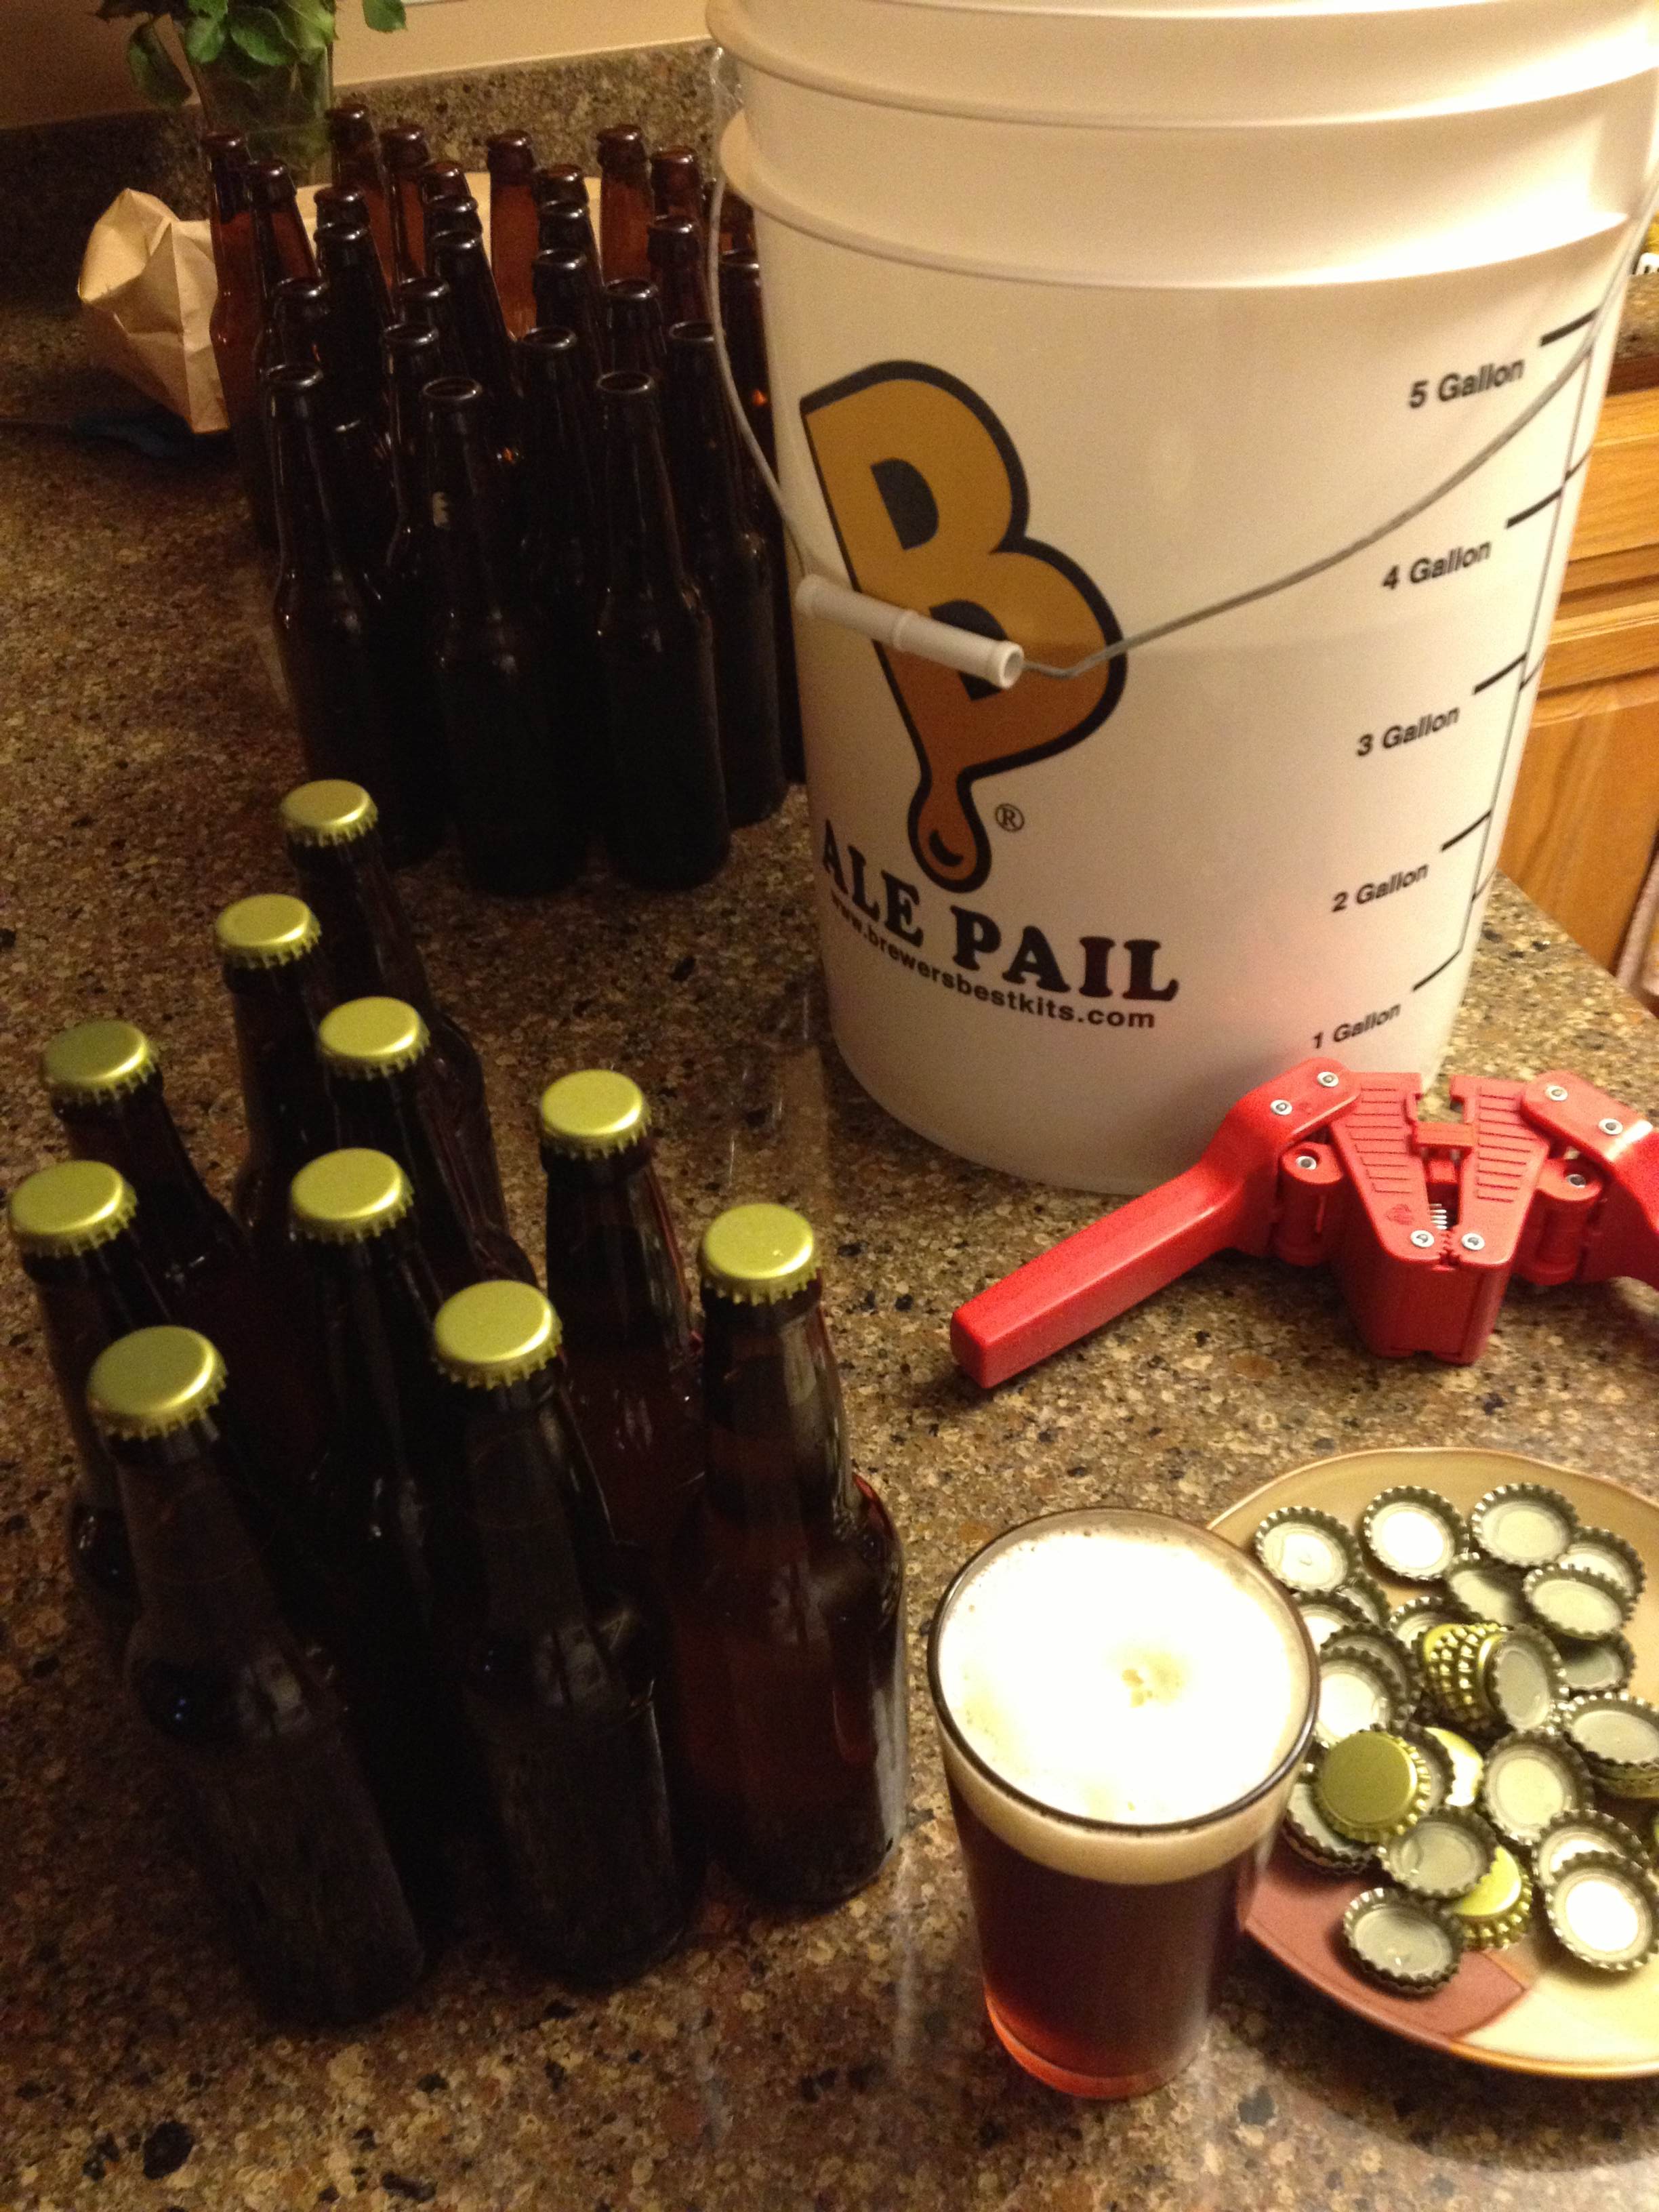
Bottling is the worst part of the process. I don’t buy bottles, so I have to de-label them, which is a big pain. Then you’ve got to make sure your 45-50 bottles are clean, so I run them through the dishwasher without detergent. After that I sanitize them using One-Step. In the meantime I transfer the beer back to the plastic fermenter, dissolve bottling sugar, add the dissolved mixture to the beer, and then I proceed to bottle 10 at a time and cap them.
For this batch I ended up with 46 bottles, one of which will remain on my shelf for all time. Doing a little math, if an average 6-pack costs $8.50, which seems on par with my FLBS (Favorite Local Beer Store), then 45 bottles (7.5 6-packs) would cost about $64. The beer brewing kit itself cost about $42. So I am saving $22! That’s a considerable amount. The downside is that I have 7.5 6-packs of the same beer. Is that $22 worth having so much of the same beer? (It is worth it if you can bring it to game nights and drink other people’s beer!)
My Newton’s Oatmeal Stout had a final gravity of 1.015. This means that the beer has an ABV (Alcohol by volume) of 4.2%. Therefore I should be able to slam a bunch of these bad boys and feel little effect.
Why Newton?
I like to name all of my beers after Renaissance men. In my opinion Renaissance men are not necessarily from the Renaissance. Rather, these are people who happen to be experts or masters in many trades. Sir Isaac Newton was definitely a Renaissance man.
I could have chosen a pudgy character who more closely fit the bill of being “stout.” However, Newton seemed to fit the bill of being “stout” due to his contributions to science and his place in history. I suppose I could have saved Newton in case I ever brewed an apple ale, but I don’t think I’ll ever brew an apple ale. So Newton joins my Renaissance fleet that already includes Leon Battista Alberti (Amber Ale) and Benjamin Franklin (Honey Ale).
In a couple of weeks a new Renaissance man will join the team behind the guise of a Scotch Ale. Unfortunately William Wallace is not technically a Renaissance man, so I’ll have to choose a different Scot as the namesake for the beer.
***
If anyone has questions about brewing or beer styles or anything having to do with zymurgy, please let me know!
Monday Brews: Reviewing Ben Franklin’s Honey
I’m back from a series of mini-vacations. In that time my Ben Franklin’s Honey Ale was able to carbonate and mature enough to try it out. So today I will review my second beer, Ben Franklin’s Honey!
Brewing Ben Franklin’s Honey
Bottling Ben Franklin’s Honey while enjoying Alberti Amber!
I’ve mentioned this beer before so I won’t go into depth here but I wanted to mention a few things.
The first is that brewing my second batch of beer was much less intimidating than the first. Everything was easier. Everything went better. And the overall amount of time and effort that was required fell a lot.
The second thing I wanted to mention is that I recently learned a little about lagering. This seemingly has nothing to do with Ben Franklin’s Honey, however, I only learned about lagering due to a conversation that was started because of Ben Franklin’s Honey. Why do I mention this? See more below.
The third thing I wanted to mention is that timing is an important part of brewing beer. Due to the amount of time is takes to brew/ferment/carbonate it is important to choose a date by which you want your beer to be ready. Then work backwards. So assume you want a month in the bottles. Then add in a week in the carboy. Then add a week in the fermenter. All told for a simple ale you’re looking at a month and a half minimum. That’s how far in advance you need to brew before your desired release party.
So completing my second brew has taught me a lot about the process and what it all involves. And I now have a great summer beer to enjoy over the next couple months!
Tasting Ben Franklin’s Honey
Last night I had the privilege of sharing the first tasting of Ben Franklin’s Honey with three friends over a game of Ora et Labora. My friends were willing to give it a try. The collective opinion: Enjoyable!
This beer is a pretty light beer that tastes “summery.” It comes in around 5% alcohol. It has a light and clear color. The honey flavor was not overwhelming, which was good.
Overall I would say this was an enjoyable brew. I have plenty more to enjoy and may bring a few to GenCon. I will hold off on rating this beer until I have had a few more. But if this brew is like the Alberti Amber, which got much better after maturing in the bottles for a month, then this will be a fantastic beer come August!
Ben Franklin’s Honey’s Successor?
So above I mentioned lagering. This leads me to my next brew. I am planning on brewing an Oktoberfest!
The problem with lagering is that it is slow and needs to ferment at a cooler temp than a typical basement. My luxury is that I have an extra refrigerator in my basement. So I can probably adjust the temperature on the fridge to a point that might work for lagering.
Since I can try to lager, I now have to make sure the timing will work. If lagering takes 6 weeks and maturing in the bottle takes a month, then I have 2.5 months before it will be drinkable. So if I want my Oktoberfest to be available at typical Oktoberfest time (September), then I need to get going on it.
If I brew within the next two weeks I should be able to have a decent Oktoberfest ready on time. Oktoberfests are one of my favorite beer styles. Perhaps it’s partially due to the season in which they show up since I really love late summer/early autumn. Perhaps it’s because I would love to attend the real Oktoberfest in Germany. Whatever the reasons, I am planning on brewing/lagering an Oktoberfest for this fall.
Have you been brewing? Any tips you’d like to share about lagering? I’m planning a post about the lagering process and how it compares to brewing ales and your tips could be included. Thanks for reading!
Brewing Process: Bottle Prep
When it comes to home brewing there are two approaches to the bottling stage. The first is kegging, which is awesome, but very expensive. The second is bottling. Bottling can be nearly free and today I’m discussing my three step process to prepare bottles for holding your precious creation.
Step 1: Bottle Procurement
Everyone has friends. And if you share the other hobby that this blog covers (board games) then you likely get together and hang out quite often. Well, if you’re a home brewer this is a great opportunity for you. During our board game nights my friends typically each bring a 6-pack of beer.
Is it weird when at the end of the night I ask to keep their empty bottles? Not at all. One friend thanked me for taking his trash. But beware… here are some tips for successful bottle procurement.
- Don’t be sneaky. Just ask if you can have the bottles.
- Don’t take any twist off bottles since they aren’t good for home brewing. (Life tip: avoid twist off bottles if you enjoy quality beer!)
- On the drive home, put the bottles in your trunk. I can’t emphasize this one enough!
Now that you’ve procured your bottles (about 50 for a 5 gallon batch) you’re ready for step 2.
Step 2: Label Removal
This is the worst part of home brewing. If I weren’t also trying to save money by home brewing I would just purchase new bottles. But I’m guessing I’m not the only one out there who removes the labels from bottles so here’s how I do it.

It’s a Utility Sink Party!
I first fill my utility sink full of hot water. Then I place the bottles in there for a good half hour. The idea here is to soak the labels and get them ready to be peeled off.
After a half hour I take one bottle at a time and peel off the label. There will likely be some residue left on the bottle. To remove the residue I take a dish scrubber or dish wand and apply a little elbow grease.
This is sort of a buy beware point, though. Some bottles have great labels that basically fall right off. Others have very gummy labels that leave behind some terrible glue that is nearly impossible to get off. In Wisconsin I’m blessed to have the New Glarus Brewing Company in my back yard. They have the best labels ever! Soak them and they fall right off.
And the best part about labels that fall right off is that you can make some really cool art with them. Here is a collage I made with the New Glarus labels:
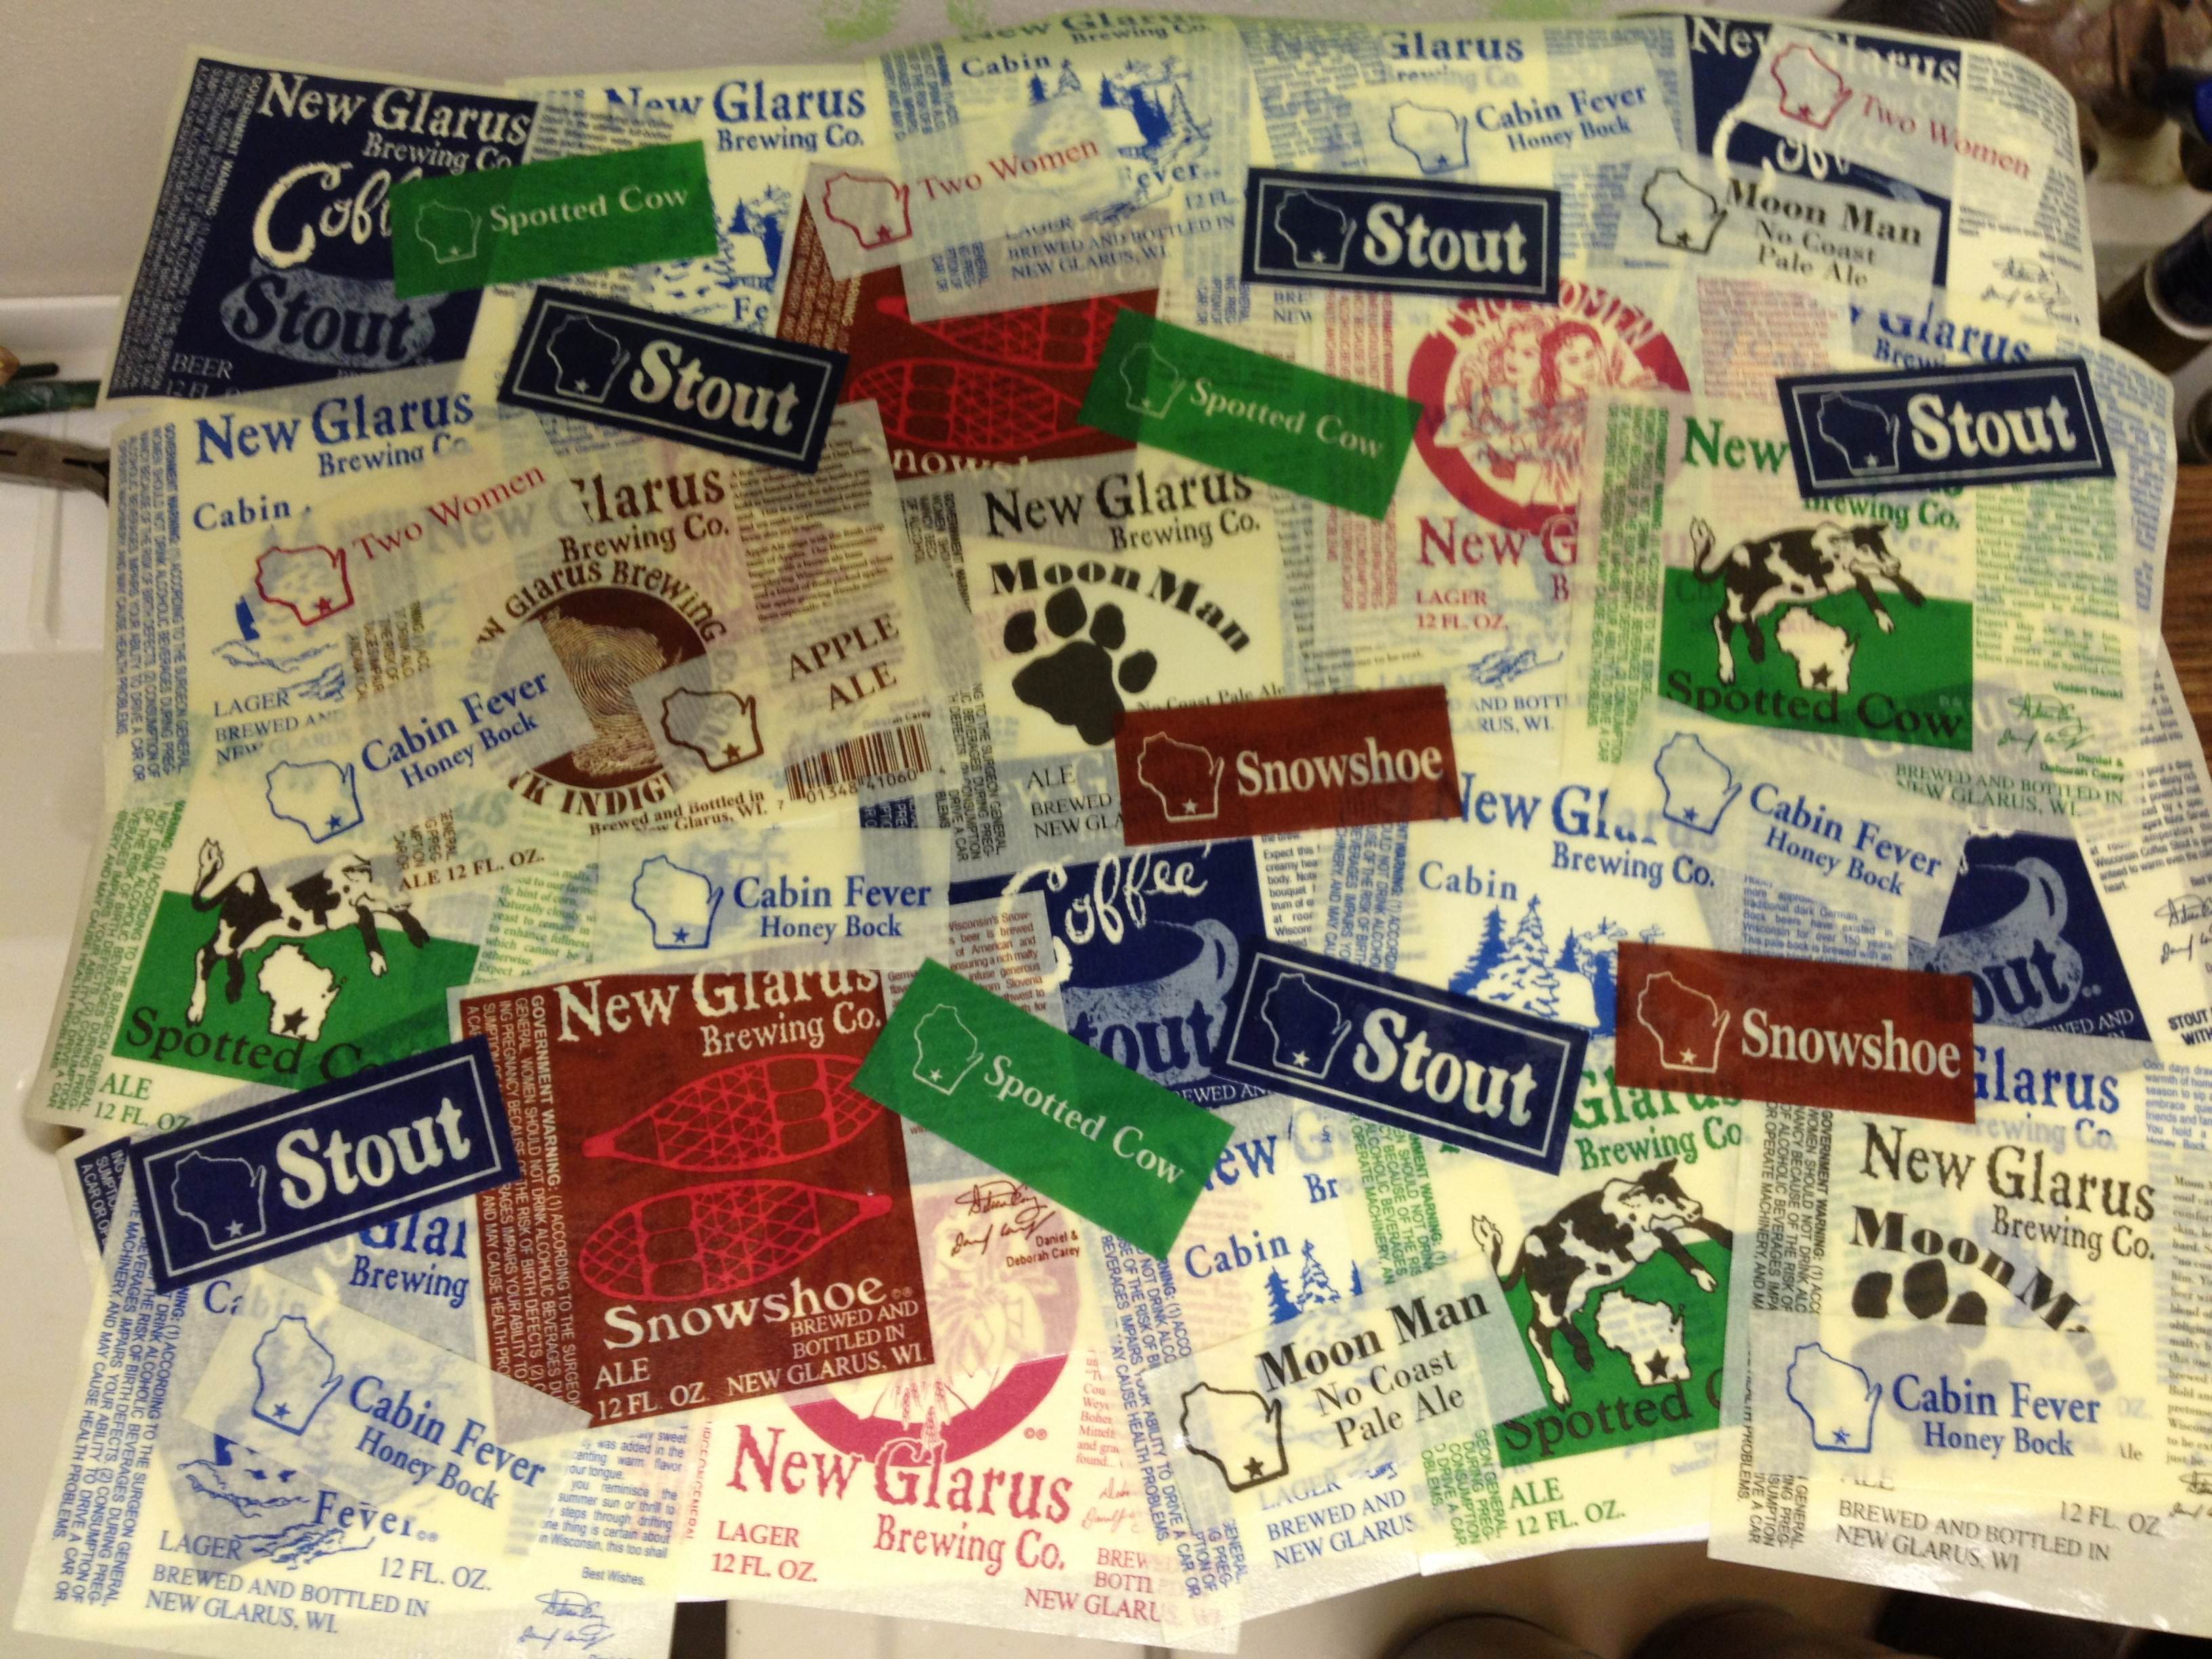
New Glarus Label Art
To get all the labels off and residue removed will take a little while. Be prepared to stand over the utility sink for a while. But once you’ve got the bottles all spic and span I like to move on to step three.
Step 3: The Dishwasher

Dishwasher parties are hotter than Utility Sink parties!
Now that your bottles are free of all denigrating marks of previous ownership they are ready to visit the dishwasher. This step helps to remove any leftover residue from the inside of the bottles and helps to sanitize them as well. And for some reason I really like how they look all lined up in the dishwasher.
The key here is to run it as a normal wash cycle, but do not use any detergent. These bottles aren’t likely to be caked with peanut butter or broccoli or any other typical dinner fare. They were filled with beer. So they really only need to be rinsed.
So run the cycle a few hours before you are going to bottle the beer. That will give you enough time to let the bottles cool off from the hot dishwasher cycle.
Bottle Prep: Simple but Tedious
And that’s it! You now have bottles that are ready to go for bottling. I would, however, make one more recommendation. And that is to do one final rinse in your sanitizer before bottling, especially if these are sitting around for too long. Better safe than sorry. If you have a preferred method for bottle prep, please let me know. I’m always looking to get more efficient!
