Monthly Archives: March 2013
What You Might Not Know About Beer
My wife uses Pinterest and every once in a while she finds something that might be of interest to me. Since what she shared with me is interesting and relevant to this site I am posting it here. You can find the original over at visual.ly.
If you plan to consume any beverages of the beer variety tomorrow during Table Top Day, pull out one of these tasty little morsels of info to impress your friends! Check this out:

200th Twitter Follower Giveaway!

Love Letter cover image from BoardGameGeek.com
Yesterday I got to 200 followers on Twitter! So to express my gratitude and share the love I’ll be purchasing a copy of Love Letter to send to one lucky follower!
Here’s how it will work. I’ll tweet about this article. To be eligible to win Love Letter all you have to do is favorite the tweet and be located in the continental US. I will randomly choose one eligible lucky winner from the list of people who favorited the tweet. Pretty simple!
Once the winner is chosen I will send a direct message to obtain the shipping address. The game will come directly from the online game store.
Thanks to everyone who follows me! Hopefully some day I’ll be able to give a published game of my own design as a giveaway prize! Don’t forget to favorite the tweet!
UPDATE: I’ll choose a winner at 8pm tonight (central)
UPDATE: You can favorite the tweet here instead of scrolling through my tweets to find the right one:
Game Design Process: Concept
Discussing how I arrive at a concept.
Last week I wrote about prototyping a board game and I shared my prototyping techniques for Scoville. This week I am sharing my concept process. How do I come up with a game design? Do I choose a theme and then add mechanics? Or do I choose a mechanic and then slap on a theme? Do I purposefully try to integrate an appropriate theme for the mechanics? These are the sorts of questions I’m answering today in a “self-interview” format.
Q: Where do you get your inspiration?
A: Everywhere awesomeness can be found. I can be easily inspired by just about anything. Make a game about boll weevils? Sure! Make a game about nuclear radioactive decay? Why Not! My main rule of thumb for game design, whether it’s the concept phase, prototyping, or potentially pitching a game is this:
Make sure it’s fun and relate-able!
If what you are designing is something that is fun, then the theme can be just about anything. I usually get inspired by the things that I waste spend my time on. If I’m enjoying the NCAA basketball tournament I’ll probably start thinking of making a card game where you represent a team in a region of the bracket and via set collection and hand management you have to play the right cards to get your team through the Final Four and eventually to win the championship. If I’m working out in the gym I might be inspired to design a game where you are a person who is trying to lose the most weight. You’d have to compete against the other players to burn the most calories or increase your bench press weight the most. The bottom line, though, is that it must be something fun. Players may love a set collection/hand management game, but if the theme is something boring that no one can relate to, then maybe you should come up with something else.
Q: Regarding a game designer’s Chicken vs. Egg Debate: Mechanic or Theme first?

Theme or Mechanic first?
My inspiration is typically theme based, so I usually start there. I’m not a huge fan of abstract games, either. So that probably guides me toward choosing a theme first.
When you choose a theme first it allows you to sort of steer your game in a direction that fits cohesively. Once you have a theme you can pick and choose the mechanics that you think will work best. Imagine you have chosen the NCAA tournament theme. It would be important to understand how the tournament works. You have 64 teams playing games over several weekends. Each game eliminates one team. Eventually you get to a Final Four. So once you understand how the tournament works you can then start to add mechanics. One way to do this would be to have players each represent one region of the tournament. Your objective would be to get your best team into the Final Four. Other players can play the spoiler role and try to cause upsets in your region. To do all this you could use a blind card mechanic with a drafting round before players apply cards. All players could draft a card and then cards could be played onto each game. The overall idea here is that when choosing a theme first you can then go and apply mechanics that you think fit the theme AND make the game fun.
On the other hand when you choose a mechanic first you are almost automatically starting with a more abstract game. A theme could be slapped on that probably fits the mechanic. Or a different theme. Or another different theme. The reason I typically don’t start with a mechanic is because the theme part of a game is typically what makes a game fun and relate-able. That’s just how I roll!
Q: What about boring themes? People seem to like them too!
Valid point, self. So there are a lot of games that have very boring (my opinion) themes that people still really like. Farming, for example. How can a game about farming be fun? The game Agricola is the third highest rated game on BoardGameGeek.com. So clearly the theme isn’t the whole picture in whether a game is fun or not. In fact, many Euro style games involve “trading” or “resource management,” which can be very boring topics. The key is this:
When the theme is boring, make sure the mechanics are innovative and unique (and fun!) (Or have awesome artwork!)
Sometimes people buy games because of the theme. Sometimes they buy games because of the mechanics. As long as the game is fun it can have a super dry and boring theme and people will potentially enjoy it.
Q: You keep mentioning “Fun.” How do you make sure a game is fun?

It looks like they’re having fun!
When I first got into designing games I searched for articles about making games fun. I found some interesting things that I wanted to list here. Some of them are less about fun and more about making a game “good.” But it’s my philosophy that if a game isn’t good, it won’t be fun. So making a game “good” is a prerequisite for making a game “fun.” Here are my rules of thumb for the conceptual phase of the game design process:
- Interaction is Critical! (Otherwise I’d be designing solo video games!)
- Avoid Downtime.
- Provide many options on each turn – you don’t want players to only have one option on their turn. If they can only do one thing then the cease playing a game and become robots.
- Provide multiple paths toward victory. Even if there is only one victory condition, make sure that there are numerous ways to get there.
- Avoid a runaway winner.
Let’s quickly run through why each of these is important for making a game good and fun:
Interaction: If there is nothing you can do to affect the other players, then you’re playing a solo game against other solo gamers. Not fun. If there is no interaction on a verbal level then it doesn’t matter that you’re sitting around a table with friends. You may as well make your game into an app that people can play when they’re sitting on the toilet. Provide a way for players to interact in the game.
Downtime: No one likes sitting around for a long time while other players are taking their turns. Try to design your game so that people are constantly paying attention. Make sure they’re invested in what the other players are doing. It’s no fun to be sitting around waiting.
Options: Without options a game of strategy or tactics or even luck becomes a simple matter of doing whatever it is that the game is forcing you to do on your turn. That’s no fun at all! Designers: give your players options! Don’t turn us into robots.
Paths to Victory: It’s important for players to be able to play your game in different ways. This can be as simple as having destination tickets like in Ticket to Ride. Or it can be complicated like choosing the best way to fill in your estate in The Castles of Burgundy. Just make sure that you’re giving the players different ways to reach a winning condition.
Runaway Winner: I just as easily could have said to avoid player elimination. With a game where a player can get so far ahead that no one can catch up it is effectively player elimination anyway. A good and fun game design will include a way for players to catch up to a leader. This can be done several ways, including hindering the leader or benefiting a last place player. Think of the NCAA thing again. Which games are more enjoyable to watch, blowouts? or close games where a team was down big and they came back and hit a buzzer beater at the end?
Of course there are other things that can determine whether or not a game is any fun. Those above are just the main five things that I always keep in mind when designing a game. Another one that I did not mention because it is difficult to get right in a game is having an ever increasing amount of tension in a game. That is one of the things that Agricola does really well. This can be done by having limited resources or a first-come-first-serve option. Agricola has both!
Q: You’ve got a theme, now what?

So you’re going with Boll Weevils, huh? Could be worse!
You’ve chosen an interesting theme that could be fun and is relate-able. Where do you go next? I like to do a little research about whichever topic I’m thinking about designing into a game. When doing the research I try to figure out things about the topic that would work well for game mechanics.
In the Boll Weevil example I just learned that boll weevils, though not native to the United States, migrated here in the 19th century and by the 1920s had devastated much of the cotton industry. So perhaps while the boll weevil theme itself may not be very fun or interesting, as a designer I could go several different routes. I could make the game be a cooperative game about controlling the infestation. I could make it so that players represent individual boll weevils trying to infest the largest amount of territory. I could even make the game about farmers trying to grow the best cotton while other players can launch infestations of boll weevils on their opponents. So I could definitely produce a game about Boll Weevils. Question is, would anyone care?
The point is that once you choose a theme, do a little research and figure out what you really want the objective of the game to be.
Q: How do you add mechanics?
Now that you’ve gotten to the point of understanding what your objective is in your game it’s time to start turning it into a real game. The key is understanding the theme. You don’t want to add things to your game that don’t really fit the theme. I recently ran across this with the game Archipelago. There are mechanics in that game that just don’t seem to fit the theme of exploring an archipelago and dealing with indigenous persons. One example is that if the rebels are advancing you can get them to stop by selling fruit. But you aren’t selling fruit to the rebels. You simply have to sell fruit. It just didn’t make much sense to me.
So when I think about adding mechanics to the theme I figure out how the theme really works. It’s like the boll weevil example above. Since boll weevils spread and infest I would probably add a mechanic where a swarm of boll weevils is taking over precious territory.
I also like to keep in mind the 5 points I made above about making a game good. If a mechanic adds too much downtime, for example, I might not go with that mechanic. Or if a mechanic has no player interaction I’d probably leave it out. It is important as a game designer to be cognizant of how the mechanics in your game not only allow for players to reach the game’s objectives, but also to make the game good and fun!
Conclusions:
Game designers face an interesting challenge. The whole idea of creating a game is almost a game in and of itself. Designers strive to make games that are fun, induce emotions from the players, create an atmosphere of engagement between players, and be innovative all at the same time. Finding a theme, applying mechanics, and balancing the game are all things that go into making a great game. If there’s a game out there that you really enjoy, find the designer on Twitter and thank them! A lot went into that game!
Prototyping Techniques Applied to Scoville
 While at Protospiel I heard a lot of kind words for the quality of my prototype of Scoville. So today I am sharing my prototyping process with you. I hope that it can help you make a quality prototype that you are confident about.
When I was first getting into board game design I was a little overwhelmed by what it took to make a prototype. I watched a few prototyping videos on BoardGameGeek.com. Those only made me shy away from the whole process. It can be intimidating. But today you can learn that it isn’t perhaps as daunting as you might think.
Overview of my Process
 First things first: you need a game concept. Assuming you’ve got a great idea in mind it’s time to start prototyping. Early on in my board game career I was designing a heavy Euro game. I waited to make a prototype until I had worked through all the details of the game. That was a mistake. It is my recommendation to make prototype components of your game as early as possible. For example: If you have an auction in your game, test it independently from the other mechanics. Test each mechanic individually and test them early on. There is no point to design an entire game only to find out that the individual parts don’t work.
Once the individual elements seem to work then you can try to put them all together to make a full game out of them. Here is a rule of thumb I try to follow:
Never add complications unless they are absolutely necessary.
This is a difficult thing to do. It is always easier to add another rule or add another component. But if you want to make a good game, focus on the innovative mechanic rather than all the little rules about the rest of the game. Keep it simple.
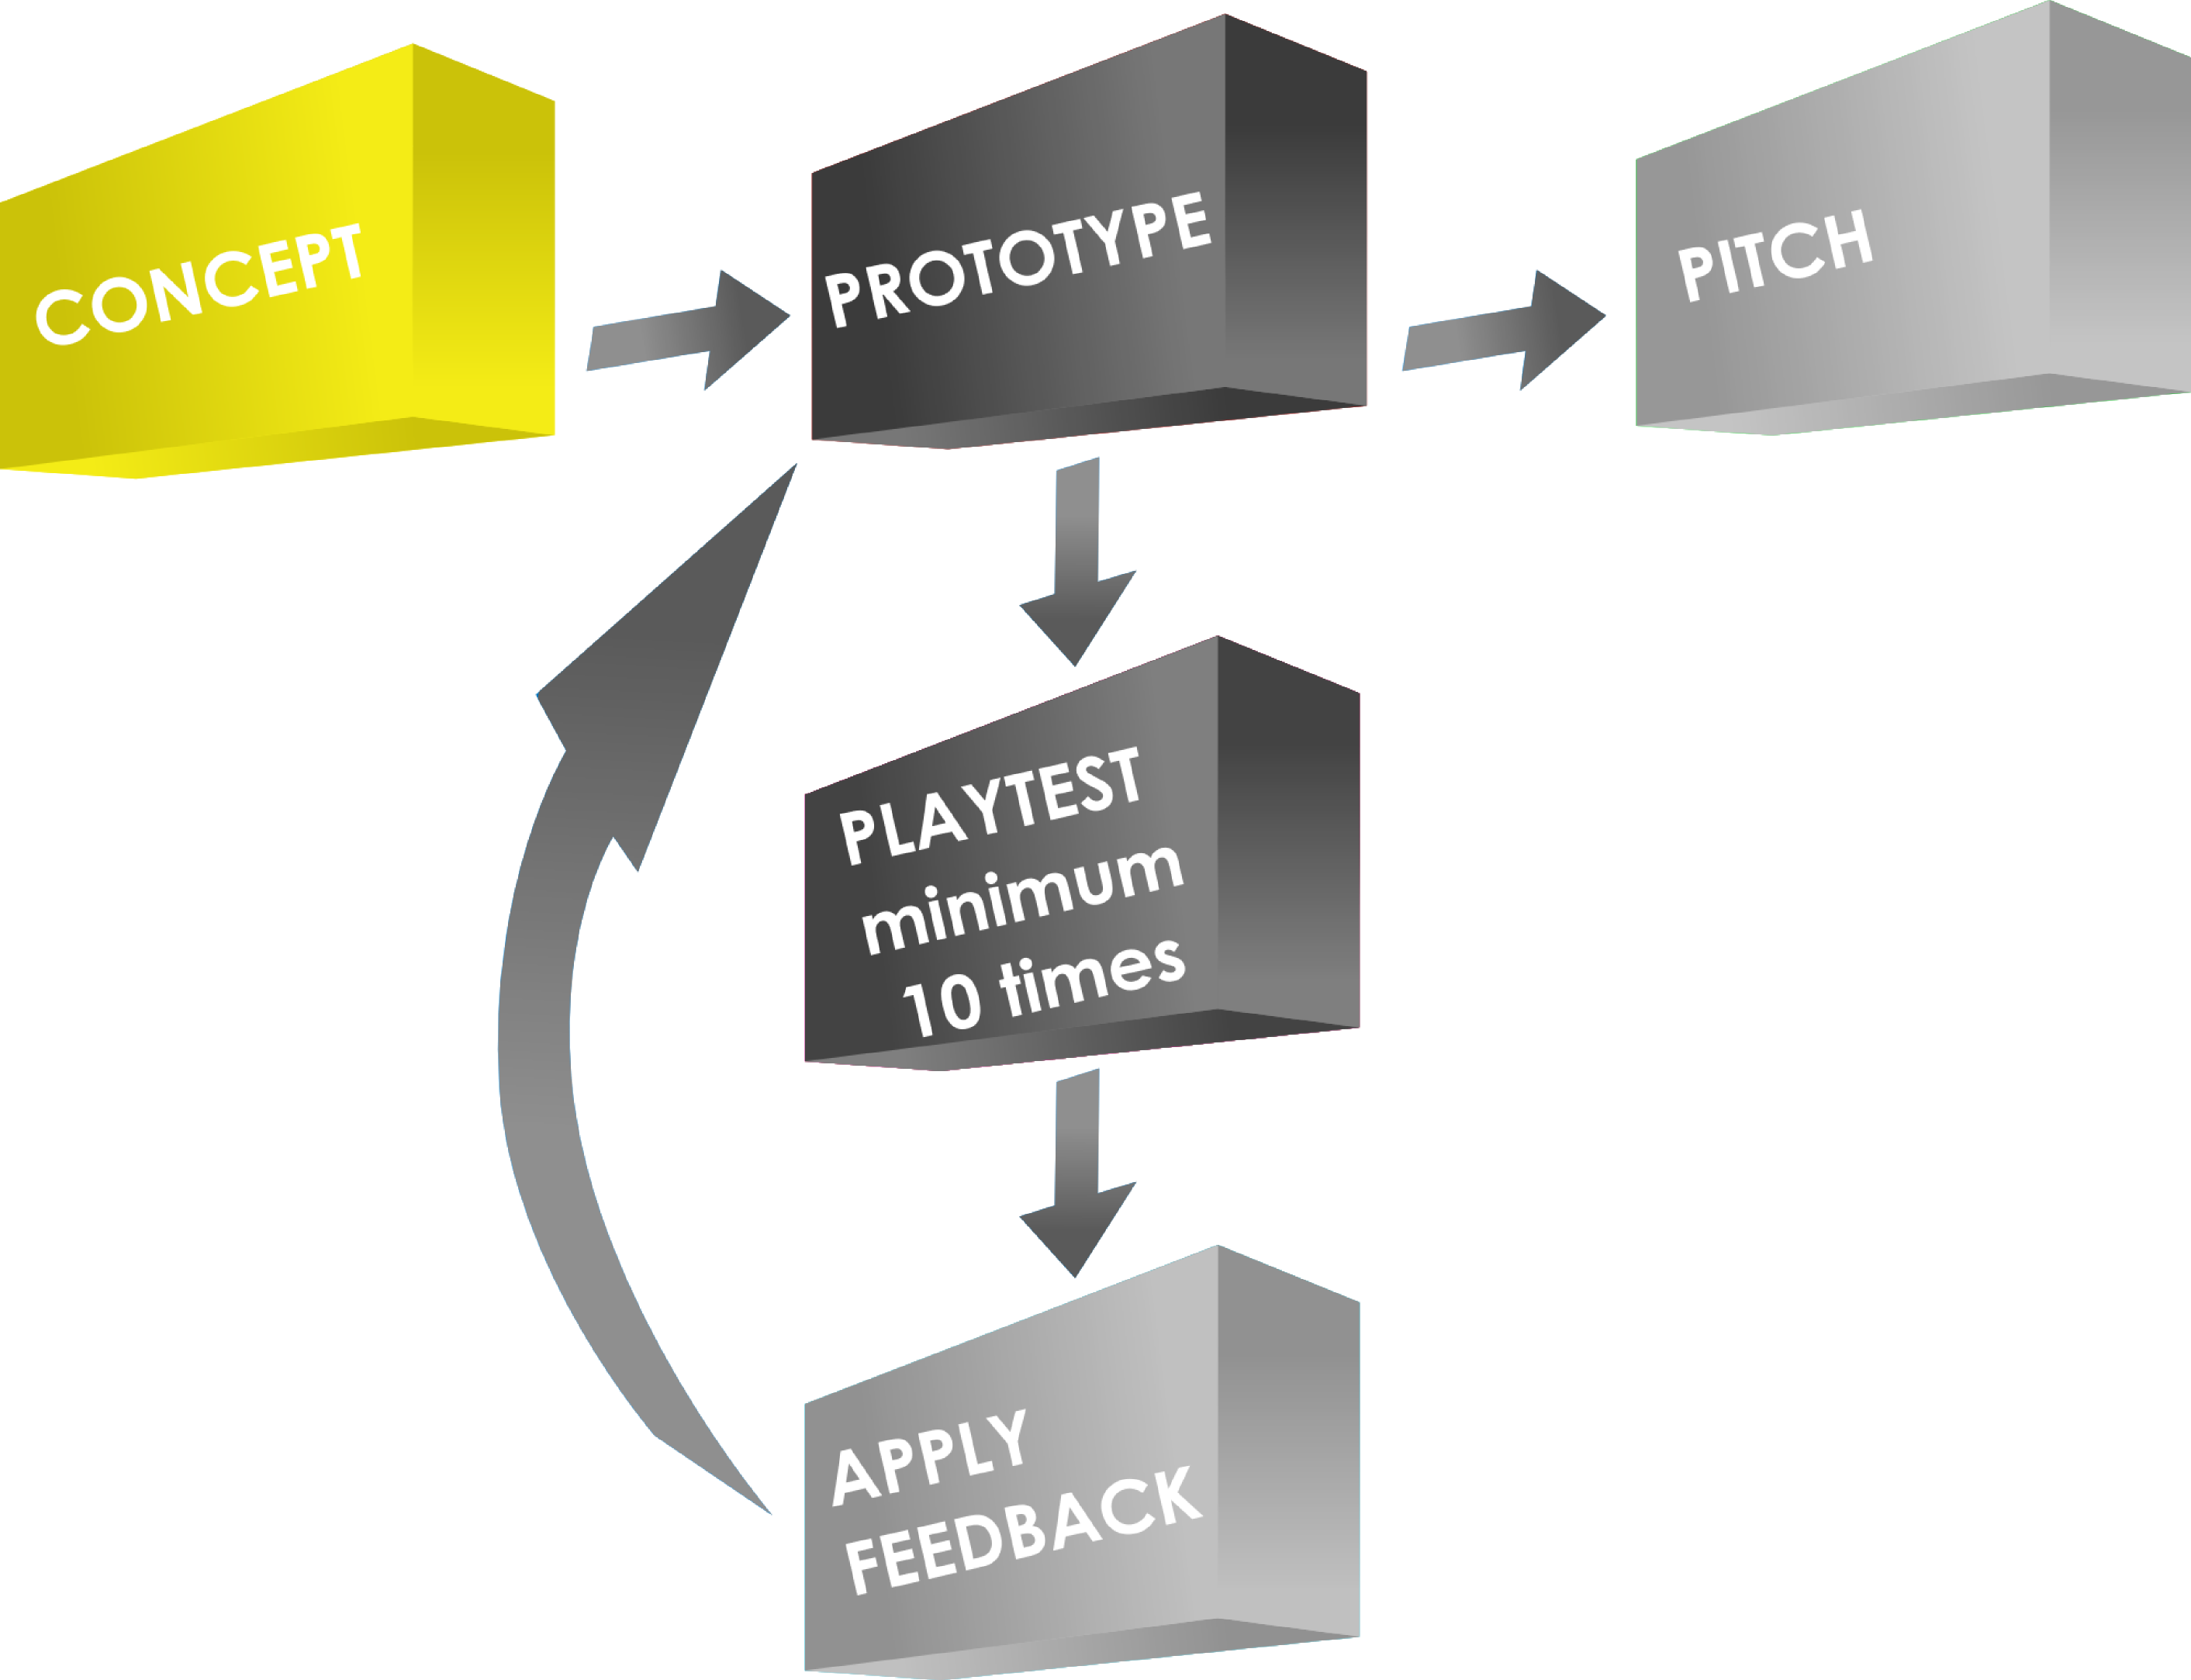
So I start with a concept. I usually write about 10 pages of notes and sketches about that concept. Then I’ll go ahead and start prototyping (this is what I’m covering today). Once I have a prototype ready then I’ll play test it at least 10 times. This will give me a solid amount of feedback. Only after testing 10 times will I apply any changes. Here’s another rule of thumb:
Don’t try to change things in the game on the fly, and don’t change more than one thing at a time.
Following this rule is critical, especially the part about changing more than one thing at a time. If you change more than one thing it can be difficult to know which of the things you changed made the game better (or worse). Change one thing at a time and test it profusely. So I apply feedback and adjust things after 10 play tests. Once the game has gone through the PROTOTYPE – PLAY TEST – APPLY FEEDBACK phase several times to the point where there are only very subtle changes then I get to the point where I am confident about contacting publishers about it. There is no point in pitching a game unless you’ve gotten it to the point where you are proud of your product and confident to show it off.
Getting Started: What do I need?
When making a prototype I usually begin with a spreadsheet. A spreadsheet allows you to create custom tiles or cards very easily. You can print them out yourself and turn them into quality prototype components. Here’s a list of everything I use(d) to create a copy of Scoville:
- Spreadsheet software
- Graphic Design Software (I prefer Inkscape, but The Gimp is also very useful)
- Paper (Plain paper for first prototypes, Glossy photo paper for pitch-able versions)
- Thick card stock – As thick as you prefer, though the thicker it is the more difficult it is to cut.
- Components: cubes/meeples/coins
- Circle Punch
- Paper Cutter (I have this one)
- Bingo chips
- Glue Stick
- Scissors
- Gerber Baby Food Containers – if you don’t have kids find some friends who do and beg them to save these for you!
Here is a picture of all the components that go into the game:
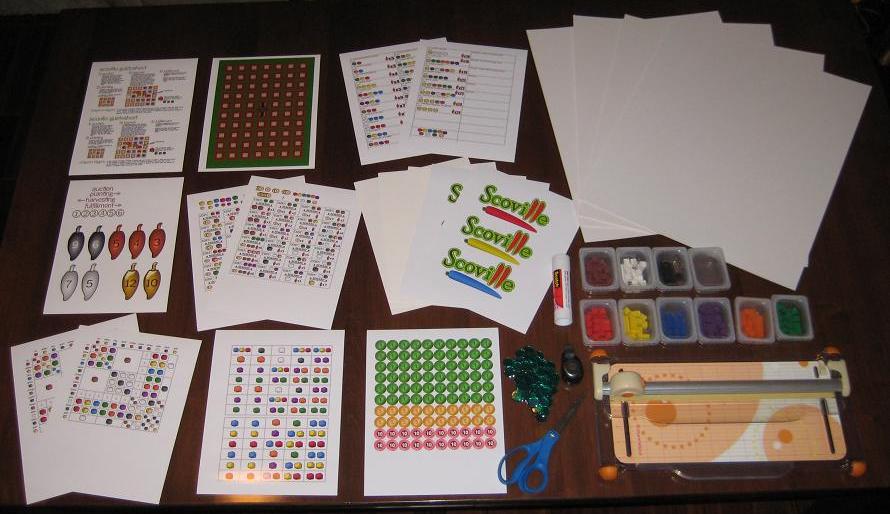
Scoville components fresh off the press!
That’s everything (except a box) I need to make a copy of Scoville. Let’s walk through the prototyping (physical creation) process.
Make it Rain! Or Something Like That
Assuming you’ve taken your concept and created artwork that suits you, it’s time to actually make something real for testing. What that means to me is that it’s time to print stuff out! Scoville has 13 pages of printing required for a full copy. The next step is to adhere those pages to the thick card stock. I like to buy the stuff that is as thick as standard board game chit board. This gives me the feeling like I am playing a real game when I test it.
So I use the glue stick and cover the back of the paper and then stick it to the card stock. Once I’ve got them all glued down I can start to cut them to size. Since the large card stock boards I buy are too big for my paper cutter I run a scissors through them to separate the difference components before using the paper cutter.

Cover with glue, adhere to card stock, coarse cut to separate.
Then I use the paper cutter to trim the fat and make them nice and clean. Shown here as an example is the first cuts done to the auction tiles:

I then go ahead and cut each tile out individually and end up with a pile of nice thick quality components:

My precious little auction tiles!
I continue this process for all of the components in the game.
Making Player Shields
Another part that seemed a little overwhelming to me was the production of player shields. But I found a nice, easy way to make them. If you don’t want pictures on them then just cut some paper and fold it. If you want pictures or logos then follow this procedure:
-

Easier to make than I thought.
Print the logos.
- Cut the logos to a rectangular size.
- Glue the logo centered on a sheet of thin card stock.
- Angle cut each edge so that it will lean when completed.
- Fold gently.

For Scoville I made the artwork on the shields include the player color. Making your own player shields rather than using shields from games you own can really spice up your prototype.
Making Money
One of the more tedious things in this process is making my own coins. I don’t have to make it as hard on myself as I do, but I prefer a really professional looking prototype.
It would be much easier to simply write a money value on the plastic bingo chips with a marker. This would make them more difficult to read and they wouldn’t look as nice.
So my process for making coins is this:
- Create the artwork.
- Insert the coin images into a document file.
- Print the document.
- Punch the coins out of the paper.
- Adhere them to the bingo chips.
Here is a tip for punching, if you use a circle punch like mine:
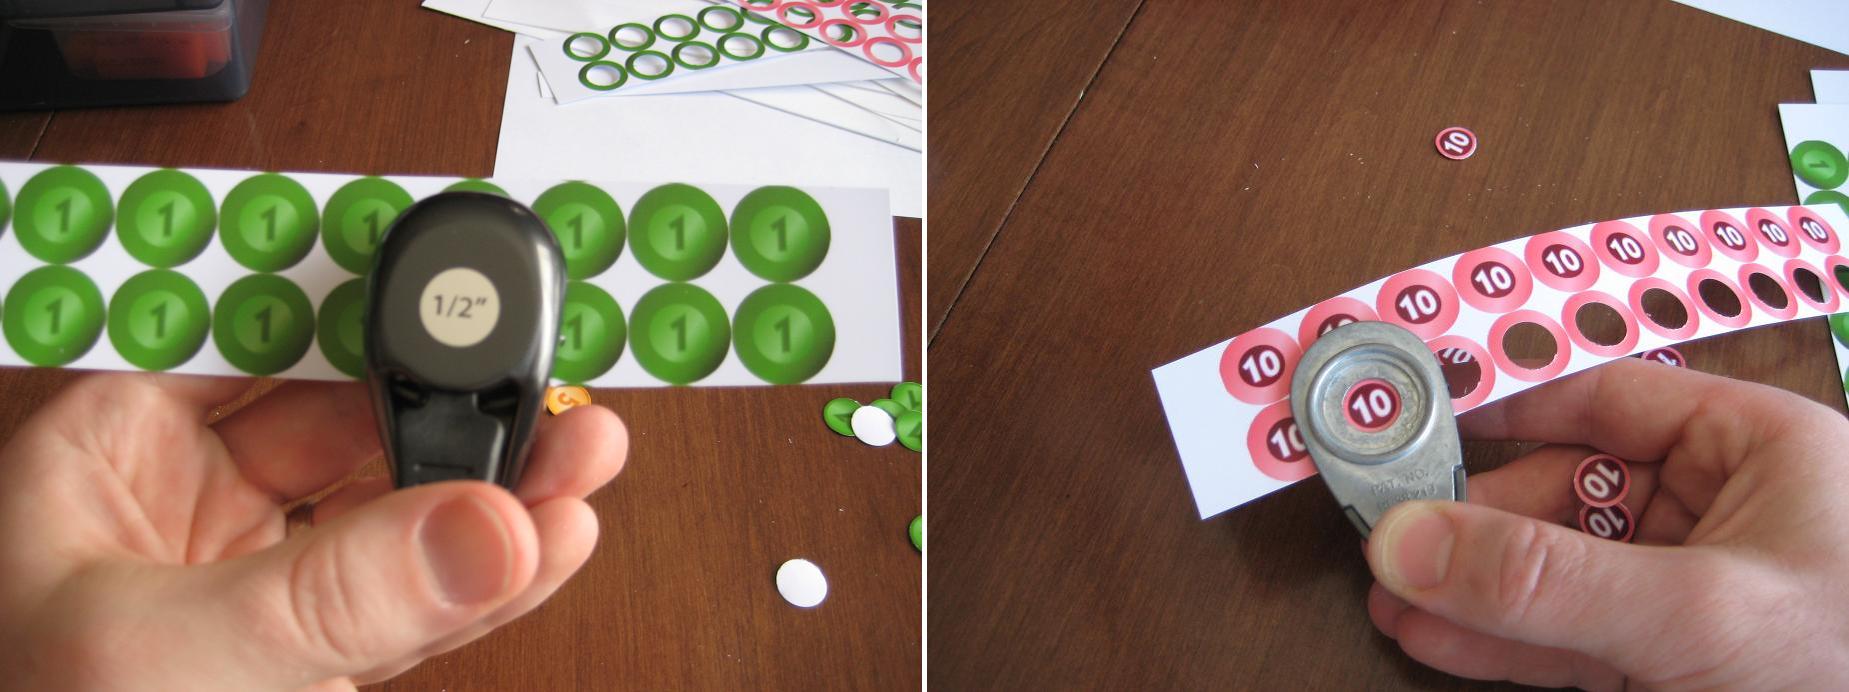
Flip the punch over for better visual alignment!
If you hold the punch like it seems it should be held then you have to rely on the little plastic bump guides on the side of it. Just flip the punch over and you can visually align the punch with the coin. This makes it so much easier!
Once you’ve got them all punched you can simply glue them to the bingo chips. I recommend watching something on TV that is really attention grabbing, so that it draws your attention from the tedium of gluing little circles to bingo chips.
If you don’t like the idea of gluing circles to bingo chips then go ahead and use the same thick card stock that you’ve been using. Just be aware that the circle punch may not punch through the thick card stock. That’s why I went with the bingo chips.
The Final Product
Once you’ve got all the components glued-punched-cut-etc. then it’s time to put it all together. Here is a before and after picture showing the reduction in volume for Scoville:
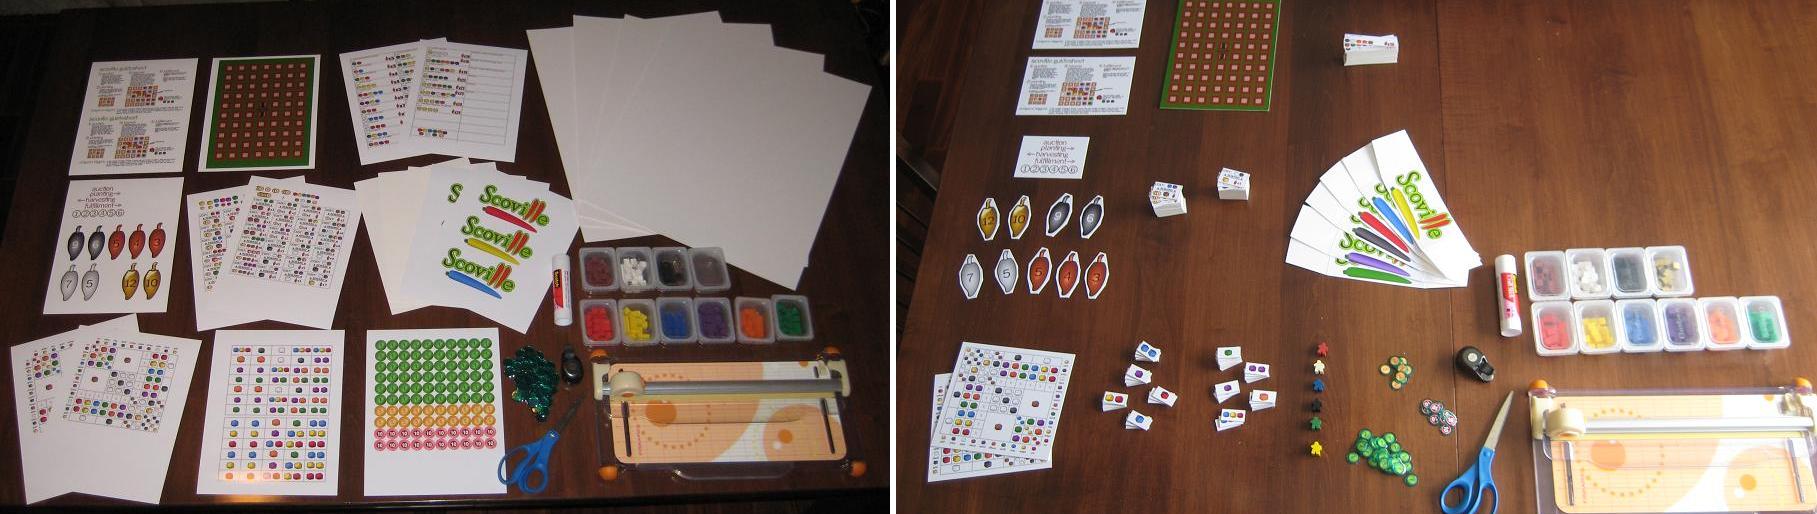
What looked overwhelming turned into a nice, quality prototype.
To continue with the theme of a quality, pitch-able prototype I like to use a nice container to hold everything. You can buy these at Target.com or you can find different colors in the store. They are only $5. I should also note that these fit into a Medium Flat Rate Priority box from the United States Postal Service. So it is pretty easy to mail one off to a publisher!
Now you’ve got your container so throw in the components, a couple copies of the rules, a business card, and you’re ready to pitch your game! Note, you do not need to have a high quality prototype to pitch a game. I am just a firm believer in making a good first impression. Here’s what Scoville looks like in it’s full prototype form:

This is the third copy of Scoville in existence! May the other two copies in the wild prosper and flourish!
How Much Is It Gonna Cost Me?
I mentioned earlier that you can make an high quality prototype that is also inexpensive. Here is a rundown of the costs for a full copy of Scoville:
- 13 sheets of glossy photo paper: $3
- Printer Ink (I buy cheap Non-OEM ink off Amazon): ~$2
- Glue Stick: $3.30
- 4-Pack of Thick Card Stock: $13
- Bingo Chips: $0.50
- Meeples ($0.14 each): $0.84 – I live near The Game Crafter so I can pick them up and avoid paying shipping costs
- Plastic Cubes (250): $7 – I bought a tub of 1000 cubes for $25 (shipping included) from EAI
So the total for a high quality prototype for Scoville costs me under $30. So maybe you wouldn’t characterize that as inexpensive. But when $30 can allow you to create a pitch-able high quality prototype that might catch a publisher’s eye, I don’t think $30 is too bad.
What techniques do you use? I wanted to point out that I did not write about making cards. Most people, when making prototype cards will purchase penny sleeves, insert their custom made cards, and make them thicker by dropping in a M:TG card. I don’t use cards in Scoville, so I didn’t include that.
I hope that you enjoyed this article. It has been a fun process for me to figure out some of the best ways to make a prototype. If you have any ways to make the process more efficient, please leave a comment so others can see!
Scoville Protospiel Recap

I had the privilege of attending my first Protospiel this past weekend in Milwaukee. Protospiel is a convention for game designers to bring prototypes and get feedback from other designers. So I took my game Scoville along and got some awesome feedback! I think that I’ll focus this recap on my game rather than provide opinions of the games I played that are unpublished. That would not be fair to the designers even if I really enjoyed their games since all the games I played are still in progress. So rather than posting a drawn out chronological recap of the weekend I will just post the drawn out highlights for the play tests of Scoville.
I was fortunate to have Scoville played five times and was pleased to play 8 other games by other designers. Protospiel is an awesome thing for a designer to attend!
Here’s a little background about my Protospiel expectations and goals…
Protospiel: First Contact
Coming to Protospiel I had two goals: 1) validate whether or not Scoville is any good and 2) connect with people who know what they’re talking about. A secondary goal was to leave a copy of the game with Grant Rodiek for inclusion in the Prototype Penpal Program. That was something I could always do later on, but I thought it could be cool to send a copy off with him.
I also had some expectations about the feedback I might receive. I knew that I wanted to adjust the auction phase of the game. So I to see the same feedback about it that I had seen from my prior play tests. I was also a little uncertain about the quality of my prototype (that thought was quickly vanquished!). Thanks to everyone for the kind words about the quality of my prototype. I’ll post an article sometime about how I make prototypes.
So if I received validation and made some connections then I would have considered this weekend a success. Let’s see how it went.
Scoville Play Test #1
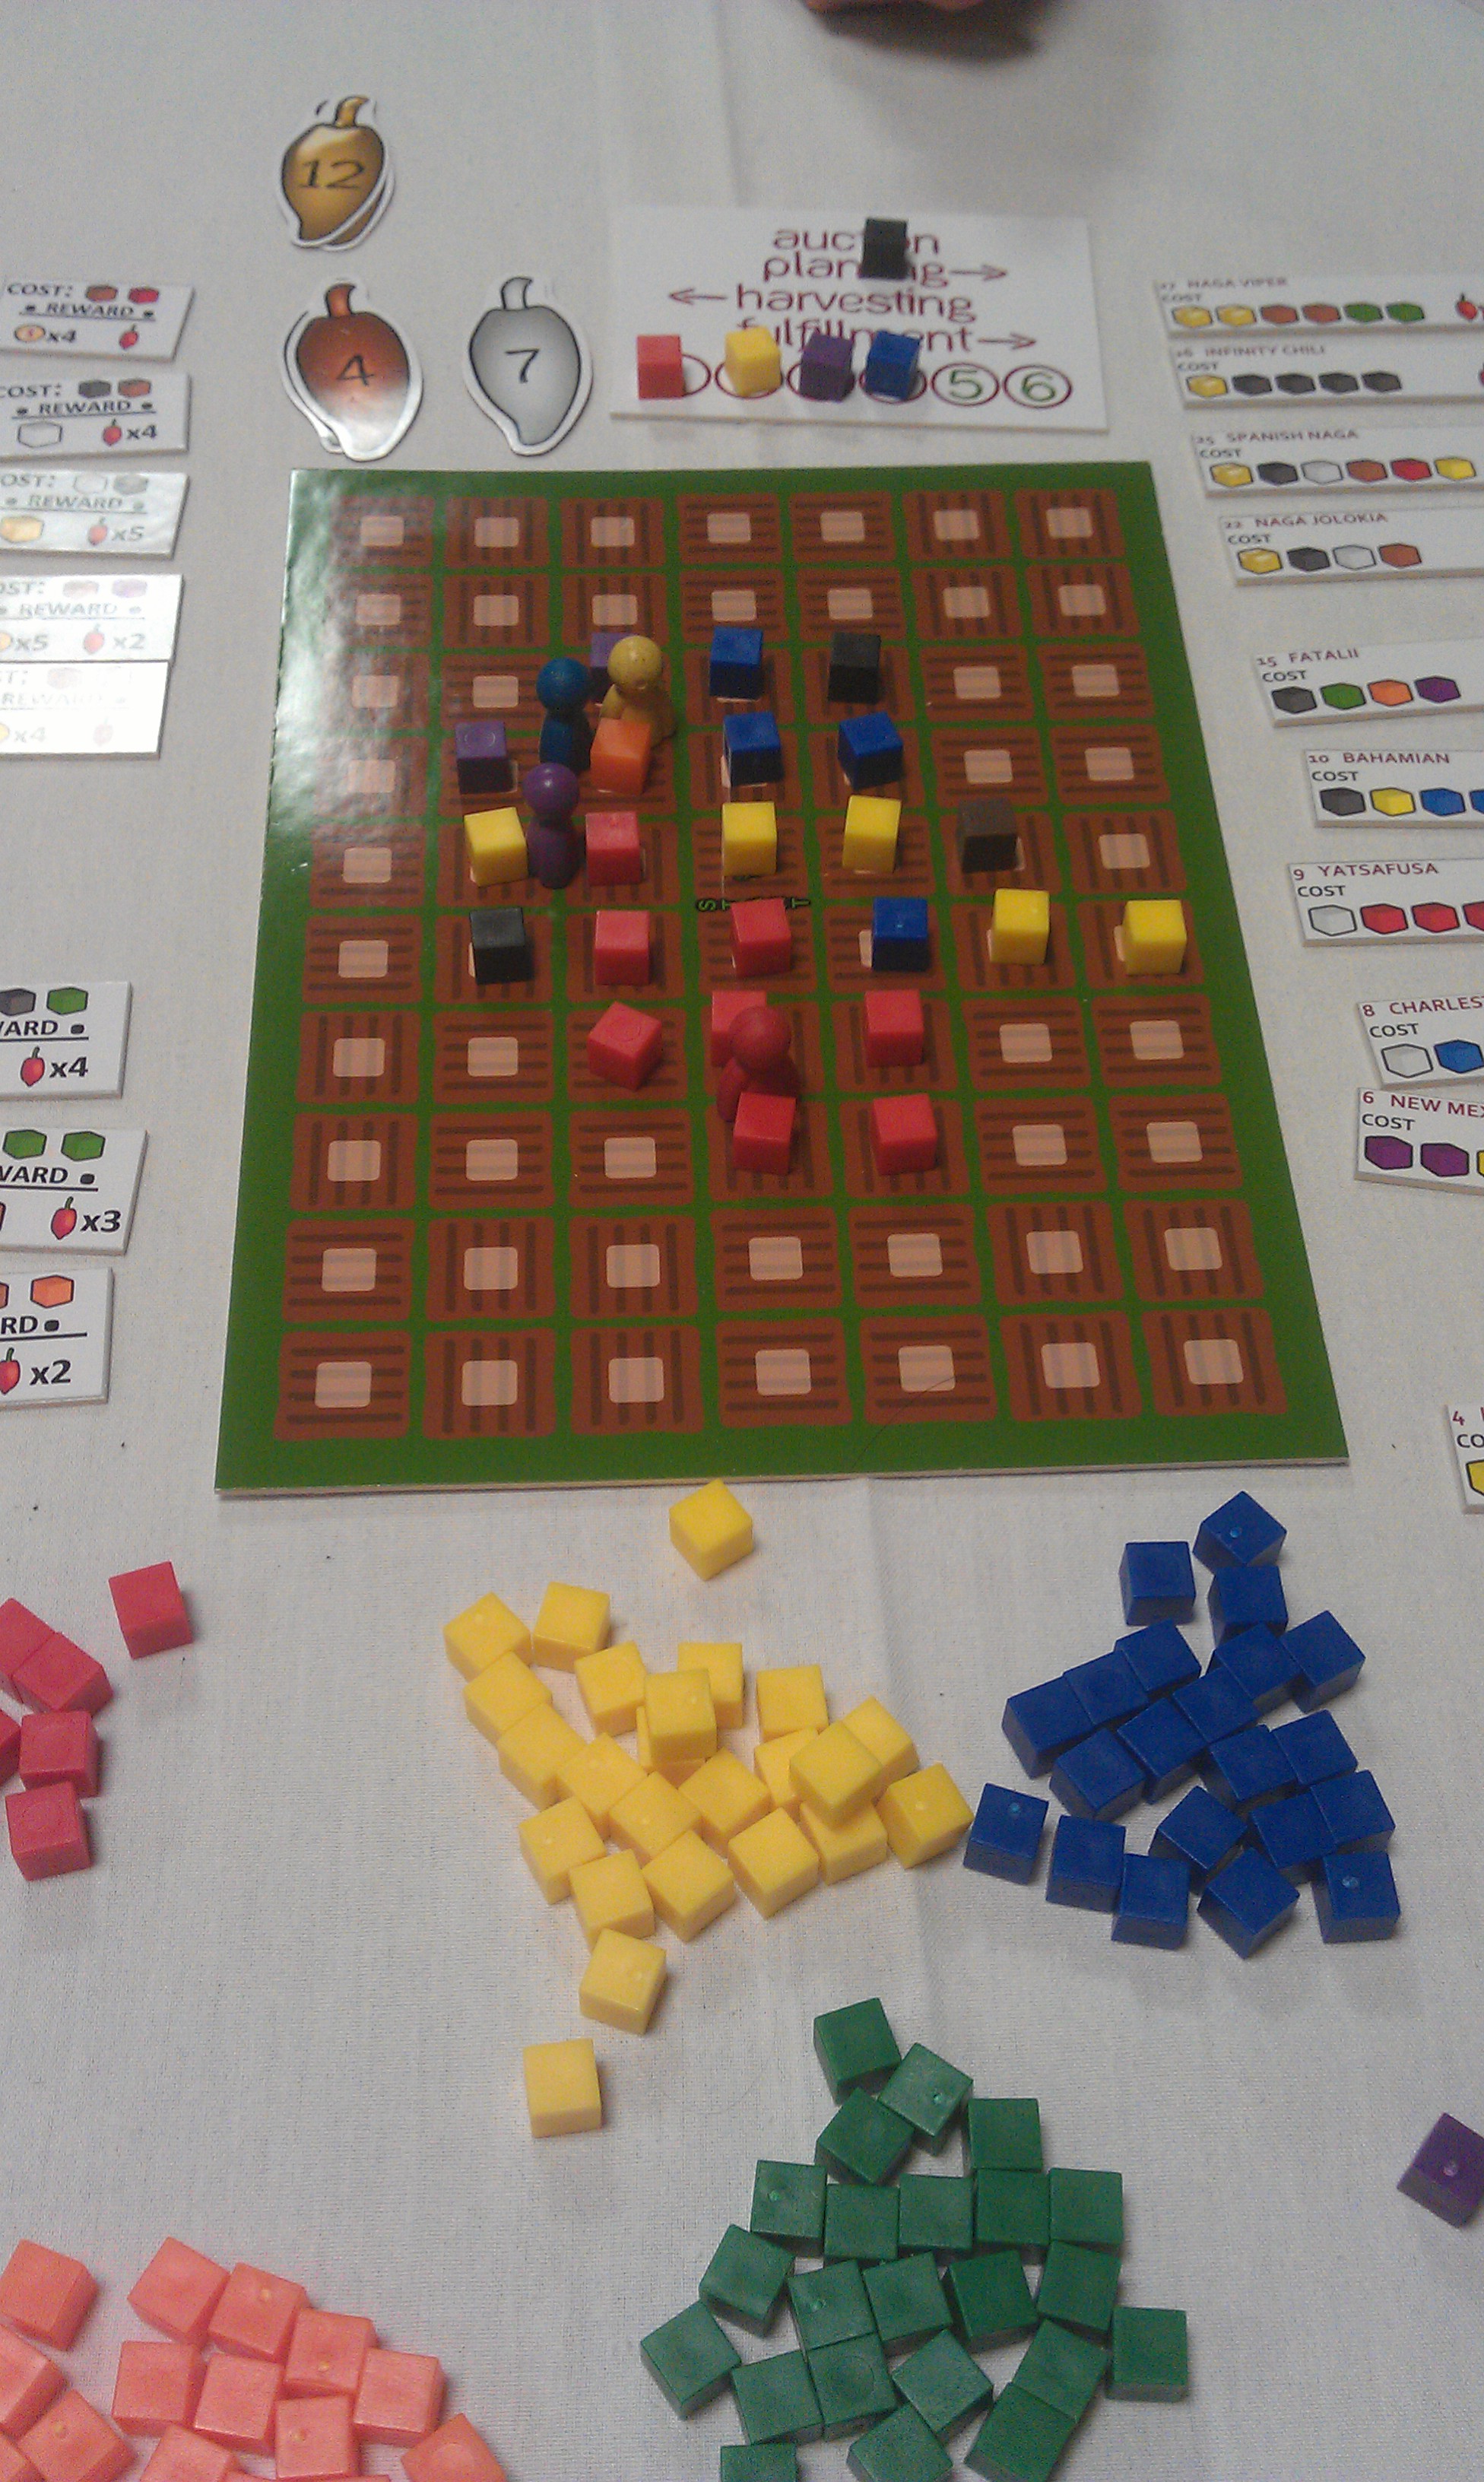
Getting to the convention at 8:15am on Saturday allowed me to get my game set up right away since few people were there. I got four people to give it a go and they seemed to really enjoy it. I won’t explain the game much here since I’ll be writing a post all about the game itself. Here are the suggestions that I received after the game:
- Beware of color blindness (Cool apps: Color Blind Vision (Android: FREE) and Colorblind Vision (iOS: $2.99)).
- Stage II orders seem to provide too many points.
- If everyone bids zero in the auction, flop the player order.
- Put endgame trigger scenario onto the guidesheet.
- Tiebreaker should go to the player with the most coins.
- The game was described as a “Euro with luck but no dice.”
- There should be no randomly chosen player order at the start of the game.
- During fulfillment there should be the option to pay for becoming the first player.
That’s a lot of great feedback. The game uses 10 differently colored cubes so I have been aware of the color blindness issue. There are several solutions for this. The biggest takeaway from play test #1 was that I received the auction feedback I was expecting. My plan would be to test a new auction mechanic on Sunday.
One player, who happened to be the winner by a lot, wanted to try a strategy that I am aware of but have not yet seen attempted. Since peppers can be sold for coins based on how many of that color are planted in the fields there is a strategy that you can plant a pepper of a certain color in each round and harvest that same color each round without doing anything else. I have done the math in my head and I do not believe that this would be a winning strategy (at least I hoped not because that would make the game broken). More on this below.
Scoville Play Test #2
After working on Protospiel goal #2 of making connections and meeting some awesome people, they were willing to give Scoville a try. During this second play test there was more bidding and jostling of player order. I think that was the reason that the auction was not mentioned in the post-game discussion. This play also resulted in much closer scores than the first play. Here are the suggestions I received:
- Peppers should be worth something at the end (that are currently worth nothing in the endgame: Use Them or Lose Them!)
- The artwork on the fields should somehow better illustrate where the player pawns can be placed.
- The game was described as a “medium to heavy Euro.”
So I received quite a bit less feedback from play #2. But the fact that I still didn’t receive any feedback about how anything seemed broken meant that perhaps Protospiel goal #1 (validation) was starting to become apparent.
Scoville Play Test #3
Later Saturday night a prominent figure in the board game reviewing business was able to play Scoville. So with three other players I got play test #3 going. In terms of rounds this was the shortest game I have seen. The game lasted 6 rounds. The players again seemed to enjoy the game and nothing seemed broken to them. They did mention the auction as the weak point of the game, so I received good feedback about that that I could implement on Sunday. Here’s the suggestions:
- Possible Trademark issue with the names of peppers used on the recipe tiles.
- Turn order needs adjusting. Option 1: Flop the order. Option 2: Purchase your spot.
- Perhaps just get rid of the reverse order for the harvest action.
- Brown peppers seem too valuable.
I want to point out that the brown peppers are somewhat of an enigma in the game. They don’t breed with anything except the best peppers. They take up space on the map. But they are used quite a bit in the recipes. I had not received feedback that browns were too valuable before this. The normal feedback on the brown peppers is that they seem pointless. So this was interesting feedback from a fresh perspective.
I was also pleased, in a bittersweet way, to hear the same feedback on the auction mechanic. I now knew that I could incorporate a revised auction mechanic on Sunday and expect good things.
I was intrigued by the suggestion to remove the reverse player order for the harvest. My first thought was “absolutely not.” What that would lead to is either huge bids during the auction or rounds of the game where one player can make a huge jump in points. I’ll have to examine this further.
Scoville Play Test #4
Sunday morning I was able to play Scoville for the first time during the weekend. I had not played in the previous play tests. And this time it was just a two player game. I have tried to design the game such that it scales well from 2 to 6 players. There are no AI players necessary and the game feels nearly exactly the same with 6 players as it does with 2.
Since it was now Sunday I was going to implement the new auction mechanic: Bid for Player Order. Now during the auction phase players would be bidding for turn order. Whoever bids the most gets to choose their spot in the turn order. The next highest bidder gets to choose the next spot, and so on. This way, if a player wanted to become the first harvester they could bid high and then choose the last spot, which would allow them to harvest first.
The new auction in the two player game seemed to work, but I suppose that this new auction mechanic would work even better with more players. What the new auction mechanic provided was a way to earn the first harvester spot. That is critical to strategy in the game.
Here are the suggestions I received:
- Are points balanced on the Order tiles?
- Change the artwork on the Cross-Breeding table for the cross-breeds that result in two peppers.
The points on the Order tiles may be slightly unbalanced, but not to the point of brokenness. These can be easily revised, which I may do depending on analysis of the scoring for the first 25 play tests. The artwork suggestion is an excellent one that I will definitely change.
Scoville Play Test #5
The attempt to break the game. He ended up red-faced!
The final play of Scoville included the big winner from play #1. He wanted to test the coin building theory and see if it could potentially provide a winning strategy. I welcomed him to try it but made sure that the other players were initially unaware of his proposed gameplay. It was a great final play and I was happy to see that the new auction mechanic really worked well with four players. Here are the suggestions:
- Don’t call it “harvesting, call it “breed-vesting.”
- Check out the game Santiago since there is a similar “fields” mechanic (uh oh… worried about this!)
- The different parts of the game were described by one player as Resources (Auction), Tactics (Orders), and Strategy (Recipes).
The first thing to discuss was the auction. Of note is that this game had the highest average bidding per round of all 5 play tests during the weekend. I think this is due to players now having two things to bid for (first player spot or last player spot) rather than for just moving up in player order. The thing of note was the compliment someone gave to the auction saying that the auction was a good mechanic for the game. This brought the game full circle over the weekend. Previously the auction was described as the weak point of the game. Now it was “good.” I’ll take that!
The other thing that was validated from this final play test was that the game was not broken in that attempting to get coins by planting and harvesting the same color did not result in a winning strategy. The player was going full steam ahead from the get-go with that strategy and came in last place (though could have finished in third place). I was pleased that the game wasn’t close to being won by that strategy. Overall it was a great play test.
Overall Scoville Analysis
Perhaps the best part of the analysis is that people really seemed to enjoy the game. While my goal was to validate whether or not it was any good, I came away from Protospiel very humbled by all the kind words people had for the game. Let’s dig in a little bit and check out the scoring breakdown:
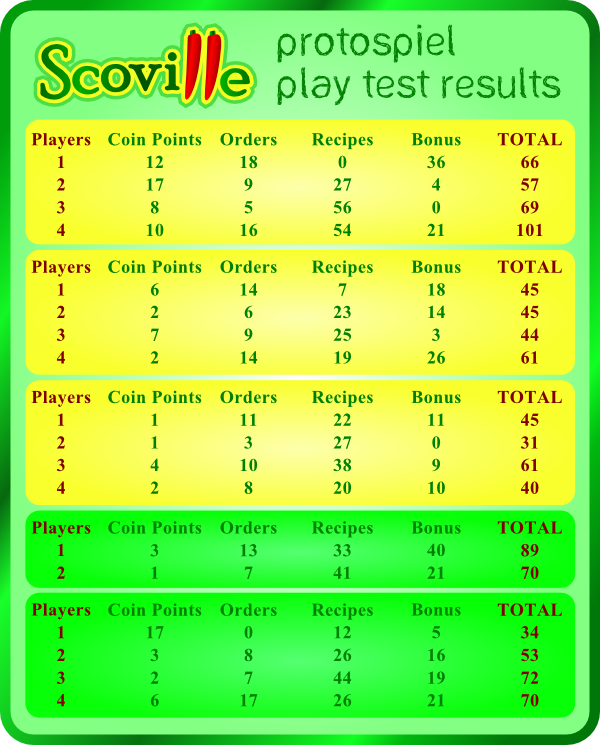
Some further analysis revealed that the number of coins bid during the game varied quite a bit. In terms of coins bid per round the numbers were 2, 6.14, 7.66, 1.38 (2-player), and 7.85 per game. The highest average was the 4-player game with the new auction, though this wasn’t unexpected.
Overall it was apparent that people had fun when playing the game. That’s the most important thing to me as a designer. There are some things that I would like to continue to develop leading up to Gen Con that I mentioned to the players. But I want to avoid the situation where I am needlessly adding complexity. That would steal from the simple elegance of the mechanics currently in the game.
Thank you to all 16 players who play tested my game. I really appreciate the feedback. It was an awesome weekend! And special thanks to Grant Rodiek for humbly accepting a copy for the Prototype Penpal Program. I know that I can expect some awesome, honest feedback!
