Prototyping Techniques Applied to Scoville
 While at Protospiel I heard a lot of kind words for the quality of my prototype of Scoville. So today I am sharing my prototyping process with you. I hope that it can help you make a quality prototype that you are confident about.
When I was first getting into board game design I was a little overwhelmed by what it took to make a prototype. I watched a few prototyping videos on BoardGameGeek.com. Those only made me shy away from the whole process. It can be intimidating. But today you can learn that it isn’t perhaps as daunting as you might think.
Overview of my Process
 First things first: you need a game concept. Assuming you’ve got a great idea in mind it’s time to start prototyping. Early on in my board game career I was designing a heavy Euro game. I waited to make a prototype until I had worked through all the details of the game. That was a mistake. It is my recommendation to make prototype components of your game as early as possible. For example: If you have an auction in your game, test it independently from the other mechanics. Test each mechanic individually and test them early on. There is no point to design an entire game only to find out that the individual parts don’t work.
Once the individual elements seem to work then you can try to put them all together to make a full game out of them. Here is a rule of thumb I try to follow:
Never add complications unless they are absolutely necessary.
This is a difficult thing to do. It is always easier to add another rule or add another component. But if you want to make a good game, focus on the innovative mechanic rather than all the little rules about the rest of the game. Keep it simple.
So I start with a concept. I usually write about 10 pages of notes and sketches about that concept. Then I’ll go ahead and start prototyping (this is what I’m covering today). Once I have a prototype ready then I’ll play test it at least 10 times. This will give me a solid amount of feedback. Only after testing 10 times will I apply any changes. Here’s another rule of thumb:
Don’t try to change things in the game on the fly, and don’t change more than one thing at a time.
Following this rule is critical, especially the part about changing more than one thing at a time. If you change more than one thing it can be difficult to know which of the things you changed made the game better (or worse). Change one thing at a time and test it profusely. So I apply feedback and adjust things after 10 play tests. Once the game has gone through the PROTOTYPE – PLAY TEST – APPLY FEEDBACK phase several times to the point where there are only very subtle changes then I get to the point where I am confident about contacting publishers about it. There is no point in pitching a game unless you’ve gotten it to the point where you are proud of your product and confident to show it off.
Getting Started: What do I need?
When making a prototype I usually begin with a spreadsheet. A spreadsheet allows you to create custom tiles or cards very easily. You can print them out yourself and turn them into quality prototype components. Here’s a list of everything I use(d) to create a copy of Scoville:
- Spreadsheet software
- Graphic Design Software (I prefer Inkscape, but The Gimp is also very useful)
- Paper (Plain paper for first prototypes, Glossy photo paper for pitch-able versions)
- Thick card stock – As thick as you prefer, though the thicker it is the more difficult it is to cut.
- Components: cubes/meeples/coins
- Circle Punch
- Paper Cutter (I have this one)
- Bingo chips
- Glue Stick
- Scissors
- Gerber Baby Food Containers – if you don’t have kids find some friends who do and beg them to save these for you!
Here is a picture of all the components that go into the game:
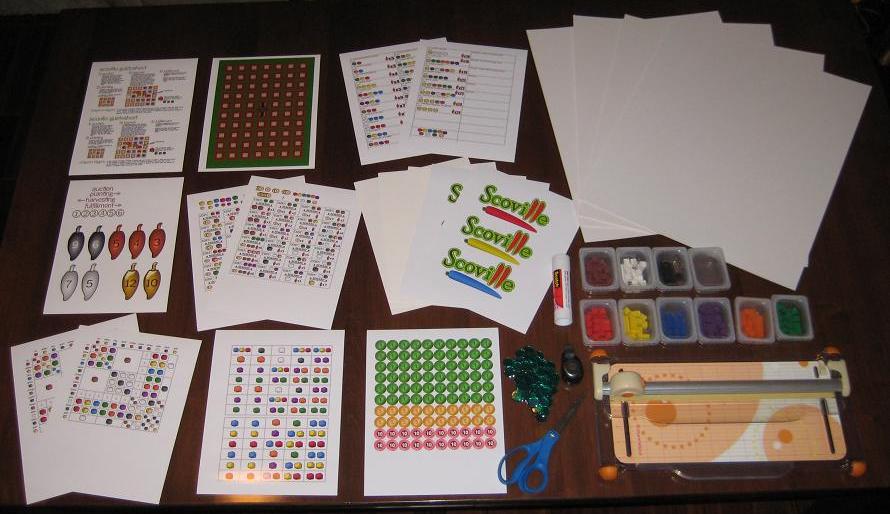
Scoville components fresh off the press!
That’s everything (except a box) I need to make a copy of Scoville. Let’s walk through the prototyping (physical creation) process.
Make it Rain! Or Something Like That
Assuming you’ve taken your concept and created artwork that suits you, it’s time to actually make something real for testing. What that means to me is that it’s time to print stuff out! Scoville has 13 pages of printing required for a full copy. The next step is to adhere those pages to the thick card stock. I like to buy the stuff that is as thick as standard board game chit board. This gives me the feeling like I am playing a real game when I test it.
So I use the glue stick and cover the back of the paper and then stick it to the card stock. Once I’ve got them all glued down I can start to cut them to size. Since the large card stock boards I buy are too big for my paper cutter I run a scissors through them to separate the difference components before using the paper cutter.

Cover with glue, adhere to card stock, coarse cut to separate.
Then I use the paper cutter to trim the fat and make them nice and clean. Shown here as an example is the first cuts done to the auction tiles:

I then go ahead and cut each tile out individually and end up with a pile of nice thick quality components:

My precious little auction tiles!
I continue this process for all of the components in the game.
Making Player Shields
Another part that seemed a little overwhelming to me was the production of player shields. But I found a nice, easy way to make them. If you don’t want pictures on them then just cut some paper and fold it. If you want pictures or logos then follow this procedure:
-

Easier to make than I thought.
Print the logos.
- Cut the logos to a rectangular size.
- Glue the logo centered on a sheet of thin card stock.
- Angle cut each edge so that it will lean when completed.
- Fold gently.

For Scoville I made the artwork on the shields include the player color. Making your own player shields rather than using shields from games you own can really spice up your prototype.
Making Money
One of the more tedious things in this process is making my own coins. I don’t have to make it as hard on myself as I do, but I prefer a really professional looking prototype.
It would be much easier to simply write a money value on the plastic bingo chips with a marker. This would make them more difficult to read and they wouldn’t look as nice.
So my process for making coins is this:
- Create the artwork.
- Insert the coin images into a document file.
- Print the document.
- Punch the coins out of the paper.
- Adhere them to the bingo chips.
Here is a tip for punching, if you use a circle punch like mine:
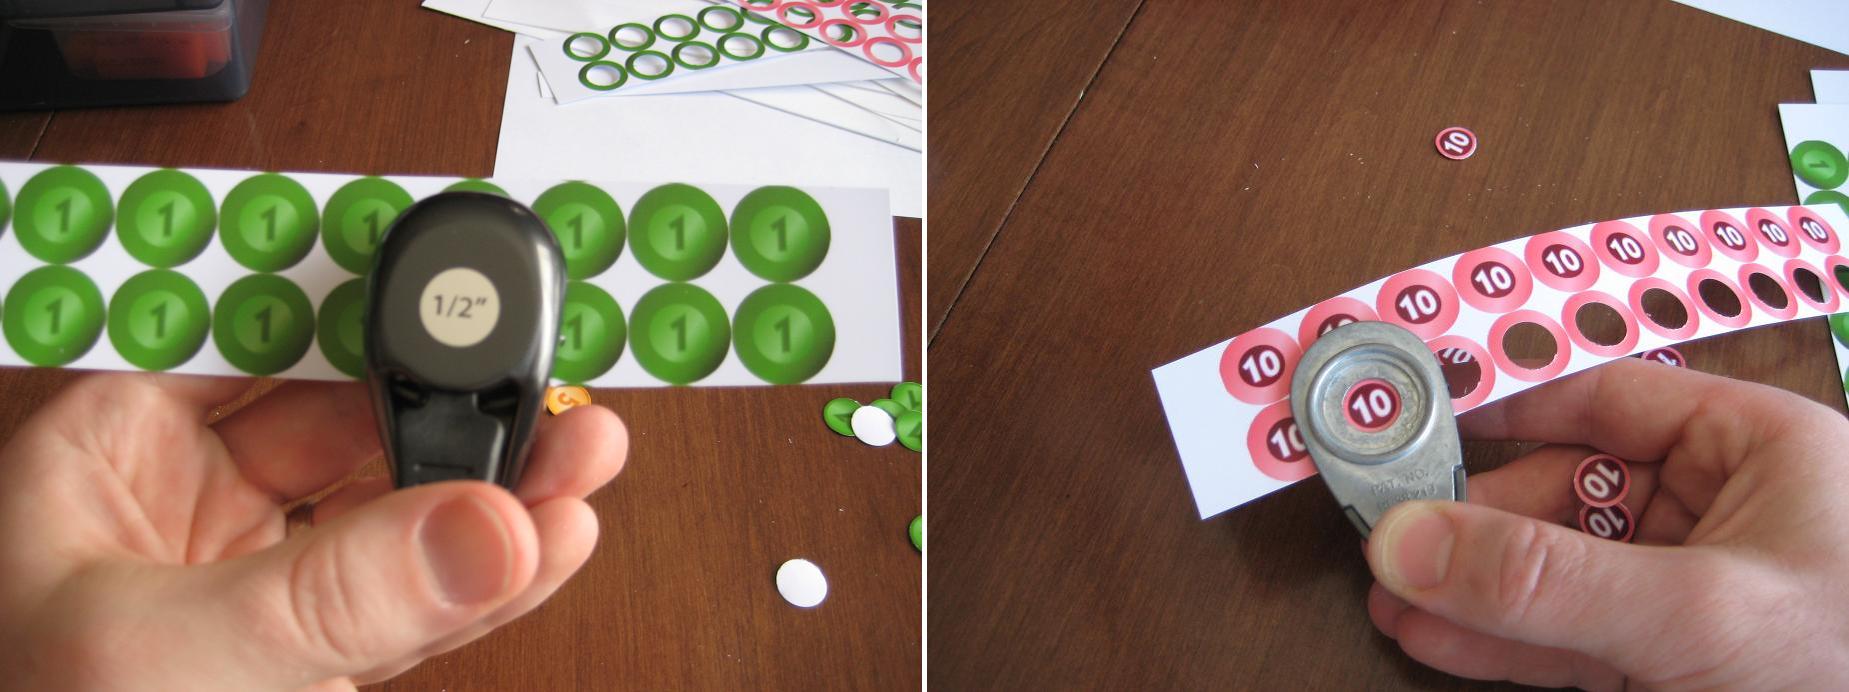
Flip the punch over for better visual alignment!
If you hold the punch like it seems it should be held then you have to rely on the little plastic bump guides on the side of it. Just flip the punch over and you can visually align the punch with the coin. This makes it so much easier!
Once you’ve got them all punched you can simply glue them to the bingo chips. I recommend watching something on TV that is really attention grabbing, so that it draws your attention from the tedium of gluing little circles to bingo chips.
If you don’t like the idea of gluing circles to bingo chips then go ahead and use the same thick card stock that you’ve been using. Just be aware that the circle punch may not punch through the thick card stock. That’s why I went with the bingo chips.
The Final Product
Once you’ve got all the components glued-punched-cut-etc. then it’s time to put it all together. Here is a before and after picture showing the reduction in volume for Scoville:
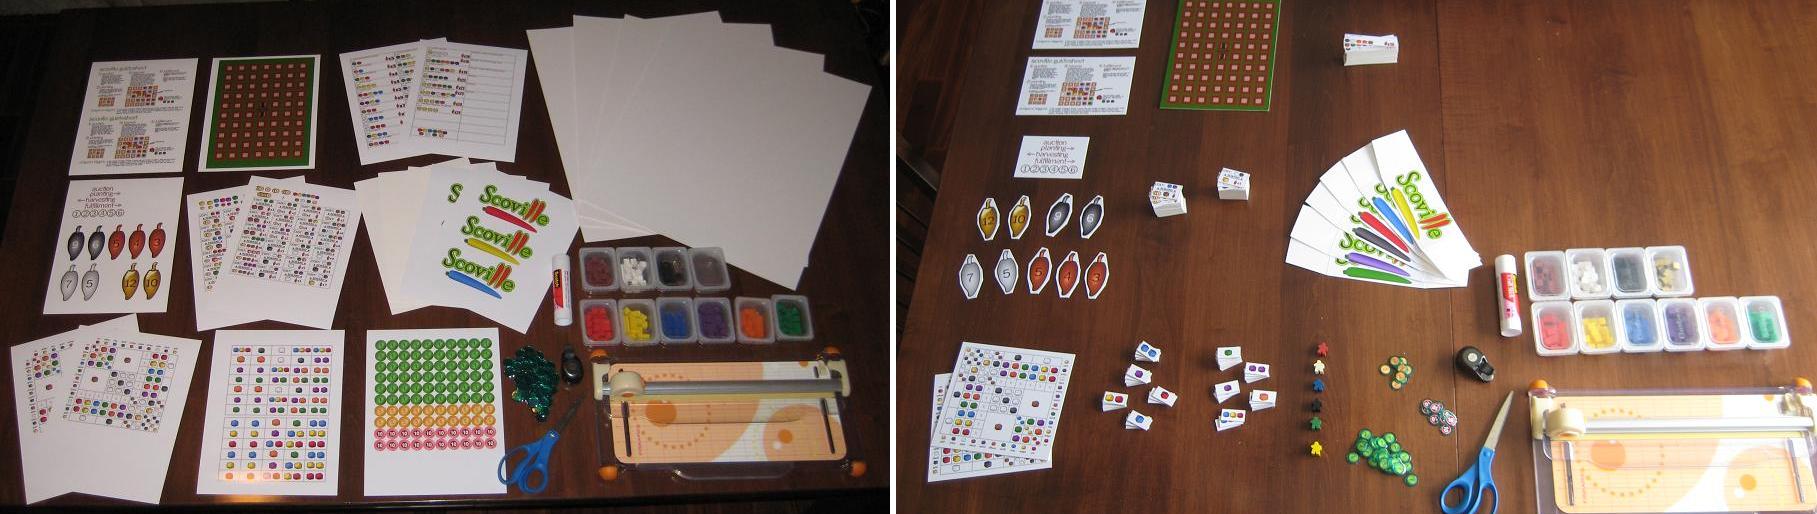
What looked overwhelming turned into a nice, quality prototype.
To continue with the theme of a quality, pitch-able prototype I like to use a nice container to hold everything. You can buy these at Target.com or you can find different colors in the store. They are only $5. I should also note that these fit into a Medium Flat Rate Priority box from the United States Postal Service. So it is pretty easy to mail one off to a publisher!
Now you’ve got your container so throw in the components, a couple copies of the rules, a business card, and you’re ready to pitch your game! Note, you do not need to have a high quality prototype to pitch a game. I am just a firm believer in making a good first impression. Here’s what Scoville looks like in it’s full prototype form:

This is the third copy of Scoville in existence! May the other two copies in the wild prosper and flourish!
How Much Is It Gonna Cost Me?
I mentioned earlier that you can make an high quality prototype that is also inexpensive. Here is a rundown of the costs for a full copy of Scoville:
- 13 sheets of glossy photo paper: $3
- Printer Ink (I buy cheap Non-OEM ink off Amazon): ~$2
- Glue Stick: $3.30
- 4-Pack of Thick Card Stock: $13
- Bingo Chips: $0.50
- Meeples ($0.14 each): $0.84 – I live near The Game Crafter so I can pick them up and avoid paying shipping costs
- Plastic Cubes (250): $7 – I bought a tub of 1000 cubes for $25 (shipping included) from EAI
So the total for a high quality prototype for Scoville costs me under $30. So maybe you wouldn’t characterize that as inexpensive. But when $30 can allow you to create a pitch-able high quality prototype that might catch a publisher’s eye, I don’t think $30 is too bad.
What techniques do you use? I wanted to point out that I did not write about making cards. Most people, when making prototype cards will purchase penny sleeves, insert their custom made cards, and make them thicker by dropping in a M:TG card. I don’t use cards in Scoville, so I didn’t include that.
I hope that you enjoyed this article. It has been a fun process for me to figure out some of the best ways to make a prototype. If you have any ways to make the process more efficient, please leave a comment so others can see!
Posted on March 19, 2013, in Board Games, Game Design, My Games, Prototyping, Scoville, The Boards and tagged board game design, components, game design, meeples, play test, production, prototype, prototype components, prototyping, quality prototype, tips. Bookmark the permalink. 11 Comments.

Nice Article, Ed. Even if you’re not sending to a publisher right away, the high-quality prototype should provide better feedback from play testers, especially “ordinary” gamer playtesters. If the components “feel” like a published game, people will be able to focus more on whether they are having fun, or if there are game elements or mechanics that don’t work. It’s not very helpful to get feedback about flimsy cards or how it’s hard to tell the orange from the red, since all that will change when it gets published.
The game I’ve been working on is all cards, and I definitely went the ‘paper and mtg card in a sleeve’ route. I used nicer sleeves, but only ’cause I had them lying around already.
Once I had it to a working game I ordered printed cards, but left a big white space for making notes and changes in an ultrafine sharpie. Using actual printed cards went over huge with my playtesters and let me get feedback on design ideas, while the big white space has let me make several changes without requiring a reprint.
“I like to buy the stuff that is as thick as standard board game chit board.”
Can you tell me where you buy that stuff?
It is basically mat board for framing artwork. I buy it at a local craft store. Good luck!
Great article Ed. I would love to read about how you come up with the concept — the process on weighing mechanics and theme. Also, something on the playtest process and collecting/applying feedback. I have been working on a game for 3.5 years and seem to be continually rewriting it.
Thanks!
Thank you so much for explain so clearly how we can make a quality prototype.
In case anyone does not want to go the route of learning all the ins & outs of a full-blown graphics package, I’m sharing about software that I am developing (but already usable) specifically for game prototyping, called protograf. Its free and open source and specifically designed to help you iterate through changes as you develop your game. You can create cards, counters, boards and player aids. Download it from: https://github.com/gamesbook/protograf
Pingback: Board and Barley – Scoville Prototype Breakdown | Board and Caffeinated
Pingback: Ed Marriott Interview
Pingback: 2013 in Review | Boards and Barley
Pingback: Prototyping Techniques Applied to Scoville – Board Game Resources