Monthly Archives: September 2014
Brewology 101: Kegging
You’ll never want to bottle again!
I have an awesome neighbor who used to brew. One of the ways he is awesome is that he is letting me borrow (indefinitely, I believe) his 6 gallon carboy, wort chiller, and double keg system!
A friend came over the other night to help me with kegging. I had never done it before and I was a little nervous.
But before we get to the kegging I wanted to mention my process for bottling:
- Save bottles from friends. You typically need 45-50 bottles per 5 gallon batch. (Time requirement: months)
- Soak bottles and peel labels off. (1 hour)
- Wash bottles in dishwasher. (1 hour)
- Transfer beer from carboy to plastic fermenter. (15 minutes)
- Sanitize a group of 10 bottles. (3 minutes)
- Fill and cap ten bottles. (10 minutes)
- Repeat Steps 5 & 6 four more times. (~45 minutes)
- Clean counter, plastic fermenter, carboy, tubes, etc. (30 minutes)
All told the bottling process usually takes about 3 hours on any given evening, which doesn’t include the bottle soaking/label peeling portion. It’s not enjoyable work. Thus, I was very happy when my neighbor loaned me his kegging gear.
What is a Keg?

Cornelius (“Corny”) Keg
A keg is basically just a metal tank in which to put beer. The keg allows for the introduction of high pressure (~10-25 psi) Carbon Dioxide to the beer.
Soda producers and beer producers often use these types of kegs to store their product. These will be distributed to restaurants and bars where they will be connected to the taps.
You can buy these types of kegs online or at a local brewing store for roughly $50.
![]() But you’ll also need some other equipment. The American Homebrewers Association has a nice run-down of the equipment you’ll need here.
But you’ll also need some other equipment. The American Homebrewers Association has a nice run-down of the equipment you’ll need here.
These include connectors for the keg, plastic tubing, a CO2 tank, and a pressure regulator. I’m not providing an exhaustive list of the items you need. You can find that elsewhere. Rather, today’s kegging article if focused on the kegging process.
Racking Your Beer
Usually a homebrewer till use a carboy for secondary fermenting. If this is the case for you, you’ll want to rack your beer before transferring it to the keg. This is a simple process.
First, make sure everything that will touch the beer is sanitized. I use One Step for my sanitization. This means you’ll need to sanitize your plastic fermenter, the transfer tubing, the keg, etc.
Then I prefer utilizing an auto-siphon to draw the beer out of the carboy and into the plastic fermenter. By doing this step you help eliminate much of the sediment from the beer getting into the keg.
Fill the Keg!
This is the portion of the brewing process that replaces bottling. Instead of doing all those steps I listed above, simply use your auto-siphon to transfer your beer from the plastic fermenter into the keg. So. Much. Easier!
Do You Have Gas?
I hope you’ve got gas. Once the beer is in the keg, seal the keg and hook up your CO2 tank. Here’s where you’ll need a little information. You’ll need to know the temperature of the beer so that you can apply the right pressure. Here is a handy (?) chart to help you set your pressure correctly (Click for full size):
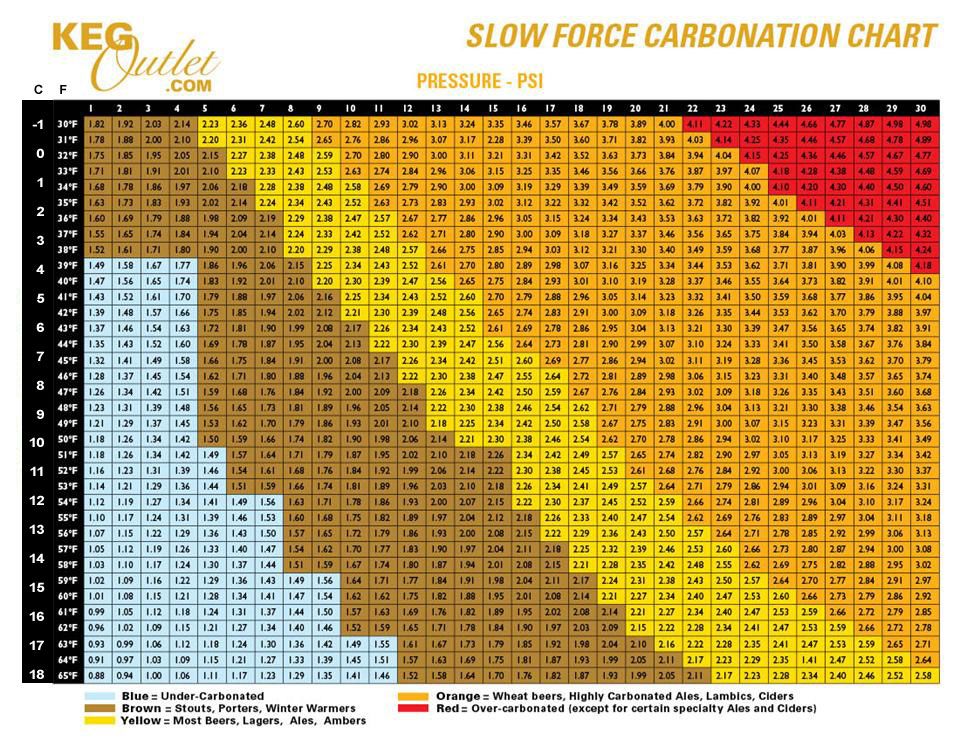
Image courtesy of KegOutlet.com
Some people force carbonate their kegged beer. This can be seen in the video below. Basically this utilizes a higher pressure of CO2 for a few days. Once those few days have passed, hook up your dispensing line, lower the pressure to dispensing levels (10-20 psi) and try your brew!
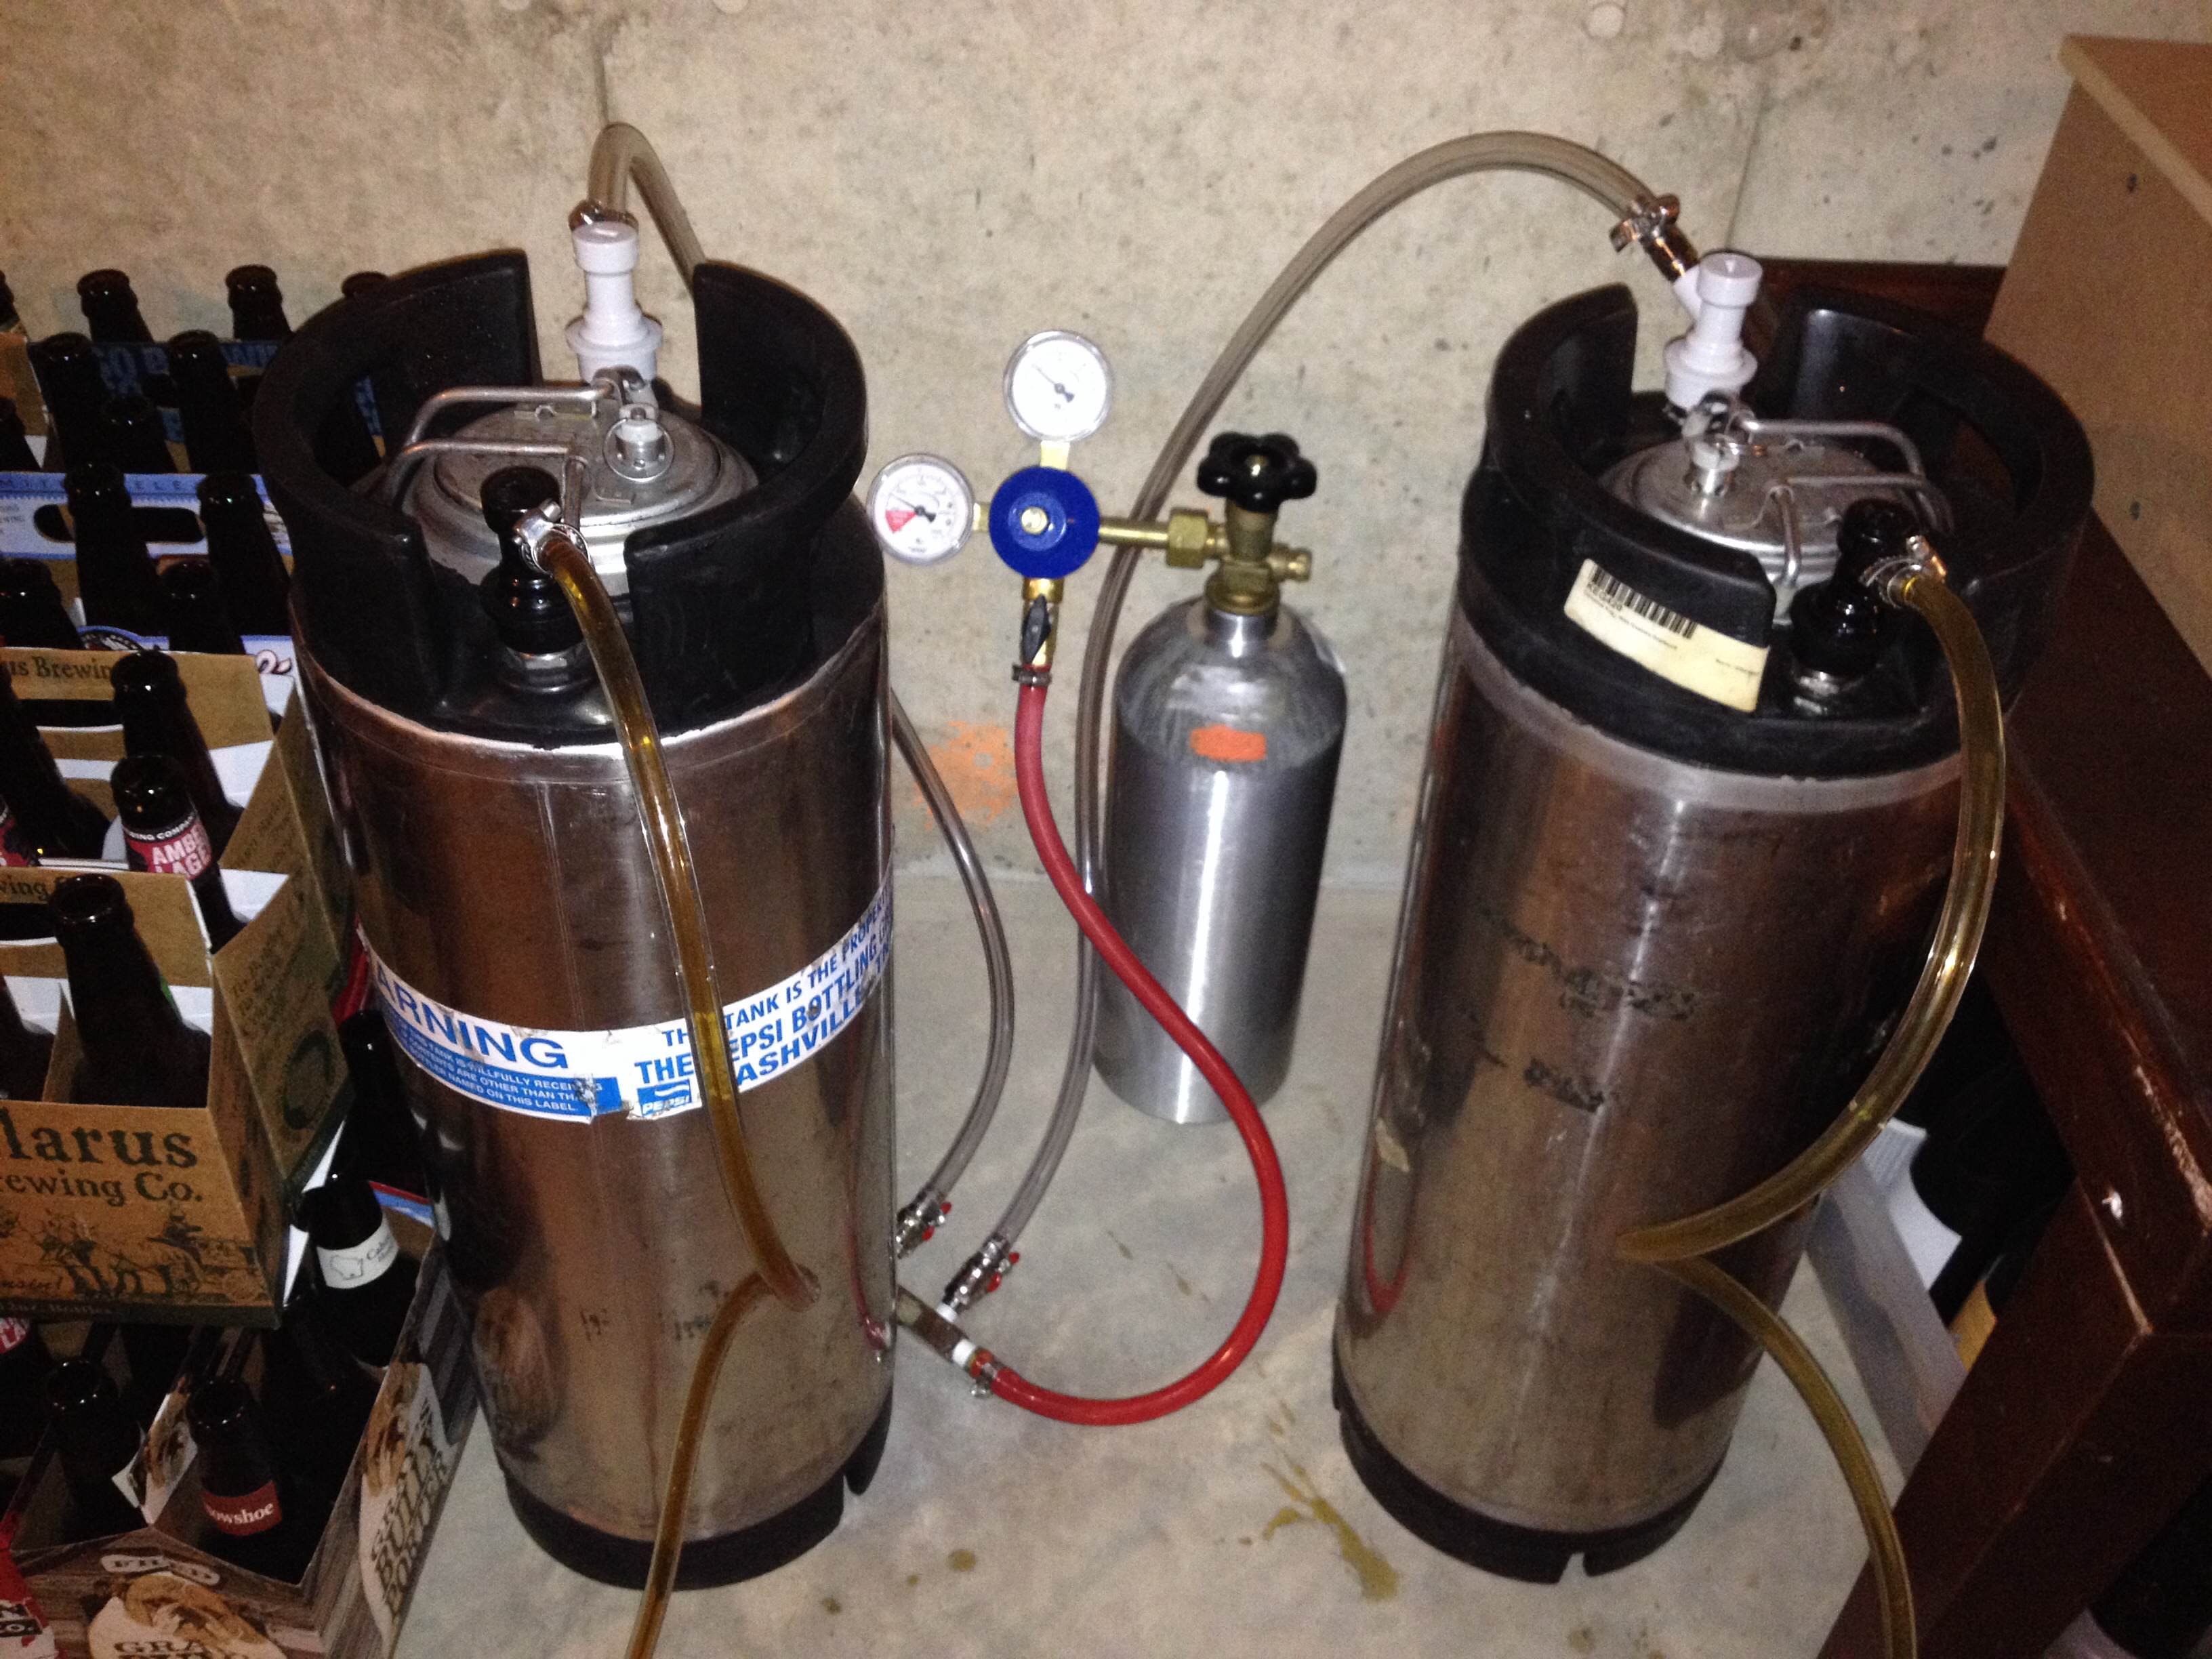
Today was a very brief article on kegging. Here are some picture of my kegs and equipment:
")
")
")

Helpful Video:

Monday Brews 9-29-14
10 gallons of beer that I didn’t have to bottle!
I totally missed out on National Drink Beer Day yesterday. I’ll redeem myself by enjoying one of my two kegged beers shown in the picture. I’ll write about my first kegging experience tomorrow. (Spoiler: I never want to bottle again!)
But today is Monday, so it’s time to cover the Boards & Barley that I’ve enjoyed over the last week. With a Board Game Night and a date night with my wife where we played games I was able to get a nice assortment to the table. But let’s start with the Barley.
The Barley:
BARLEY SPOTLIGHT: New Glarus Staghorn
My friend Jeremy describes this as the best domestic Oktoberfest. I agree with him. This is a very excellent beer and I’ll often choose it over the German Oktoberfests. Is that beer heresy? Doesn’t matter to me. New Glarus has produced a truly fine Oktoberfest. Next time you’re in Wisconsin in September or October, make sure you try it!
- New Belgium Pumpkick
- Tyranena Painted Ladies
- Lake Louie 10-81
- Boddington’s (My British colleague gave this to me as a gift)
The Boards:
Don’t worry. He wasn’t lonely for long!
BOARDS SPOTLIGHT:
Agricola: All Creatures Big and Small
This game is my Spotlight game this week because I was able to get my wife to play it. She graciously learned a new game and when it was done said she’d play it again! That’s a big win for me. I’ve wanted her to learn Agricola for a while so introducing her to ACBAS seemed like a good intro. The gameplay feels roughly the same and the pasture/animal elements emulate those in the full game. So I think she got a feel for how Agricola would go. I’m excited about that.
Designer’s Corner:
This past week was a good one. I finished up prototype art (haven’t done that in a long time) and I got The Grand Illusion to the table for it’s first two playtests (It had been a long time since I put a new game design on the table).
It’ll be magic if I can find time to read these.
Since the playtests were successful (I should write an article on what makes a playtest successful because I think that can mean a lot of different things) I thought I’d do a little more research into magic and the late 1800s-early 1900s magicians. I picked up a few books. I have no idea when/if I’ll have time to read them.
I think the playtests were successful for two main reasons:
- Both played to completion.
- It was fun (Or at least I had fun playing).
Playing to completion is a big metric for me. If you can design a game on paper or in your head and bring it to the table such that it can be played in full, that is a big accomplishment. Of course, that doesn’t matter as much if the game stinks.
So I had the two successful playtests and I’m ready to implement some good initial changes to things that were obviously not perfect. I think there are good things ahead for this game.
Monday Brews 9-22-14
Today is the last official day of summer. Bummer. Before we know it snow will be on the ground, the days will be short, and we’ll be freezing. Aye. What a horrible way to start a blog post. Sorry for that.
Let’s cheer you up by covering the Boards & Barley I’ve enjoyed over the past couple weeks!
The Barley:

Perfect amount of pumpkin and raven!
BARLEY SPOTLIGHT: New Belgium Pumpkick
So Autumnal. So delicious. It has a very nice level of pumpkin flavoring. Much more manageable than the Southern Tier Pumking and Warlock brews. This beer makes me think of Fall, and I like Fall quite a bit, so this is an enjoyable beer for me.
- Southern Tier Warlock
- Spaten Oktoberfest
- Milwaukee Brewing Sasquash
- Deschutes Black Butte
- Brau Brothers Moo Joos Oatmeal Milk Stout
- Ayinger Oktoberfest
The Boards:
 BOARDS SPOTLIGHT: Istanbul
This game has such a nice and simple mechanism of movement. It allows for great replayability. It adds interesting and tough decisions. And can allow you to mess with other players without it seeming like a “take-that” kind of game. I’m looking forward to playing this again.
Designer’s Corner:
 I have made a lot of progress with the prototype for The Grand Illusion. I’m on pace to have it playable for our group’s Board Game Night this week.
I’ve laid out the gameplay foundation, which is quite simple mechanically. I’ve tried to include a system that will provide for some good interaction. And I’m just ready to play it. It will probably be horrible, but at least the logo looks okay! Hopefully I’ll have a report on Playtest #1 later this week.
Autumn Beer Style Guide

Some pumpkins (ales) are greater than others!
It is starting to get colder outside. The leaves will soon start to change colors. And a brisk breeze will be bringing in snow before we know it. Autumn is nearly upon us so I thought I would share with you some of the best beer styles to enjoy during this too-short season.
When I think of Autumn there are two main beer styles that come to mind: Oktoberfest and Pumpkin. But I’ll also mention a few others and why I think they make for good Autumn beer styles. But let’s start with the blue and white checkered beer of German awesomeness:
Oktoberfest:

A local Oktoberfest that’s awesome!
Description from BeerAdvocate.com (for Marzen/Oktoberfest):
Before refrigeration, it was nearly impossible to brew beer in the summer due to the hot weather and bacterial infections. Brewing ended with the coming of spring, and began again in the fall. Most were brewed in March (Märzen). These brews were kept in cold storage over the spring and summer months, or brewed at a higher gravity, so theyd keep. Märzenbier is full-bodied, rich, toasty, typically dark copper in color with a medium to high alcohol content.
The common Munich Oktoberfest beer served at Wies’n (the location at which Munich celebrates its Oktoberfest) contains roughly 5.0-6.0% alcohol by volume, is dark/copper in color, has a mild hop profile and is typically labeled as a Bavarian Märzenbier in style.
My Favorite Oktoberfest: New Glarus Staghorn Octoberfest
Other Enjoyable Oktoberfests:
- Hofbrau
- Spaten
- Hacker-Pschorr
- Samuel Adams

Pumpkin:
 Description from BeerAdvocate.com:
Often released as a fall seasonal, Pumpkin Ales are quite varied. Some brewers opt to add hand-cut pumpkins and drop them in the mash, while others use puree or pumpkin flavoring. These beers also tend to be spiced with pumpkin pie spices, like: ground ginger, nutmeg, cloves, cinnamon, and allspice. Pumpkin Ales are typically mild, with little to no bitterness, a malty backbone, with some spice often taking the lead. Many will contain a starchy, slightly thick-ish, mouthfeel too. In our opinion, best versions use real pumpkin, while roasting the pumpkin can also add tremendous depth of character for even better results, though both methods are time-consuming and tend to drive brewmasters insane.
My Favorite Pumpkin-ish: Milwaukee Brewing Sasquash (Brewed with pumpkins and sweet potatoes)
Other Enjoyable Pumpkin brews:
- Southern Tier Pumking
- Southern Tier Warlock
- New Belgium Pumpkick
Bock / Doppel Bock:
 Description (of doppelbocks) from BeerAdvocate.com:
Bocks–you know, those beers with goats on the label–are relatively strong German lagers. Doppelbocks–as the name might suggest–are typically even stronger and contain enough malty goodness that theyve been considered a meal in a glass for centuries. Generally they have a very full-bodied flavor and are darker than their little Bock brothers and sisters and a higher level of alcohol too. They range in color from dark amber to nearly black, and dark versions often have slight chocolate or roasted characters.
My Favorite Doppel Bock: Capital Autumnal Fire
Other Enjoyable Dopple Bocks:
- Spaten Optimator
- Paulaner Salvator
- Ayinger Celebrator
Belgian Dubbel:
 Description from BeerAdvocate.com:
The Belgian Dubbel is a rich malty beer with some spicy / phenolic and mild alcoholic characteristics. Not as much fruitiness as the Belgian Strong Dark Ale but some dark fruit aromas and flavors may be present. Mild hop bitterness with no lingering hop flavors. It may show traits of a steely caramel flavor from the use of crystal malt or dark candy sugar. Look for a medium to full body with an expressive carbonation.
Traditionally a Trappist Ale, many brew similar “Abbey Dubbels” to try and emulate the originals (Trappist Westvleteren 8, Westmalle Trappist Dubbel & Chimay Première).
My Favorite Belgian Dubbel: Vintage Dedication
Other Enjoyable Dubbels:
- Trappistes Rochefort 6
- Ommegang Abbey Ale
- St. Bernardus Prior 8
- Westmalle Trappist Dubbel
What are your favorite Autumn beer styles? What are some of your specific favorite Autumn brews?
Grand Illusion Update
Today I wanted to report on the progress of The Grand Illusion. Normally I do that on Thursdays and I was planning on posting a game review today but I’m excited about the game so I figured I’d write about it.
What’s New?
I’ve begun prototyping! I have created a deck of skill cards. These cards represent the 9 types of magic in the game. The types of magic are in two separate tiers: basic and advanced. There are 6 basic types and 3 advanced types. Here is a picture showing the skill cards (thanks to The Game Crafter for blank cards – They have blank poker cards on sale right now for 1 cent each!).
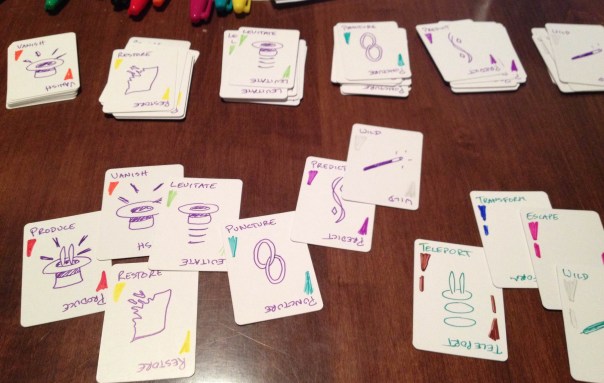
Collect these and use them to perform never-before-seen magic tricks to appease your growing audience!
Those are hand-drawn icons, people!
What’s Next?
The next step for the prototype is to create a deck of Trick cards. These are cards that represent magic tricks. During the game you’ll need to collect the skill cards shown above and then turn them in to complete the magic tricks.
Once you perform a magic trick you will earn the rewards and audience shown on the card.
So let’s discuss audience… Audience is actually a currency in the game. It is necessary to build an audience during the game or you will not meet the requirements on your Grand Illusion card. So each time you perform a trick, if successful, you will gain audience. In the game you will collect skill cards, spend them to perform tricks, gain audience and increase your skills to be able to perform better tricks.
There will definitely be some engine building in the game. The goal of this design is to be an entry-level game with an easy rule set that is quick to teach and play. The main mechanics are set collection and engine building.
Engine Building
Engine building in games refers to the idea of obtaining some ability or benefit that let’s you do things a little better, then getting another one that builds on the previous ability or benefit.
In The Grand Illusion the engine is represented by the skills each magician will gain. Will you become a master of vanishing acts? Perhaps you’ll be the best at restoration magic? Ultimately you’ll have to get proficient at at least two basic types of magic and one advanced magic.
The question I’m currently struggling with is how exactly to create the engine building element. I have two options I’m considering:
1) Splendor-Like
In the game Splendor players turn in poker chips to grab a card from the table. Once they grab that card it usually acts as a poker chip. So for future card grabs they need one less poker chip. This would work perfectly for The Grand Illusion but I don’t want to copycat an existing game.
2) Tech Tree
A tech tree is something where you must complete “Level 1” stuff before you can work on “Level 2.” So in The Grand Illusion I could have a tech tree (pyramid) of trick cards on the table. When a player would perform a trick they would place a token of their player color on the trick to show they’ve completed it. This would also direct their play as there would be advantages and disadvantages for breadth versus depth.
I think that once I create the Trick deck I’ll try out both of these options. The Splendor-like version may work better, but I’m more drawn to the Tech Tree version since it is more original.
My goal is to prototype the skills deck this weekend and aim for the first playtest next week! Thanks for reading. I’d love to hear your thoughts about the different engine building options.
