Brewology 101: Kegging

You’ll never want to bottle again!
I have an awesome neighbor who used to brew. One of the ways he is awesome is that he is letting me borrow (indefinitely, I believe) his 6 gallon carboy, wort chiller, and double keg system!
A friend came over the other night to help me with kegging. I had never done it before and I was a little nervous.
But before we get to the kegging I wanted to mention my process for bottling:
- Save bottles from friends. You typically need 45-50 bottles per 5 gallon batch. (Time requirement: months)
- Soak bottles and peel labels off. (1 hour)
- Wash bottles in dishwasher. (1 hour)
- Transfer beer from carboy to plastic fermenter. (15 minutes)
- Sanitize a group of 10 bottles. (3 minutes)
- Fill and cap ten bottles. (10 minutes)
- Repeat Steps 5 & 6 four more times. (~45 minutes)
- Clean counter, plastic fermenter, carboy, tubes, etc. (30 minutes)
All told the bottling process usually takes about 3 hours on any given evening, which doesn’t include the bottle soaking/label peeling portion. It’s not enjoyable work. Thus, I was very happy when my neighbor loaned me his kegging gear.
What is a Keg?

Cornelius (“Corny”) Keg
A keg is basically just a metal tank in which to put beer. The keg allows for the introduction of high pressure (~10-25 psi) Carbon Dioxide to the beer.
Soda producers and beer producers often use these types of kegs to store their product. These will be distributed to restaurants and bars where they will be connected to the taps.
You can buy these types of kegs online or at a local brewing store for roughly $50.
![]() But you’ll also need some other equipment. The American Homebrewers Association has a nice run-down of the equipment you’ll need here.
But you’ll also need some other equipment. The American Homebrewers Association has a nice run-down of the equipment you’ll need here.
These include connectors for the keg, plastic tubing, a CO2 tank, and a pressure regulator. I’m not providing an exhaustive list of the items you need. You can find that elsewhere. Rather, today’s kegging article if focused on the kegging process.
Racking Your Beer
Usually a homebrewer till use a carboy for secondary fermenting. If this is the case for you, you’ll want to rack your beer before transferring it to the keg. This is a simple process.
First, make sure everything that will touch the beer is sanitized. I use One Step for my sanitization. This means you’ll need to sanitize your plastic fermenter, the transfer tubing, the keg, etc.
Then I prefer utilizing an auto-siphon to draw the beer out of the carboy and into the plastic fermenter. By doing this step you help eliminate much of the sediment from the beer getting into the keg.
Fill the Keg!
This is the portion of the brewing process that replaces bottling. Instead of doing all those steps I listed above, simply use your auto-siphon to transfer your beer from the plastic fermenter into the keg. So. Much. Easier!
Do You Have Gas?
I hope you’ve got gas. Once the beer is in the keg, seal the keg and hook up your CO2 tank. Here’s where you’ll need a little information. You’ll need to know the temperature of the beer so that you can apply the right pressure. Here is a handy (?) chart to help you set your pressure correctly (Click for full size):
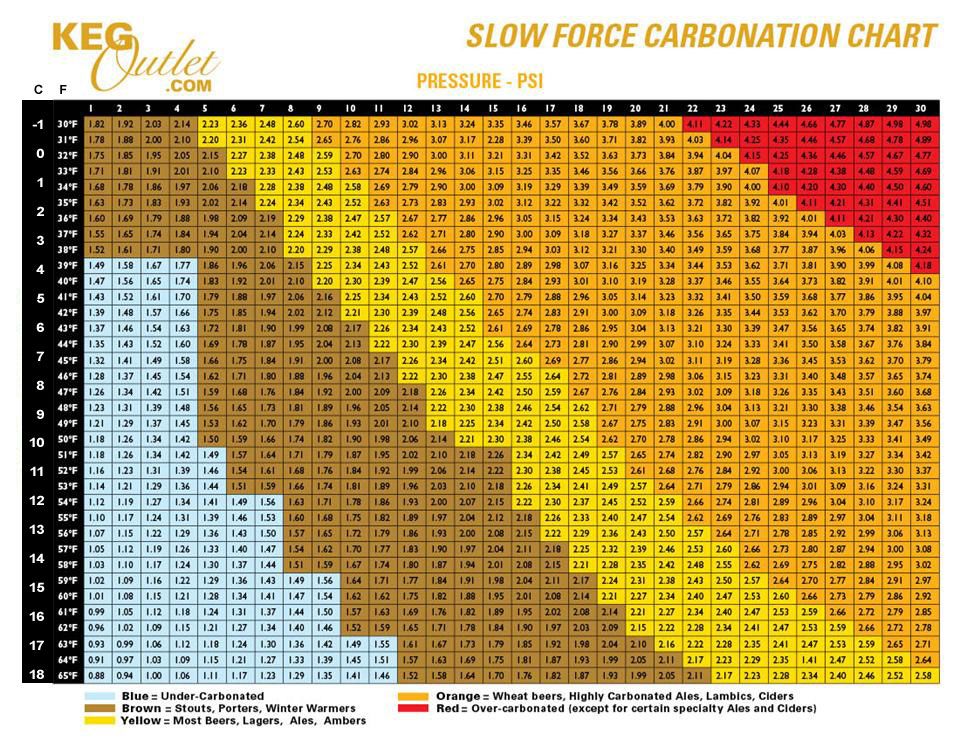
Image courtesy of KegOutlet.com
Some people force carbonate their kegged beer. This can be seen in the video below. Basically this utilizes a higher pressure of CO2 for a few days. Once those few days have passed, hook up your dispensing line, lower the pressure to dispensing levels (10-20 psi) and try your brew!
Today was a very brief article on kegging. Here are some picture of my kegs and equipment:
")
")
")

Helpful Video:
Posted on September 30, 2014, in Brewology 101, Homebrewing, Lessons Learned, The Barley and tagged beer, Brewology 101, homebrew, keg system, kegging, kegs. Bookmark the permalink. Leave a comment.

Leave a comment
Comments 0