Blog Archives
Prototype Art: Alignment in Inkscape
 I use Inkscape for all of my game design artwork. It is relatively easy to use and is vector based, so I can make things larger or smaller as needed without any loss in picture quality.
I’ve done a couple other Inkscape tutorials about game design artwork. You can check those out:
Today I want to focus on one specific tool within Inkscape: Alignment.
If you don’t have the software, you can download it from their website: inkscape.org.
Let’s Line Things Up!
The tool I find I use the most within Inkscape is the alignment tool. I use it for every piece of artwork or graphic design that I make in Inkscape.
When you are working in Inkscape and desire to line things up, look for this icon: 
Clicking that will open the Alignment options, which will look like this:

Control Panel of Alignment
Let’s run down what those options are. Here is a new version of that image:

Instead of running through each of those things listed above I am going to provide a couple examples. At the end of this article you will find a the Inkscape file that I used for these examples. Feel free to download it and use it to get familiar with the alignment tools.
Anchors Away!
When aligning things the most important thing is understanding which object is the anchor. The anchor is the object that will not move when the command is applied. You can choose the anchor with the options from the “RELATIVE TO” box at the top, which are the following options:
- Last Selected
- First Selected
- Biggest Object
- Smallest Object
- Page
- Drawing
- Selection
The three that I use the most are “Last Selected,” “First Selected,” and “Page.”
When selecting multiple items, if you chose the anchor last, then you should set RELATIVE TO to “Last Selected.” That way when you choose the alignment function, the anchor will appropriately stay put and the other objects will move.
Likewise, the “First Selected” option will cause the anchor to be the first object you select. Both of these options are nice because you can make sure you’ll know which object won’t be moving.
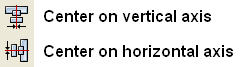
Using the “Page” option will align things with the page. The Page is represented by the black box in the middle of the canvas when opening a new document. I use this a ton when designing artwork for cards since it allows me to center things on the page. This one can come in very handy. You can align things to the center of the page by using these two alignment functions:
Alignment Examples
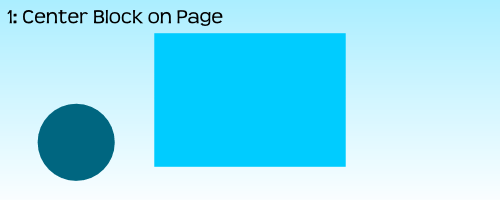
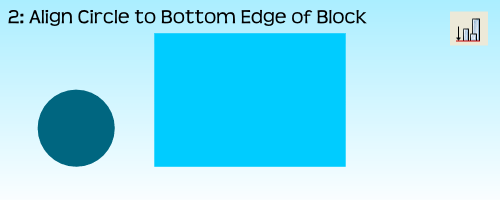
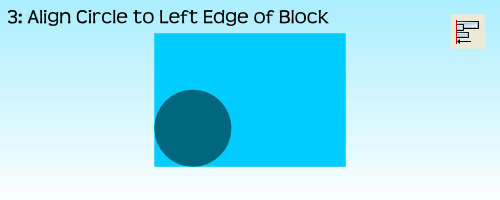
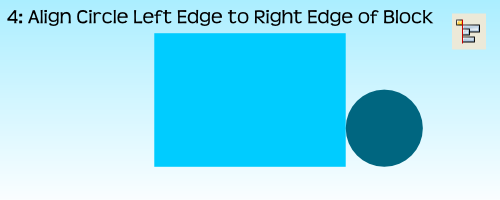
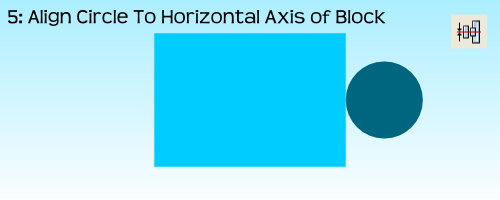
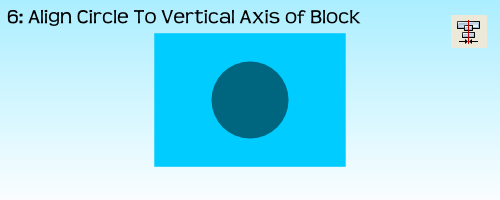
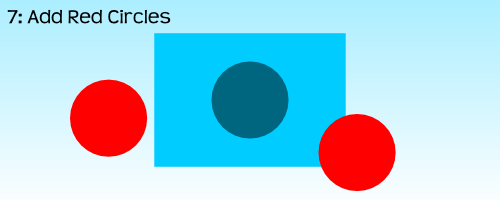
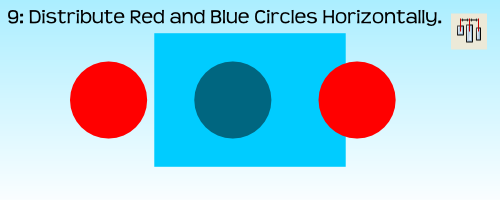
I’m going to use a circle and a block and show you how several of the functions work. After centering the block on the page I’ll be using the block as the anchor for the remaining alignments.


 For the very last example, step 10, I had to use the “Treat Selection As Group” option. If I had not used it the result would have been to stack all three circles on the vertical axis of the block:
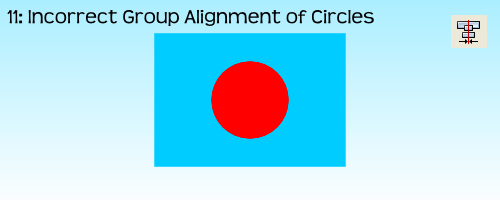
By treating the three circles as a group it allows for the whole group to be aligned without adjusting the relative locations of the objects in the group. Often I’ll just group objects myself before aligning them and then ungrouping them after the alignment. But feel free to do it however you like.
That’s Basically It
I have found that these alignment tools are very useful when making prototype artwork for my game designs. It allows you to consistently place things in the same spots. It allows you to make things line up correctly. And it allows Inkscape to help design your awesomeness!
Here is the file: BoardsAndBarleyAlignmentExample.svg
It is located in Google Drive and to get it to work you’ll have to download it. Please let me know if you have any questions. Thanks for reading.
Prototype Art: Icons in Inkscape
Inkscape logo of squidy awesomeness!
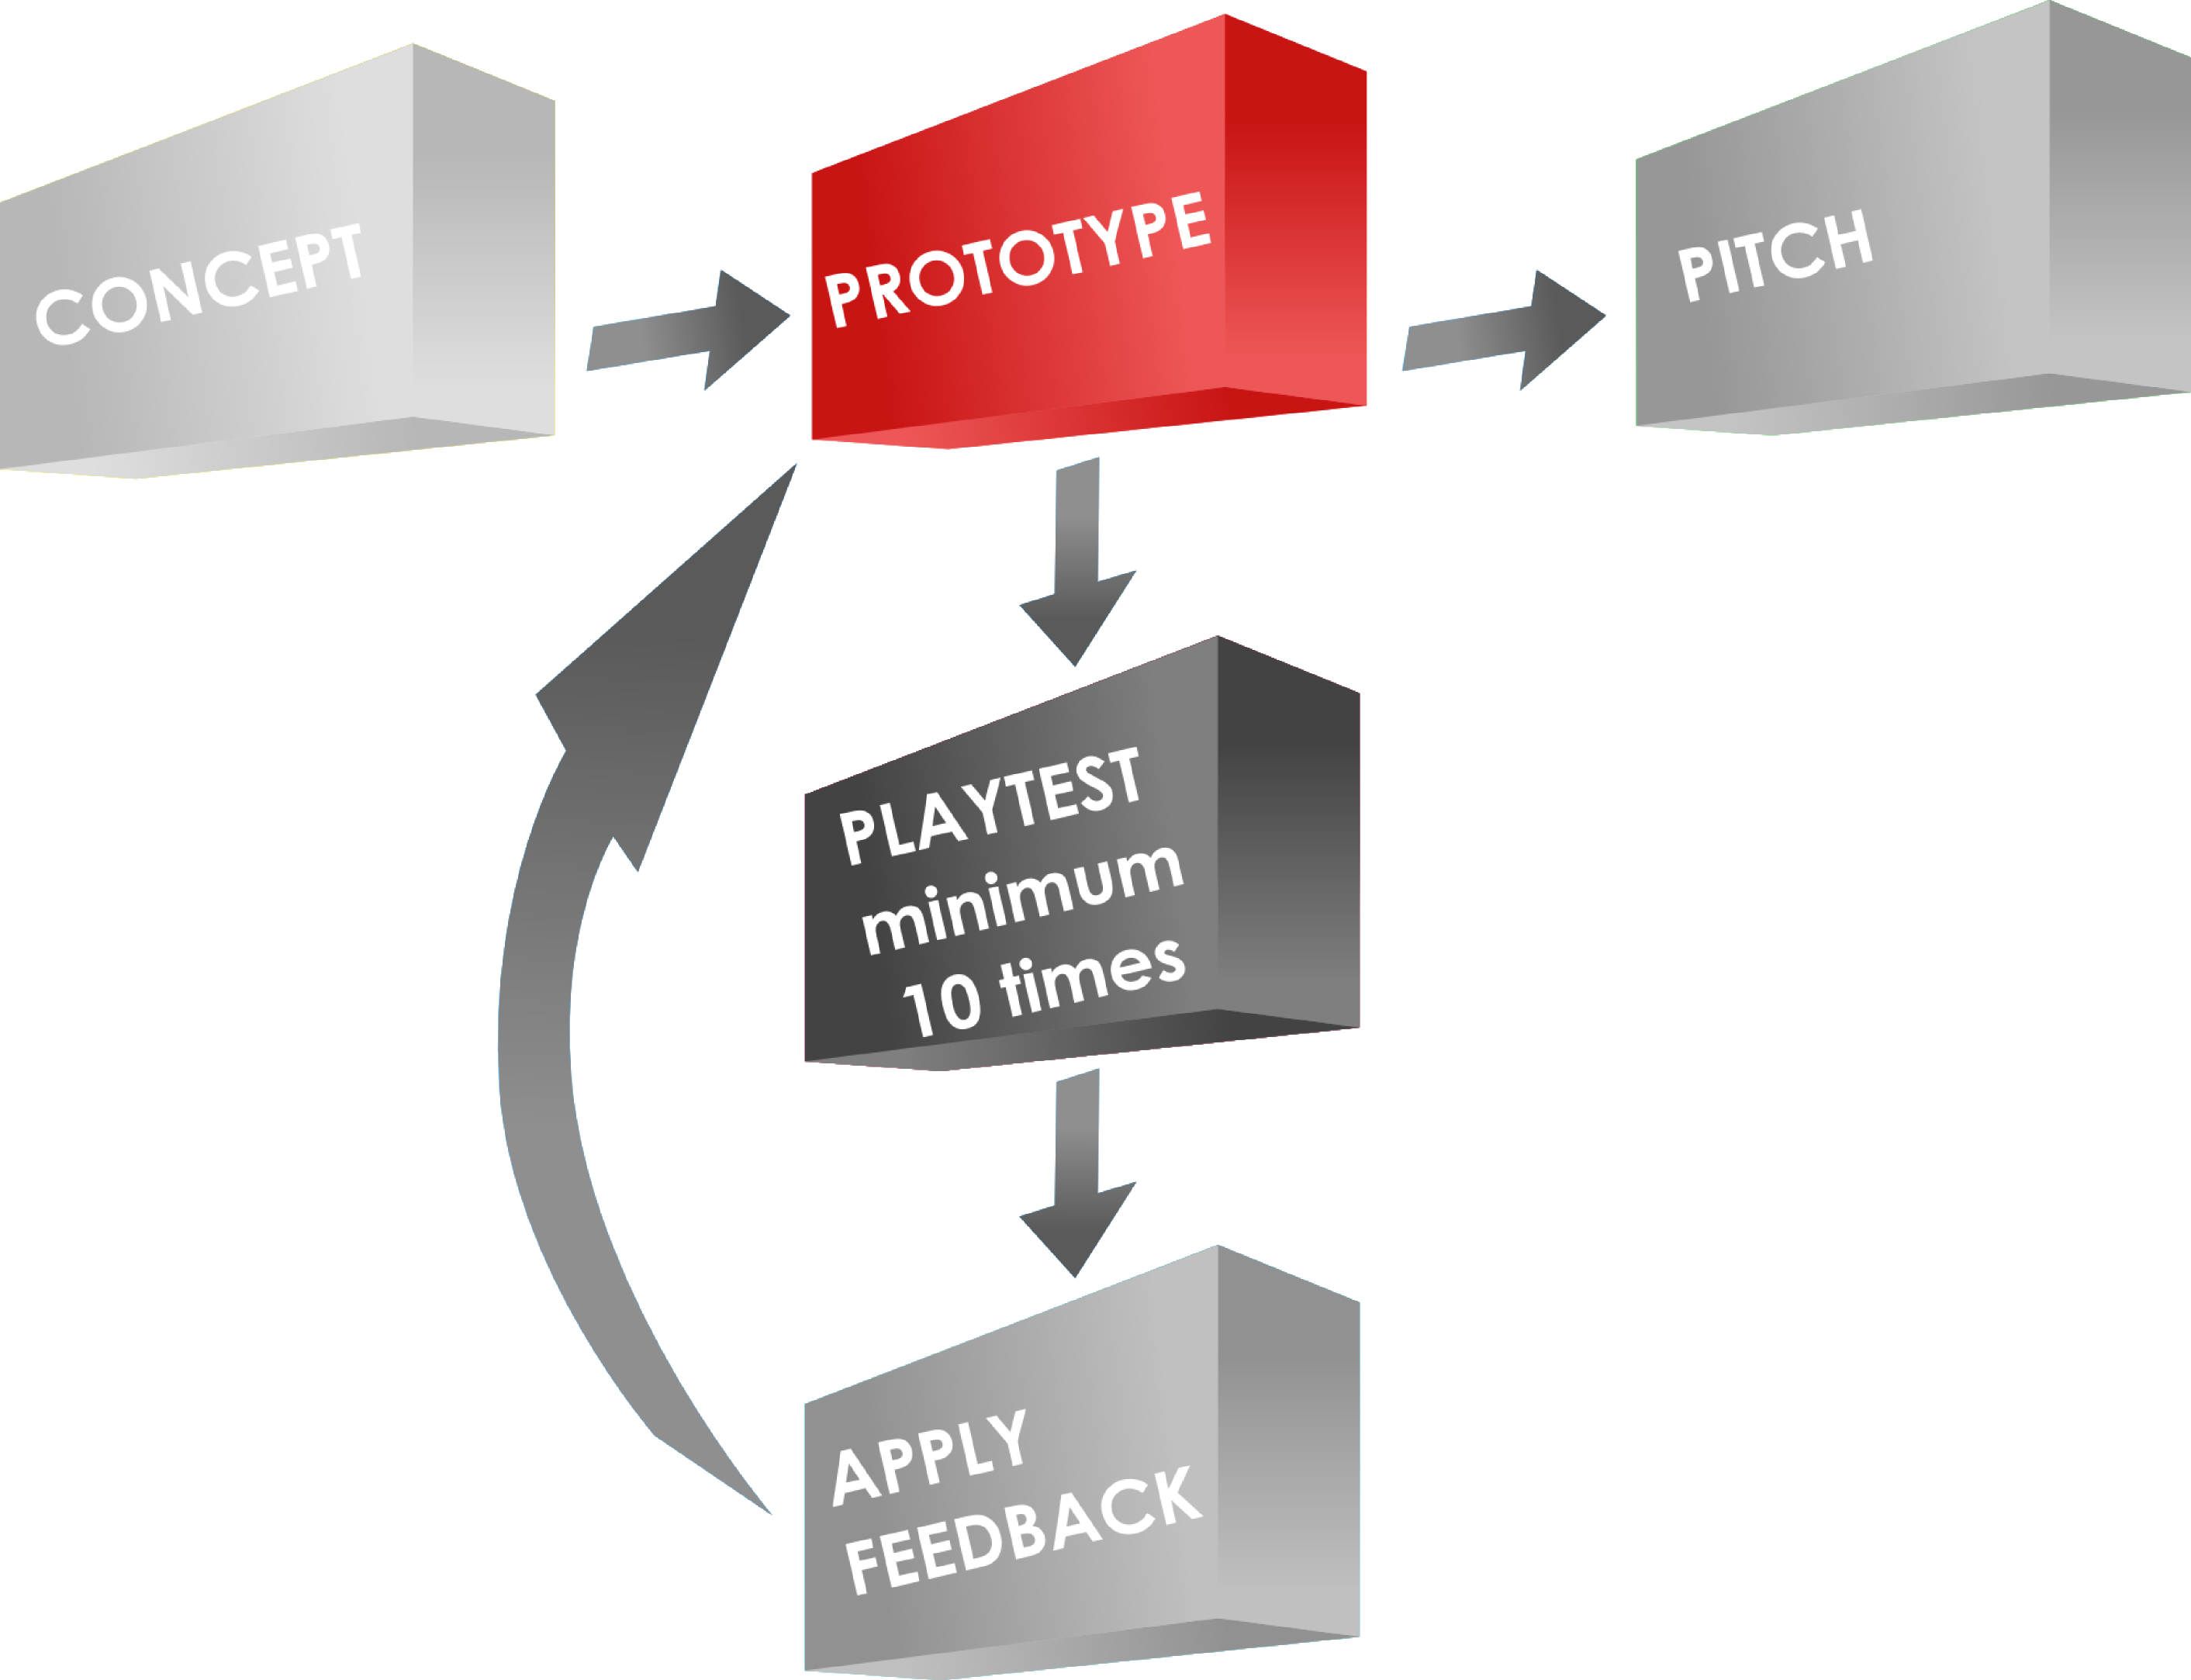
One of the things that can take your game design from playable to pitchable is iconography. Icons can really help put a nice polish on a game. There are a few benefits that icons can provide for your game design:
- Ease of viewing/understanding
- Beautification
- Language Independence
Those are a few and I’m sure there are more. So today I wanted to present a tutorial similar to my “Cubes in Inkscape” tutorial to help game designers with the creation of icons for their games.
This article will be focused on the software called Inkscape. It is a free Scalable Vector Graphics (SVG) software. Don’t worry too much about what that means, just know that it’s awesome. If you don’t have the software I recommend downloading it and using it for your game design art. Note: if you have Photoshop/Illustrator then I would recommend staying with that and skipping the rest of the article.
Also, if you love icons but just can’t figure out how to make your own, then head over to Game-Icons.net where they have over 1,000 free icons for your use. So let’s get started.
Let’s Get Iconizing!
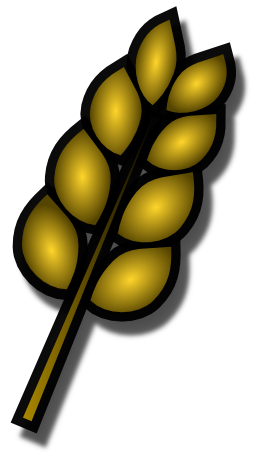
So “Iconizing” isn’t really a word. But that’s beside the point. The objective for today is to teach you how to make icons that you can use with confidence in your board game designs. We are going to be making a barley icon. But you’ll hopefully be able to use what you learn here today to make any icons you might need for your game design.
Once you’ve downloaded and opened Inkscape you’ll see a plain canvas outlined in front of you. I like to leave it turned on, but you can turn off the “edges” if you visit the document properties under “File.” Here’s what it should look like:

We will be working with the “Create Circles, Ellipses, and Arcs” command for this article.
You’ll often want a web browser open as well. It is often beneficial to do a web search for the item you are looking to iconize. So here’s a snapshot of a web search page for barley:

Using a web search can give you ideas of how to iconize the item.

Barley, you’re about to be iconized!
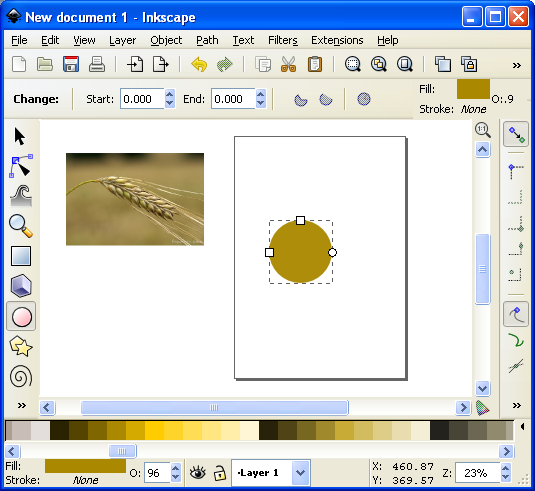
After I’ve done a web search I like to copy and paste a picture or two into Inkscape as a starting point. In this case I’ll be using the photo on the right as my guide for creating a barley icon. So copy that picture into Inkscape if you want to follow along.
One thing to remember when creating icons is that we want them to be very clear and understandable. Sometimes icons represent things, like resources. Other times they represent actions, like “move an extra space.” We before we create the icon we need to know what we are going for. In the barley example we will simply use the icon to represent a barley resource.
So now that the picture is in Inkscape we can start our tutorial. I like to use a picture so that I can create the correct shape of something in Inkscape by overlaying that shape on the right part of the picture and making the edges line up. I won’t show that today since this image will be for reference only, but it is a useful thing to do. I may write about that in the future.
The icon of a barley begins with one circle…
Go ahead and click on the “Circles, Ellipses, and Arcs” command and click and drag a circle on the page anywhere you like. If you want to change the color, scroll along the color bar at the bottom. If you want to make sure it is a true circle, hold CTRL when dragging. If you hold CTRL and drag at a different angle then it will jump to an ellipse rather than a circle. Once you’ve dragged out the circle and chosen a color you might have something like this:
This circle will be one grain of barley.
The next thing we want to do is turn our circle into a Path. There are two ways to do this. The first is to go to the PATH toolbar at the top and click “Object to Path.” The second way to do this is to select the item and press SHIFT + CRTL + C.
 Then we want to use this command from the left toolbar. It is the “Edit Paths by Node” tool and is pretty awesome for what we want to accomplish today. Click on it and then click on our circle. Then your circle should look like this (note that I have zoomed in on the circle):

The dots around the circle are the nodes that we will edit.
What we do next is edit our circle by moving the nodes around. Across the top we have different options for editing the nodes. The tools that I utilize most often are these:
- Insert new nodes into selected segment
- Make selected nodes corner
- Make selected nodes smooth
I recommend playing around with each of those commands so that you become familiar with how node editing works.
So let’s take our circle and turn it into a barley grain. First click on the upper node. Then click on “Make selected nodes corner.” Then you can grab the little circles on the lines extending from the node and move them to wherever you like. Here’s what you might end up with:

By editing the nodes we can make the circle look like a barley grain.
Now go ahead and manipulate the other nodes. I “Cornered” the bottom node and angled up the right side. I moved the bottom node to the right. I moved the top node up and to the left. And I brought in both side nodes. Here’s my result thus far:

Okay. That’s pretty passable for a barley grain. Now we want to make more of them. But instead of following that whole process over and over we are simply going to duplicate this grain. You can duplicate the grain in two ways. The easiest is to simply push CTRL + D. That will make a new copy over the top of the previous version. Then if you click the arrow tool at the top of the left toolbar you can move the new barley grain. Do this about 5 times, line them up, and then you might have something like this (I’ve zoomed out a little):

We are getting there! Who’s excited??
Okay. It is starting to look alright. Let’s go ahead and duplicate the entire thing and mirror it using the “Flip selected objects horizontally” tool. Then you can rotate the whole selection with the arrow tool. You have to click on the selection so that the arrows on the corner of the selection turn into curved arrows. Then click and hold one of the curved arrows and drag to the angle you want. Note that when dragging, if you hold CTRL it will rotate at discrete angles. This can be really useful. After all of that we should have something like this:

Feel free to enjoy a nice brew while we are iconizing barley!
Now we’ve got most of the hard work done. You may desire to shrink a few of the barley grains near the top end. If you do, you can simply click on one with the arrow tool, then click and drag one of the corner arrows around the object you are shrinking. Note that when you drag the corner arrows, if you hold CTRL it will maintain the aspect ratio of the object. If you hold CTRL + SHIFT it will maintain the aspect ratio and resize it while also maintaining its position in reference to its reference point (shown by the plus sign, which can be moved). For the sake of the tutorial today we are not going to shrink any of the barley grains.
So far so good. But now we need the stalk. So we are going to use the “Draw Freehand Lines” tool from the left. With the tool chosen you should then set the tool to “Triangle In” at the top toolbar where it says “SHAPE.” Then starting at the bottom of the stalk click once. Then move the cursor to where you want the stalk to end and double click. A triangle line should be made that looks something like this:

We’re almost done!
You can change the color again by using the color bar along the bottom. And you can manipulate the shape by editing the nodes.
Alright. So I jumped ahead a little bit and did some of the things I’ve already mentioned. I changed the color of the stalk. I make it thicker by adding a “Stroke” to it (See below about adding a “Stroke”). I didn’t like how tall it was so I deleted two of the grains from each side at the top. I shrank two from each side and rotated them slightly. By simplifying all of this I was able to create a better icon for the barley:

It looks more “Icon-y this way.
So there you go. You’ve got yourself the tools to edit nodes, manipulate shapes, and make cool icons. Those are the basics and they can get you off the ground running. But if you want to add some awesomeness, then keep reading!
Adding the Awesomeness!
If you aren’t quite content with your icons there are a few things you can do to spruce them up. The first is to add a border around them. Remember above when I mentioned about adding a “Stroke”? Let’s start with that and see what kind of border we can come up with.
First, with the arrow tool selected, click and drag a box around all the components in the icon. They click on the “Group” tool to group them into one picture. Then go ahead and duplicate that new group. You will have two copies of the same icon. We will add a stroke to one and then place it behind the other. With one of the copies chosen, click on “Object > Fill and Stroke.” This will open a sidebar like this:

Now we can add awesomeness!
On the “Stroke paint” tab we want to set a solid color stroke. This is the solid blue square icon. For now just keep the black color that it should default to. Then on the “Stroke style” tab let’s go ahead and set the stroke to a value that makes it look nice. In this example the value was 20. You should have a nice big black border around the entire barley. Once you have the border, click on the “Lower Selection to Bottom (end)” command and it will send this copy of the icon behind the other copy, which has no stroke:
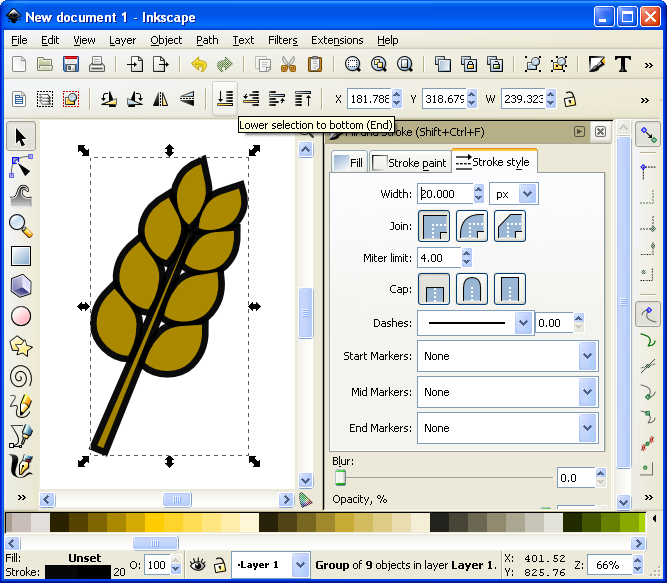
I think it’s really starting to be a nice icon!
Now we’ve got a really nice border. How else might we add awesomeness? We could add gradients to the grains and the stalk!
If you are content with the icon like that, then by all means leave it that way. I think it looks pretty good and icons like that will certainly help with the presentation of your prototype. But if you want to go another level you can add gradients. So let’s see what happens…
First you’ll want to ungroup that top level copy of the barley. We want to add gradients individually to the grains. With it ungrouped go ahead and click on one of the grains. Let’s choose the lower left grain for this example. Then you can click on the “Create and edit gradients” tool on the left toolbar.
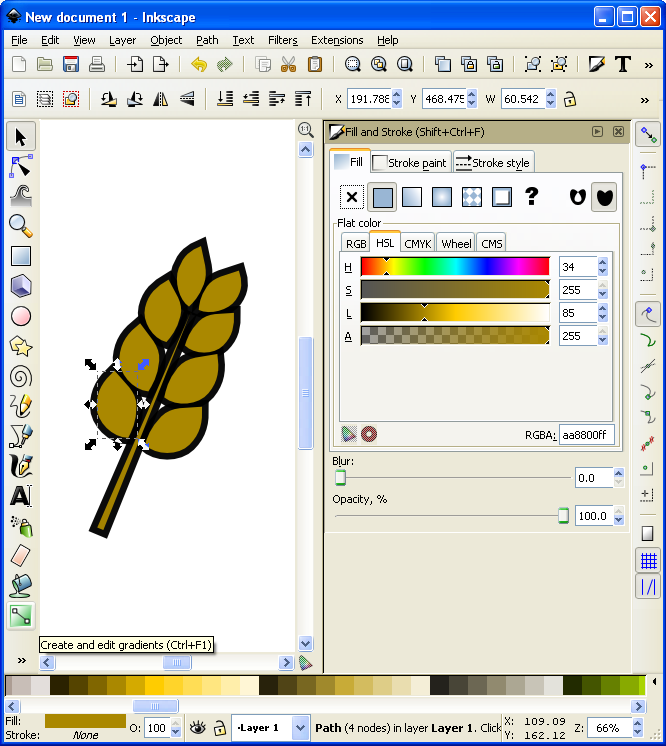
It’s about to get wild!
Then click and drag from one side of the selected grain to the other. You will want to play around with the gradient editor to familiarize yourself with the gradient editing options. The easiest are linear gradients. I recommend you start there. Otherwise a radial gradient could look nice. I’ve used one for the grains (each individually) here (Note that you could have applied a radial gradient after editing the first circle and then duplicated that for each grain of barley):
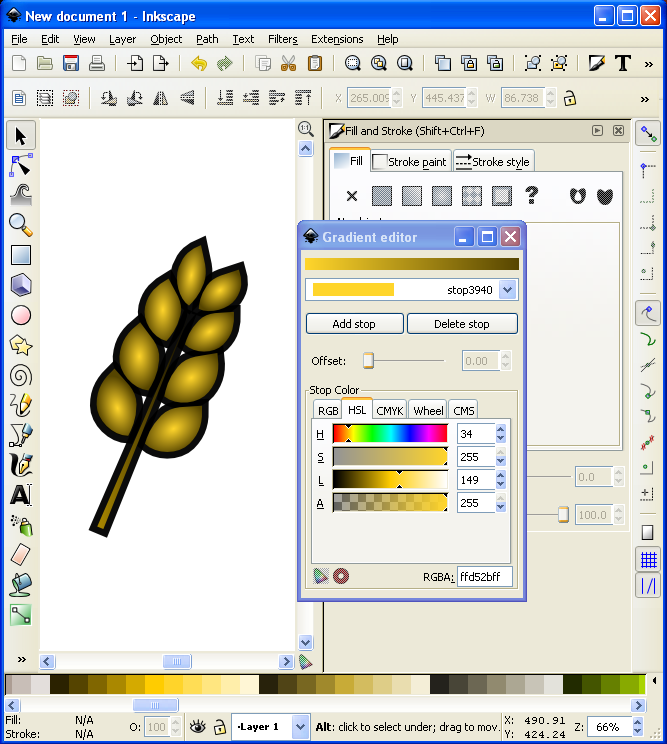
I might actually use this icon!
Alright… we have time for one more layer of awesomeness. What could it be other than a drop shadow??? Thankfully I don’t really have to teach you anything here since Inkscape makes it so easy! With the entire icon (both copies) highlighted go to “Filters > Shadows and Glow > Drop Shadow” and it will open a popup window. If you click on “Live Preview” it will show you what the drop shadow will look like.
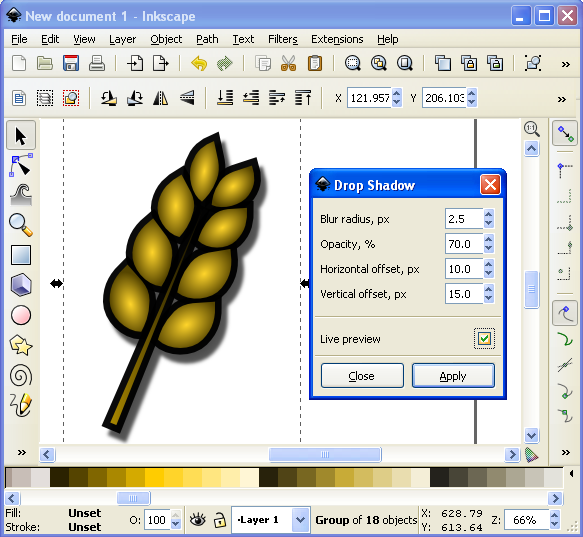
Now that’s what I’m talking about!
And there you have it. A nice and simple icon with three points of awesomeness!
Lesson Complete!
Here is my finished icon of barley, with radial gradients on the grains, a linear gradient on the stalk, a nice “Stroke” border, and a decent drop shadow:
Not too shabby!
That’s all I’ve got for you today. I hope that this article was able to equip you to add some high quality iconography to your game designs to help take them from playable to pitchable and give you confidence in front of the publishers! Please let me know if you have any questions. I would love to help you out. Thanks for reading!
Prototype Art: Cubes in Inkscape
Inkscape Logo of Squidy Awesomeness
There are a lot of you out there who are working on board game prototypes. Often those prototypes will utilize the ever popular cube. And that usually results in the cube being placed onto graphics such as cards or tiles or the board itself and then later on, in the rulebook. So today I wanted to give you a quick tutorial to show you how I make a cube for board game graphics using Inkscape.
You can create your own set of awesome looking Scalable Vector Graphics versions of cubes using the free Inkscape software. If you don’t have the software, you can download it from their website: inkscape.org.
Let’s Get Cubing!
Once you’ve downloaded and opened Inkscape you’ll see a plain canvas outlined in front of you. I like to leave it turned on, but you can turn off the “edges” if you visit the document properties under “File.”
What we are going to do first is click on the “Create 3D Boxes” icon on the left. Here is a picture showing what this should look like:
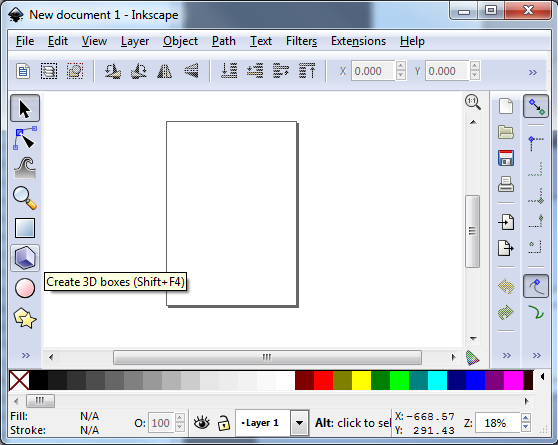
There… on the left… the icon that game designers love!
Click on the icon. Then click and drag within the framed region to create a generic box. It should look something like this:
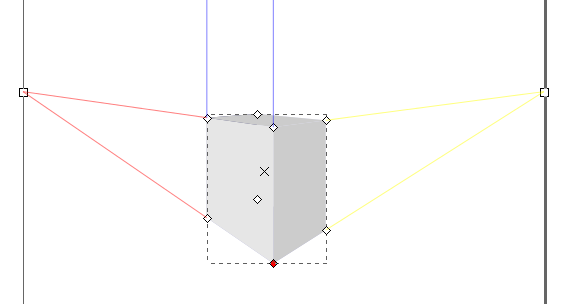
Great! You’re doing it!
You can see we’ve created a generic gray box. Now it’s time to make it look like a cube of awesomeness that you would be proud to include in your board game graphics!
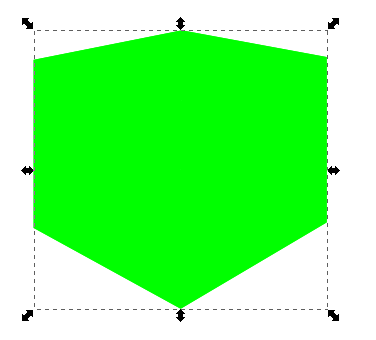
So the next thing you should do is “shape” the box to look like a cube. This can be done by clicking and dragging the little diamonds on the corners of the generic box. Go ahead and try it out. Once you’ve dragged then to the positions of your liking then you might end up with something like this:
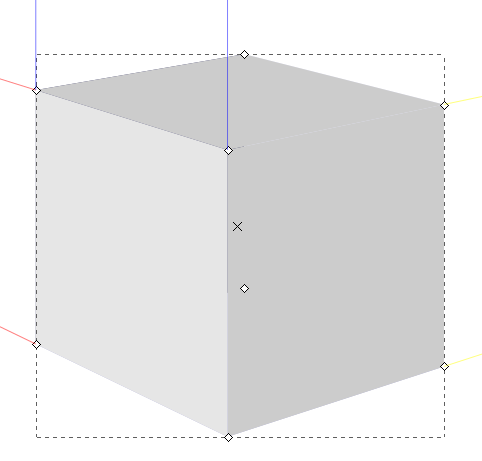
Our cube of awesomeness is started to be awesome!
Assuming you’re pleased with the shape of you cube it’s then time to make it look good. Normally you can just click on an object using the “Select and Transform” icon (it’s the black arrow on the left). Once you’ve selected the “Select and Transform” icon, click on the cube. Then you can change the color by selecting any color from the color row at the bottom of Inkscape. But that’s not the way I do it. Why? Because you end up with a flat monotone cube of ugliness rather than a sweet cube of awesomeness. Here’s what it might look like:
Our awesome turned ugly. Let’s fix that!
Don’t be afraid! We can transform that cube from ugly to awesome in just a few easy steps! First, we’ll want to use the “Edit paths by node” tool, which is right below the “Select and Transform” icon. This one looks like a quarter of a circle, with three nodes, and a black arrow. By clicking on this icon you can then go and choose a specific face of the cube. Once you’ve selected a face of the cube you can then change its color without changing the other faces. In this next picture I have changed two of the faces and have selected the top face:
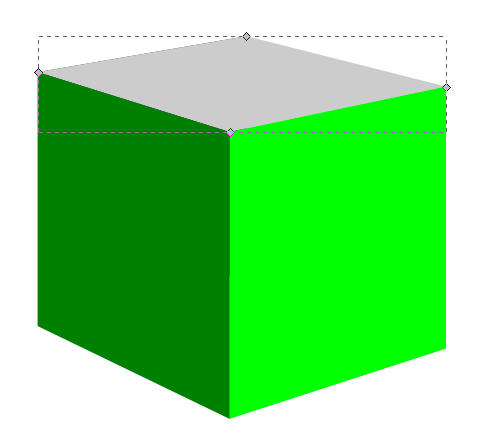
Looks like we’re back on track!
So I had selected the right face and made it a light green. Then I selected the left face and made it a dark green. Now with the top face selected I can choose its color, in this case an even lighter green. Now you should have something like this:
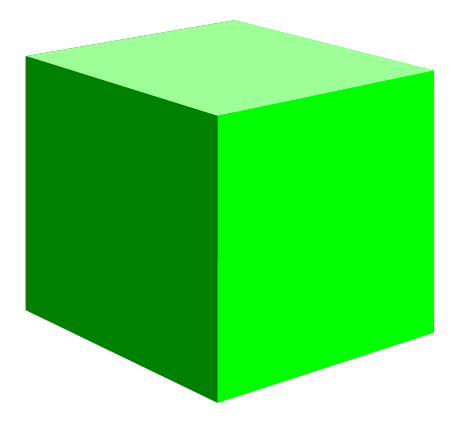
Not too shabby!
Alright!
Just a side note, if you have trouble selected the individual faces, make sure you’ve chosen the “Edit Paths by Node” tool rather than the “Select and Transform” tool.
So we’ve got a green cube with differently colored faces. What’s next? I found that sometimes the hidden faces will show through along the edges. So we can change their colors too. This is a little tricky though, so follow closely.
Go ahead and click on the left face. Then what you want to do is press the “left” arrow on your keyboard to move the face over. Don’t use your mouse to drag it since it will be almost impossible to easily put it back in the right spot. It should look something like this:
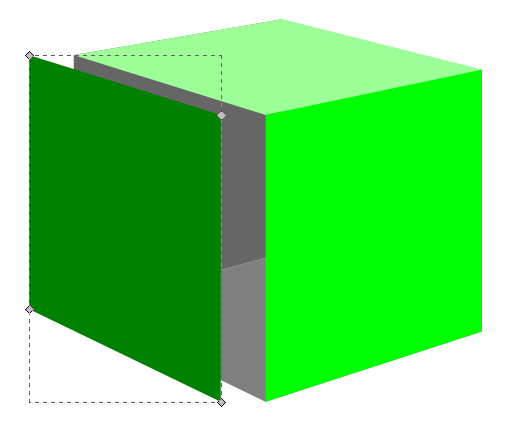
The hidden “ugly” faces show themselves!
With two of the three ugly faces exposed you can click on each one and change them to a color that matches your cube color. In this case I just choose a dark green for these two hidden faces. Then slide the moved left face back into place using your “right” arrow key. You can then move the right face or the top face to expose the third hidden side and change its color.
Now you’ve got your beautiful cube. You can call it quits right there if you want a nice simple cube. Just select the cube, click “File > Export Bitmap” and you can save it as a nice little .png file. And I also recommend saving the .svg file so that you don’t have to recreate the cube every time. But if you want to spruce it up a bit then keep reading!
Adding Awesomeness!
Sometimes cubes can look better with a border. There’s a very easy way to create one. With the cube selected click on “Filters > ABCs > Black Outline” to get something like this:

Oh boy! Things are looking good!
Pretty dec, right! (Note: dec is short for “decent,” all the cool kids know that!) Just be careful because the smaller your cube the larger the border will appear relative to the cube.
If you don’t want a black outline there are other options, but it’s slightly more complicated. With the cube selected you’ll want to click on “Object > Fill and Stroke.” That will open a panel on the right. “Fill” will color the main area of the object. “Stroke” will add a border to the object. We want to use Stroke. Taking our border-less cube and applying a simple black stroke will result in a cube like this (Note, on the Stroke Style tab you will want to choose the “Round Join” option):
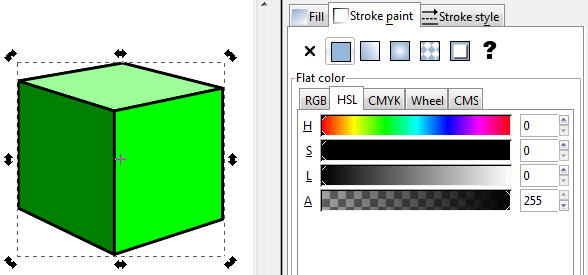
Not quite as awesome as I’d hoped!
I am not a fan of the lines along each edge. It just doesn’t look that clean to me. So here’s my trick: duplicate the cube and apply a stroke to the copy in the back. To duplicate the cube make sure it is selected and then right click. On the pop up menu click “Duplicate.” This will create a duplicate directly on top of the original. Adding a stroke to the copy in back will show allow only the outside edges of the stroked cube to show past the unstroked cube. Then you can create cubes that look like this:
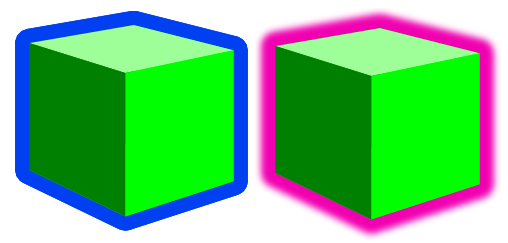
Awesomeness complete, even though these two examples look pretty ugly!
On the left is a duplicate cube with a blue stroke applied to the back copy. On the right is a duplicate cube with a blurred pink stroke applied to the back cube. One final note is that if you choose the duplicate cube option you will want to group the two together so that when moving them around you won’t have to constantly be lining them up.
Lesson Complete!
Now you know how to use Inkscape to create nice looking cubes for your board game graphics! If you are a starving artist and you have little computer skills then I have a special bonus for you. I am supplying a .svg file for all of you with a slew of cubes that you can use freely without crediting me, without paying me, and without worrying about getting sued. Feel free to use this file and the cubes wherever you want, however you want, and in whatever way you want so long as you use them for the greater good! Here is an image of the .svg file:

Go on… use this artwork freely! Make your prototypes look awesome!
To download it just click here: Google Drive > FreeUseCubesbyEdPMarriott.svg
Note, if you have trouble downloading the file from Google Drive you might want to allow third party cookies. You can read more here: http://productforums.google.com/forum/#!topic/docs/_pXrQmwkrGU . If you have further problems, please let me know!
And let me know how they work for you. Now get Cubing!
