Blog Archives
Prototyping Tools of the Trade
Tools of the Trade
One topic that seems to come up a lot is how to make board game prototypes. I’m not talking about coming up with a design. I’m talking about physically creating prototype game components. Game designers are constantly trying to make their components so that they can get right to the playtesting phase of game design.
Today I want to discuss the tools I use to create my prototypes. At this point you should already have your prototype artwork created if you’re going to be printing anything. Let’s assume it’s already been printed. Now it’s time to make it awesome!
Chits…
One common component that is particularly easy to make for prototypes are chits. These are typically just printed artwork glued onto matte board. But matte board can prove to be difficult to cut.
There’s two ways that I’ll cut my chits out of the matte board.
- Straight edge and utility or X-acto knife (not ideal)
- Rotary cutter (ideal)
What we are doing here is separating the chits from one another. When creating your artwork you should line up the edges of the components so that you only need to make one cut between them.
This will help you keep your fingertips!
The straight edge and knife approach is definitely NOT my approved method and I would never recommend it. However, a lot of people use that approach so I needed to mention it. One recommendation is to use a safety straightedge like the one shown here. You only have 10 fingertips so why not spend a few extra dollars and get a straightedge like this and make sure to not lose any fingertips!
I don’t like this method for a few reasons. The first is that you need a cutting mat to go underneath so you don’t scratch your table. The second is that the blade doesn’t always stay straight as you are cutting the matte board. And that can be really annoying.

Just get this thing instead!
My preferred method is to use a rotary cutter like this Fiskars 12″ Scrapbooking version. It is super easy to use, relatively cheap (especially compared to the $40 safety straightedge), and very reliable. And since most of us don’t have printers that print on anything other than 8.5×11 paper anyway, the 12″ Fiskars tool is perfect!
So I will print my prototype artwork on photo paper, adhere it to matte board, and then cut out the individual components using the rotary cutter. Just a heads up when using matte board though: you’ll likely have to roll the cutter back and forth a few times to cut all the way through. That’s still an easier process than trying to run a blade along the straightedge.
On the topic of matte board, I recently went to Hobby Lobby and purchase two huge packs of “matboard” for $6 each. I got a pack of 12″x12″ and a pack of 11″x14″. These are so cheap that I almost felt like I was stealing. They are just the leftovers from the framing department that were cut out from the boards used to mat pictures/paintings for customers. What a great way for Hobby Lobby to reduce their waste and provide a useful product. Here’s what I got for $12:
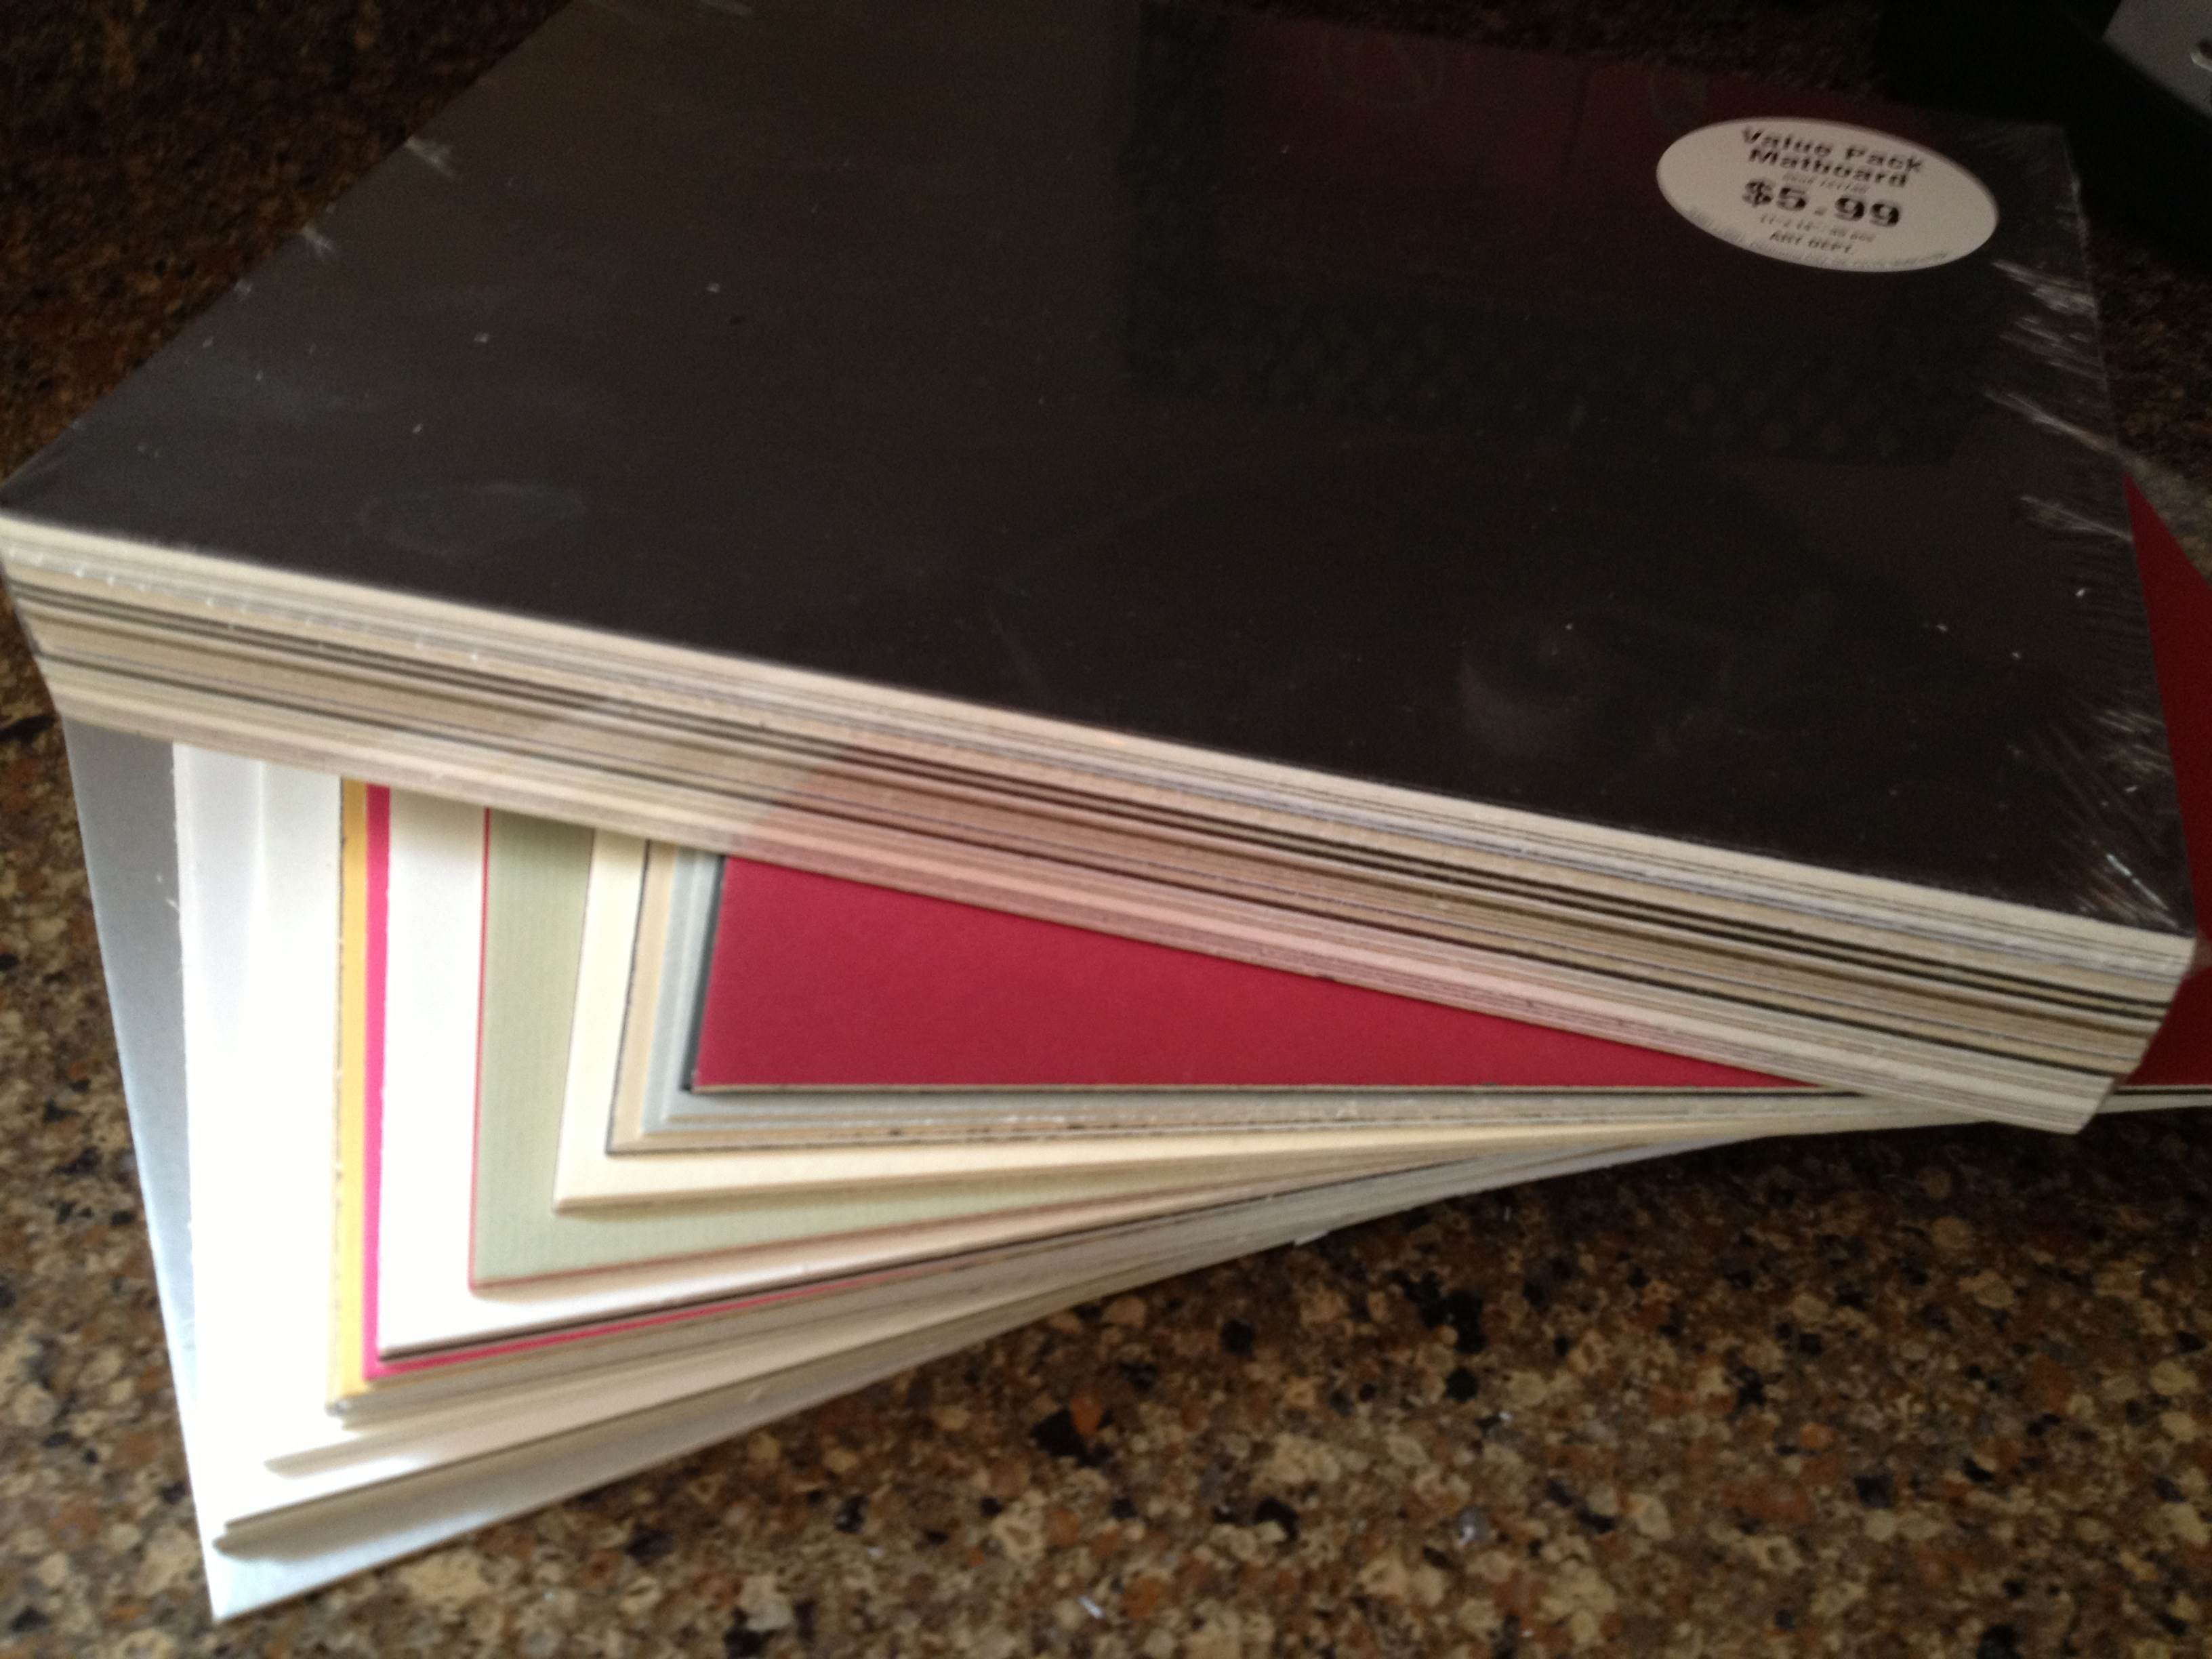
So cheap!
The other key tool of my trade is a glue stick. Some people will use standard glue, some will use spray adhesive. I prefer the glue stick to standard glue since it is simple to apply evenly. This is very helpful when trying to make sure that your components are completely glued down.
Now you know a great method for producing chits. If possible, keep them as rectangles rather than circles of hexes. But since we’re on the topic of circles and hexes let’s move on to another excellent tool…
Punches…
There are times when you don’t want rectangular components. Perhaps your game is a map building game with hex tiles. Or perhaps you require special discs for your game. If that’s the case, then I strongly urge you consider purchasing a punch.

The hex punches from Fiskars work great!
One thing to keep in mind when purchasing a punch is how thick of paper/board are you wanting to punch. Often these sorts of punches are used by scrapbookers who are only punching paper. That means they may not be able to punch through matte board. Sometimes you can only find out after you’ve bought the punch. Bummer.
Here are some recommendations, keeping in mind that I don’t know specifically how thick they can punch. OR you can just do a search for “hobby punch” and find one you’d like.
- Fiskars Squeeze Hex Punches
- Creative Memories Punches
- Older Creative Memories Hex Punches on eBay
- And don’t forget the Corner Rounder punch which can be helpful for cards that are printed on nice canvas/linen finish paper.
These can come in really handy. I use a circle punch when creating prototype coins. I have used a hex punch to create stickers for hex tiles. And here is my little tip for punching, which I mentioned in a prototyping article a long while back, but which is worth repeating.
When punching, flip the punch over so you can visually align the part that you want cut.
So now you’ve got the tools to cut out chits and punch out little bits of awesomeness! What about cards?
Sleeves…
Many game designers come across the need for cards in their game designs. I have made cards numerous times. Early on I would buy 60lb. paper and just cut out rectangles. But there is a problem with that. The edges of the rectangles can be slightly bent from cutting, which leads to great difficulty in shuffling the cards.

Mayday sleeves are convenient and cost effective!
The way to prevent that while also protecting the cards is to purchase card sleeves. These inexpensive beauties will be a little lifesaver by removing anguish from your prototypes. Plus, you can get awesome one’s like the one shown here with a kitten running through a field!
If you want a good go-to source for sleeves then look no further than Mayday Games. Here is a series of links to the sizes you may be looking for:
- Euro Cards (59×92 mm)
- Mini Euro Cards (45×68 mm)
- Card Game (63.5×88 mm)
- Standard USA Cards (56×87 mm)
- Magnum Ultra Fit for 7-Wonders (65×100 mm)
Those should offer some help. They definitely help with being able to shuffle your cards. The only downside is that when stacked they can be really slippery and your stack may tumble over.
Speaking of tumbling…
Dice…
Sometimes it becomes necessary for a game designer to create their own set of dice. Sure, you could always just make a cheat-sheet conversion table, but that can be a huge burden for your playtesters who would constantly have to recheck the sheet. So one of the tools of the trade is to purchase blank, sticker-able dice.

Just think of the potential here!
Look no further than Indented Blank Dice. The best part of their site is that they have labels that you can purchase and print on rather than having to buy blank label paper and try to cut/punch out your own labels and then peel them off.
Don’t buy blank label paper. Don’t cut/punch out stickers. Don’t try to peel them.
Just buy the sticker label paper and save yourself from the frustration.
So this concludes my little article about Prototyping Tools of the Trade. Next week I will be posting a follow-up article on Sourcing Components for Prototyping. It will cover where to purchase boards, bits, and more. So stay tuned!

The Monday Brews: 7-29-13
What a splendid week we had last week. I ordered prototype cards for Conclave. I playtested new components for Scoville. And I enjoyed a few beverages.
Here’s a recap of what I drank and what I played last week:
The Barley:
Here are the tasty beverages I was able to enjoy last week:
Leinenkugel’s Honey Weiss: This was an easy choice since we were camping. It’s a pretty easy-drinking wheat and honey beer from Wisconsin brewer Leinenkugel’s. We needed something in a can (Not Pabst!) that would be enjoyable around a campfire. I had requested Leinie’s Summer Shandy, but my wife choose Honey Weiss instead. No complaints there.
Ben Franklin’s Honey: This is my second homebrew and is rather enjoyable. Perhaps I have something for honey beers. This was enjoyed while working on game design. A perfect combination!
New Belgium Fat Tire: This fine beverage was enjoyed after our softball game where we won and became the first half champions of our league, thus locking in a spot in the championship game for our team.
Lake Louie Warped Speed Scotch Ale: This delicious scotch ale from nearby Lake Louie Brewery was also a post-game celebratory beverage. It is probably my favorite scotch ale and I hope to visit and tour the brewery someday.
Pearl St. Mills Pils: This was the last of the celebratory softball beverages and unfortunately also was my least favorite. It was a typical pils and nothing about it really stood out. Or it could have been because I had two before this one, it was late, and I was really tired. I guess I’ll have to give it another attempt.
Alberti Amber: This is my first homebrew and I only have a few of them left. I saved the very first bottle and it will remain in my basement/man cave forever! I was able to enjoy this during a game night last Friday. I think it’s pretty decent for a first go at homebrewing.
The Boards:
Here are the delightful games I was able to enjoy last week:
Conclave: This prototype of mine is still very rough. I solo tested it and learned that it needed some mathematical tweaks to make sure things are balanced for all players, and so that it can actually be played the way I want it to be played. I’ll likely have this with me at GenCon if anyone is interested.
Scoville: Four of my Level 1 friends were willing to test some new components for this game. The components are bonus abilities that let you do things you normally can’t do. But you can only do them once per game. If you use an ability, then you sacrifice the four points that it is worth. If you do not use them, then each is worth 4 points at the end of the game. This is like the train stations in Ticket to Ride: Europe.
Tsuro: This tile-laying game plays quickly and can be frustrating. We played twice, but the finish to the first was quite memorable. This picture shows the final tile placement, which resulted in all three remaining players being eliminated at the same time.
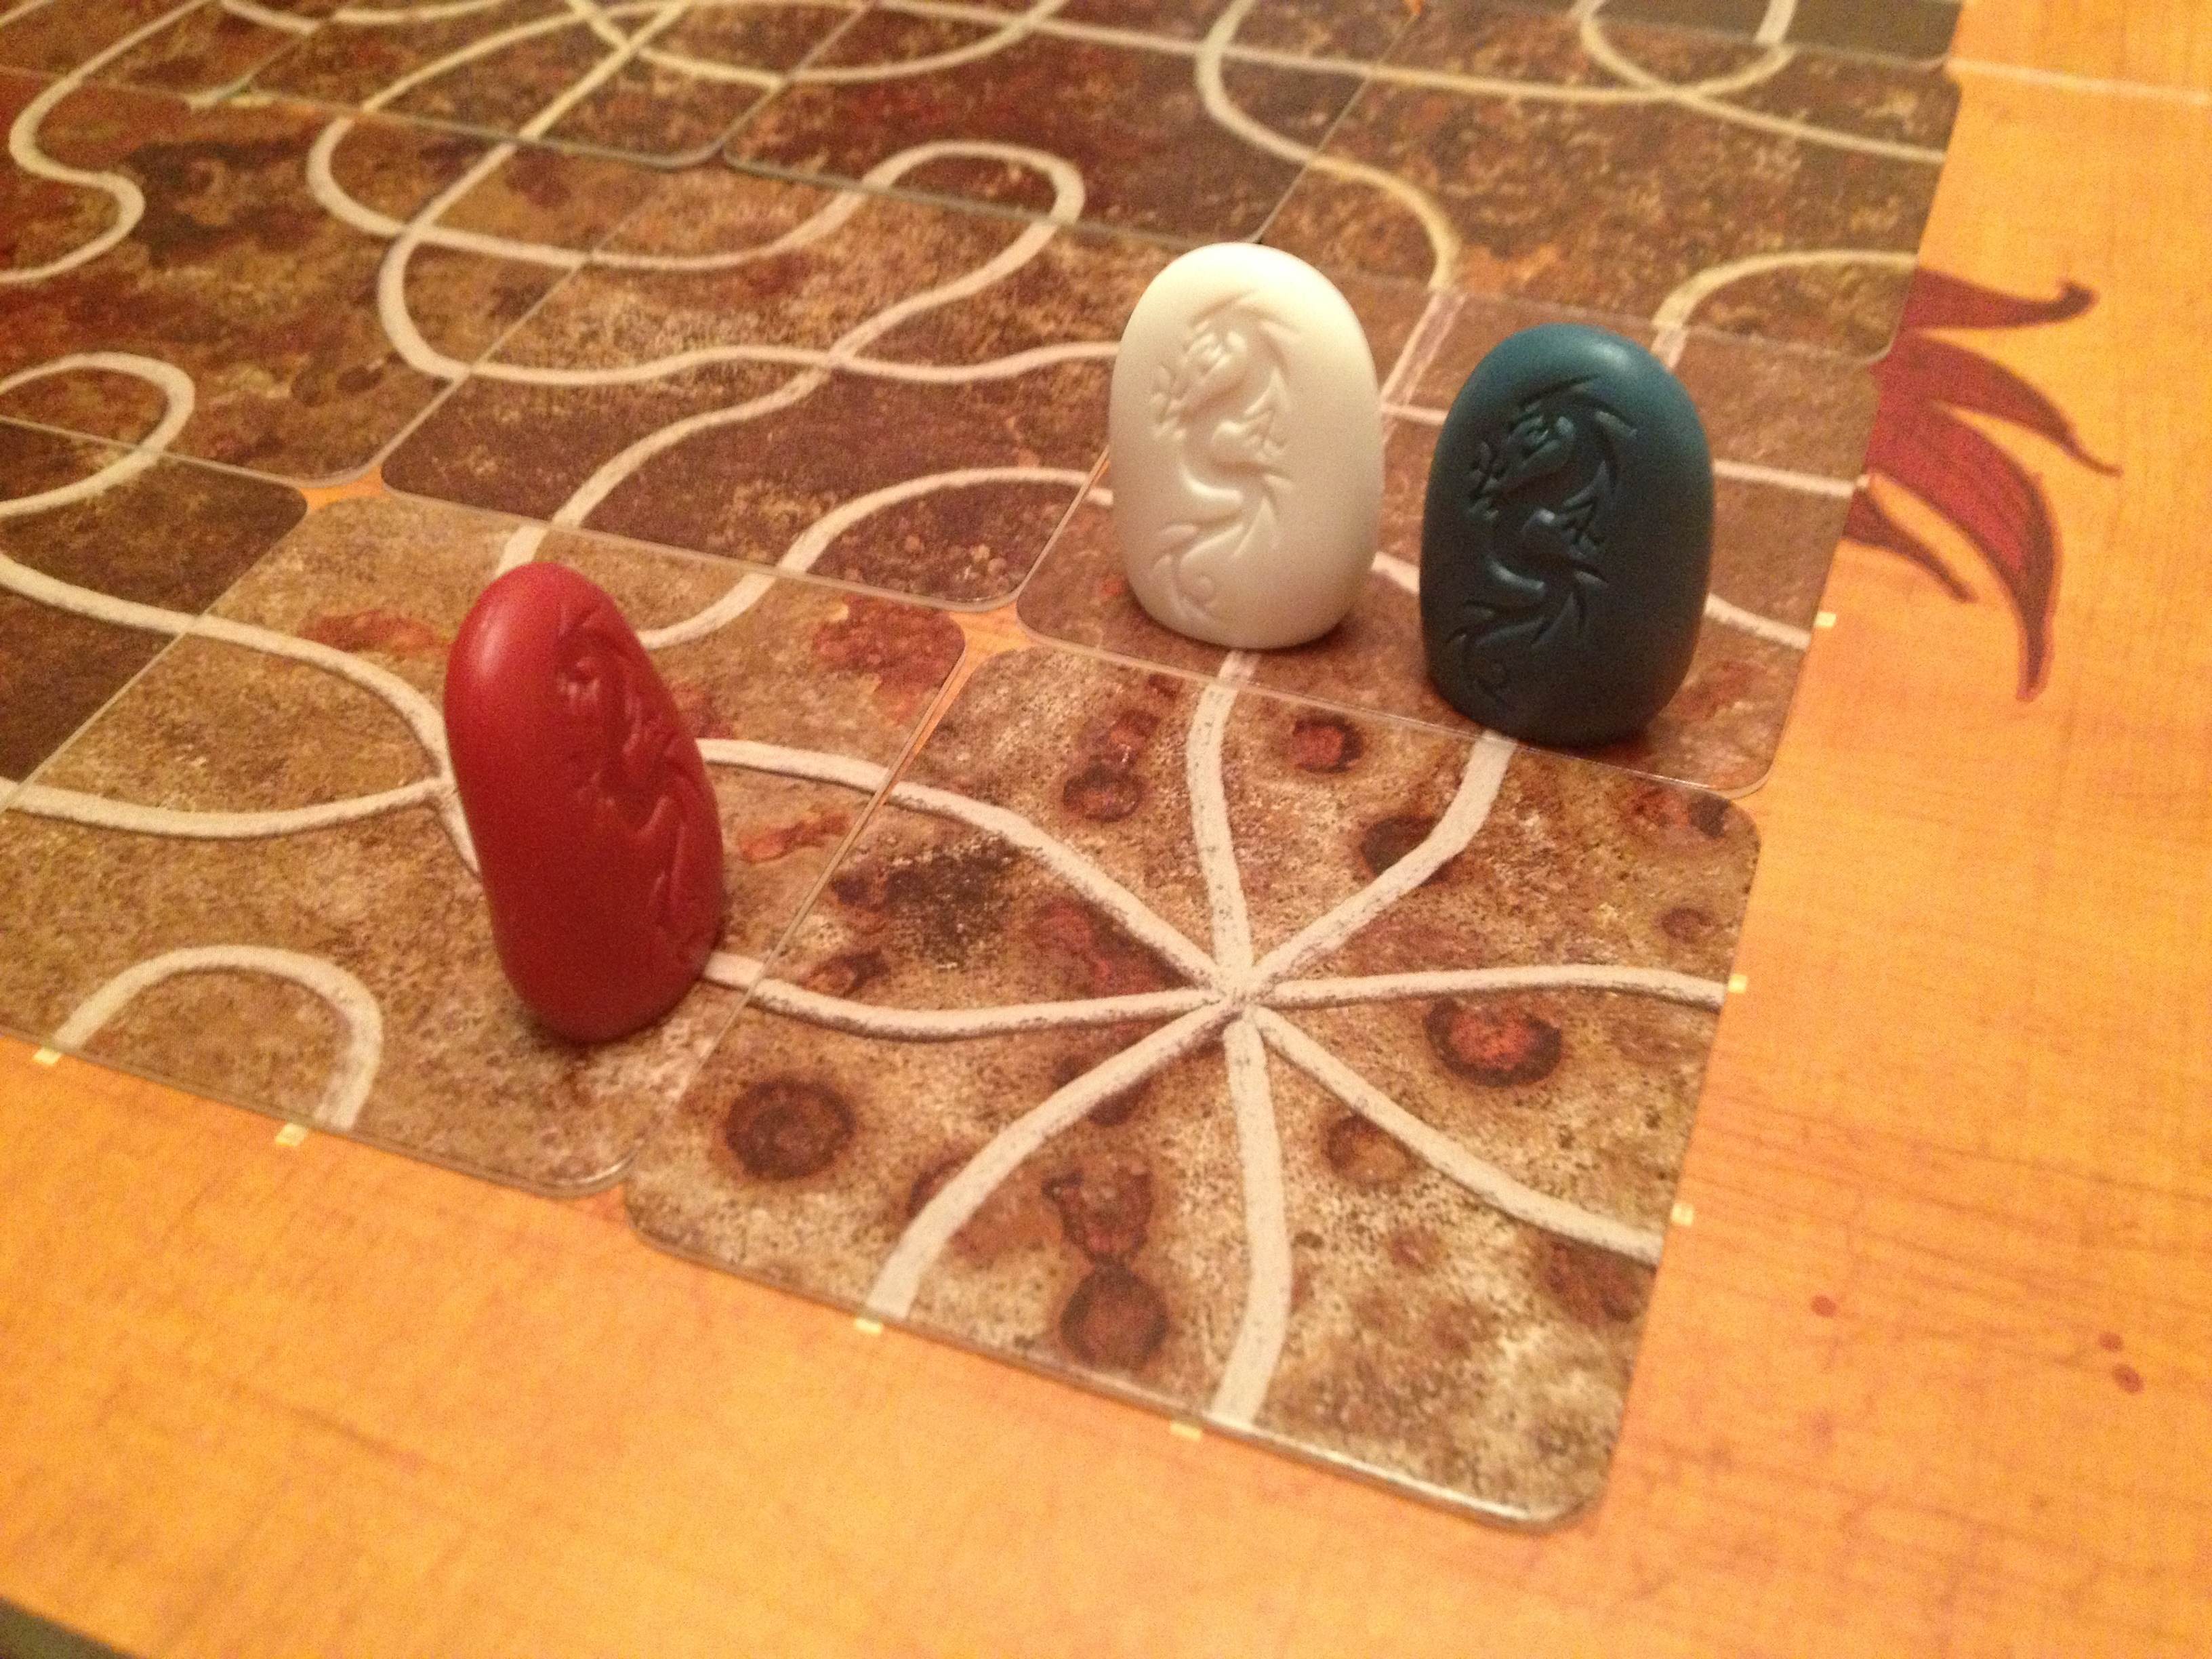
The grand elimination/victory moment for the Red, White, and Blue!
Gentlemen Thieves: This is a competitive game where you are trying to earn your own character the most loot from participating in different robberies throughout the game. On your turn you place a piece of evidence onto one of the five locations. If a location then has at least one of each of the five different types of evidence, then that location is robbed. The evidence tokens are flipped over to the loot side and divvied up between whichever team robbed the location. The team that robbed the location is the one with more evidence of their player colors in that spot. The game ends when the Brigadier makes a showing, and the player with the most loot wins. This is a fun light-ish game with a large mental aspect. I’ve now played twice (Once 2p and once 5p). I enjoy it, though it feels like my brain wants to explode each time!
***
So what Barley or Boards were your favorites from this past week? Anything you’re hoping to enjoy this week?
Game Concept: Conclave
Of course I’ve already designed a logo!
So there I was, working on Trading Post, watching the Dan Brown movie Angels & Demons when all of a sudden a new game design hit me. I thought to myself wouldn’t a game about electing a pope be kind of fun? So I changed course and laid the groundwork for a game design I am calling Conclave. (It could also be called Preferiti, Triregnum, Habemus Papem – which is already used for a game, or Fumata Bianca).
That was back in 2011. I had the idea for the game and a sheet of paper with a few details, but, like so many other game concepts, it sat on my shelf for nearly two years.
While again working on Trading Post a few weeks ago, and yes, while watching Angels & Demons (I guess I have a liking for that movie) I again was drawn to the idea of a game about electing a pope. So this time, since Trading Post is my white whale, I diverted my attention to actually conceptualizing Conclave.
Papal Conclave: What is it?
In the Catholic Church the pope is the person elected to succeed the line of Saint Peter, Jesus’ disciple. Since the dawn of Christianity there has been a leader of the Christian Church. And the Catholic Church has referred to that leader as the Supreme Pontiff, or more simply, the Pope.
Conclave is all about electing a new pope. The word Conclave is a conjunction of two Latin words, cum (“with”), and clave (“the key”). The interpretation of the word conclave is “sealed with a key.” In 1274, due to several elections taking years to decide the next pope, it was decreed by Pope Gregory X that the elections should take place inside a sealed room. This way the college of cardinals would have to elect a pope while basically being sequestered and given small rations of food and water.
Since 1846 all conclaves have taken place in the Sistine Chapel, in the Vatican City.
During conclave the cardinals of the Catholic church are locked in the Sistine chapel. They will cast their first vote in the afternoon of the first day. To elect a pope requires a 2/3rds majority for any single candidate not including that candidate’s vote. If the vote does not result in a newly elected pope, the ballots will be burned with chemicals that result in black smoke emanating from the Sistine Chapel smoke stack. Each subsequent day the cardinals will take a vote in the morning and another vote in the afternoon. Black smoke will be displayed each vote until a pope is elected. Once a pope is elected then the smoke will be white, thus informing the world that a new leader of the Catholic church has been elected.

How are you going to earn their votes?
While this Scrutinium method (secret ballot) of electing the pope is a standard method there are three others: Compromissum, Accessus, and Quasi-Inspiratio. This game design is focused on Scrutinium.
How does the Game Work?
During a game of Conclave you represent one of the Preferiti, the preferred cardinals for the papacy. It is your objective throughout the game to manipulate the college of cardinals such that you earn their votes and get elected as the next pope.
This game is all about area influence. The game will be played using cards that represent each of the players. Each player will have their own deck of cards. Half of the cards are your own player color. The other half match the colors of the other players.
The first portion of the game represents the first afternoon vote on the first day of Conclave. During this portion of the game players take turns playing cards onto each cardinal to set their initial vote. Once all the votes are in, assuming no player has a 2/3rds majority (which is physically impossible in the first round with how I’ve designed the game), then the second phase of the game begins.
The second phase is the manipulation portion of the game. One your turn you can perform one of several types of miracles/charities, each basically giving you a specific action. These are listed here:
- Miracle of Feeding: Flip the cards of any one cardinal.
- Miracle of Healing: Swap the top cards of any two cardinals.
- Acts of Service: Lock any one cardinals vote.
- Acts of Mercy: Examine the bottom card of up to three cardinals.
So I’ve mentioned cards and tables. Let’s explain. During the first phase of the game (the first afternoon vote) players will take turns placing cards on each of the cardinals. They will place one card face down, and one card face up. The face up card is the only one that matters when counting the votes. The bottom card represents the bias that the cardinal has toward another Preferiti. So when players choose Miracle of Feeding they will flip any one cardinal’s vote over to the other card.
When players choose the Miracle of Healing they will take the top cards from any two cardinals at any tables and swap them.
Acts of Service allows for any one cardinal’s vote to be locked in for the rest of the game. This cardinal can no longer be swayed. But beware, each player has only so many “locking cubes” that they can use to lock cardinals.
And Acts of Mercy allows a player to look at the bottom cards of up to three different cardinals to see which way they might be leaning. This will help players know when it might be beneficial to choose the Miracle of Feeding (flip cards) action.
How do you win?
The game board basically represents the locked down Sistine Chapel. Your objective is not to earn a straight up 2/3rds vote as that would be boring for a game. Rather, you are trying to win different tables within the Sistine Chapel. It’s an electoral college of sorts. There are tables of 3, 5, and 7 cardinals. If you possess the majority of votes at any table, then you receive a number of votes equal to the number of cardinals at that table.
So if a table of 3 cardinals has two green votes and one blue vote, the green player would currently have 3 votes. It is an all-or-nothing system.
Players play to a certain number of votes depending on how many players are playing. Once a player has successfully manipulated their way to the right number of votes then they are elected as the new pope and the game is over.
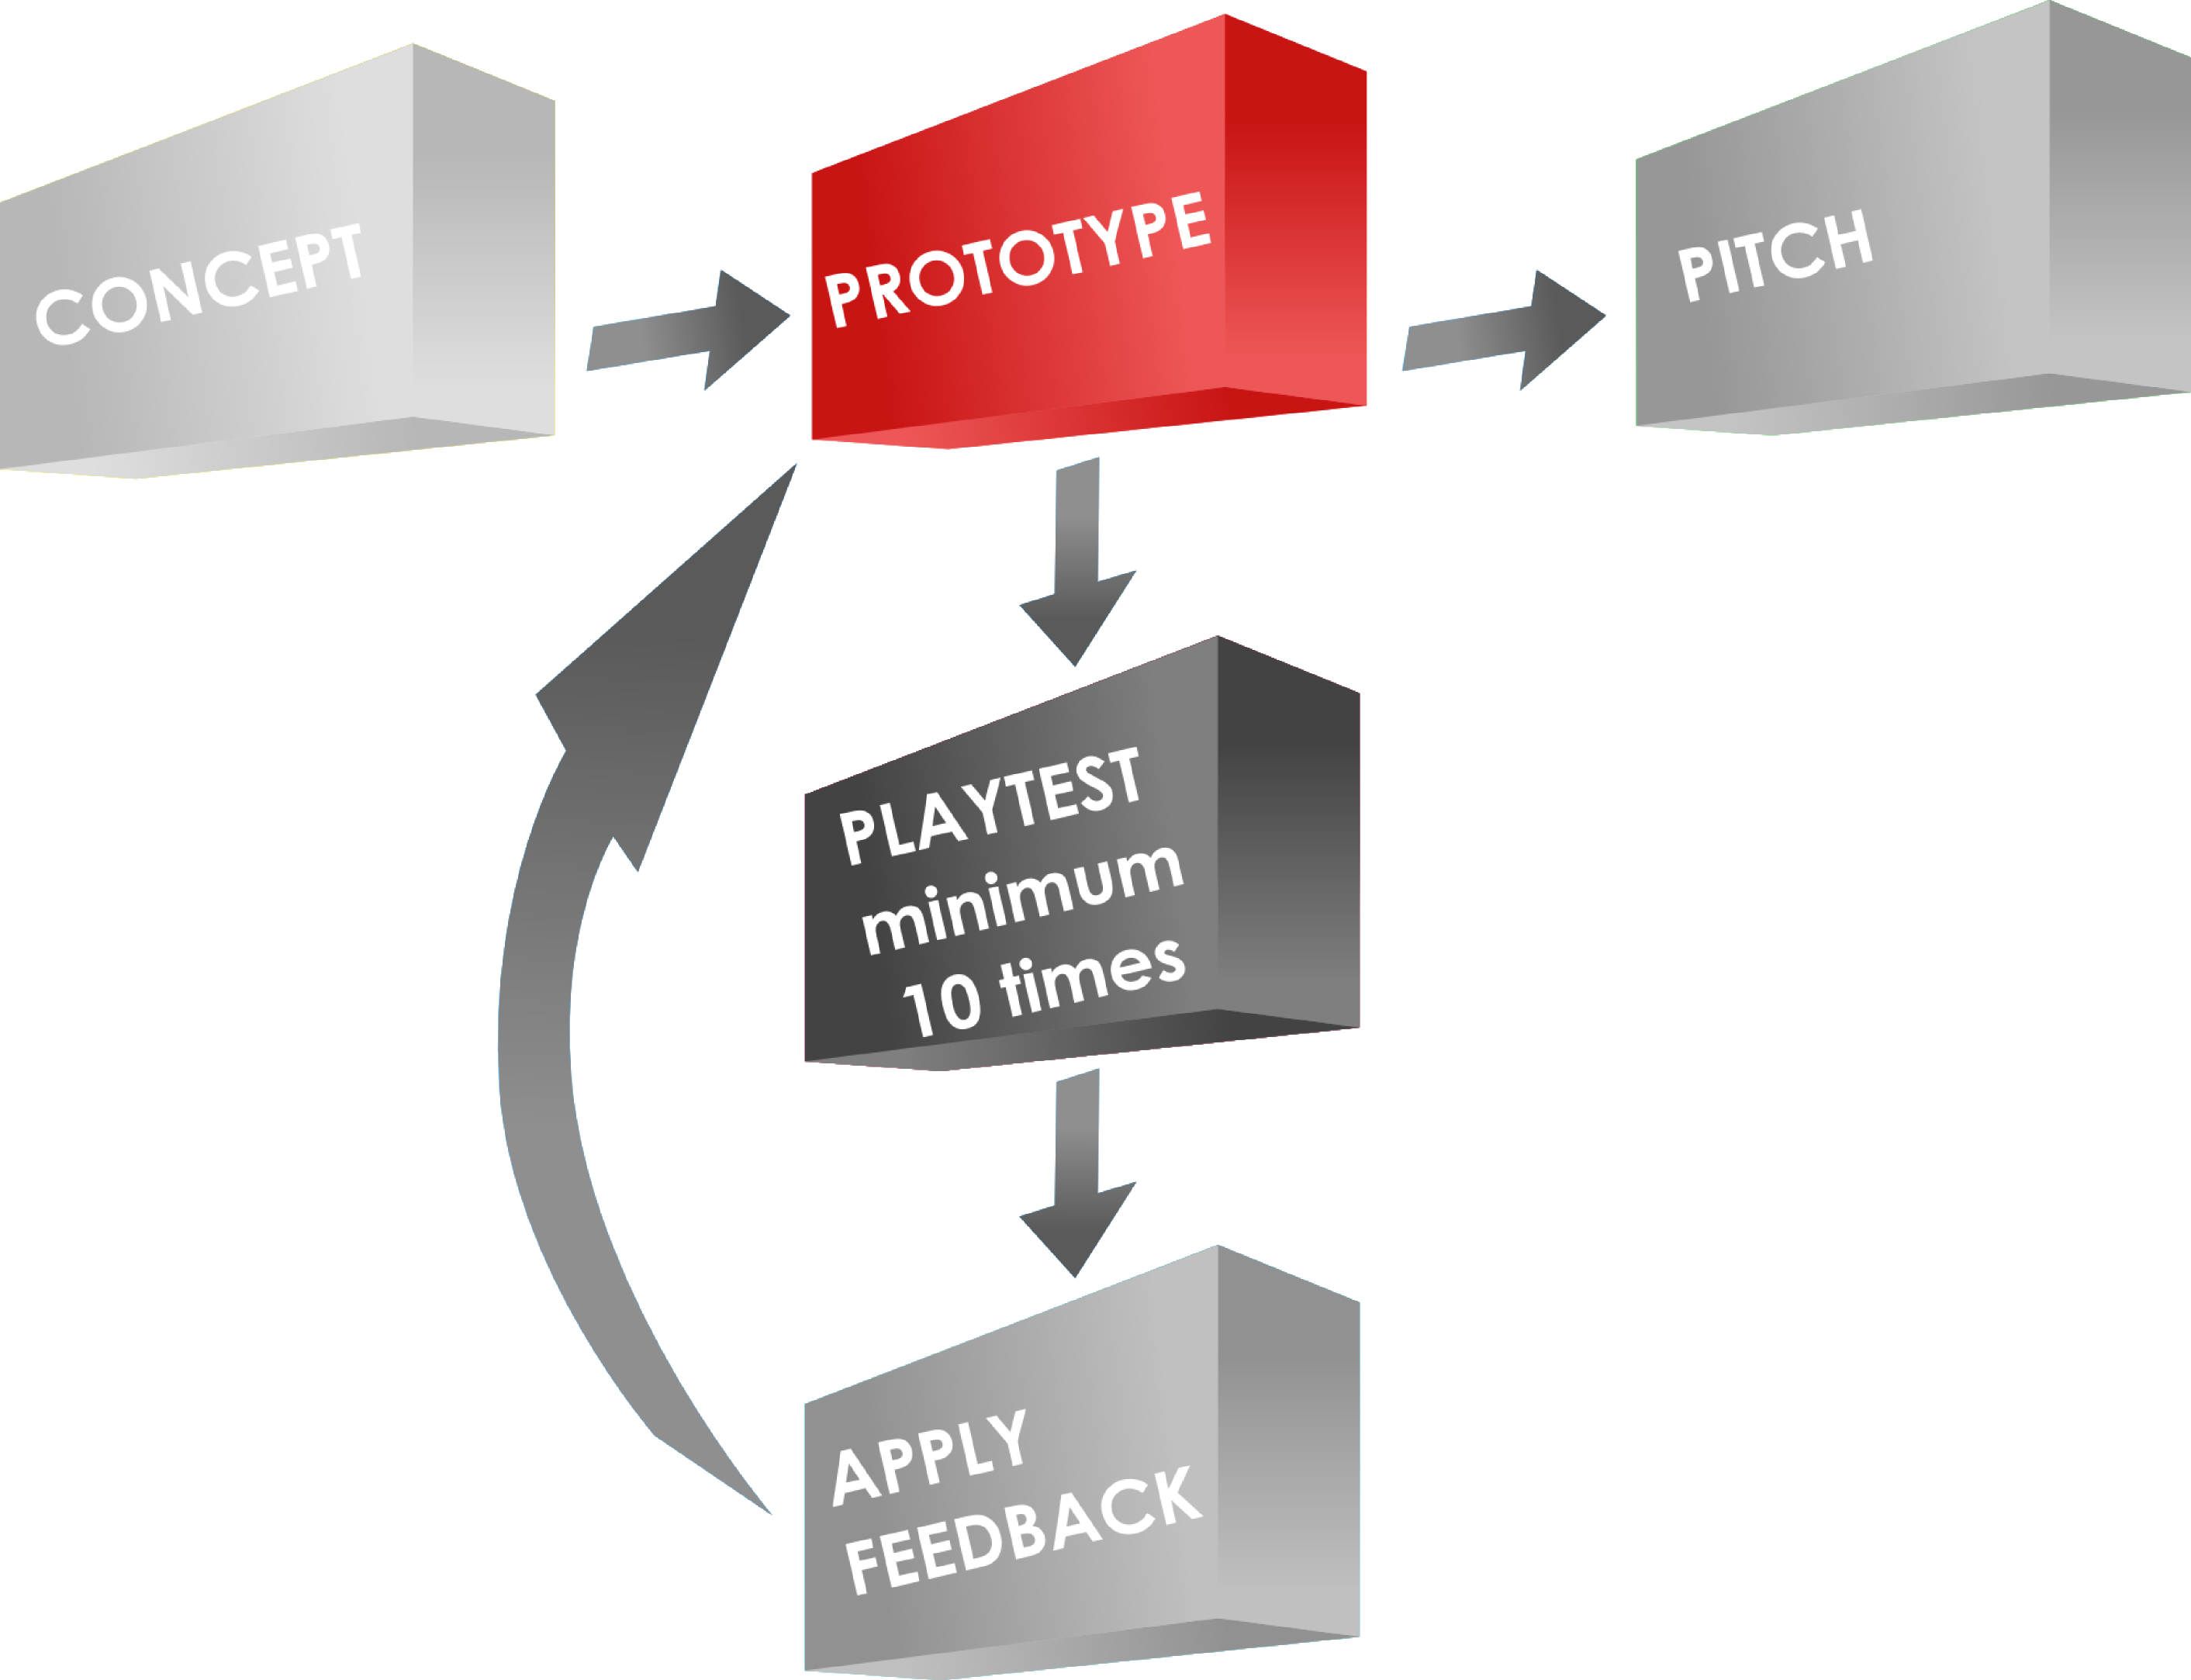
Current State of the Game…
Currently the game is in the prototype phase. I basically have it ready for solo playtesting. Right now it is a pretty simple concept and is easy to prototype. But I’m exploring a few things that could make it both more interesting from a gameplay perspective and more difficult to prototype at the same time. So for now I’ll keep it simple. My goal is to solo it this weekend and get a better idea about how to move forward with the concept.
I’ll post more about Conclave in the future, but until then check out this awesome infographic from image-illustration.net: (click to embiggen)

4th of July Family Gaming
With the Fourth of July on a Thursday this year it is likely a few of you are taking some extra days off for a little family vacation. That means you’ll likely have a good opportunity to teach/play games with people who probably don’t typically play games. So today I present a short list of games that are accessible and enjoyable to gamers and non-gamers alike.
Here are the criteria that a game needs to meet to make it into today’s article:
- Easy to learn (Can teach in under 5 minutes)
- Easy to play (Decisions are relatively simple)
- Under an hour (Sorry Uwe, your games are awesome, but not accessible for family get-togethers)
With those simple criteria in mind here are my top five board games that you can play with your family this holiday weekend:
#5) HANABI
Disclaimer: I have not played Hanabi. But Hanabi is a fireworks game in a small box that seems like it would fit the criteria above. Here is a video by Tom Vasel showing how it’s played:
This game looks like a really fun game to try out with your family. And since fireworks are so appropriate for the Fourth of July weekend I just had to add it to the list.
#4) CARCASSONNE
 Here’s how I teach Carcassonne: Take a tile and lay it down.
This game is so simple from a mechanics perspective and yet their is so much depth in your decision of where and how to place the tile and then whether or not to put a meeple on it. That’s what I love about games like this: simple mechanics with deep strategy.
With just the base game this one definitely can appeal to non-gamers. Add in the Inns and Cathedrals expansion and it adds some depth. My favorite expansion is Traders and Builders where you’ve got wheat, beer barrels, and Fruit by the Foot to gather up for more points.
This game is just such an easy game to teach and play that I love to bring it along to family gatherings.
#3) STONE AGE
This one probably goes beyond the 5 minute teaching rule, but it’s simple enough that I like to bring it along. People really seem to like the cave-man theme. I like this game because there is some fun, deep strategy. Here’s a look at the components in the game:

If you really want to spruce it up try visiting the Mating Hut!
This game can give non-gamers a little bit of component overload. But teaching them how simple it is to play will get them going in no time. As a bonus, have them smell the cup. If you own the game, you’ll understand!
#2) KINGDOM BUILDER
 Our founding fathers were building a kingdom (of sorts) when they signed the Declaration of Indepence, so what better weekend to try this game with your family?
Kingdom Builder is another game that is really easy to teach and play. On your turn you basically place three settlements on the board. Based on where you place them you may or may not have earned points (which get scored at the end). If you place a settlement by a special location then you have earned an ability which can help you the rest of the game. This game has a rulebook that is easy to follow and is quick to learn. I also like the cool boards in the game and the replayability (I know some people won’t agree with me on that… oh well). I’ve probably played it 30 times and it hasn’t gotten old to me, though owning the Nomads expansion helps.
#1) TICKET TO RIDE
No Settlers of Catan here. That game doesn’t meet the simple to learn criteria. Ticket to Ride does meet the criteria. It is so simple to setup, teach, and play. On your turn you can do one of three things:
- Draw train car cards
- Claim a route by placing trains
- Draw destination tickets
That means the game moves along pretty quickly. And this game is a lot of fun. Players work toward connecting their routes. The inevitable blocked route will occur and someone may get a little grumpy. But the bottom line is that this game is so easy to introduce to non-gamer family members that you might just convert them into a gamer!
Here’s a video from CoolStuffInc.com describing the game:
…
So there’s my round-up of the best games to play with your non-gamer friends and family this holiday weekend!
But… what about YARD GAMES? I don’t want to be stuck indoors during the beautiful summer weather! Okay. Here’s a quick list of four fun yard games to play with your friends and family this holiday weekend:
#4 BOCCE
 Grab that palino and huck it! The palino is the name of the small white ball. One player tosses the palino and then players take turns bowling, tossing, chucking, heaving their bocce balls toward the palino. The players closest to the palino score points. This game also provides a fun way to give people a tour of your yard. If your yard is weedy and gross, maybe skip Bocce.
#3 LADDERS
Growing in popularity, this fun tossing game involves players throwing strings with balls on the ends at makeshift ladders, usually made from PVC. Players score points based on which rung of the ladder the string and balls land on. You can build yourself a set of this pretty easily. But if you choose to drill through golf balls, don’t smell the burnt plastic inside. I almost passed out by doing that!
#2 CORNHOLE / BEAN BAG TOSS
Another tossing game. This time you are throwing a bean bag into a hole. Players take turns lofting a bean bag through the air trying to get it to fall through the hole in the board. Here is a particularly striking and appropriate version of Cornhole:

#1 KUBB

If you squint it looks like a monster with a serious underbite!
We have the Vikings to thank for this game. Apparently they were into tossing things as well. Weird how all these outdoor games involve throwing things. Perhaps I should have added Croquet to the list to mix it up a bit.
Kubb is a game where you throw batons at chunks of wood. Your objective is to knock down all of your opponent’s kubbs and then knock over the king. This game is a lot of fun because of the ability to stack the kubbs when they’re knocked over. It takes a while to play, but time with family is always worth it, right? Just ask your crazy uncle!
Here’s a nice boring video about the game:
Looks pretty awesome, huh?
HONORABLE MENTION: Hammerschlagen
…
Thanks for reading! I hope that you get in some nice quality gaming with your non-gamer family and friends this holiday!
The Benefits of Pretty Prototypes
Today I’m presenting you my rebuttal for an article posted on Example of Play on May 30th. Here’s the link:
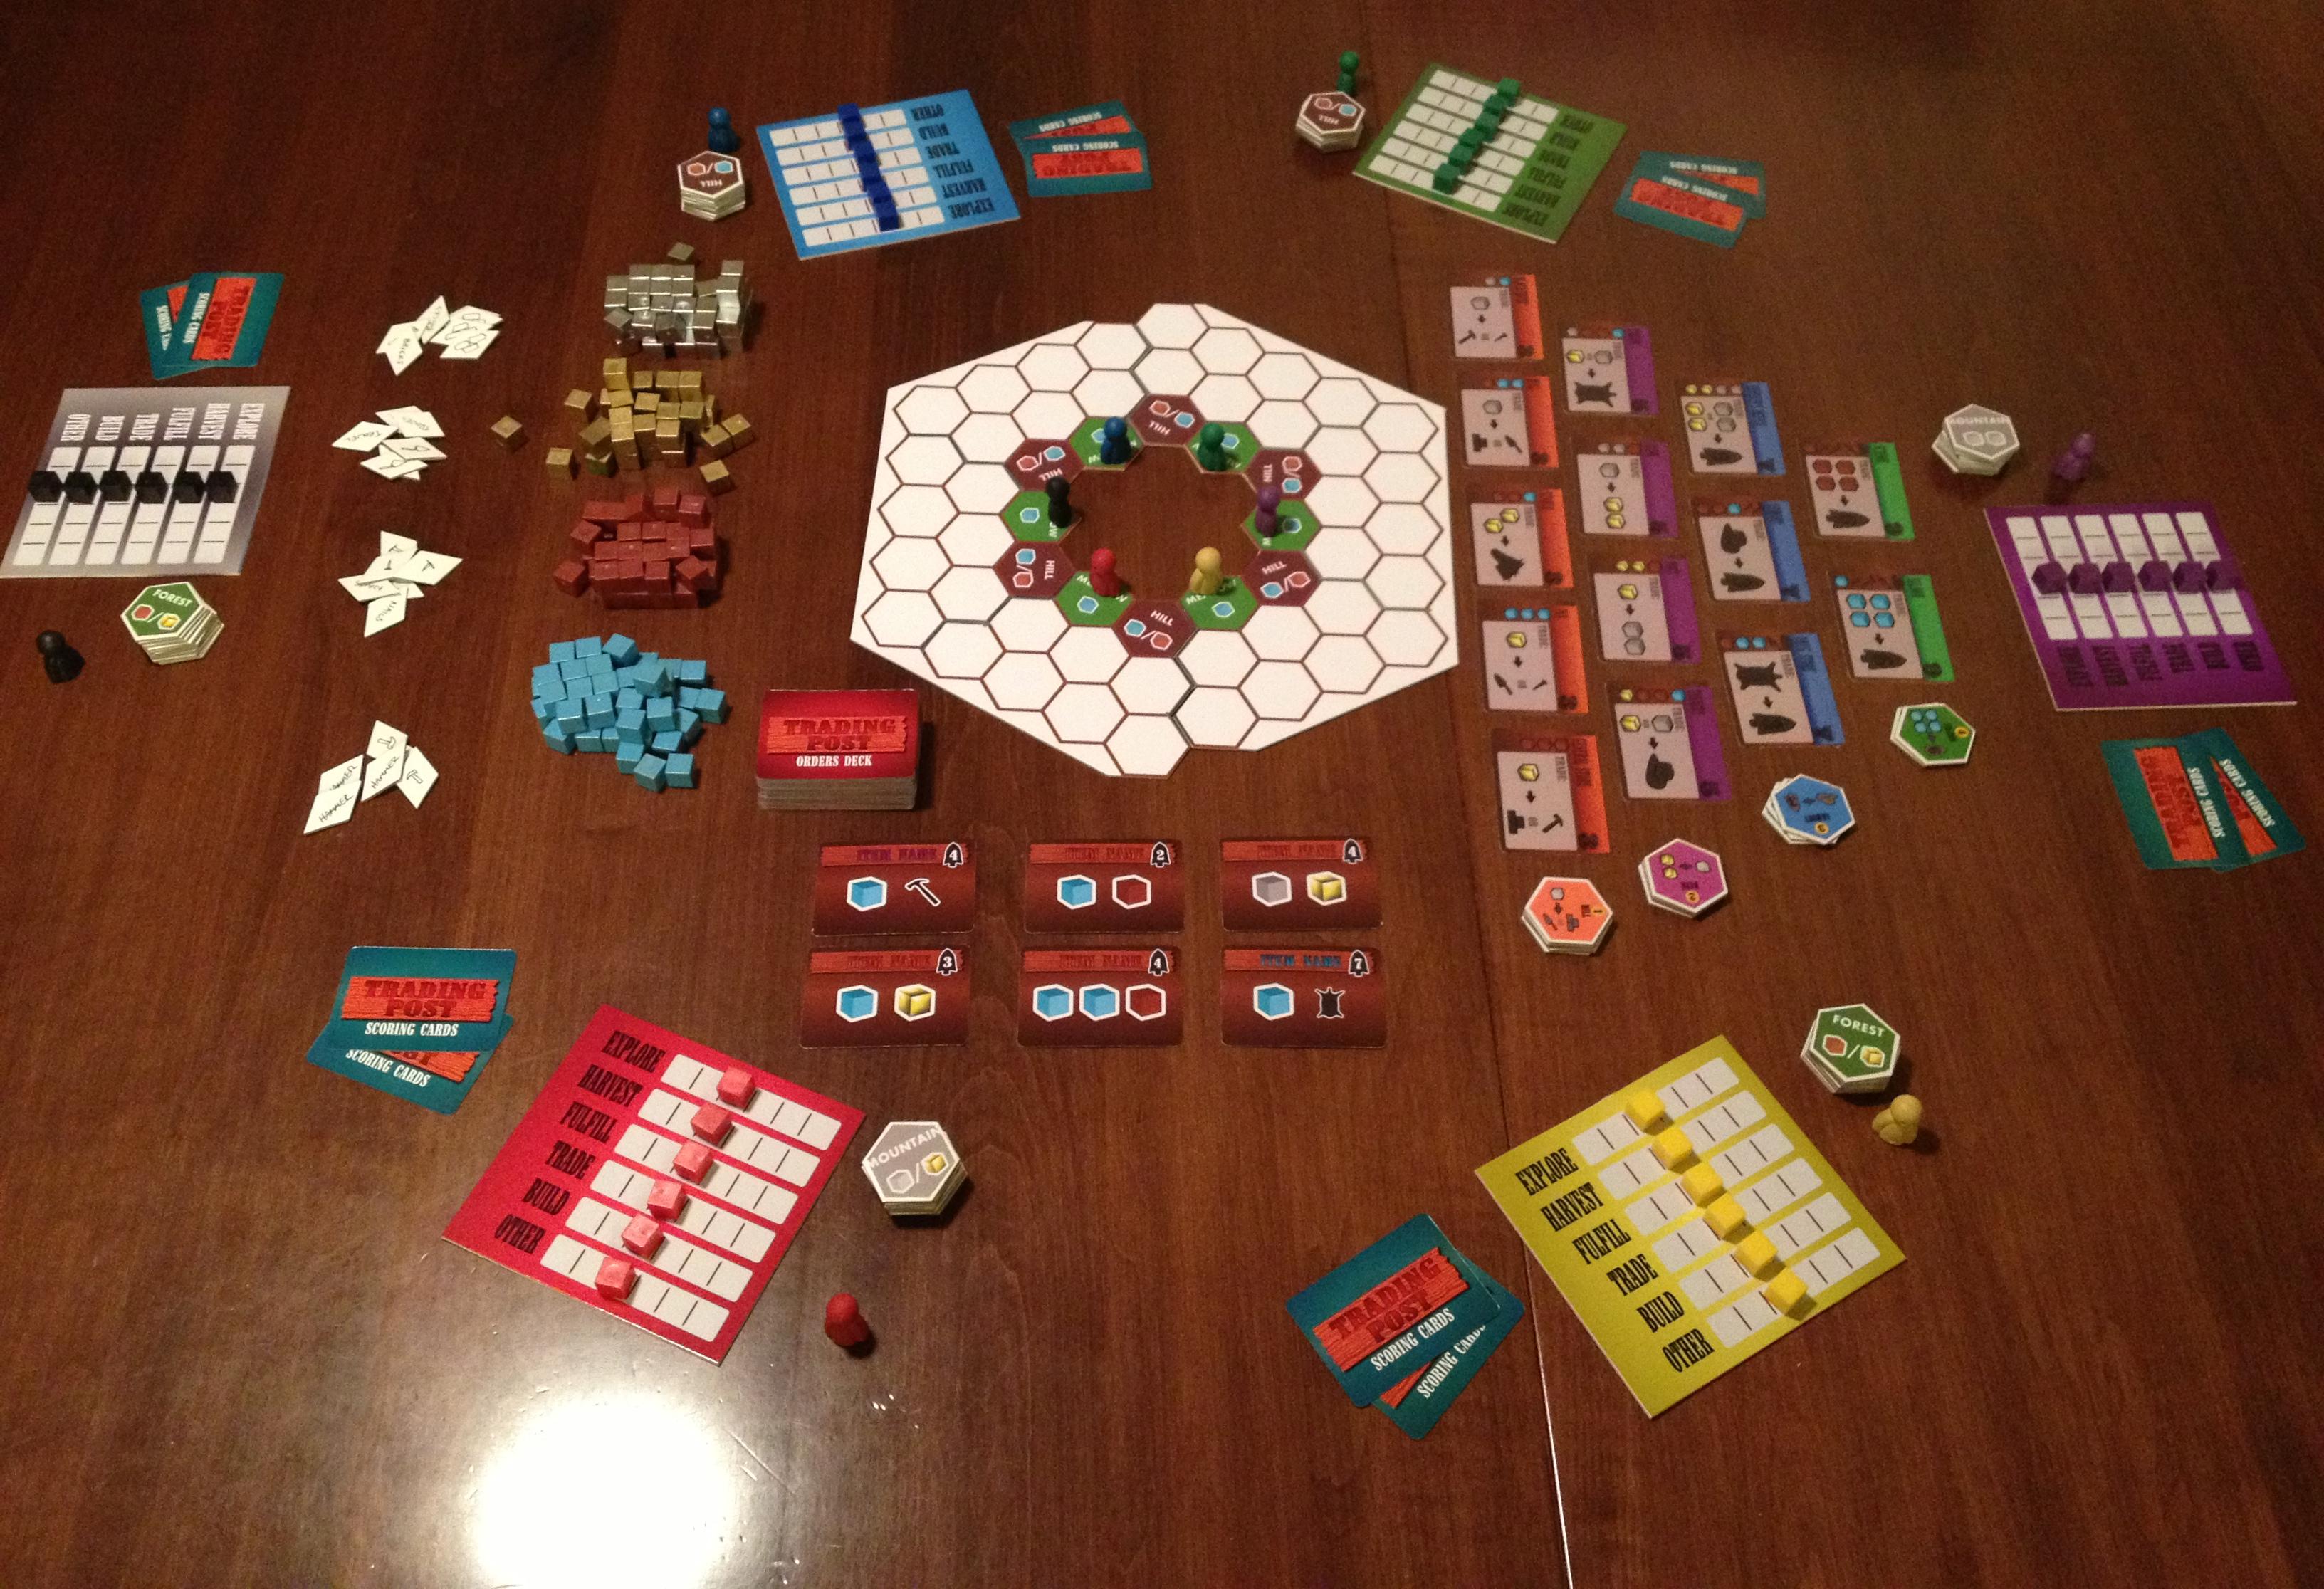
It’s an interesting article and I am currently at the prototype phase with Trading Post. So now’s as good a time as ever to post my rebuttal. I’m a big fan of the visual aesthetic of quality prototypes versus handwritten game designs on 8.5×11 sheets of paper. It’s worth the effort to me to make a quality prototype. Let’s get started…
The BEST possible prototype is an amazing looking prototype.

Prototype Cards for Trading Post and Scoville
Maybe. It’s all about perspective and approach.
When designing a board game you will have to create something physical to test the game. There are many approaches to this but here are the two genres that your prototype will likely fit into:
- Use pencil/pen/colored pencils/markers.
- Use art creation software and a printer.
These aren’t the only options, of course, but they are the basis for today’s rebuttal of that article.
It Can Be Worth the Effort to Make Nice Prototypes.
So there you are, sitting at Protospiel or an UnPub event. You’ve got your prototype on the table. It’s got a few poker chips for money. You’ve got an 8.5×11 piece of paper that has folds and creases. It’s covered with a few chicken scratches of notes, but still it serves as the game board. And you’ve got sleeved cards covered in Sharpie. Your table is empty. You glance at the exceedingly full table next to you to see what’s going on. On that table is a glowing, beautifully rendered, full art prototype on thick matte board with quality printed cards and an aesthetic that draws you in.
Uh oh.
Think of it like this. If you were an attender of Protospiel or UnPub and were looking for games to play, would you be more drawn to the nice fancy artwork where you can tell the designer put a lot of effort into his or her product? Or would you be more drawn to the 8.5×11 with Sharpie notes and no art?
One of the reasons I think Scoville had some of the buzz that it did after Protospiel-Milwaukee was due to the quality of the prototype. Several people commented on the thick, quality feel of the Orders and Recipes in the game. Others asked how I made the components. The point is that I put in a little extra effort to make things seem more like a real game rather than a prototype.
What Should Be the Focus of Your Playtester?
Let’s examine the same scenario as above. So someone sits down at your table, with your 8.5×11 covered in Sharpie. You think you’ve got a decent game here. So you teach them how to play and after a few rounds, when you believe things should really be taking off, you notice a look of confusion on their face.
Let’s get into their head a little bit. As that player you are trying to enter into whichever world the designer has built for you. Part of playing games is about stepping into a different world for a while. In this case you don’t know what world you’re entering because there is no theme and no artwork. This 8.5×11 with Sharpie thing has you in a mental police chase to try and figure out how things work in this game.
Your mind has lost it’s focus. You are staring at a white sheet of paper while trying to put yourself in some other world. Where will your focus be? I imagine it would be difficult to make the game your focus.
Let’s think of another example. It’s 1910 in Manhattan and you need a cab. You’re waiting in the rain watching for a cab to roll by. Whoops, one just drove by, but it looked just like a normal car. Aye. Wait, what’s this? A Yellow Cab? That sure was easy to spot. So you hop aboard the yellow cab and they take you on your way. And not surprisingly, you leave a nice little tip for the driver because he was so easy to spot.
Board game prototypes are the same. As I saw at Protospiel-Milwaukee and as evidenced by the plethora of games on Kickstarter alone, there are a lot of people designing games. Your game should have appropriate enough artwork to be able to draw in players, build buzz, get your name out there, and perhaps earn a publisher’s eye. I wouldn’t expect to get anywhere with my designs if they looked very poorly made.
Are You Willing To Change Things?
One of the problems with building a high quality prototype is that it can be difficult or cumbersome to make changes. With Scoville I just about wore out my rotary cutter. Every time I made some changes I’d have to print out new components and cut them and mount them to matte board.
One way around this issue is that when you make your original prototype, go ahead and make some blank components. That way you’ve got pieces that you can write on as placeholders until you’re ready to make a complete new version.
The article that I linked above discussed a card that the designers were unwilling to change for a long time. The point they made was that if you are unwilling to change it, it’s not a prototype. In their case they had an elegant card with full artwork.
I totally agree with their sentiment. And in the situation where you are unwilling to change a component then you might as well put full art on it.
Don’t Get Too Attached!
Another point of the article was that the designer expended a lot of effort to make a nice quad-fold board and then began to consider player tableaus rather than the nicely crafted board.
While I enjoy the quality feel of the components in my prototypes, I don’t let myself get attached to them. So what if I spent three hours designing a deck of cards and paid $10 to have the deck made at The Game Crafter. If the game is terrible with those cards then I have to be willing to get rid of them.
So that brings us to our balancing act of the show. There is a balance between the effort you put into making a quality prototype and the usefulness of that prototype. If you are solo testing there is absolutely nothing wrong with the 8.5×11 with Sharpie approach. If you are having friends over to try out a new game design there is nothing wrong with that approach either. If you are attending a convention and you are seeking valuable feedback, then please don’t go with the 8.5×11 approach. Put in some effort and make it look nice. Then after the convention when you apply that feedback, be willing to throw away your original quality prototype.
Why Awesome Prototypes are Better
If you’ve put in some effort and realize that you’ve made a quality prototype that you aren’t ashamed to show off then here are a few points to consider:
- You can believe that players will feel immersed in your game, and feedback will represent that.
- You will have built a prototype that you would be happy to send off if a publisher requests it.
- People are conventions will be more willing to playtest your game than the ugly 8.5×11 game at the next table.
- You will be honored as a great human being and a plaque with your image will be mounted at the Board Game Prototypers Hall of Fame!
Okay, maybe not that last one.
The bottom line is that, depending where you are in the design process, it may be time to make a nice, high quality prototype.
To Sum:
Spend a little effort and make things look nice so that you are the one that draws a crowd!
High Quality Prototype of an Untested game!
