*This is a guest post by my Level 1 friend Jeremy Van Maanen (Twitter: @jeremyvanman). All text is written from his perspective. Any Editor’s notes are in italics.
One of my hobbies that I enjoy as much as board games is woodworking and a couple of years ago I started seeing some games that could also become woodworking projects. The one that was most interesting to me was Crokinole. Crokinole is a dexterity game of flicking discs to remove your opponents discs from the board and/or score by getting in the center hole or as close as possible. Crokinole has its roots in Canada and even has world championships. I finally decided to build a board at GenCon 13 after playing a game of Crokinole at the Mayday Games booth. If you check out the links below, you’ll see that nothing I did is completely original but it was a good project anyway.
I started by gathering information and plans on what others had done and made my own plans that suited what I wanted in a board and the tools I owned. Here are some resources I used to create my plan:
- Crokinole World: Making a Crokinole Board
- Woodgears: Crokinole Board Plans
- The Game Ranch: Making a Crokinole Board
- Instructables: Build a Crokinole Board
I decided to create a board with an octagonal base instead of circular because I thought the rail would be easier to make. I also decided to use ½” maple plywood for the board and the base because I already had some in my wood pile and solid maple for the rails because I also had that on hand. I bought a new sheet of maple plywood as well because I didn’t have a big enough piece to get a 26” diameter circle. The other decision I made was to cut enough pieces for two boards. This decision was mainly driven by the fact that I could get two 26” boards out of a half sheet (4’x4’) of plywood and since I was going through the work anyway, I thought it made sense. This write-up will be about my first board and at the end I’ll list what I plan to do differently on my second board.
Below are the parts, tools, and rough dimensions of my components. I say rough dimensions because it’s always better to measure the components against each other instead of independently cutting pieces to a certain dimension (I’ll give examples of what I mean below).
PARTS:
- Half-sheet of ½” maple plywood
- 15 board feet of hard maple
- Clear vinyl tube – ¼” inner diameter, 3/8” outer diameter
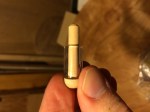
- Wood pegs – I found mine labled as toy wooden axles.
- Wood glue
- Polyurethane
- Paint
- Car wax (carnauba wax)
- Other scraps of wood for jigs, support, cauls, etc.
TOOLS:
- Table saw
- Jig saw
- Miter saw
- Drill
- 1 3/8” Forsner drill bit
- Drill bit that matches the diameter of the wooden pegs
- Orbital sander
- Sand paper
- Beam compass – or a piece of wood with a nail in one end
- Clamps
- Tape measure
- Paint brush / foam brush
- Rags for wiping excess glue
With the plan in place I got started by rough cutting the circle for the board. I created a beam compass by taking a scrap of wood, putting a nail in one end and drilled a hole 13 inches away from the nail. I borrowed a jig saw from Ed to rough cut the circles.
*What follows is a picture gallery walking us through Jeremy’s building process.
-

- Rail Sections
-

- Base Sections
-
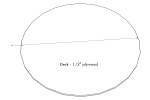
- Deck
-

- My starting board. I cut two circles from this board.
-

- Homemade compass for the large diameter of the deck.
-

- Two rough cuts to separate the boards.
-
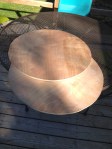
- Two rough cut decks.
-

- One thing I learned after cutting the first circle is to give a wider birth to my guide line. The top layer of the plywood splinters easily when cutting across the grain.
-

- I next went to my table saw and put the nail in the center of my board in into a piece of scrap wood.
-

- I then raised my saw blade as high as it would go and aligned the scrap board so that the nail was perpendicular to the leading edge of the blade. Then I turned on the saw and slowly rotated the deck through the blade. This was the first time I had tried something like this and I think it turned out really well.
-

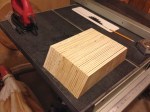
- With the deck squared away I moved on the base. For miters I like to leave the blade in place and flip the wood so the angles are always complimentary. I also clamped a piece of wood to the right of the saw as a fence.

-

- With all the base pieces cut I moved on to the rail.
-
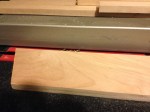
- After cutting the rails to width I used my dado blade to cut a rabbet in the bottom inside edge of the rail.
-
- This is not necessary but I wanted this to make the joint between the rail and base look cleaner.
-

- In the intro I mentioned using the dimensions of pieces to measure other pieces. Here is an example where it’s simpler to use the depth of the base instead of some other tool to measure the depth of the rabbet.
-

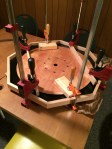
- At this point I had all of the components cut and was ready to begin assembly. One sign of a good woodworking project in my book is that it requires me to buy a new tool. For this project I bought a band clamp to glue up the base.
-

- It worked really well and is a very versatile clamp to have if you don’t already own one. I had a couple of friends help with the glue up because there were 8 seams to glue and align and it made it a lot easier to have some help watching all the parts. I put the base on wood scraps with paper beneath the seams to catch extra glue.
-

- Next I added the rails with more glue. Again I measured the length of the rails by measuring them against the base. I started by cutting the miter on one end of the rail, held it against the base, and marked the other end and cut, and then glued and clamped. I continued this method around the base.
-

- After I completed this I switched back to the deck. I sanded the top, bottom, and edge. Then I applied 3 coats of poly to the top of the deck, sanding lightly between coats. Then I used another beam compass with a Sharpie taped to it at the right distances to draw the circles. I added the circles on top of a couple coats of poly so the line wouldn’t bleed on the bare wood. After I finished the lines I added two more coats of poly and sanded the final coat smooth.
-
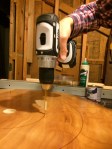
- I used my drill to drill the center hole and post holes. I should note that even if you own a drill press you will probably need to drill these by hand because most drill presses don’t have the swing (reach) for these holes. I started each hole with a nail hole to help the bit start in the right spot. I let the drill run very slowly at first so the top edge of the hole would be clean and I wouldn’t have to clean up frayed plywood.
-
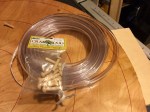
- After the holes were cut I applied a coat of car wax to make the deck slippery so the discs would glide well. Then I got my vinyl tubing at Home Depot and the posts at a craft shop for the next step.
-

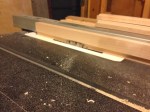
- I tried cutting the tubing with a side cutters but I didn’t like that I couldn’t make the pieces the same length or with a square cut reliably. So I made a jig by drilling a 3/8” hole into the end of a board with the depth that I wanted each piece to be. Then I used a razor blade to cut along the edge of the board.
-
- The results weren’t perfect, but pretty good.
-
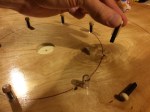
- Next I used a black sharpie to color the shafts of the posts black (just because I thought it might look good) and then glued the posts in the deck with the vinyl on.
-

- The end was finally in sight. Next I painted the ditch (the exposed area of the base between the deck and rail), the back of the deck, the edge of the deck, and the center hole black. I left exposed wood on the back of the deck and the base so the glue would adhere well when attaching the deck to the base.
-

- The back of the deck.
-
- The penultimate step was to attach the deck to the base. I took some care to center and align the deck before applying the clamps. I used cauls to protect the deck and avoid damaging the rails.
-

- The last step was to play!
Costs: Around $70? It can vary based on how many of the supplies and tools you have and the deal you can get on your wood, but I’d estimate $30 for the plywood and another $40 for the maple. Add more money for the other supplies you don’t already own.
Time: This is hard to quantify. I started the project at the end of the summer and it sat for several months between steps. I’d guess I put around 30 hours into this board – though that includes planning and figuring things out. I would guess my next board would go much faster since I already have the pieces cut and a good idea of how to construct it. If you don’t enjoy woodworking I would not suggest this project – or I’d suggest a simplified version of it. I enjoyed the time I put into it so I ended up putting in extra time to make it the way I wanted it.
What would I do differently next time? I’d paint the base before attaching the rails. I’d also like to try adding graphics or art to the board.
*Jeremy had originally planned an awesome map of Middle Earth for his board. That would have been amazing!
I had a great time making my board and I really enjoy the game as well. If Crokinole looks cool to you and you like woodworking – or want to get into woodworking – I recommend giving this project a try. There are a number of ways you could make this simpler or more complex to suit your ability and resources. You could make a board simply by taking a flat square piece of wood, adding the lines, pegs, center hole, and finish. On the other end of the spectrum you could try making a round base and rail and adding graphics to the board (which I plan to try next). Either way, it’s a good way to build some woodworking skill and end up with a great game.
***
Thanks, Jeremy, for supplying the article and the images. You did a great job building the test board and I’m looking forward to seeing your next improved version!

Pingback: Today in Board Games Issue #147 - Dark Horse Giveaway! Russian Railroads - Today in Board Games