Blog Archives
Game Design: Starter Prototyping Tools
I recently asked myself the following question: “If I were to start over with game design, which prototyping tools would I buy to get started?” I’ve made numerous prototypes and I’ve learned what to do and what not to do. So today I present a set of prototyping tools to help get you started as a game designer.
When I got started out I didn’t want to throw a lot of money at prototypes. This was because I had no idea if the prototypes would ever actually go anywhere. I was fortunate to have a wife who used to do physical scrapbooking. So I had some tools available to me that wouldn’t have otherwise been available.
Never-the-less, there are some key tools and resources that I think every game designer can utilize to make high quality prototypes at low(ish) cost and with relative ease. For the sake of this article I will assume that you can print on photo paper (I recommend Kodak 8.5×11 – 100 sheets).
Game Prototyping Resources
First, let’s cover where to get some basic resource type things. These are my go-to retailers for these items:
- CUBES: 1,000 1cm cubes from EAI Education for $16.95
- MEEPLES: Avatar pawns from TheGameCrafter.com for $0.15 each
- DICE: Buy a set of Tenzi dice! (Or search Amazon or eBay)
- CARDS: Blank Cards – Different Sizes – from TheGameCrafter.com
Game Prototyping Tools
Things that are not mentioned above include boards, tiles, tokens, reference sheets, rulebooks, and more. I generally use the same process to make all of those except a rulebook. I don’t typically make a rulebook.
To make my prototype components feel like high quality I purchase the following materials:
- Matte board remnants from Hobby Lobby for super cheap. You can get a stack of about 25 12″x12″ matte boards for about $6.
- Kodak Photo Paper (100 sheets for ~ $15)
- Non-OEM ink for my inkjet printer via eBay. (I bought 5 full sets of ink cartridges for ~$20)
- Glue Sticks – you’ll want to keep several on hand.
I often create artwork and then print it on the photo paper. I glue it down to the matte board. Then I break out my most highly recommended tool: The Rotary Cutter!
The Rotary Cutter

Easily worth the cost!
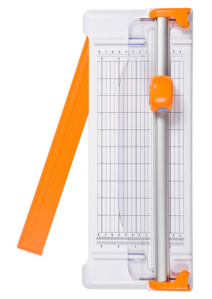
This has been my most-used tool for creating game prototypes.
I have a Fiskars rotary cutter similar to the one shown in the picture. You can buy it here:
It isn’t the best cutter. You can pay a lot more money for better cutters. But it does exactly what I need it to do for my prototypes. Other cutter options include:
There are more options than those, so if you don’t like those options feel free to do more thorough searching.
I use this tool to cut out the components that have been printed and glued to the matter board. This cutter works well enough for that.
Punches

Great for cardstock chits!
Other great tools for designers are punches. These are used to quickly create tokens and chits. When I create tokens and chits I usually prefer printing the artwork onto thicker stock paper so they are more rigid. 90lb or 100lb paper is usually a good weight.
There are a plethora of different punches out there, but for the sake of board games you’ll most likely be interested in circle and hex punches and corner rounders. Here are some options.
- Fiskars Squeeze Punches
- Fiskars Lever Punches
- Fiskars Corner Rounders
- List of Punches on Scrapbook.com
As before, go ahead and do some more searching to find the right product for you.
Sharpies

I am firmly in the Sharpie camp. I love them. They are bold, colorful, and extremely useful. Sharpies can be used to create prototype components rapidly, especially in the case where you own blank cards because you took my recommendation above.
By having a variety of Sharpies you become an unstoppable force of game design awesomeness!
I use them to create prototypes. I use them to mark up my prototypes. I use them to revise my prototypes. I use them to draw silly pictures for my kids.
Seriously, Sharpies are fantastic. I feel they are a must-have for any game designer, if for no other reason than to be able to practice your signature for the time when lovers of your games will ask for your autograph for their game box!

I feel like this article needs more tools in it, but those are the only tools I utilize on a regular basis. Are there prototyping tools that you use regularly? Post a comment and let everyone know which prototyping tools you prefer!
Prototyping Tools of the Trade
One topic that seems to come up a lot is how to make board game prototypes. I’m not talking about coming up with a design. I’m talking about physically creating prototype game components. Game designers are constantly trying to make their components so that they can get right to the playtesting phase of game design.
Today I want to discuss the tools I use to create my prototypes. At this point you should already have your prototype artwork created if you’re going to be printing anything. Let’s assume it’s already been printed. Now it’s time to make it awesome!
Chits…
One common component that is particularly easy to make for prototypes are chits. These are typically just printed artwork glued onto matte board. But matte board can prove to be difficult to cut.
There’s two ways that I’ll cut my chits out of the matte board.
- Straight edge and utility or X-acto knife (not ideal)
- Rotary cutter (ideal)
What we are doing here is separating the chits from one another. When creating your artwork you should line up the edges of the components so that you only need to make one cut between them.
This will help you keep your fingertips!
The straight edge and knife approach is definitely NOT my approved method and I would never recommend it. However, a lot of people use that approach so I needed to mention it. One recommendation is to use a safety straightedge like the one shown here. You only have 10 fingertips so why not spend a few extra dollars and get a straightedge like this and make sure to not lose any fingertips!
I don’t like this method for a few reasons. The first is that you need a cutting mat to go underneath so you don’t scratch your table. The second is that the blade doesn’t always stay straight as you are cutting the matte board. And that can be really annoying.

Just get this thing instead!
My preferred method is to use a rotary cutter like this Fiskars 12″ Scrapbooking version. It is super easy to use, relatively cheap (especially compared to the $40 safety straightedge), and very reliable. And since most of us don’t have printers that print on anything other than 8.5×11 paper anyway, the 12″ Fiskars tool is perfect!
So I will print my prototype artwork on photo paper, adhere it to matte board, and then cut out the individual components using the rotary cutter. Just a heads up when using matte board though: you’ll likely have to roll the cutter back and forth a few times to cut all the way through. That’s still an easier process than trying to run a blade along the straightedge.
On the topic of matte board, I recently went to Hobby Lobby and purchase two huge packs of “matboard” for $6 each. I got a pack of 12″x12″ and a pack of 11″x14″. These are so cheap that I almost felt like I was stealing. They are just the leftovers from the framing department that were cut out from the boards used to mat pictures/paintings for customers. What a great way for Hobby Lobby to reduce their waste and provide a useful product. Here’s what I got for $12:
The other key tool of my trade is a glue stick. Some people will use standard glue, some will use spray adhesive. I prefer the glue stick to standard glue since it is simple to apply evenly. This is very helpful when trying to make sure that your components are completely glued down.
Now you know a great method for producing chits. If possible, keep them as rectangles rather than circles of hexes. But since we’re on the topic of circles and hexes let’s move on to another excellent tool…
Punches…
There are times when you don’t want rectangular components. Perhaps your game is a map building game with hex tiles. Or perhaps you require special discs for your game. If that’s the case, then I strongly urge you consider purchasing a punch.

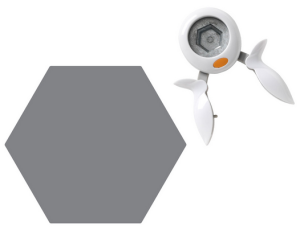
The hex punches from Fiskars work great!
One thing to keep in mind when purchasing a punch is how thick of paper/board are you wanting to punch. Often these sorts of punches are used by scrapbookers who are only punching paper. That means they may not be able to punch through matte board. Sometimes you can only find out after you’ve bought the punch. Bummer.
Here are some recommendations, keeping in mind that I don’t know specifically how thick they can punch. OR you can just do a search for “hobby punch” and find one you’d like.
- Fiskars Squeeze Hex Punches
- Creative Memories Punches
- Older Creative Memories Hex Punches on eBay
- And don’t forget the Corner Rounder punch which can be helpful for cards that are printed on nice canvas/linen finish paper.
These can come in really handy. I use a circle punch when creating prototype coins. I have used a hex punch to create stickers for hex tiles. And here is my little tip for punching, which I mentioned in a prototyping article a long while back, but which is worth repeating.
When punching, flip the punch over so you can visually align the part that you want cut.
So now you’ve got the tools to cut out chits and punch out little bits of awesomeness! What about cards?
Sleeves…
Many game designers come across the need for cards in their game designs. I have made cards numerous times. Early on I would buy 60lb. paper and just cut out rectangles. But there is a problem with that. The edges of the rectangles can be slightly bent from cutting, which leads to great difficulty in shuffling the cards.

Mayday sleeves are convenient and cost effective!
The way to prevent that while also protecting the cards is to purchase card sleeves. These inexpensive beauties will be a little lifesaver by removing anguish from your prototypes. Plus, you can get awesome one’s like the one shown here with a kitten running through a field!
If you want a good go-to source for sleeves then look no further than Mayday Games. Here is a series of links to the sizes you may be looking for:
- Euro Cards (59×92 mm)
- Mini Euro Cards (45×68 mm)
- Card Game (63.5×88 mm)
- Standard USA Cards (56×87 mm)
- Magnum Ultra Fit for 7-Wonders (65×100 mm)
Those should offer some help. They definitely help with being able to shuffle your cards. The only downside is that when stacked they can be really slippery and your stack may tumble over.
Speaking of tumbling…
Dice…
Sometimes it becomes necessary for a game designer to create their own set of dice. Sure, you could always just make a cheat-sheet conversion table, but that can be a huge burden for your playtesters who would constantly have to recheck the sheet. So one of the tools of the trade is to purchase blank, sticker-able dice.

Just think of the potential here!
Look no further than Indented Blank Dice. The best part of their site is that they have labels that you can purchase and print on rather than having to buy blank label paper and try to cut/punch out your own labels and then peel them off.
Don’t buy blank label paper. Don’t cut/punch out stickers. Don’t try to peel them.
Just buy the sticker label paper and save yourself from the frustration.
So this concludes my little article about Prototyping Tools of the Trade. Next week I will be posting a follow-up article on Sourcing Components for Prototyping. It will cover where to purchase boards, bits, and more. So stay tuned!

