Blog Archives
Prototype Art: Cubes in Inkscape
Inkscape Logo of Squidy Awesomeness
There are a lot of you out there who are working on board game prototypes. Often those prototypes will utilize the ever popular cube. And that usually results in the cube being placed onto graphics such as cards or tiles or the board itself and then later on, in the rulebook. So today I wanted to give you a quick tutorial to show you how I make a cube for board game graphics using Inkscape.
You can create your own set of awesome looking Scalable Vector Graphics versions of cubes using the free Inkscape software. If you don’t have the software, you can download it from their website: inkscape.org.
Let’s Get Cubing!
Once you’ve downloaded and opened Inkscape you’ll see a plain canvas outlined in front of you. I like to leave it turned on, but you can turn off the “edges” if you visit the document properties under “File.”
What we are going to do first is click on the “Create 3D Boxes” icon on the left. Here is a picture showing what this should look like:
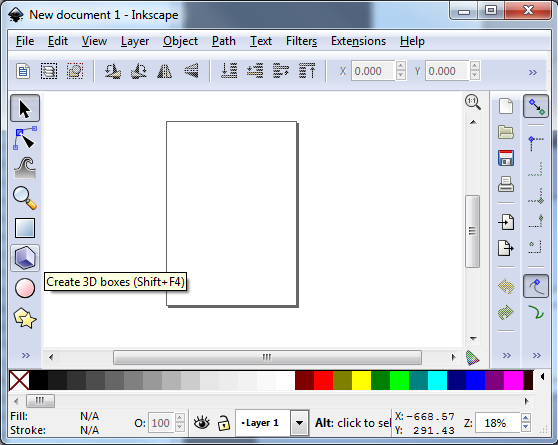
There… on the left… the icon that game designers love!
Click on the icon. Then click and drag within the framed region to create a generic box. It should look something like this:
Great! You’re doing it!
You can see we’ve created a generic gray box. Now it’s time to make it look like a cube of awesomeness that you would be proud to include in your board game graphics!
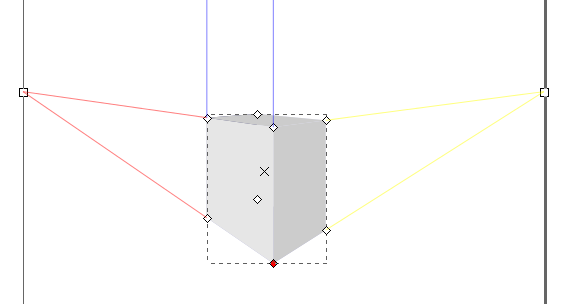
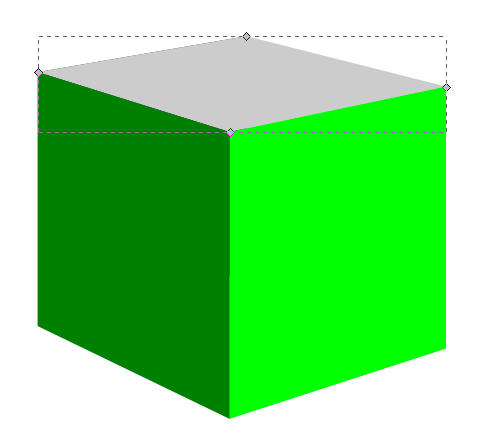
So the next thing you should do is “shape” the box to look like a cube. This can be done by clicking and dragging the little diamonds on the corners of the generic box. Go ahead and try it out. Once you’ve dragged then to the positions of your liking then you might end up with something like this:
Our cube of awesomeness is started to be awesome!
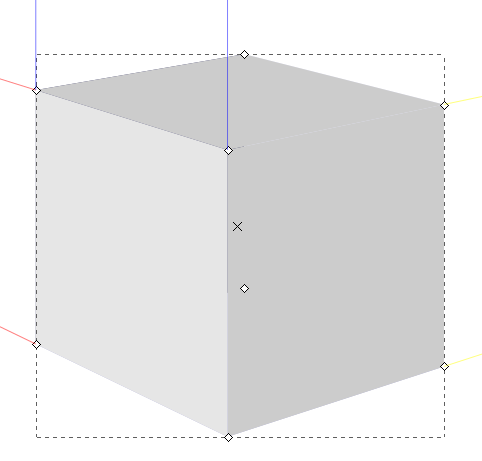
Assuming you’re pleased with the shape of you cube it’s then time to make it look good. Normally you can just click on an object using the “Select and Transform” icon (it’s the black arrow on the left). Once you’ve selected the “Select and Transform” icon, click on the cube. Then you can change the color by selecting any color from the color row at the bottom of Inkscape. But that’s not the way I do it. Why? Because you end up with a flat monotone cube of ugliness rather than a sweet cube of awesomeness. Here’s what it might look like:
Our awesome turned ugly. Let’s fix that!
Don’t be afraid! We can transform that cube from ugly to awesome in just a few easy steps! First, we’ll want to use the “Edit paths by node” tool, which is right below the “Select and Transform” icon. This one looks like a quarter of a circle, with three nodes, and a black arrow. By clicking on this icon you can then go and choose a specific face of the cube. Once you’ve selected a face of the cube you can then change its color without changing the other faces. In this next picture I have changed two of the faces and have selected the top face:
Looks like we’re back on track!
So I had selected the right face and made it a light green. Then I selected the left face and made it a dark green. Now with the top face selected I can choose its color, in this case an even lighter green. Now you should have something like this:
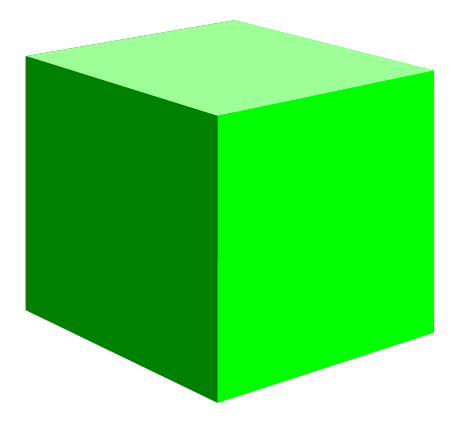
Not too shabby!
Alright!
Just a side note, if you have trouble selected the individual faces, make sure you’ve chosen the “Edit Paths by Node” tool rather than the “Select and Transform” tool.
So we’ve got a green cube with differently colored faces. What’s next? I found that sometimes the hidden faces will show through along the edges. So we can change their colors too. This is a little tricky though, so follow closely.
Go ahead and click on the left face. Then what you want to do is press the “left” arrow on your keyboard to move the face over. Don’t use your mouse to drag it since it will be almost impossible to easily put it back in the right spot. It should look something like this:
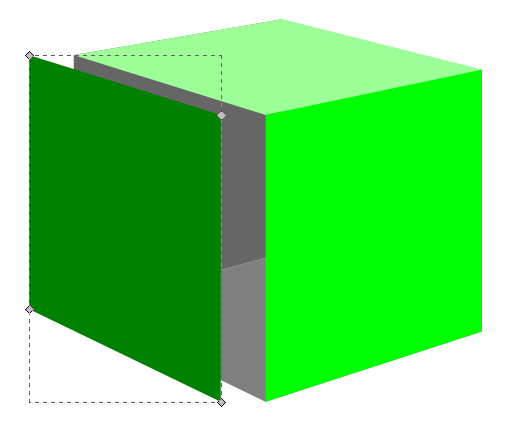
The hidden “ugly” faces show themselves!
With two of the three ugly faces exposed you can click on each one and change them to a color that matches your cube color. In this case I just choose a dark green for these two hidden faces. Then slide the moved left face back into place using your “right” arrow key. You can then move the right face or the top face to expose the third hidden side and change its color.
Now you’ve got your beautiful cube. You can call it quits right there if you want a nice simple cube. Just select the cube, click “File > Export Bitmap” and you can save it as a nice little .png file. And I also recommend saving the .svg file so that you don’t have to recreate the cube every time. But if you want to spruce it up a bit then keep reading!
Adding Awesomeness!
Sometimes cubes can look better with a border. There’s a very easy way to create one. With the cube selected click on “Filters > ABCs > Black Outline” to get something like this:

Oh boy! Things are looking good!
Pretty dec, right! (Note: dec is short for “decent,” all the cool kids know that!) Just be careful because the smaller your cube the larger the border will appear relative to the cube.
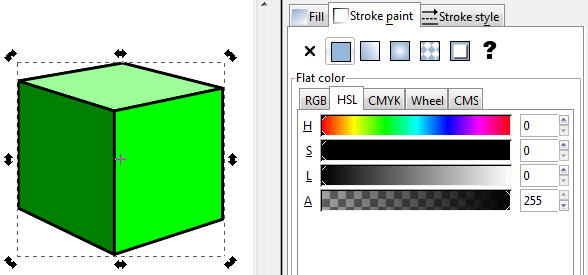
If you don’t want a black outline there are other options, but it’s slightly more complicated. With the cube selected you’ll want to click on “Object > Fill and Stroke.” That will open a panel on the right. “Fill” will color the main area of the object. “Stroke” will add a border to the object. We want to use Stroke. Taking our border-less cube and applying a simple black stroke will result in a cube like this (Note, on the Stroke Style tab you will want to choose the “Round Join” option):
Not quite as awesome as I’d hoped!
I am not a fan of the lines along each edge. It just doesn’t look that clean to me. So here’s my trick: duplicate the cube and apply a stroke to the copy in the back. To duplicate the cube make sure it is selected and then right click. On the pop up menu click “Duplicate.” This will create a duplicate directly on top of the original. Adding a stroke to the copy in back will show allow only the outside edges of the stroked cube to show past the unstroked cube. Then you can create cubes that look like this:
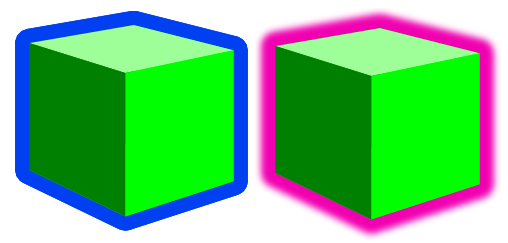
Awesomeness complete, even though these two examples look pretty ugly!
On the left is a duplicate cube with a blue stroke applied to the back copy. On the right is a duplicate cube with a blurred pink stroke applied to the back cube. One final note is that if you choose the duplicate cube option you will want to group the two together so that when moving them around you won’t have to constantly be lining them up.
Lesson Complete!
Now you know how to use Inkscape to create nice looking cubes for your board game graphics! If you are a starving artist and you have little computer skills then I have a special bonus for you. I am supplying a .svg file for all of you with a slew of cubes that you can use freely without crediting me, without paying me, and without worrying about getting sued. Feel free to use this file and the cubes wherever you want, however you want, and in whatever way you want so long as you use them for the greater good! Here is an image of the .svg file:

Go on… use this artwork freely! Make your prototypes look awesome!
To download it just click here: Google Drive > FreeUseCubesbyEdPMarriott.svg
Note, if you have trouble downloading the file from Google Drive you might want to allow third party cookies. You can read more here: http://productforums.google.com/forum/#!topic/docs/_pXrQmwkrGU . If you have further problems, please let me know!
And let me know how they work for you. Now get Cubing!
Prototyping Techniques Applied to Scoville
 While at Protospiel I heard a lot of kind words for the quality of my prototype of Scoville. So today I am sharing my prototyping process with you. I hope that it can help you make a quality prototype that you are confident about.
When I was first getting into board game design I was a little overwhelmed by what it took to make a prototype. I watched a few prototyping videos on BoardGameGeek.com. Those only made me shy away from the whole process. It can be intimidating. But today you can learn that it isn’t perhaps as daunting as you might think.
Overview of my Process
 First things first: you need a game concept. Assuming you’ve got a great idea in mind it’s time to start prototyping. Early on in my board game career I was designing a heavy Euro game. I waited to make a prototype until I had worked through all the details of the game. That was a mistake. It is my recommendation to make prototype components of your game as early as possible. For example: If you have an auction in your game, test it independently from the other mechanics. Test each mechanic individually and test them early on. There is no point to design an entire game only to find out that the individual parts don’t work.
Once the individual elements seem to work then you can try to put them all together to make a full game out of them. Here is a rule of thumb I try to follow:
Never add complications unless they are absolutely necessary.
This is a difficult thing to do. It is always easier to add another rule or add another component. But if you want to make a good game, focus on the innovative mechanic rather than all the little rules about the rest of the game. Keep it simple.
So I start with a concept. I usually write about 10 pages of notes and sketches about that concept. Then I’ll go ahead and start prototyping (this is what I’m covering today). Once I have a prototype ready then I’ll play test it at least 10 times. This will give me a solid amount of feedback. Only after testing 10 times will I apply any changes. Here’s another rule of thumb:
Don’t try to change things in the game on the fly, and don’t change more than one thing at a time.
Following this rule is critical, especially the part about changing more than one thing at a time. If you change more than one thing it can be difficult to know which of the things you changed made the game better (or worse). Change one thing at a time and test it profusely. So I apply feedback and adjust things after 10 play tests. Once the game has gone through the PROTOTYPE – PLAY TEST – APPLY FEEDBACK phase several times to the point where there are only very subtle changes then I get to the point where I am confident about contacting publishers about it. There is no point in pitching a game unless you’ve gotten it to the point where you are proud of your product and confident to show it off.
Getting Started: What do I need?
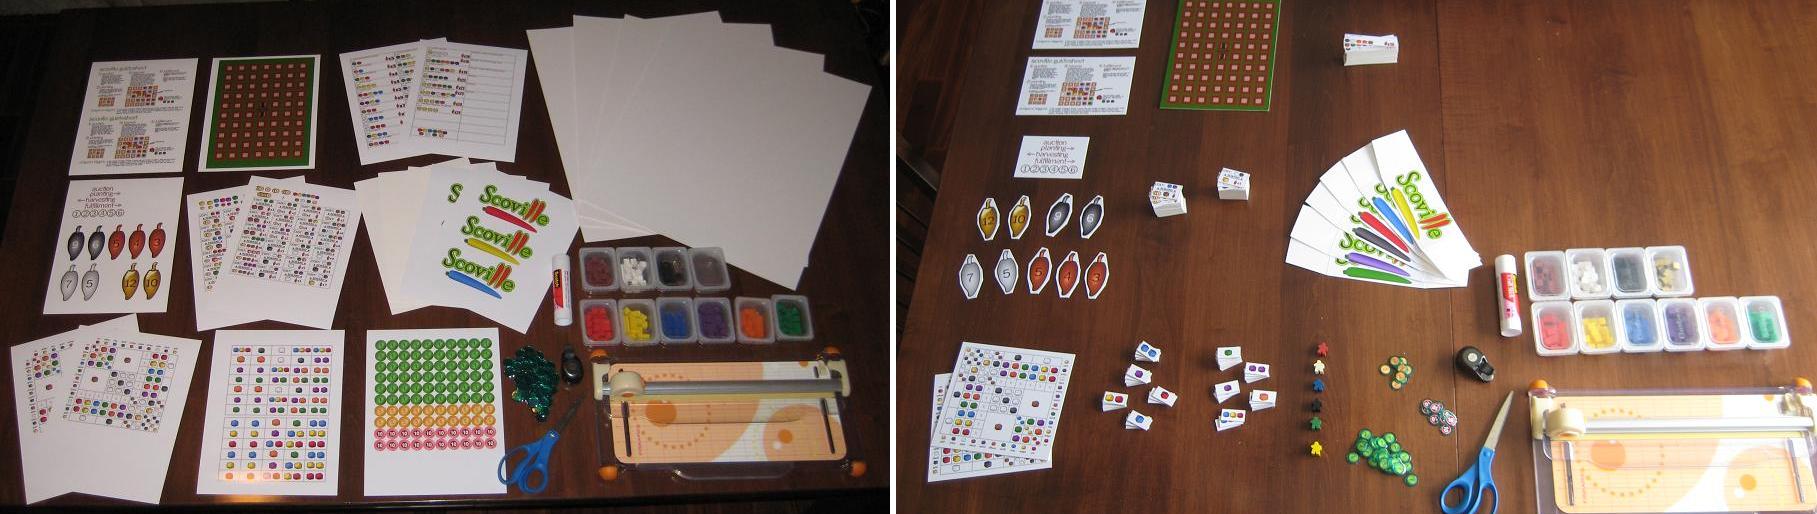
When making a prototype I usually begin with a spreadsheet. A spreadsheet allows you to create custom tiles or cards very easily. You can print them out yourself and turn them into quality prototype components. Here’s a list of everything I use(d) to create a copy of Scoville:
- Spreadsheet software
- Graphic Design Software (I prefer Inkscape, but The Gimp is also very useful)
- Paper (Plain paper for first prototypes, Glossy photo paper for pitch-able versions)
- Thick card stock – As thick as you prefer, though the thicker it is the more difficult it is to cut.
- Components: cubes/meeples/coins
- Circle Punch
- Paper Cutter (I have this one)
- Bingo chips
- Glue Stick
- Scissors
- Gerber Baby Food Containers – if you don’t have kids find some friends who do and beg them to save these for you!
Here is a picture of all the components that go into the game:
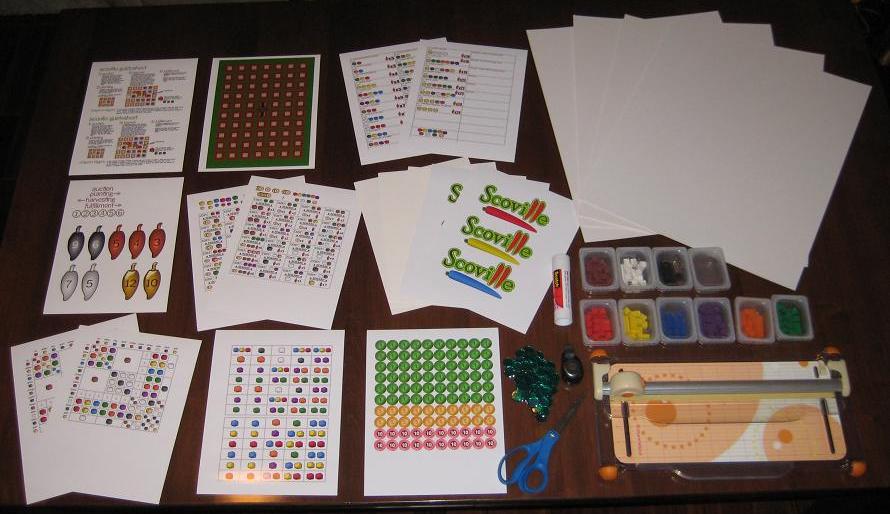
Scoville components fresh off the press!
That’s everything (except a box) I need to make a copy of Scoville. Let’s walk through the prototyping (physical creation) process.
Make it Rain! Or Something Like That
Assuming you’ve taken your concept and created artwork that suits you, it’s time to actually make something real for testing. What that means to me is that it’s time to print stuff out! Scoville has 13 pages of printing required for a full copy. The next step is to adhere those pages to the thick card stock. I like to buy the stuff that is as thick as standard board game chit board. This gives me the feeling like I am playing a real game when I test it.
So I use the glue stick and cover the back of the paper and then stick it to the card stock. Once I’ve got them all glued down I can start to cut them to size. Since the large card stock boards I buy are too big for my paper cutter I run a scissors through them to separate the difference components before using the paper cutter.

Cover with glue, adhere to card stock, coarse cut to separate.
Then I use the paper cutter to trim the fat and make them nice and clean. Shown here as an example is the first cuts done to the auction tiles:

I then go ahead and cut each tile out individually and end up with a pile of nice thick quality components:

My precious little auction tiles!
I continue this process for all of the components in the game.
Making Player Shields
Another part that seemed a little overwhelming to me was the production of player shields. But I found a nice, easy way to make them. If you don’t want pictures on them then just cut some paper and fold it. If you want pictures or logos then follow this procedure:
-
Easier to make than I thought.
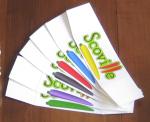
Print the logos.
- Cut the logos to a rectangular size.
- Glue the logo centered on a sheet of thin card stock.
- Angle cut each edge so that it will lean when completed.
- Fold gently.

For Scoville I made the artwork on the shields include the player color. Making your own player shields rather than using shields from games you own can really spice up your prototype.
Making Money
One of the more tedious things in this process is making my own coins. I don’t have to make it as hard on myself as I do, but I prefer a really professional looking prototype.
It would be much easier to simply write a money value on the plastic bingo chips with a marker. This would make them more difficult to read and they wouldn’t look as nice.
So my process for making coins is this:
- Create the artwork.
- Insert the coin images into a document file.
- Print the document.
- Punch the coins out of the paper.
- Adhere them to the bingo chips.
Here is a tip for punching, if you use a circle punch like mine:
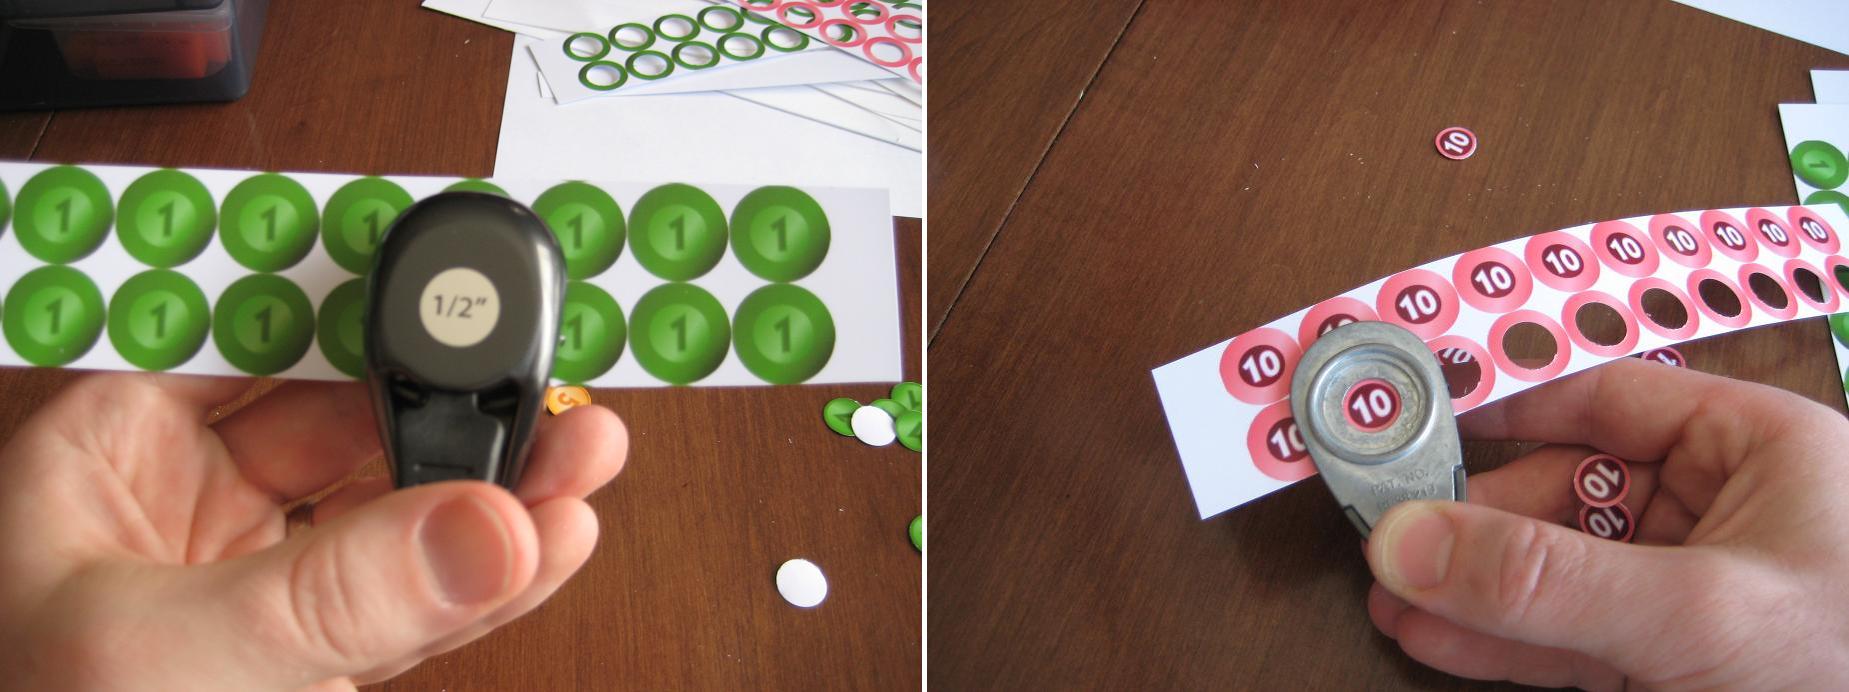
Flip the punch over for better visual alignment!
If you hold the punch like it seems it should be held then you have to rely on the little plastic bump guides on the side of it. Just flip the punch over and you can visually align the punch with the coin. This makes it so much easier!
Once you’ve got them all punched you can simply glue them to the bingo chips. I recommend watching something on TV that is really attention grabbing, so that it draws your attention from the tedium of gluing little circles to bingo chips.
If you don’t like the idea of gluing circles to bingo chips then go ahead and use the same thick card stock that you’ve been using. Just be aware that the circle punch may not punch through the thick card stock. That’s why I went with the bingo chips.
The Final Product
Once you’ve got all the components glued-punched-cut-etc. then it’s time to put it all together. Here is a before and after picture showing the reduction in volume for Scoville:
What looked overwhelming turned into a nice, quality prototype.
To continue with the theme of a quality, pitch-able prototype I like to use a nice container to hold everything. You can buy these at Target.com or you can find different colors in the store. They are only $5. I should also note that these fit into a Medium Flat Rate Priority box from the United States Postal Service. So it is pretty easy to mail one off to a publisher!
Now you’ve got your container so throw in the components, a couple copies of the rules, a business card, and you’re ready to pitch your game! Note, you do not need to have a high quality prototype to pitch a game. I am just a firm believer in making a good first impression. Here’s what Scoville looks like in it’s full prototype form:

This is the third copy of Scoville in existence! May the other two copies in the wild prosper and flourish!
How Much Is It Gonna Cost Me?
I mentioned earlier that you can make an high quality prototype that is also inexpensive. Here is a rundown of the costs for a full copy of Scoville:
- 13 sheets of glossy photo paper: $3
- Printer Ink (I buy cheap Non-OEM ink off Amazon): ~$2
- Glue Stick: $3.30
- 4-Pack of Thick Card Stock: $13
- Bingo Chips: $0.50
- Meeples ($0.14 each): $0.84 – I live near The Game Crafter so I can pick them up and avoid paying shipping costs
- Plastic Cubes (250): $7 – I bought a tub of 1000 cubes for $25 (shipping included) from EAI
So the total for a high quality prototype for Scoville costs me under $30. So maybe you wouldn’t characterize that as inexpensive. But when $30 can allow you to create a pitch-able high quality prototype that might catch a publisher’s eye, I don’t think $30 is too bad.
What techniques do you use? I wanted to point out that I did not write about making cards. Most people, when making prototype cards will purchase penny sleeves, insert their custom made cards, and make them thicker by dropping in a M:TG card. I don’t use cards in Scoville, so I didn’t include that.
I hope that you enjoyed this article. It has been a fun process for me to figure out some of the best ways to make a prototype. If you have any ways to make the process more efficient, please leave a comment so others can see!
