Author Archives: edpmarriott
A New Endeavor
I haven’t written on this blog in a long time, but I’ve continued to be an active board gamer. I’ve continued designing, playing new games, and keeping up with my tradition of attending Gen Con.
But now I’ve got a new thing I’m starting. Introducing Evergreen Games!

Evergreen Games LLC (www.letsplayevergreen.com) is a new board game publishing company that I have started. I’ll be ramping up over the course of this year to hit “print” on our first title, Spyre. I’ll be researching distribution networks, marketing strategies, artists, graphic designers, and more. Eventually, I want Evergreen Games to become a household name for great games. For now I’m focusing on that first game and learning all about board game publishing.
Over the next months I’ll be porting over some of my more favorite content from this site. I’m also anticipating sunsetting Boards & Barley after Gen Con 2026. While Boards & Barley has been a really fun journey, I’m eager to see what’s next with Evergreen Games.
Come follow along with my journey over at Evergreen Games!
Gen Con Pictorial Recap
It had been two years since my previous Gen Con. The last time I visited was 2016. I’m so happy my friends and I decided to go back this year! However, instead of a verbose write-up about my experience at Gen Con I thought I’d create a pictorial recap. Enjoy!


If you made it to Gen Con 2019 and have some great memories, go ahead and leave a comment! (I’ll approve it when I get a chance).
As a side note, one of the highlights for me was that my buddy and I had a successful game design pitch with the publisher taking home the prototype! Totally awesome!

3D Printing for Game Prototypes
When I got started in game design I hunted all over the internet forums to find the best deals on game design components. I searched for meeples, cubes, blank cards, and more. And I ended up paying a bunch of money for those things. I wished I could afford a MakerBot or other 3D printer but I wasn’t willing to spend $1,500+ at the time.
Times have changed and huge advancements in 3D printing technology has allowed the prices to drop. This has opened the door for many designers to be able to purchase their own 3D printer for game design purposes.
Which 3D Printer?
This is probably the most common question that potential consumers have when it comes to 3D printers. There are so many printers on the market and so many ways to modify those 3D printers.
My recommendation for people getting into the 3D printing world is to start cheap and simple. Some thoughts are here:
- Stay at or below $250.
- Purchase one that is ready to use out of the box.
- Start with simple prints.
My Printer – Monoprice Select Mini
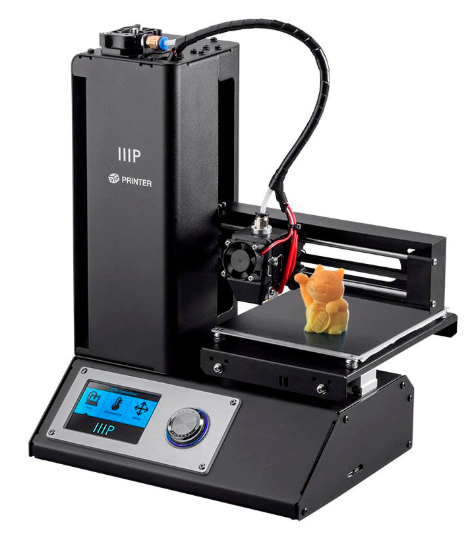 For my birthday last year I was gifted a Monoprice Select Mini 3D printer. It runs around $190. It also works right out of the box. The only adjustment required would be to level the bed. That just means that every part of the printing bed is equally distant from the nozzle when the nozzle is over that part of the bed.
This printer has been really great for me. I am currently using it to print some game design pieces for a vertical system in a game.
This printer is great for small game design components. The print volume is 12cm x 12cm x 12 cm. I have four different filaments so I can currently make components for games up to 4 players. With more filaments I could add more players.
What Filament to Use?
Most 3D printers use PLA, which is a plastic. PLA stands for Polyactic Acid. But don’t let the “acid” part scare you. This is just a common plastic material.
Other printers and some of the 3D Pens use ABS. ABS is Acrylonitrile Butadiene Styrene.
My printer uses the PLA. I purchase PLA on 1kg spools in whichever color I desire. I prefer the 3D Solutech brand but the Hatchbox products are also nice. Be careful when you purchase filament. They often list a +/- value of 0.05 or 0.03. Anything over these values may lead to poor print quality as it means the filament is not consistently thick.

One thing I recommend for getting started is to purchase a filament sample pack. Monoprice sells one but it is currently out of stock. I’m sure you could find an appropriate sample pack at your favorite online retailer.
What about the 3D Models?
I am an engineer so I happen to have access to 3D solid modeling software. But if you’re not an engineer and don’t have access, do not fear! There are numerous 3D modeling tools out there that are free to use. Unfortunately I cannot speak for any of then.
Ultimately, to print in 3D you will need a .STL or .gcode file. You can make your own 3D geometry and save in this format or you can visit some of the following websites with loads of 3D files readily available!
- Thingiverse – Free.
- MyMiniFactory – Free and Paid models available.
- Shapeways – Upload your model and someone will print it and mail it to you.
- YouMagine – Free.
What about Slicing Software?
3D printed models are printed one layer at a time. To be able to tell the 3D printer what to do you will need to utilize a 3D printing software that can generate a .gcode file from your .STL file. You can pay for software like Simplify3D ($149) or you can use a free one.
The software I prefer, because it is relatively easy to use and understand, is Ultimaker’s Cura software. When you install the software you tell it which printer you have. It then knows how large of a print area you have available and other settings specific to your printer.
Bits for Board Gamers
There is a great thread on BoardGameGeek about 3D printers. They share a lot of the same links that I’ve compiled on this page. On the thread you can see prints available for a lot of your favorite board games.
Now that you’ve got a great framework to get started in 3D printing, what are you waiting for? Please feel free to comment with your experiences in 3D printing for board games.
Getting Back in the Game
Once upon a time I created, designed, and signed a game called Scoville. It was an amazing experience and I completely fell in love with the board gaming community, the design community, and all the awesome people who share my love for board games.
But then I got a new job and my kids are getting older. Time for this hobby fell away. I still enjoyed designing when I gave it time, but I found my time for the hobby was dwindling. So I just didn’t put much time into blogging or social media.
During my “respite” from immersion in the community I realized that I have missed it greatly. So I’ve got plans to bring this blog back to life. I’ve also got plans to start a video channel. I’m not quite ready to post any videos yet, but I do have a series of topics I’d like to write about.
I’ll be getting back in the game, if you excuse the pun. I’m excited about jumping back in. I’ll be back at Gen Con this year and I’ve got some fun things coming up over the next year and a half.
Thanks for checking out Boards and Barley and I look forward to engaging with you all again. Also, I’d appreciate if you could point out any dead links on my previous articles. Finally, if there is anything you’d like to learn about game design, the community, how to get into designing, or other board game world or beer related things, just let me know!
How to Demo Your Game
One of my favorite things things that the Board Game Geek team does is broadcast live demos of recent or upcoming games at game fairs. So with Convention Season getting into full swing with Origins this week I wanted to provide a useful tool for all those fine folks who will be in front of the camera presenting their upcoming games.
Sometimes it seems like some people just don’t know how to demo their games. I recently witnessed a representative from a board game company telling someone about a recent release and it seemed like the guy had no clue how to talk about the game.
Using that as inspiration for this article, I present to you today the Demo Diamond! This handy guide walks you through your demo so that you can bring the relevant information to the viewer and so that you don’t waste time where you shouldn’t.
Demo Diamond
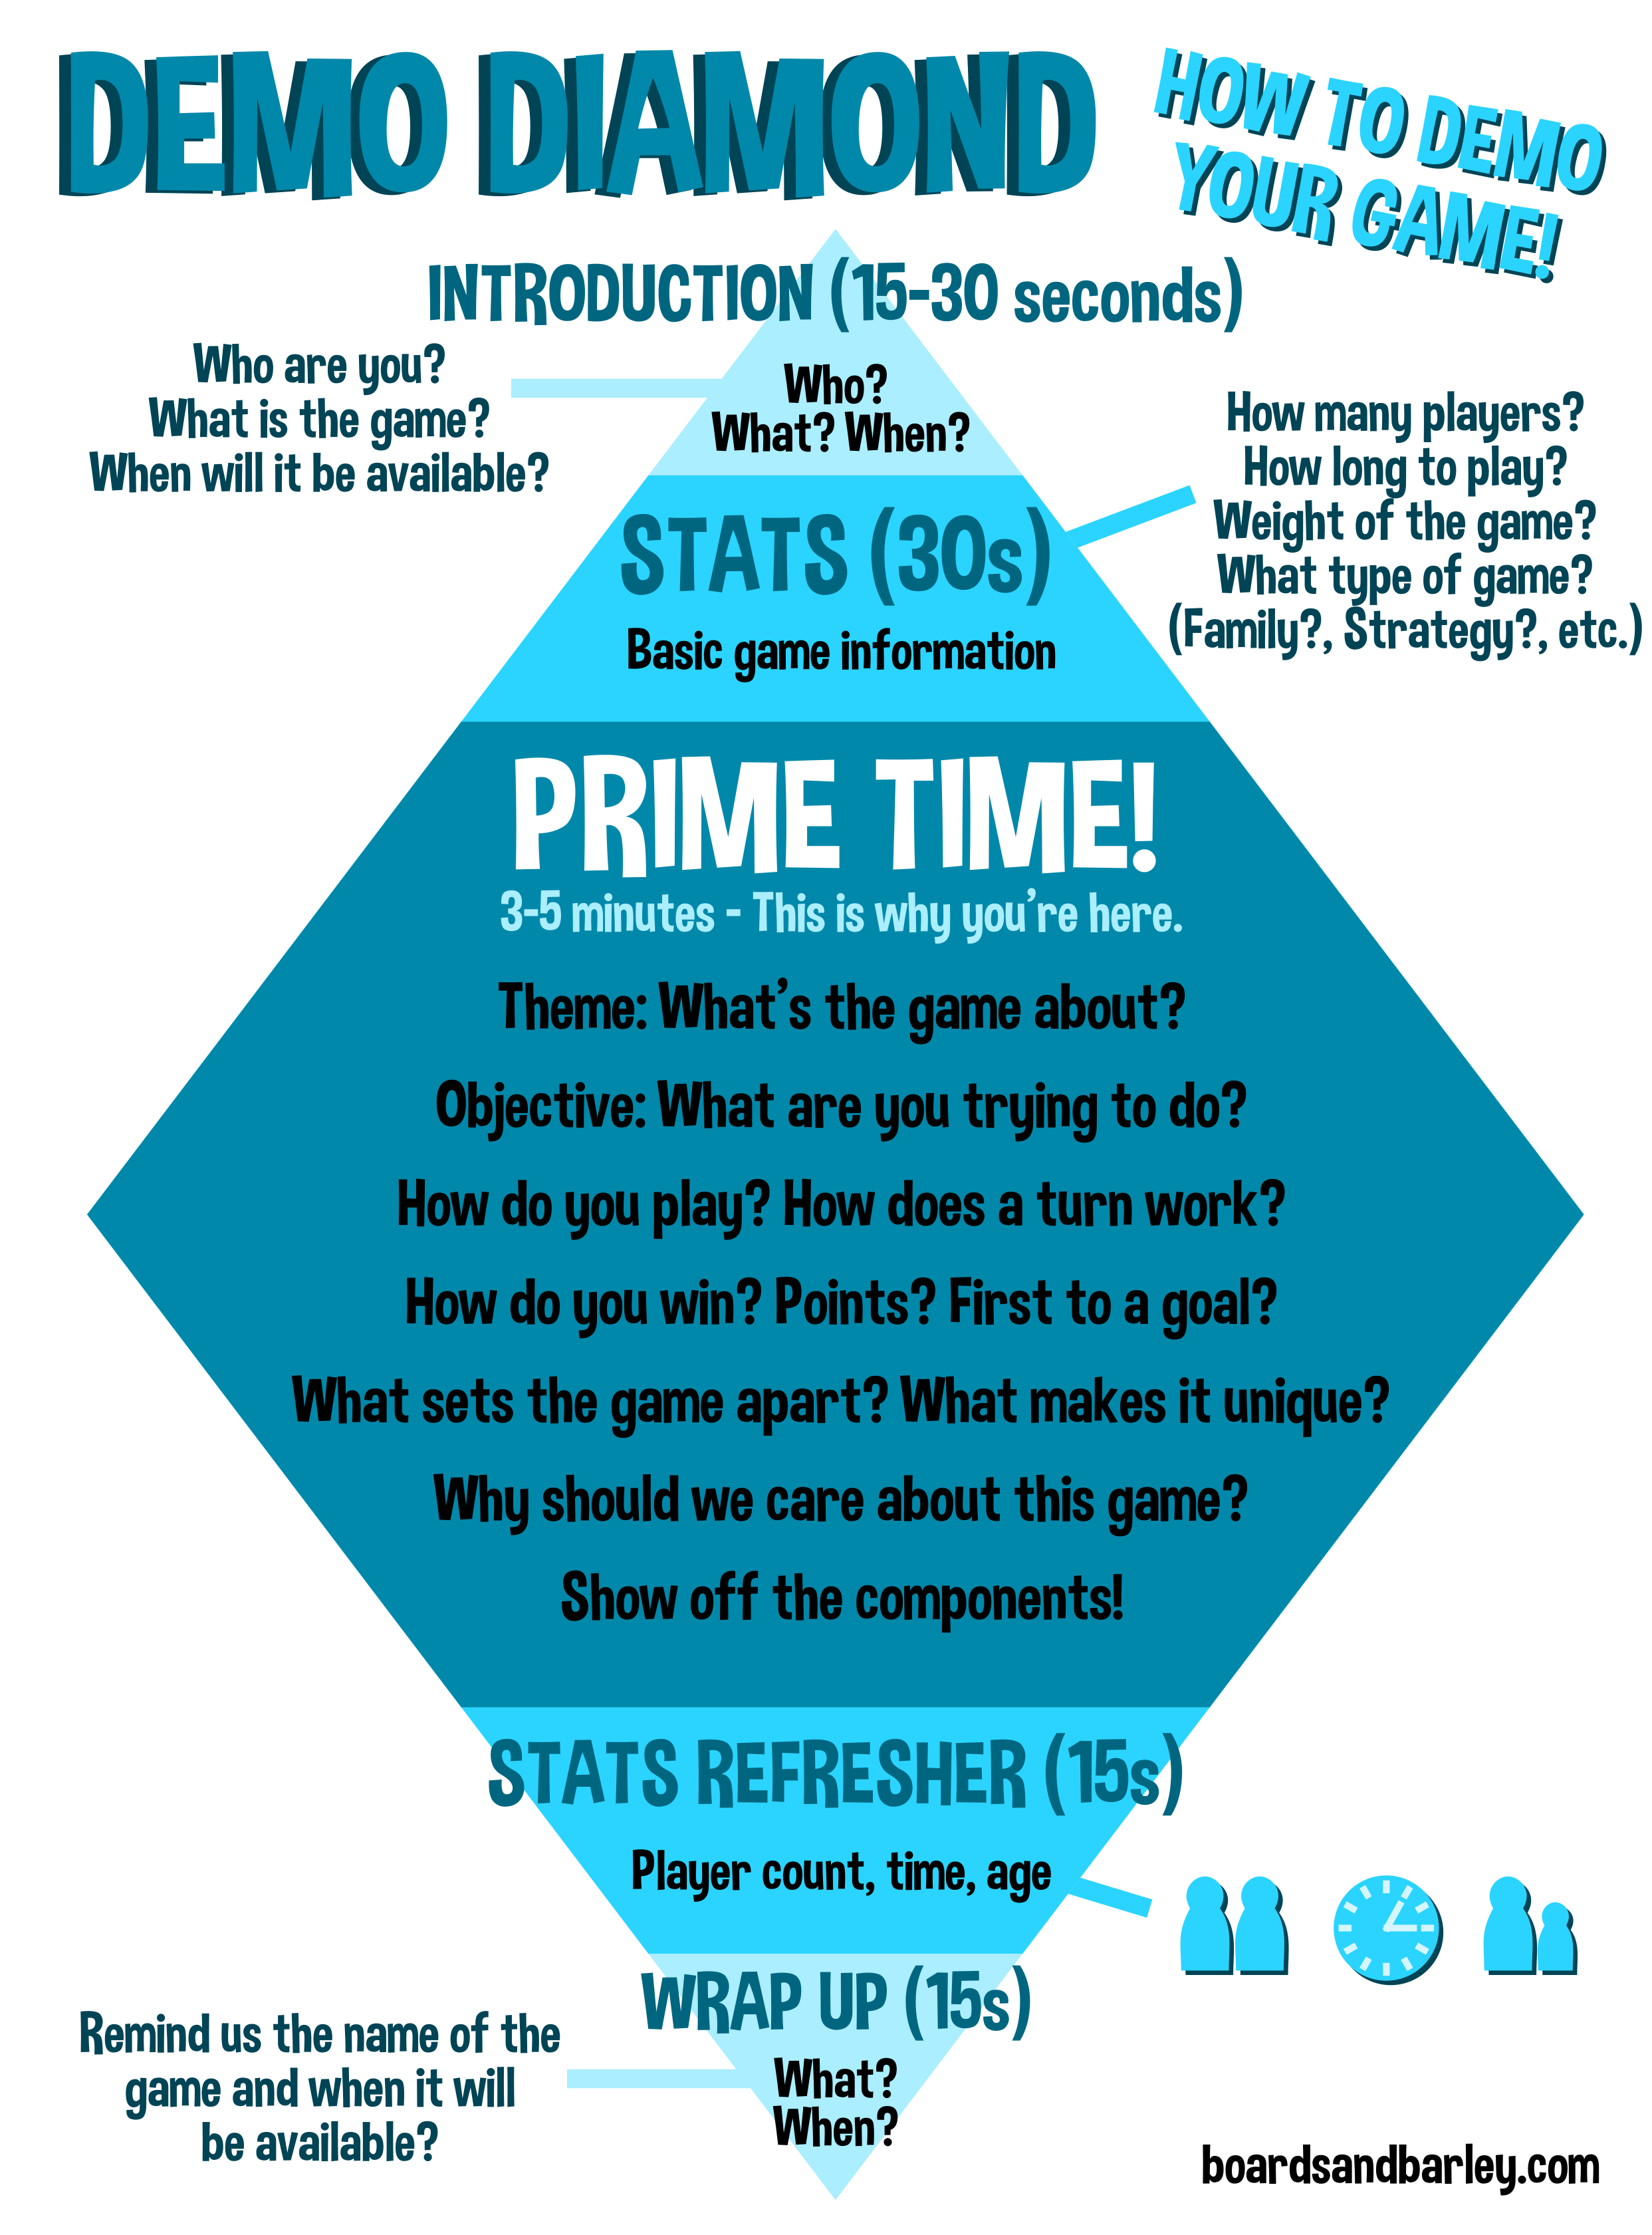
Demo Diamond Explanation
Introduction – 15-30 seconds
You should always introduce yourself or be introduced. The BoardGameGeek team always does this really well.
But this is also the time to introduce the game and tell us when it will be available.
Stats – 30 seconds
Briefly cover the player count, the playing time, the ages, and the weight of the game. This helps people know right away if this might be a game for them or their gaming group.
Also mention the type of game that it is. People want to know if it is a family game or a strategy game or a filler game or a war game or whatever.
Prime Time – 3 to 5 Minutes
This is where you can really make your game shine. We want to know all about the game. So tell us the theme, the objectives, how to play, how a turn or round works, show off the components (this can be a really big selling point!), and basically teach the game with just enough information to pique our interest.
We don’t want all the nitty gritty stuff. Hit the high points. Talk about the things that make it special. Make us want to learn more.
Since this is a demo, keep it brief. We don’t want rambling talk or jumping from one thing to the next. Focus on being coherent and flowing through the game. Try to have a stream of thought where you work through the details in a linear way:
Theme > Objective > How you win > How you play > How it ends
Stats Refresher – 15 seconds
Once you’ve worked through the gameplay it’s time to remind people about the stats again. So tell us the player count, the ages, and the play time.
Wrap-Up – 15 seconds
Time to be done. Remind us again what the game is and when it will be available. And it would be great to thank us for watching!
![]()
I hope that this article can help you as you’re demoing your game! Let me know if you have other ways of doing it or if you think the Demo Diamond should be tweaked or modified.
