Blog Archives
Prototype Art: Icons in Inkscape
Inkscape logo of squidy awesomeness!
One of the things that can take your game design from playable to pitchable is iconography. Icons can really help put a nice polish on a game. There are a few benefits that icons can provide for your game design:
- Ease of viewing/understanding
- Beautification
- Language Independence
Those are a few and I’m sure there are more. So today I wanted to present a tutorial similar to my “Cubes in Inkscape” tutorial to help game designers with the creation of icons for their games.
This article will be focused on the software called Inkscape. It is a free Scalable Vector Graphics (SVG) software. Don’t worry too much about what that means, just know that it’s awesome. If you don’t have the software I recommend downloading it and using it for your game design art. Note: if you have Photoshop/Illustrator then I would recommend staying with that and skipping the rest of the article.
Also, if you love icons but just can’t figure out how to make your own, then head over to Game-Icons.net where they have over 1,000 free icons for your use. So let’s get started.
Let’s Get Iconizing!
So “Iconizing” isn’t really a word. But that’s beside the point. The objective for today is to teach you how to make icons that you can use with confidence in your board game designs. We are going to be making a barley icon. But you’ll hopefully be able to use what you learn here today to make any icons you might need for your game design.
Once you’ve downloaded and opened Inkscape you’ll see a plain canvas outlined in front of you. I like to leave it turned on, but you can turn off the “edges” if you visit the document properties under “File.” Here’s what it should look like:

We will be working with the “Create Circles, Ellipses, and Arcs” command for this article.
You’ll often want a web browser open as well. It is often beneficial to do a web search for the item you are looking to iconize. So here’s a snapshot of a web search page for barley:

Using a web search can give you ideas of how to iconize the item.

Barley, you’re about to be iconized!
After I’ve done a web search I like to copy and paste a picture or two into Inkscape as a starting point. In this case I’ll be using the photo on the right as my guide for creating a barley icon. So copy that picture into Inkscape if you want to follow along.
One thing to remember when creating icons is that we want them to be very clear and understandable. Sometimes icons represent things, like resources. Other times they represent actions, like “move an extra space.” We before we create the icon we need to know what we are going for. In the barley example we will simply use the icon to represent a barley resource.
So now that the picture is in Inkscape we can start our tutorial. I like to use a picture so that I can create the correct shape of something in Inkscape by overlaying that shape on the right part of the picture and making the edges line up. I won’t show that today since this image will be for reference only, but it is a useful thing to do. I may write about that in the future.
The icon of a barley begins with one circle…
Go ahead and click on the “Circles, Ellipses, and Arcs” command and click and drag a circle on the page anywhere you like. If you want to change the color, scroll along the color bar at the bottom. If you want to make sure it is a true circle, hold CTRL when dragging. If you hold CTRL and drag at a different angle then it will jump to an ellipse rather than a circle. Once you’ve dragged out the circle and chosen a color you might have something like this:
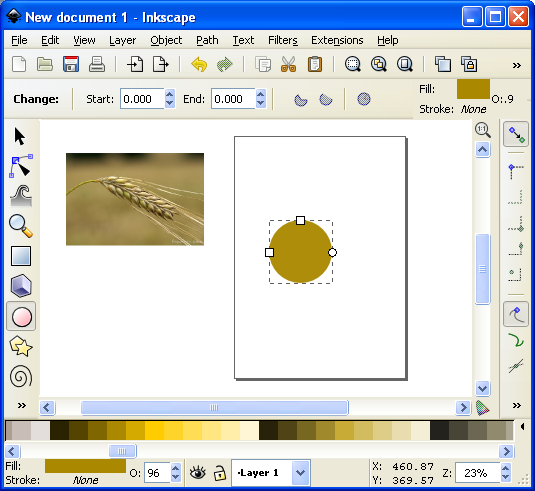
This circle will be one grain of barley.
The next thing we want to do is turn our circle into a Path. There are two ways to do this. The first is to go to the PATH toolbar at the top and click “Object to Path.” The second way to do this is to select the item and press SHIFT + CRTL + C.
 Then we want to use this command from the left toolbar. It is the “Edit Paths by Node” tool and is pretty awesome for what we want to accomplish today. Click on it and then click on our circle. Then your circle should look like this (note that I have zoomed in on the circle):

The dots around the circle are the nodes that we will edit.
What we do next is edit our circle by moving the nodes around. Across the top we have different options for editing the nodes. The tools that I utilize most often are these:
- Insert new nodes into selected segment
- Make selected nodes corner
- Make selected nodes smooth
I recommend playing around with each of those commands so that you become familiar with how node editing works.
So let’s take our circle and turn it into a barley grain. First click on the upper node. Then click on “Make selected nodes corner.” Then you can grab the little circles on the lines extending from the node and move them to wherever you like. Here’s what you might end up with:

By editing the nodes we can make the circle look like a barley grain.
Now go ahead and manipulate the other nodes. I “Cornered” the bottom node and angled up the right side. I moved the bottom node to the right. I moved the top node up and to the left. And I brought in both side nodes. Here’s my result thus far:

Okay. That’s pretty passable for a barley grain. Now we want to make more of them. But instead of following that whole process over and over we are simply going to duplicate this grain. You can duplicate the grain in two ways. The easiest is to simply push CTRL + D. That will make a new copy over the top of the previous version. Then if you click the arrow tool at the top of the left toolbar you can move the new barley grain. Do this about 5 times, line them up, and then you might have something like this (I’ve zoomed out a little):

We are getting there! Who’s excited??
Okay. It is starting to look alright. Let’s go ahead and duplicate the entire thing and mirror it using the “Flip selected objects horizontally” tool. Then you can rotate the whole selection with the arrow tool. You have to click on the selection so that the arrows on the corner of the selection turn into curved arrows. Then click and hold one of the curved arrows and drag to the angle you want. Note that when dragging, if you hold CTRL it will rotate at discrete angles. This can be really useful. After all of that we should have something like this:

Feel free to enjoy a nice brew while we are iconizing barley!
Now we’ve got most of the hard work done. You may desire to shrink a few of the barley grains near the top end. If you do, you can simply click on one with the arrow tool, then click and drag one of the corner arrows around the object you are shrinking. Note that when you drag the corner arrows, if you hold CTRL it will maintain the aspect ratio of the object. If you hold CTRL + SHIFT it will maintain the aspect ratio and resize it while also maintaining its position in reference to its reference point (shown by the plus sign, which can be moved). For the sake of the tutorial today we are not going to shrink any of the barley grains.
So far so good. But now we need the stalk. So we are going to use the “Draw Freehand Lines” tool from the left. With the tool chosen you should then set the tool to “Triangle In” at the top toolbar where it says “SHAPE.” Then starting at the bottom of the stalk click once. Then move the cursor to where you want the stalk to end and double click. A triangle line should be made that looks something like this:

We’re almost done!
You can change the color again by using the color bar along the bottom. And you can manipulate the shape by editing the nodes.
Alright. So I jumped ahead a little bit and did some of the things I’ve already mentioned. I changed the color of the stalk. I make it thicker by adding a “Stroke” to it (See below about adding a “Stroke”). I didn’t like how tall it was so I deleted two of the grains from each side at the top. I shrank two from each side and rotated them slightly. By simplifying all of this I was able to create a better icon for the barley:

It looks more “Icon-y this way.
So there you go. You’ve got yourself the tools to edit nodes, manipulate shapes, and make cool icons. Those are the basics and they can get you off the ground running. But if you want to add some awesomeness, then keep reading!
Adding the Awesomeness!
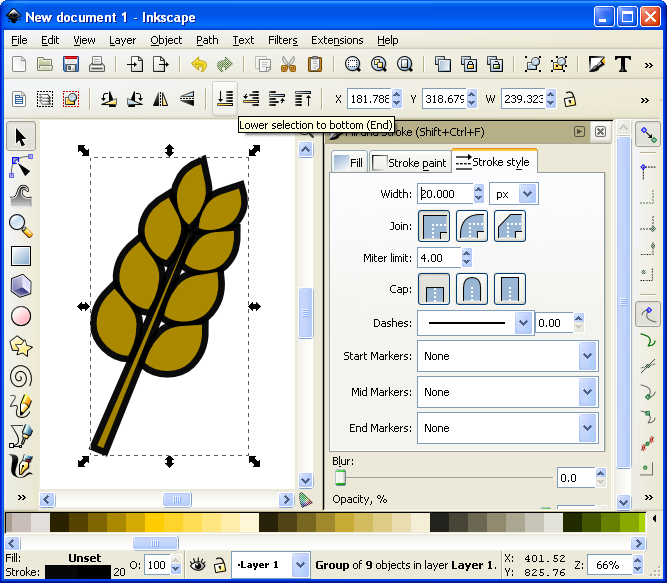
If you aren’t quite content with your icons there are a few things you can do to spruce them up. The first is to add a border around them. Remember above when I mentioned about adding a “Stroke”? Let’s start with that and see what kind of border we can come up with.
First, with the arrow tool selected, click and drag a box around all the components in the icon. They click on the “Group” tool to group them into one picture. Then go ahead and duplicate that new group. You will have two copies of the same icon. We will add a stroke to one and then place it behind the other. With one of the copies chosen, click on “Object > Fill and Stroke.” This will open a sidebar like this:

Now we can add awesomeness!
On the “Stroke paint” tab we want to set a solid color stroke. This is the solid blue square icon. For now just keep the black color that it should default to. Then on the “Stroke style” tab let’s go ahead and set the stroke to a value that makes it look nice. In this example the value was 20. You should have a nice big black border around the entire barley. Once you have the border, click on the “Lower Selection to Bottom (end)” command and it will send this copy of the icon behind the other copy, which has no stroke:
I think it’s really starting to be a nice icon!
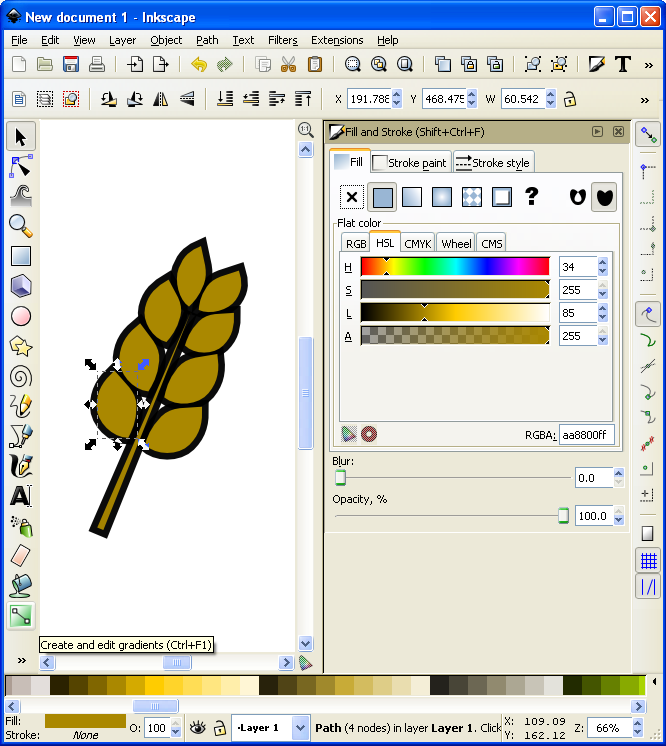
Now we’ve got a really nice border. How else might we add awesomeness? We could add gradients to the grains and the stalk!
If you are content with the icon like that, then by all means leave it that way. I think it looks pretty good and icons like that will certainly help with the presentation of your prototype. But if you want to go another level you can add gradients. So let’s see what happens…
First you’ll want to ungroup that top level copy of the barley. We want to add gradients individually to the grains. With it ungrouped go ahead and click on one of the grains. Let’s choose the lower left grain for this example. Then you can click on the “Create and edit gradients” tool on the left toolbar.
It’s about to get wild!
Then click and drag from one side of the selected grain to the other. You will want to play around with the gradient editor to familiarize yourself with the gradient editing options. The easiest are linear gradients. I recommend you start there. Otherwise a radial gradient could look nice. I’ve used one for the grains (each individually) here (Note that you could have applied a radial gradient after editing the first circle and then duplicated that for each grain of barley):
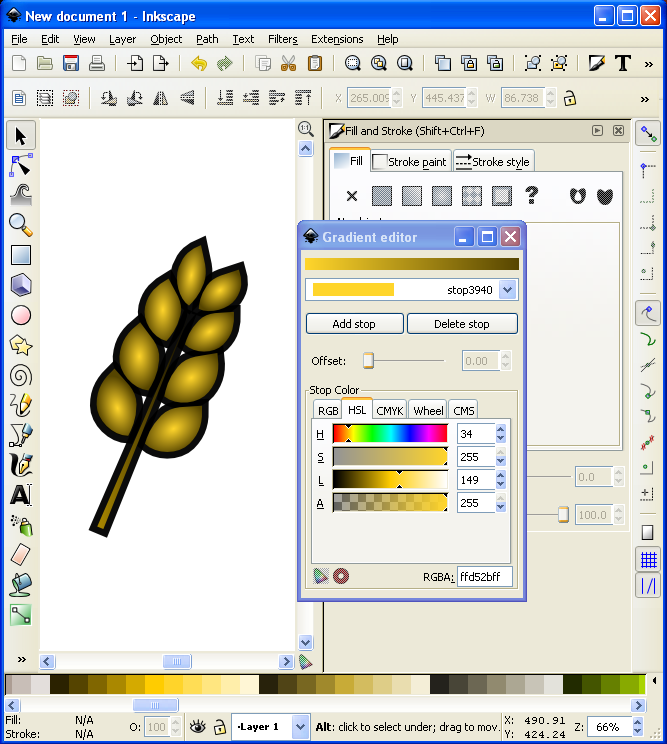
I might actually use this icon!
Alright… we have time for one more layer of awesomeness. What could it be other than a drop shadow??? Thankfully I don’t really have to teach you anything here since Inkscape makes it so easy! With the entire icon (both copies) highlighted go to “Filters > Shadows and Glow > Drop Shadow” and it will open a popup window. If you click on “Live Preview” it will show you what the drop shadow will look like.
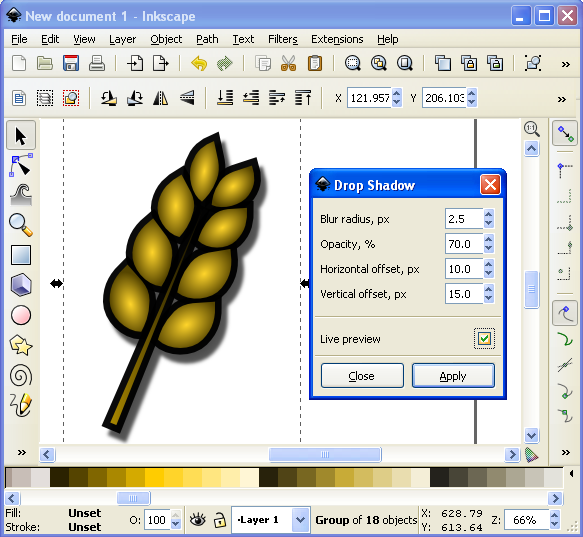
Now that’s what I’m talking about!
And there you have it. A nice and simple icon with three points of awesomeness!
Lesson Complete!
Here is my finished icon of barley, with radial gradients on the grains, a linear gradient on the stalk, a nice “Stroke” border, and a decent drop shadow:

Not too shabby!
That’s all I’ve got for you today. I hope that this article was able to equip you to add some high quality iconography to your game designs to help take them from playable to pitchable and give you confidence in front of the publishers! Please let me know if you have any questions. I would love to help you out. Thanks for reading!

Monday Brews: 10-7-13
Happy Monday everyone! I hope you’re all doing well. Last week was a good one for me. My son turned 2, our group had a game night, and the weather is getting nice an Autumn-y! The downside was that I only played three games.
Since it’s Monday, it’s time to blog about the beer I drank and the games I played in the past week. So here’s the Boards and Barley I enjoyed last week:
The Barley:

2 year old boys love it! (The box art, that is!)
Sand Creek Oscar’s Chocolate Oatmeal Stout: My son chose this beer at the beer store. We walked up to the beer section and he started going bonkers over it since it had a big bear on the cardboard. So it was an easy choice. Pleasantly enough it was a decent beer that I would drink again.
Southern Tier Warlock: This is an imperial pumpkin stout and it was a doozy! It was almost like drinking a pumpkin beer shake. The smell was a little interesting, and not necessarily in a good way. I don’t think I’d drink it again, but I was glad to have had a taste.
O’so O-Toberfest: Another Oktoberfest under the belt. I think that’s the 5th or 6th Oktoberfest style I’ve had this season!
Homebrew Black Ale: I was able to enjoy a friend’s homebrewed black ale while playing a game this past week. It was delicious!
New Glarus Spotted Cow: A staple in my beer diet, this is an always enjoyable beer!
New Belgium Giddy Up: A lemon-peel espresso infused ale from New Belgium is an interesting experience. It was a little too out there for me to enjoy, but, like the Southern Tier Warlock, I’m glad I was able to try it.
Milwaukee Brewing Polish Moon: MKE brewing out of Milwaukee is a fun newish brewery located in an area of Milwaukee that is undergoing a revival! This particular beer, a Milk Stout, was enjoyable, but not my favorite milk stout that I’ve had. It is a little too earthy tasting, or at least has too earthy of an aftertaste. But MKE Brewing is doing good things!
The Boards:
Rhome: This is an awesome “rhombus” based game from esteemed designer Brett Myers (@BrettSpiel). It is a really great game that I believe will have a great published career at some point. The tile placement mechanic is awesome and tight. There is a lot of anxiety and tension in the game, which is fantastic. And like Hedeby and Baron Age that I mentioned last week, this is a game that I will be owning!

It’s Hoof Hearted making a tight first turn!
Long Shot: A horse racing game? Blegh! Oh wait… what’s this?? It’s fun? Okay. When you’ve got Pony Danza heading off Harry Trotter and the Horserer’s Stone along the final stretch, then this game can be a lot of fun. Okay… Pony Danza and Harry Trotter are made up names from my gaming group. But they make the game more fun! While there is a lot of luck in the game, it can be a ton of fun with a big group. It plays up to 8 people, which makes it a nice alternative to 7 Wonders of Robo Rally. Check it out!
Attika: My friend Jeremy got this game in the Math Trade at GenCon and we finally got it to the table. I really enjoyed it! There is a cool mechanic in it that allows players the opportunity to make some big moves. If you can chain the right buildings together you can really get ahead. I’ll definitely play this game again! And I’m not just saying that since I won.
Monday Brews: 9-23-13
Good Monday to all of you! I hope you had a great weekend. I had a very nice weekend. I got a few games in, attended a football game, and came up with a new game design that I’m pretty excited about and am hoping to get ready for Protospiel-Milwaukee, which is this coming weekend!
Let’s see what Boards & Barley I enjoyed this past week…
The Barley:
Barley and Boards are good on their own, but are unstoppable when combined!
Leffe Bruin: I love Leffe. The Blond and the Brown are both really enjoyable. I think I prefer the blond during the spring and summer and the brown during autumn and winter. We were having a game night last week so I bought a 6 pack of this. Fortunately for me only one person took one, so I had plenty for myself! Side note: a friend of mine also likes Leffe and we once had fun making up Steampunk names. His chosen name: Leffe Steampunker.
New Glarus Staghorn: Yep, I enjoyed more of New Glarus’ Oktoberfest brew. It’s so good!
Lake Louie Dino’s Dark: I’ve had other beers from Lake Louie before, but never the Dino’s Dark. The other beers they offer have all been really enjoyable. This was no different. They have a pretty small operation, but they sure put out high quality beers! I’m hoping to tour their brewery some day.
Leinenkugel’s Oktoberfest: I still had one on hand from the crate we bought a few weeks ago. I solved that problem by quickly downing this tasty beverage.
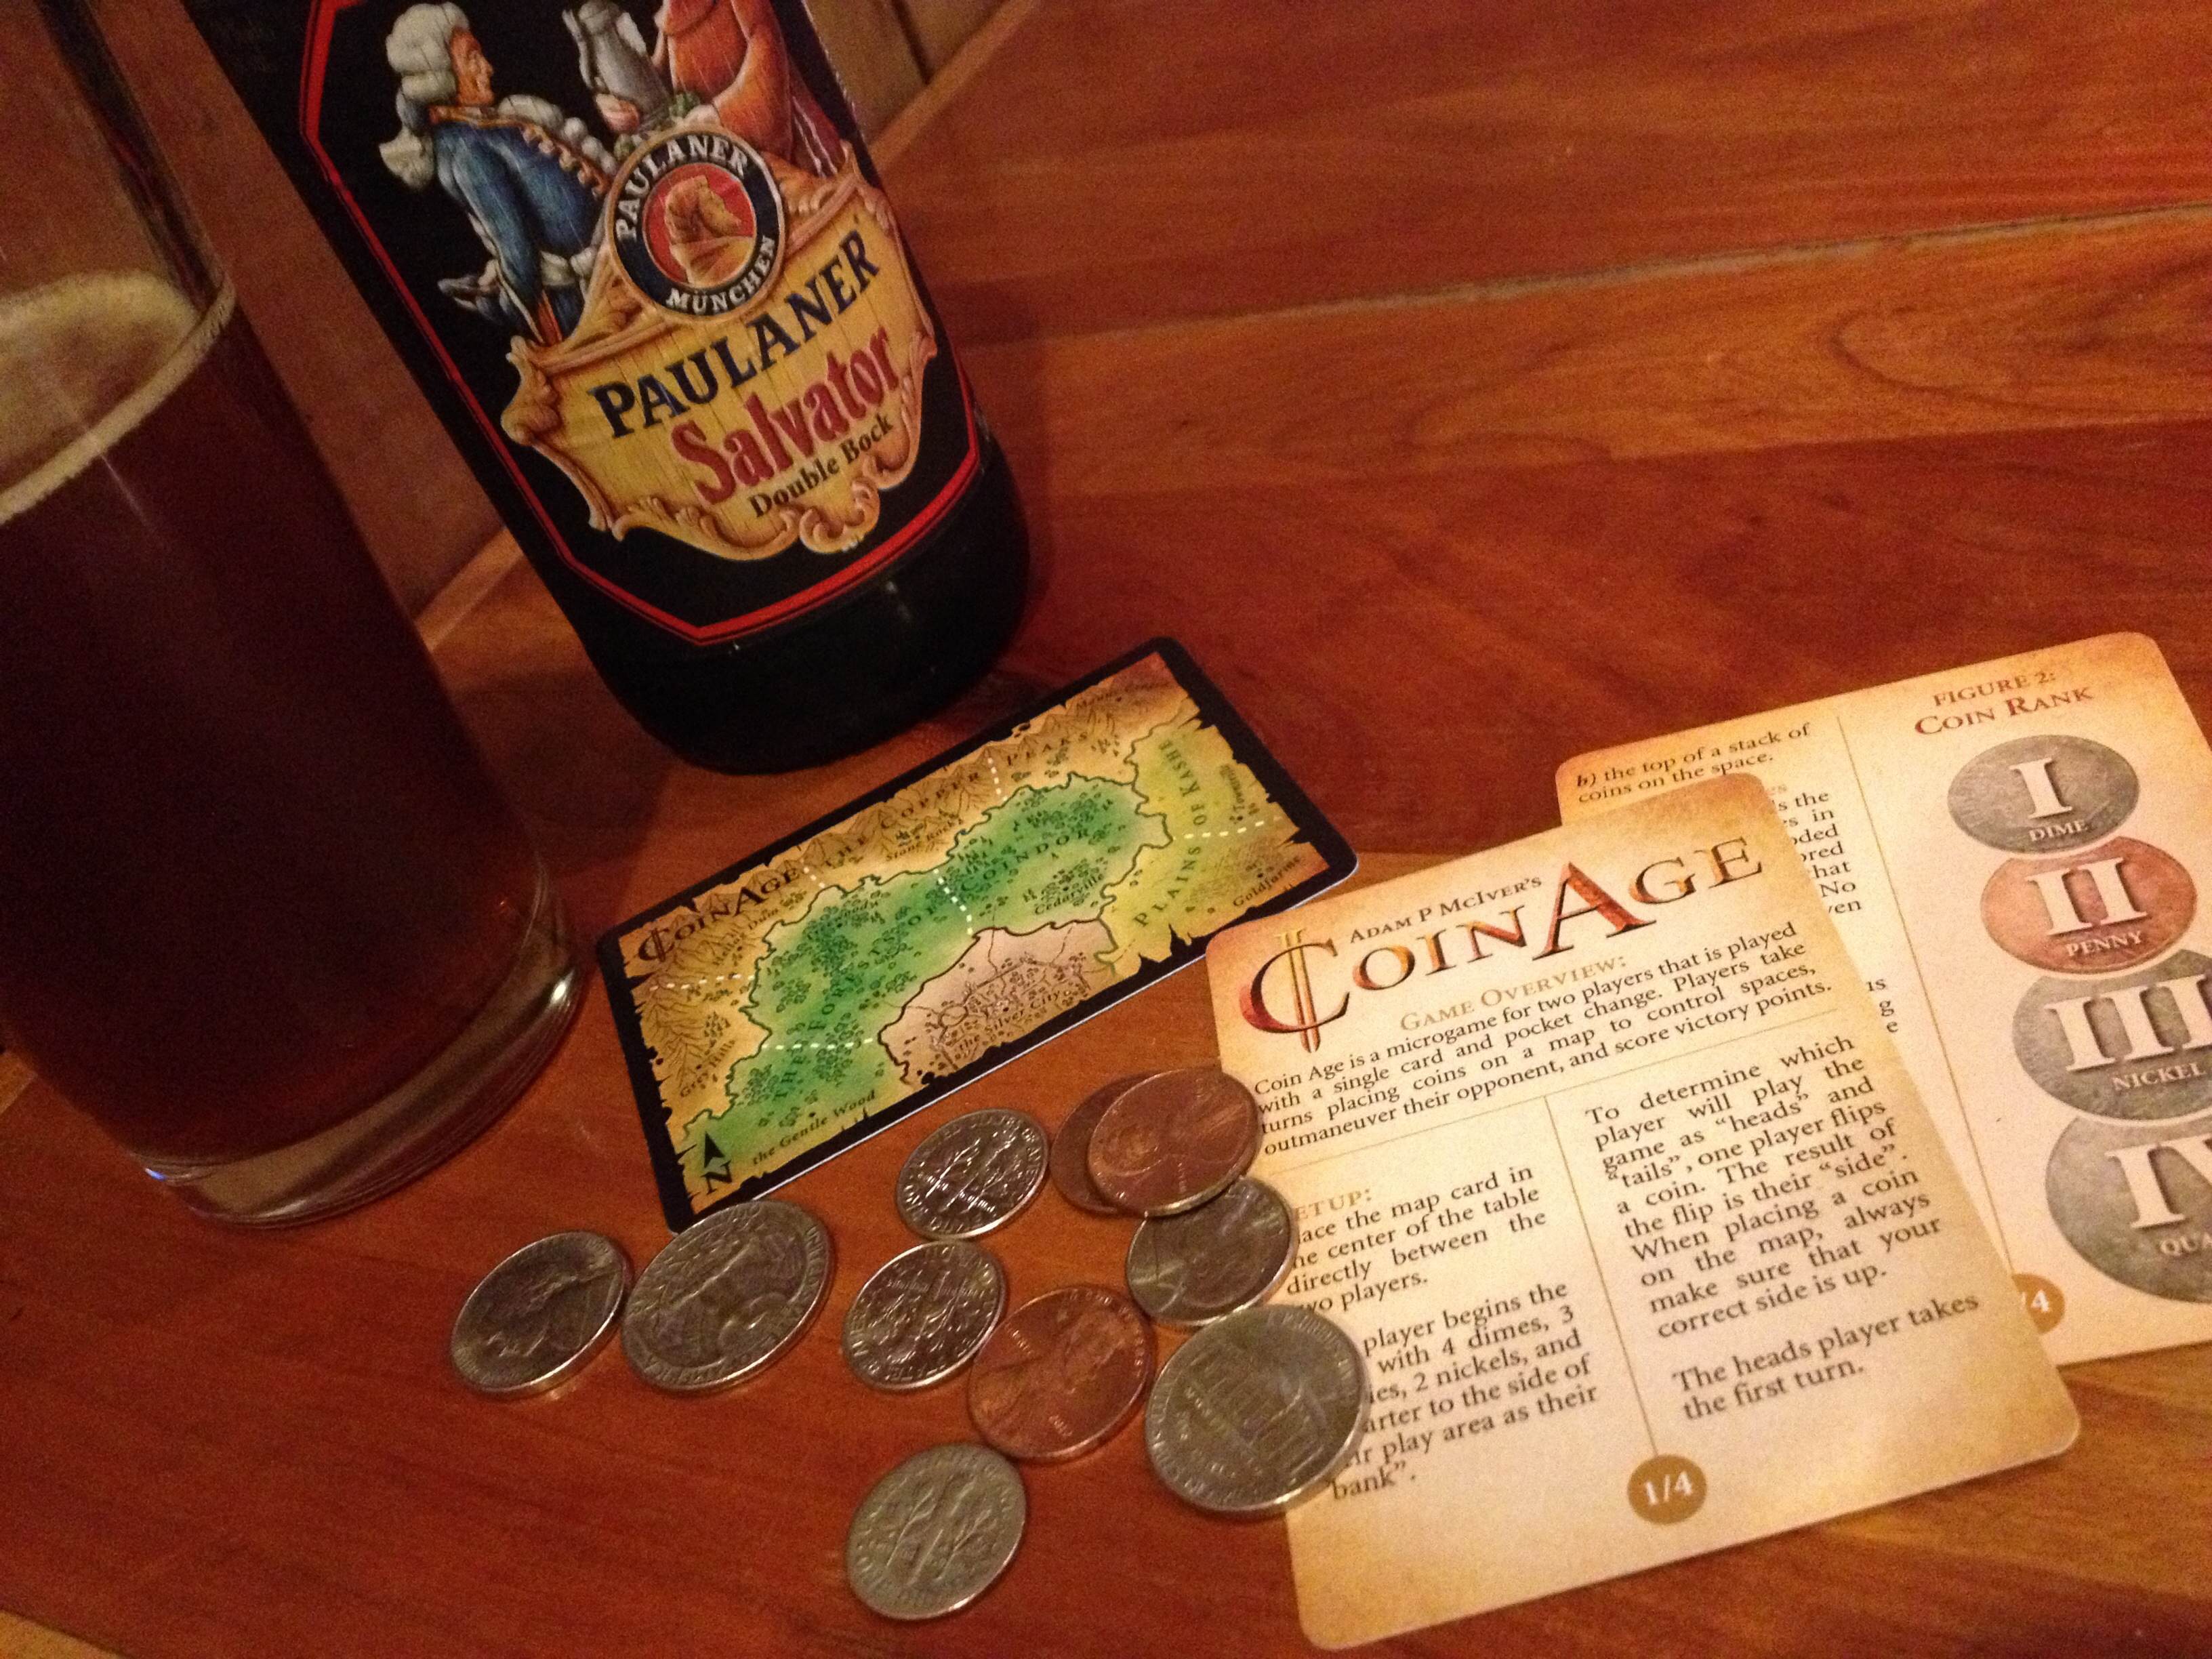
Paulaner Salvator Double Bock: Yum. I enjoyed this beer while on a date with my wife where we got three games to the table. Wife + Beer + Games = Great date night!
Tyranena Gemuctlichkeit Oktoberfest: Besides the goofy name, this was a pretty decent Oktoberfest brew. It should be noted that I will have to try another one since I drank this one from the bottle while I was also watching my kids, which ultimately lowered the overall experience with this beer. What a pity, having to re-try a beer.
The Boards:
X-Wing: Why did it take me so long to play this game? Maybe because I kept waiting to see if my local Target would drop the price to $12 like other people have mentioned. You lucky people. Fortunately my friend bought a copy (and has subsequently bought a bunch of add-ons). So I was able to get my first taste of the game. AHHH-mazing! It helps that I rolled hits on 90 percent of my rolls. It was total domination!
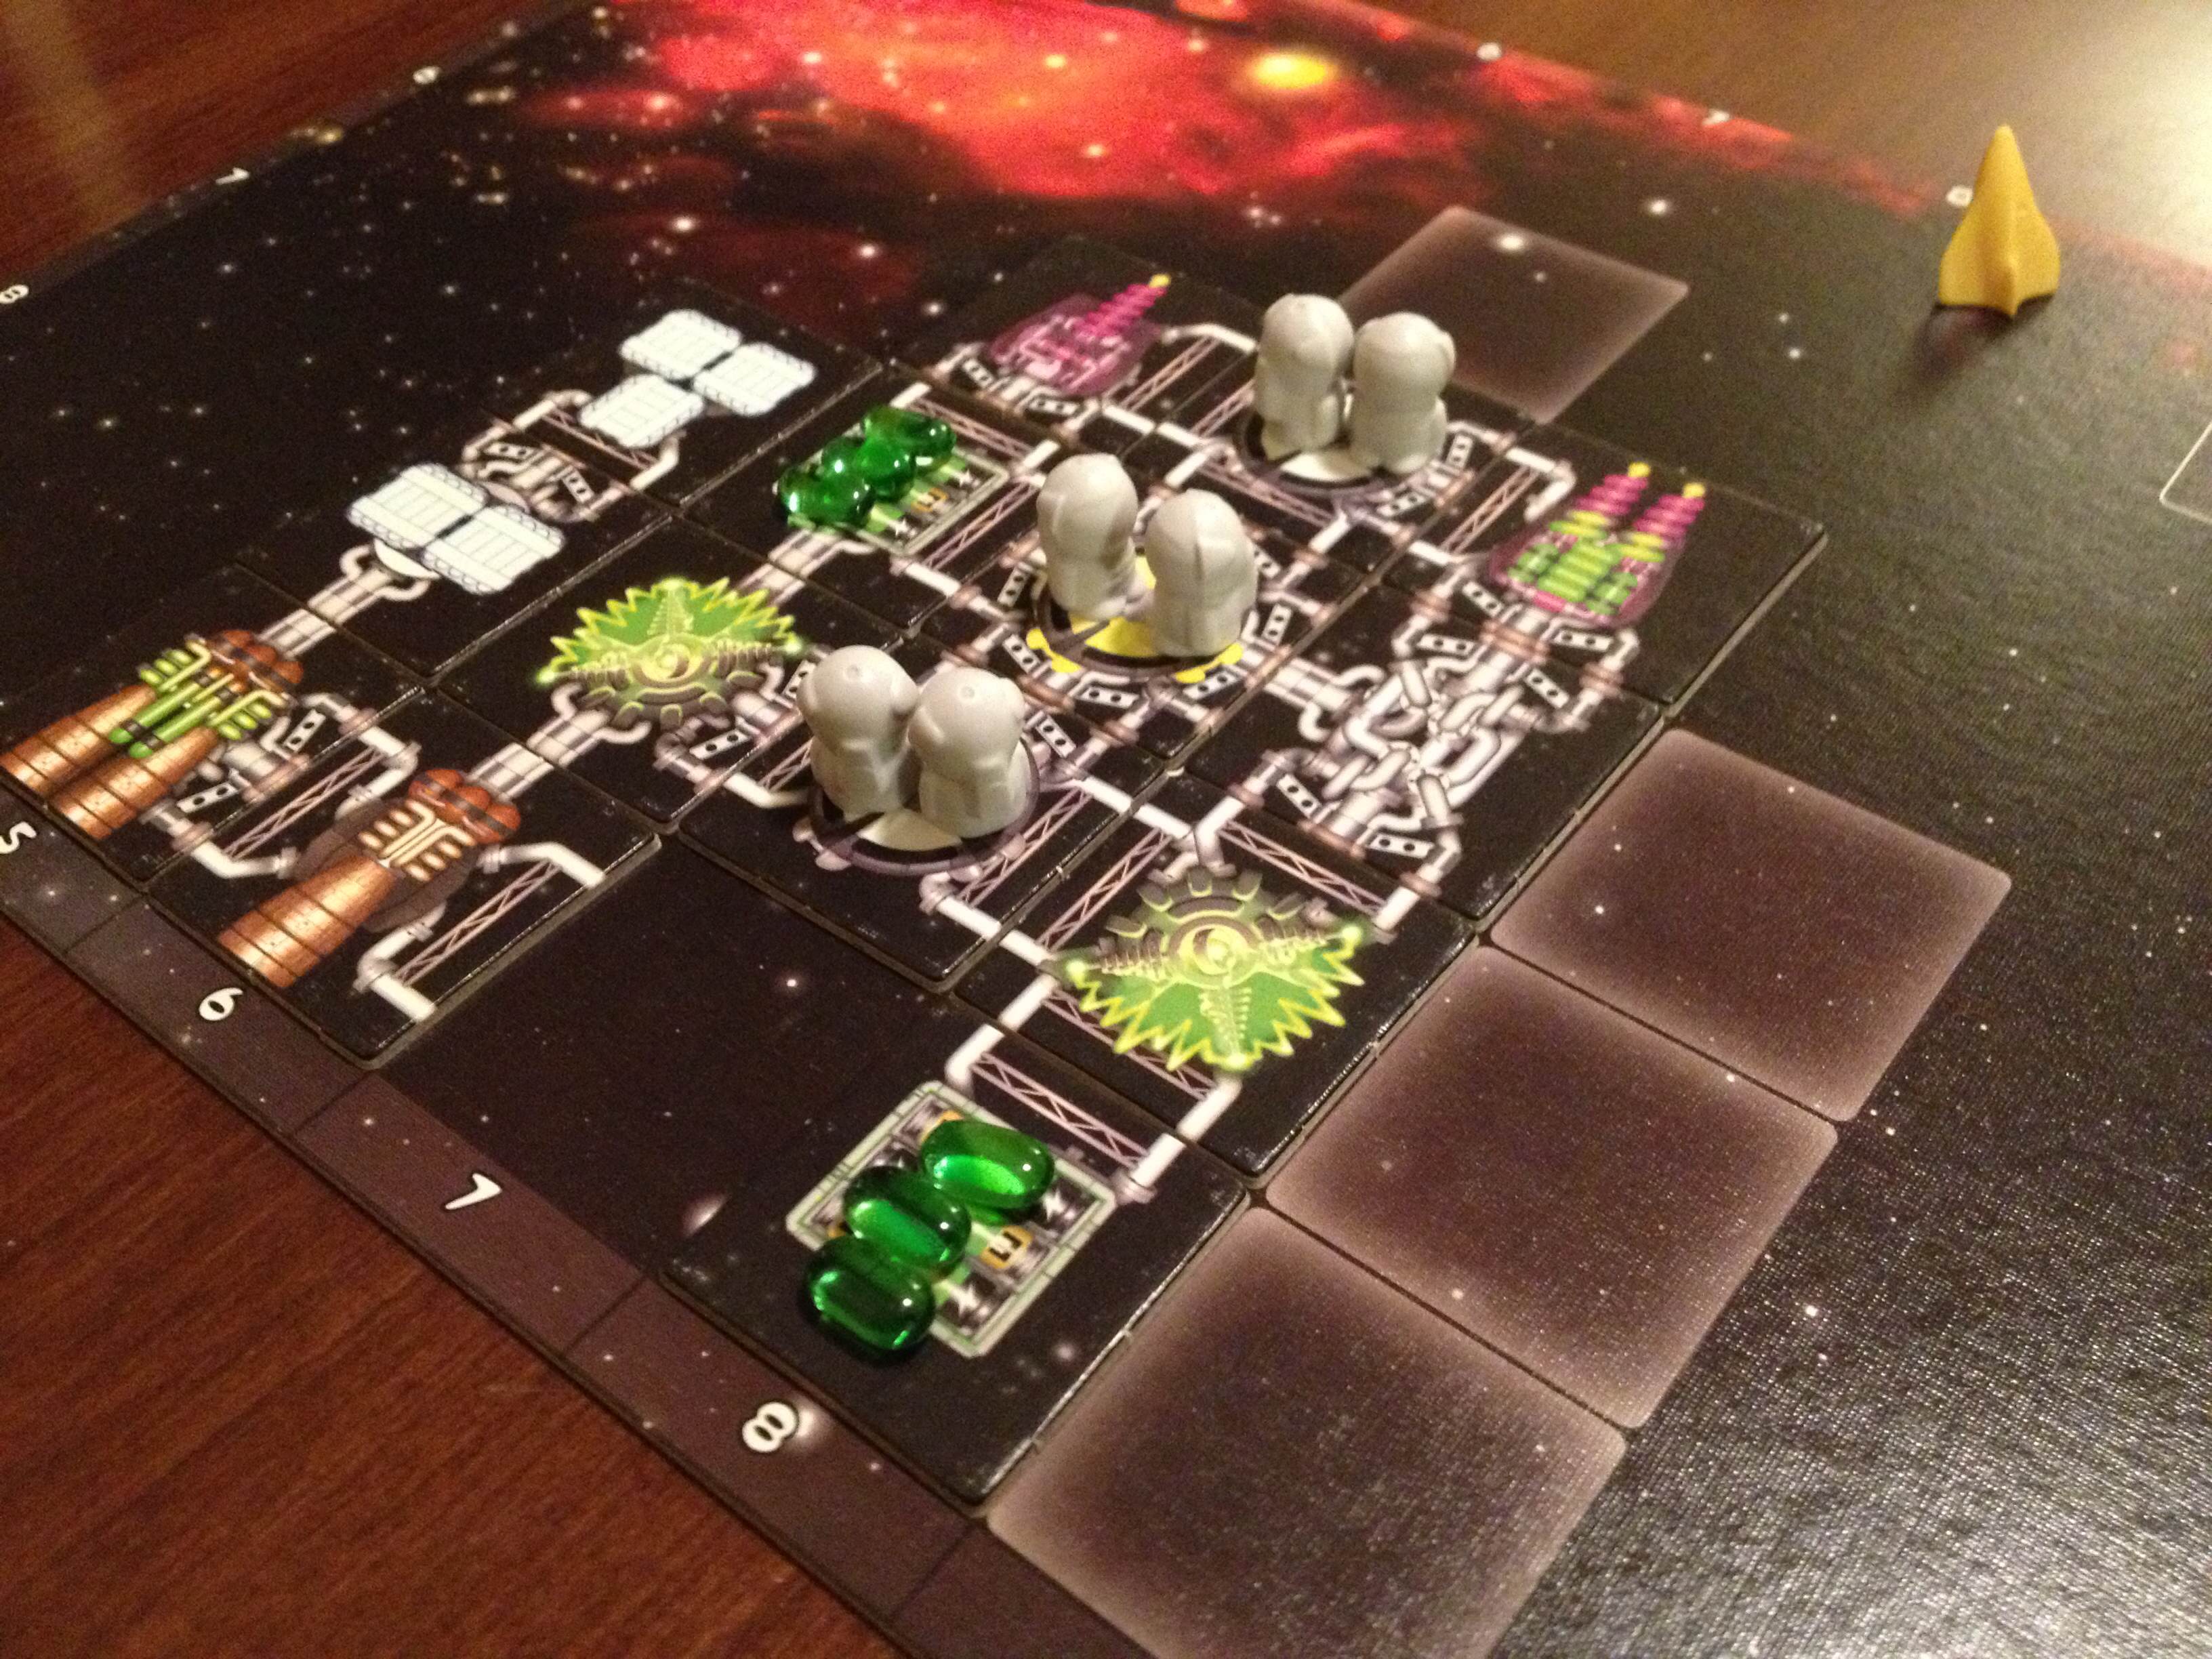
My first ever Galaxy Truck!
Galaxy Trucker: I received this game in a trade over a year ago. This past Wednesday I finally got to play it. That is unacceptable and I have offered my sincerest apologies to my copy of Galaxy Trucker. I may have to send a personal apology to Vlaada Chvatil. When we played it we realized that it was completely awesome! This is a really excellent game that I should not have waited so long to play.
Libertalia: Arrr Matey. We got Libertalia to the table on Wednesday and, as usual, thoroughly enjoyed it. Well, I enjoyed the first two rounds. I was playing my best game of Libertalia ever. Then I got Monkeyed. And the Monkey passed me 4 curses. And to add insult to injury, during dusk I had to take another curse token. Needless to say I did not win.
Tsuro: My friend’s $1.20 thrift find of Tsuro keeps making it to the table. We played a pretty fun game of it where nearly everyone was left until the last four tiles. This is such a good filler game, but I don’t think I’d pay $40 for it.
CoinAge: I got a free copy of CoinAge from the designer, Adam McIver, at GenCon. I hadn’t been able to play it until last Friday, when I taught it to my wife. For being a game of three cards, where two of them are rules, I’ve never realized how much strategy you can pack into a game that requires pocket change. This was really enjoyable and I’m looking forward to playing it with someone who likes games more than my wife.
Morels: This is a game that my wife really enjoys. I enjoy it for that fact. You can check out my review of Morels to see what I thought. But the fact that my wife will play it with me means it gets a shiny little star.
The Little Prince: This is another game that my wife enjoys. So with Morels from GenCon 2012 and The Little Prince from GenCon 2013 I’ve been able to prove to my wife that my visiting of GenCon has been worth it both years. While I don’t enjoy the 2 player version of The Little Prince as much, it is still a really fun game.
***
So those are the Boards and Barley I enjoyed last week. What did you enjoy???
Sourcing Game Components: Chits

Unpunched chits from Small World.
Today I’m posting the third article in a four part series about where to buy components for your game designs. Last week I posted about Meeples. The previous week I posted about cards. Today is about those obscure little components so nicely referred to as Chits. Here is a list of the four articles in this series:
- Sourcing Cards: 9-5-13
- Sourcing Meeples: 9-12-13
- Sourcing Chits: Today!
- Sourcing Dice: 9-26-13
First, a disclaimer: There is nothing quite like that fresh new board game smell when you pull off the shrink wrap and open a game for the first time. Then you have the awesome moment of getting to punch out the chits and that really makes you feel special. I love that!
Today, however, we are not talking about unpunched chits, but rather blank chits that you can use for prototyping your game design. These include circles, squares, hexes, and more.
As a reminder I want to give credit to the list that inspired me to write these articles. This list is much more exhaustive than mine since I am just highlighting a few of the major suppliers. But here’s the list so you can check it out yourself:
So today I present a few of the sources that I think are worth checking out…

SpielMaterial.de
If you are of the European contingent, then I would suggest starting with SpielMaterial.de. They have a very nice assortment of chits that you can purchase. Here is the link:
On their page you can purchase triangles, hexagons, squares, rectangles, diamonds, circles, and more. They seem like an excellent option for purchasing chits.
Print & Play Productions
 I have purchase hexagon chits from Print & Play in the past and have been very pleased. I like to buy the blank tiles with white on both sides. You can order them with your own artwork as well, so keep that in mind. Here is their page for “Counters”:
One of the nice things about Print & Play productions is that if you order the hex tiles, you’ll also receive the little rhombuses that were in between the tiles. And those could potentially be useful in a future game design! Available to you are triangles, circles, squares, rectangles, and hexes.
The Game Crafter
![]() While my go-to source for chits is Print & Play it is necessary to add The Game Crafter into the list as well. If you are ordering cards and meeples from The Game Crafter, then you might as well order some chits too! Here is a link to one of the chits they offer. Below the main area they link to similar items:
While my go-to source for chits is Print & Play it is necessary to add The Game Crafter into the list as well. If you are ordering cards and meeples from The Game Crafter, then you might as well order some chits too! Here is a link to one of the chits they offer. Below the main area they link to similar items:
They don’t have nearly the variety of SpielMaterial or Print & Play Productions. And you have to deal with the lead-time issue. But it sure is convenient if you can order all of your components from the same source.
Superior POD
![]() While blank counters are not available, Superior POD (Print On Demand) does offer printed square and hex tiles, but only of limited sizes. Here is the link:
While blank counters are not available, Superior POD (Print On Demand) does offer printed square and hex tiles, but only of limited sizes. Here is the link:
They only offer 2″ hexes, 1″ squares, and 5/8″ squares. So it’s pretty limited, but it appears that they might be mailed to you unpunched, which is sweet.
So there you go. I know this is a short list, but I think that’s because there just are not very many sources for board game tiles like these. If you know of other sources that have quality components available, please let me know and I’ll add them to this list.
Thanks for checking this out. I hope it helps you as you build your game prototypes!
Monte Carlo Simulations for Game Design
Today’s article is a guest post by my good friend Adam Buckingham. You can find him on Twitter (@AdamBuckingham). Adam has written some excellent sci-fi novels, posted about them on his blog (aegisys.blogspot.com), and is planning on bringing a game design to Protospiel-Milwaukee at the end of the month. Today he is sharing some amazing stuff about using Monte Carlo simulations within Microsoft Excel to help balance your game design. Thanks, Adam, for writing this article for all of us! Throughout the article editor’s notes are in italics.
You’ve just designed the coolest game ever conceptualized. You’ve done a few playtests, and as a result, you’ve started to see some possible signs of imbalance in the deck of cards. But you’re not sure if the problem is just an anomaly of the first couple of playtests, or a core issue with the game. If only you had the time to do 1,000 playtests to test the balance. Enter the Monte Carlo Method.
What is the Monte Carlo Method?
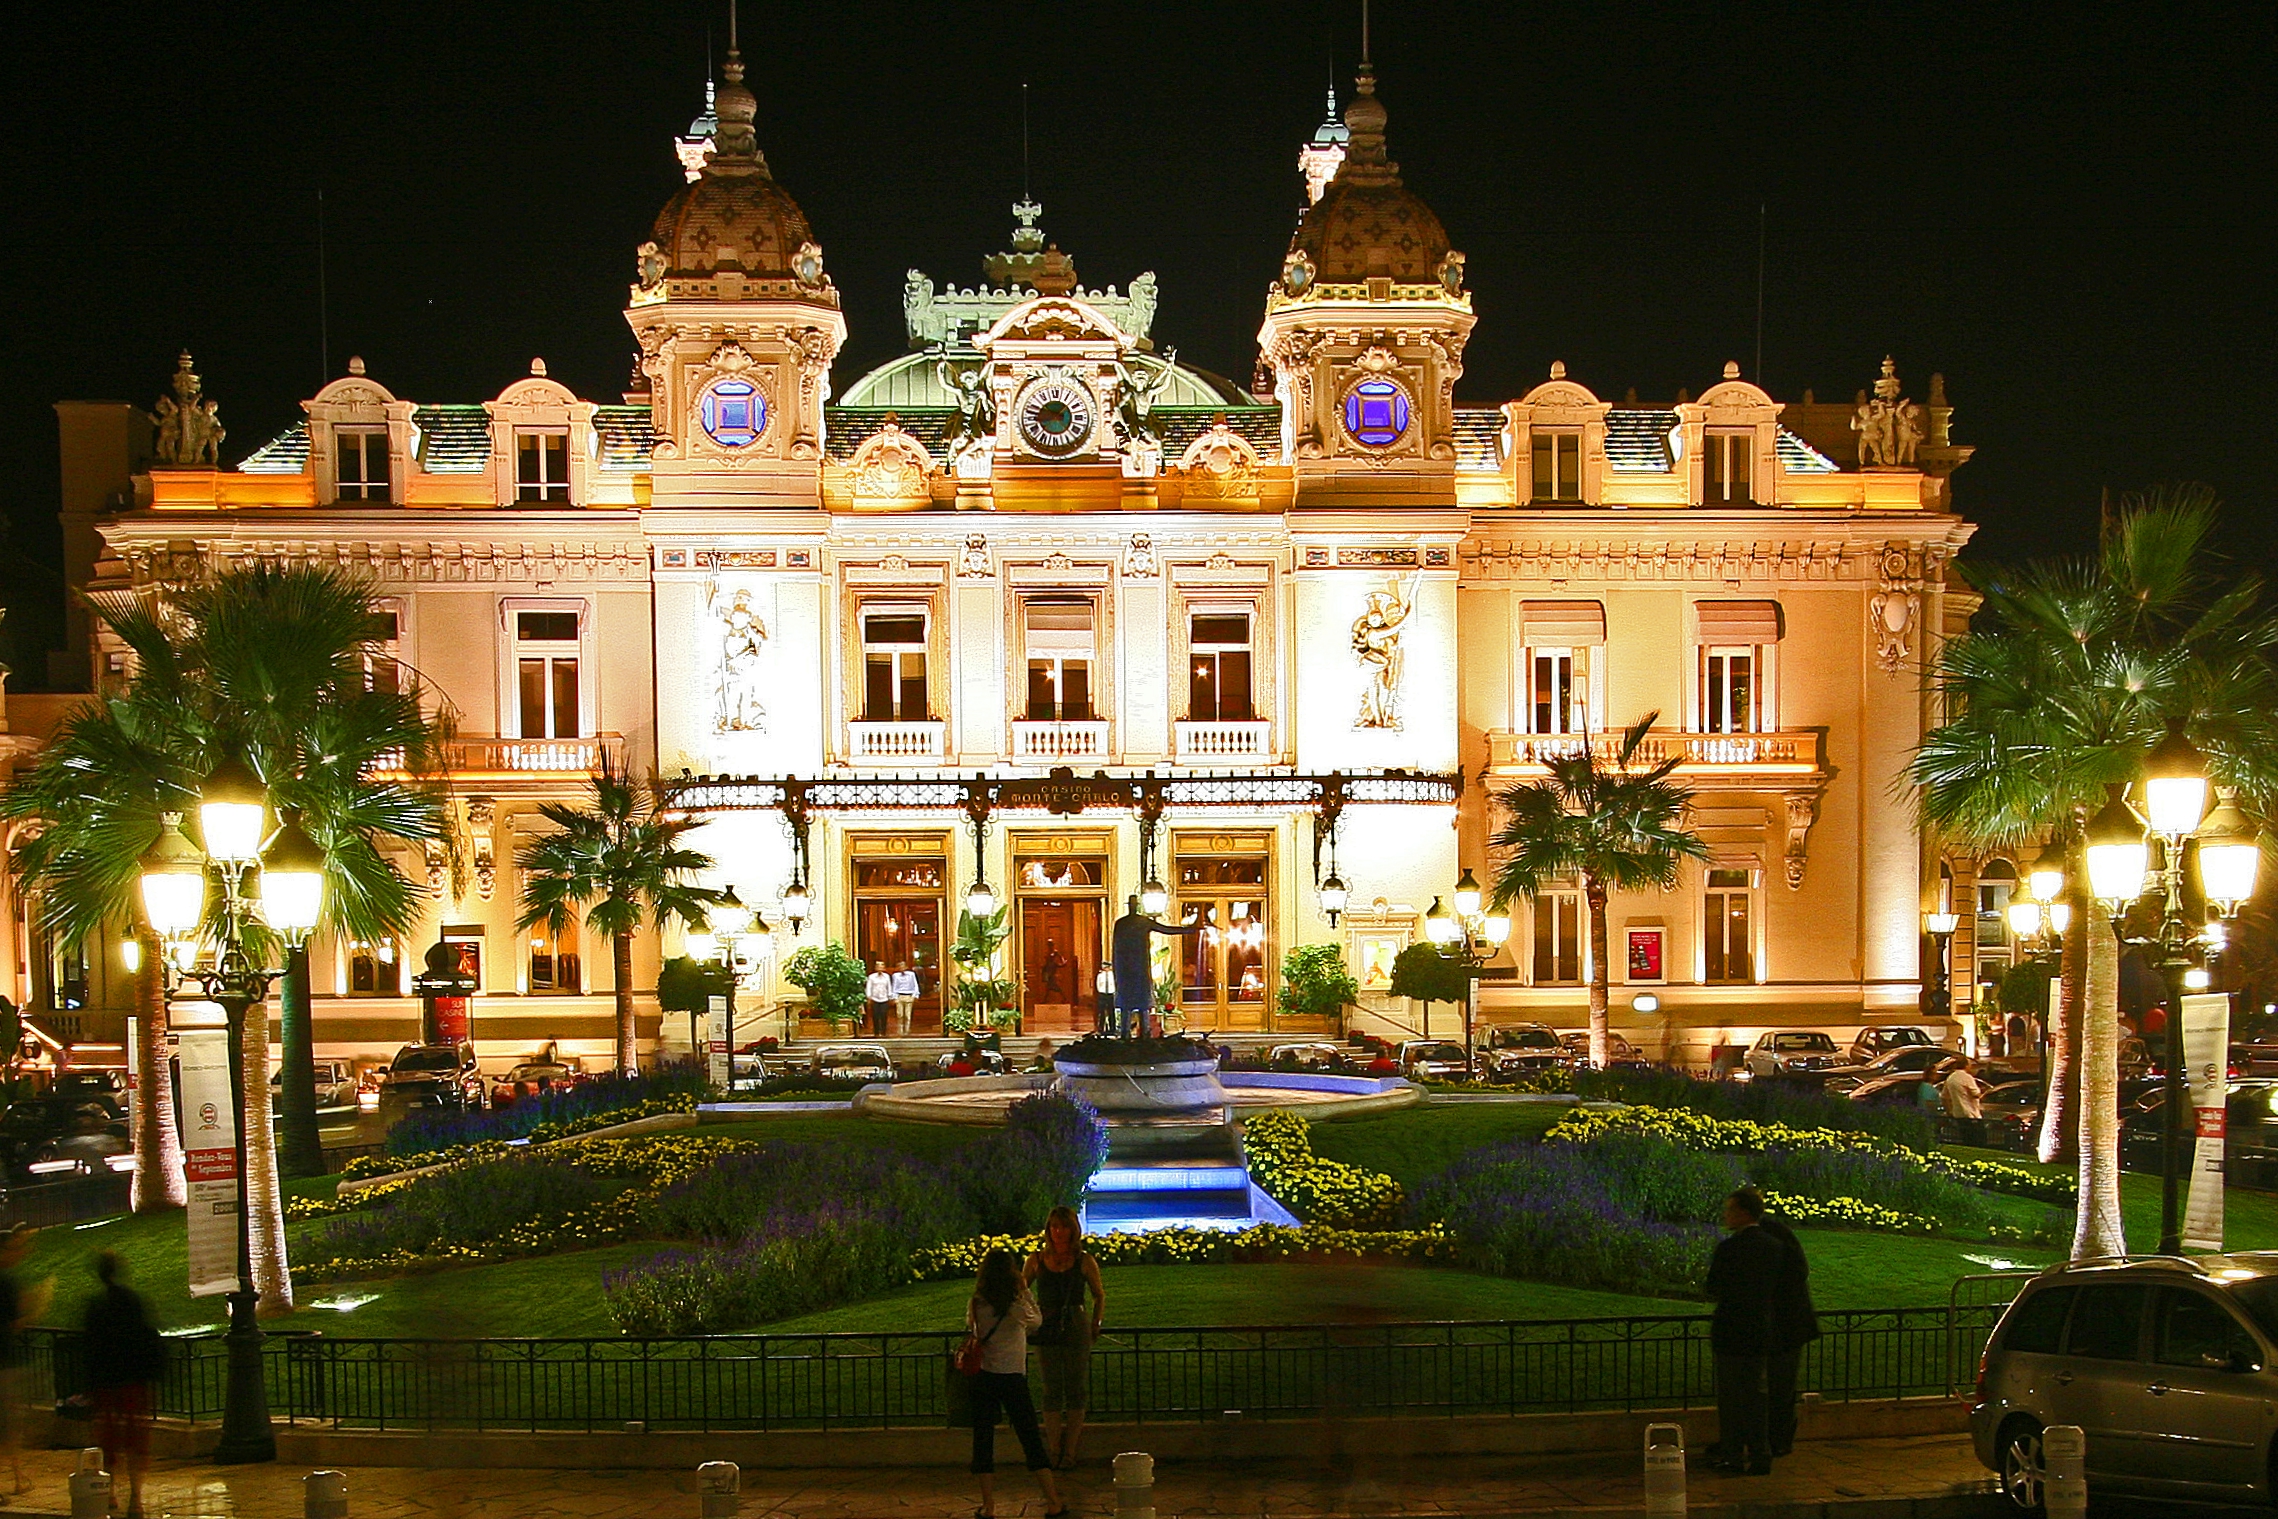
The famous Monte Carlo Casino
The Monte Carlo method is a method of statistical modeling that uses random factors to create a set of results that can then be analyzed similarly to how a statistical sample would be. The name is in honor of the creator’s uncle, who used to borrow lots of money to gamble at the Monte Carlo Casino in Monaco. The method came into common use on the Manhattan Project (the bomb thing… not the awesome worker placement game by Minion Games) and has become a standard in fields from physics to finance. The idea is that rather than try to calculate the probability of a series of random events blindly, just create a dataset you can analyze. If you can define the random elements, determine their constraints and associated probabilities, then you can run a large number (Typically 1000 or more) of simulations to determine the most likely result.
Editor’s Nerd Note: We use Monte Carlo analysis for determining the effect that neutrons have in nuclear fusion reactors. Neat, huh?
Games are a perfect (if quite simple) application of the method. Imagine a game that has a deck of 20 goal cards (e.g., Ticket to Ride). Each player will be dealt 3 of those cards. On these cards, there are a number of resource requirements and a point value. If we know the number of players and have a list of the cards, we can simulate the starting hands for the players by generating a random shuffle of the deck. Repeat a few hundred times, and you’ve got a picture of what the game will look like if dealt repeatedly. Taking it a step further, we can calculate the likely end score, average score per player, resource requirements, average winning margin if all players complete their goals, and a whole host of other statistics.
Sounds Magical, tell me more!
It is Magical! More on that later. Running a Monte Carlo Simulation can be resource intensive (Editor’s Note: this means it can swamp your computer). Luckily, most of us have a tool on our home computers that can run simple simulations really easily. That’s right, I’m talking about Microsoft Excel. Using Excel, it’s actually quite simple to run a simulation with thousands of iterations, and takes less than 10 minutes to set up if you know what you’re doing. Hopefully, this article will get you on your way.
I’ve created a sample file that you can follow along with. It’s located here:
https://docs.google.com/uc?export=download&id=0B7jhoEOs7yvtRkNVM2NCYWxvR0k
Depending on your machine, It may take a minute to calculate, but just hang in there. If it’s unbearable, you can change to Manual calculation: Formulas Tab > Calculation Options > Manual. Just remember that you need to press F9 when you want to calculate.
To start, I’ll give an overview of a few of the key functions you will use in creating the simulation. Note that some of these functions might not be available in versions of Excel before 2007.
| Function | Arguments | Explanation |
| Rand | None | =Rand() will return a random number between zero and 1. Especially useful for calculating the occurence an event that we know will happen x% of the time. Also useful in our deck of cards example. |
| Randbetween | Lower & Upper Bound | =randbetween(1,6) will return a random number between 1 and 6 inclusive. Good for simulating die rolls. |
| Small/Large | Range & k (item # in the list you want) | =small(A:A,6) will return the 6th smallest number in column A. This is used for programmatically sorting randomized values. =Large(Range,K) works exactly opposite small |
| Vlookup | Lookup value, range, lookup column, exact | =vlookup(C1,A:B,2,0) will take the value in C1, find the same value in column A, and tell you what is in column B on the same row. Vlookup is instrumental for referencing values in a table. The function will always look for the lookup value in the leftmost column of the range you specify in the 2nd argument. The Third argument is the column number within the range specified in the 2nd argument. The 4th argument should generally be 0: return only an exact match. 1 will return the next closest if an exact match isn’t found. |
| Statistical functions | Range | Average, min, max, stdev. These will provide the statistical information you want to know about your results. |
Setting up the Simulation
Basic Card Design: Assigning “resources” to your cards.
Let’s go back to the earlier example of the 20 card deck with resources and points for each card. In order to create our Monte Carlo Model, we need to be able to create a single, randomly generated simulation of our game. Once we do that, we can repeat that setup 1,000 times to calculate our statistics.
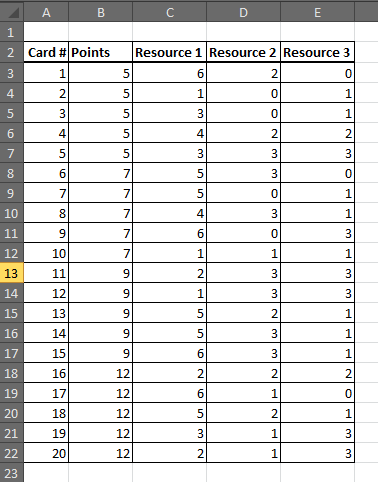
The first step is to input all the card parameters into a table in excel. For each card, we need the number of points and the requirements for each resource. We’ll put this on the first tab of our workbook. You could add other elements to this table, but for now, we’ll keep it simple.
 Next, we’ll create our simulation on a second tab in the same file. We need to create a deck shuffling engine. To do this, we’re going to generate a random value for each card, and then sort the cards based on that value. This will put them in a random order each time we calculate our spreadsheet.
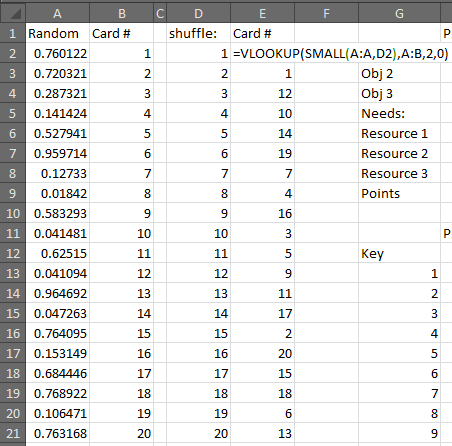
Put the numbers “1” through “20” in column B to represent the 20 cards in your deck. In column A, we’re going to use our Rand function to generate random numbers. So type =Rand() next to the first card, and fill that down to card number 20. The result will look something like the picture to the left.
Why did we use Rand() instead of Randbetween(1,20)? You could use randbetween, but since each function result is truly random, it would be possible to get two results that are the same number. This will cause issues when sorting later. With rand, you get 15 digits, which means it’s very unlikely that there will be two values that are exactly the same.
Using Vlookup and Small will allow for correct sorting every time!
Speaking of Sorting, it’s time to sort these numbers by the randomly generated numbers. We can’t just sort the list, because the order will change every time we “shuffle” the deck. So we’re going to do it programmatically. To do this, we’re going to use a combination of vlookup and small. Remember that small returns the kth smallest value in a list. So we are going to start by making a list from 1 to 20, representing the order of the cards in the deck. Put that in Column D. Then in E2, we’re going to use Small to return the smallest random value: =small(A:A,D2). That returns the smallest random number from column A. We’ll go a step further and return the card number from Column B using a Vlookup: =vlookup(small(A:A,D2),A:B,2,0). Fill that formula down and we’ve got a shuffled deck. Press F9 a few times to verify that it shuffles each time you calculate.
Now that the deck is shuffled, we’re almost there. We just need to deal 3 to each player. So we’ll create yet another table, with the 4 players listed across the top and the 3 cards dealt to each. P1 is dealt the 1st, 5th, and 9th cards, etc… Make sure you use a formula to fill in these values (=E2, etc.). Below that, we’re going to calculate the resources each player needs and the points they earn. We’ll use a bunch of Vlookups to look these values up in the first table we built. We end up with a table that looks something like this:

So now we just need to repeat that 1000 times. Just keep pressing F9 over and over, and write down the results…
Actually, Let’s do it the Fancy Way!
To make this easier, we’re going to translate all those values above so that they show up in a single row of data. So P1 R1 | P1 R2 | P1 R3 | P1 Points | P2 R1| etc… and create formulas for each column that points to the appropriate cell in our table above. We’ll also add columns to the right that sum the total needs for each resource and total points. It should look like this (click to embiggen):
![]()
You can see I’ve labeled this row “Key” because this will serve as the key from which we will run our thousand simulations. Below the word Key, we’re going to number 1 to 1,000. (Quick tip, you can do this via the “Fill” button on the Home tab in Excel. Type 1 in the first cell, then select it and go to Fill>Series, then select columns, and a Stop value of 1000).
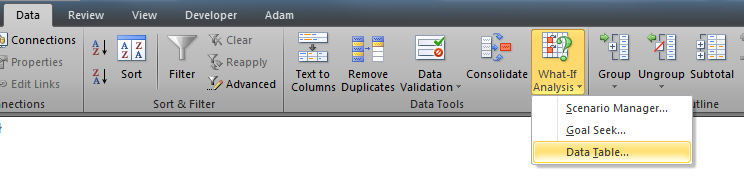
Now we’ll use the Magic of Excel to run 1,000 iterations of your simulation. We’ll use the Table tool for this. Start by selecting your key row (including the word Key), and dragging down to your last numbered row. So you should have a big selection of 1,000 rows and a bunch of columns. Now go to the Data Tab in Excel, and click What-If Analysis > Data Table:
Awesomeness approaches!
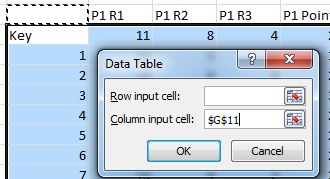
In the pop-up window, leave “Row Input Cell” blank, and for Column Input Cell, just select some empty cell. Maybe the cell directly above the word “Key,” it doesn’t matter, as long as the cell is completely empty, and is outside your table range.
Click OK, sit back, and watch the magic. Excel will run your simulation 1000 times. Now you can calculate statistics like the average number of resource 1 per player or the average total points per game. Press F9 a few times. The statistics should change slightly, but not significantly. If they are changing a lot, you can try making a bigger table with 2,000 iterations or more until you get a more stable result.

Results! Yay! What do they mean???
Interpreting the Results
Editor’s Note: This is the tricky part. If you can’t understand what the results are actually saying, then don’t bother doing the analysis. When you start the simulation, make sure you ask yourself what you expect or want the results to look like. Then you can compare the results with what you expected. After that you can tweak your deck of cards, in this example, to get the expected result.
Based on our result, we can see that Resources 2 (R2) and 3 (R3) are fairly well balanced with each other, while Resource 1 is in much greater demand. This might be ok, but you will want to make sure that there is enough Resource 1 available. We see the average points per player is about 25 per game, with a minimum of 15 and a max of 36. The average total score between 4 players is 99. The average highest possible score for any given game is about 30, while the average spread is about 10 points from highest to lowest.
See! It is Magical!
So there you have it. You’ve just tested balance in your game without having to touch a single card. Now you can re-balance and get your friends together to play. Of course, you shouldn’t consider this to be a replacement for playtesting. Excel can’t tell you if your game is fun, and it can’t simulate strategy. It can’t make complicated choices or stab you in the back. It’s difficult to simulate social game or smack-talk. But it might be able to help you see areas of imbalance or help you make tweaks.
https://docs.google.com/uc?export=download&id=0B7jhoEOs7yvtRkNVM2NCYWxvR0k
I’ve uploaded a copy of the simulation above that you can feel free to download and use to test your own designs. I’ve also included a simple Blackjack dealing simulation, and a few die roll simulations. Feel free to contact me with any questions. @AdamBuckingham or AdamLBuckingham at gmail.
Editor’s Note: Thanks, Adam, for writing this article! I know that this method has already helped me with the Scoville design. I’m looking forward to hearing success stories from other people!
Also, I am definitely NOT the person to contact about this. If you have questions, please send them Adam’s way rather than posting as comments on this article.
