Category Archives: The Boards
Board game reviews. Board game design info. Upcoming games. Convention information. All things board game related are here!
Prototype Art: Alignment in Inkscape
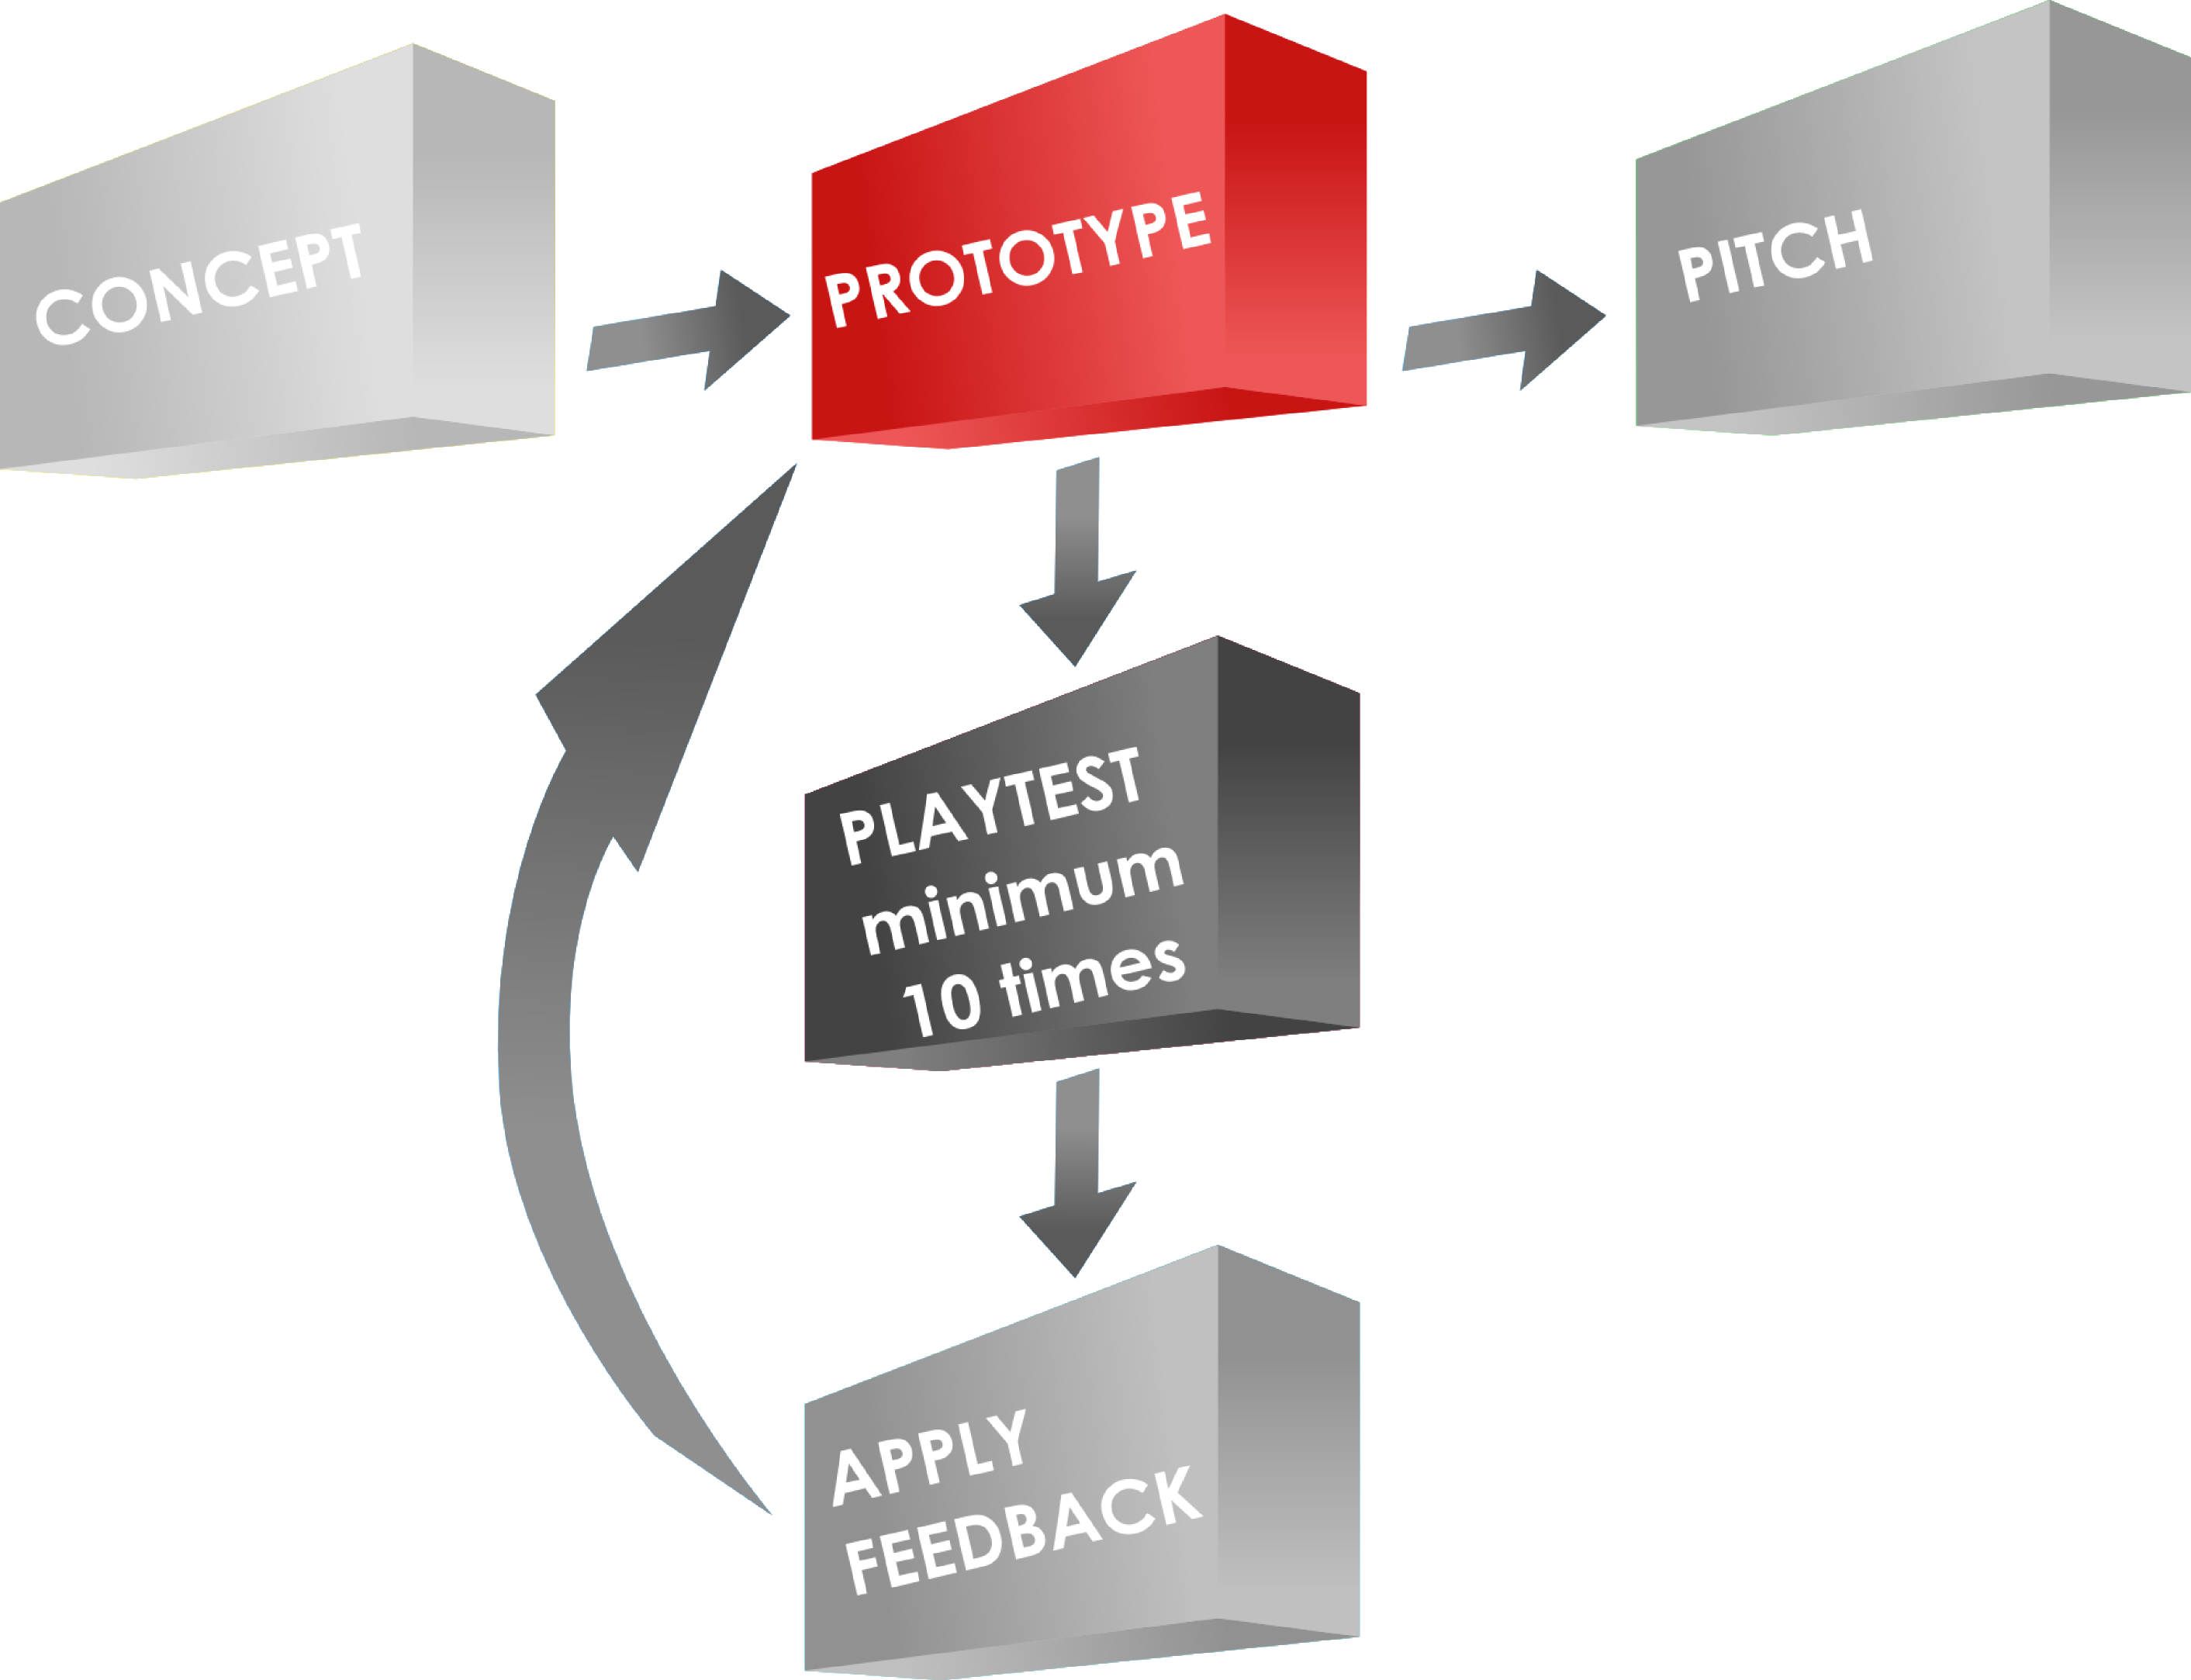 I use Inkscape for all of my game design artwork. It is relatively easy to use and is vector based, so I can make things larger or smaller as needed without any loss in picture quality.
I’ve done a couple other Inkscape tutorials about game design artwork. You can check those out:
Today I want to focus on one specific tool within Inkscape: Alignment.
If you don’t have the software, you can download it from their website: inkscape.org.
Let’s Line Things Up!
The tool I find I use the most within Inkscape is the alignment tool. I use it for every piece of artwork or graphic design that I make in Inkscape.
When you are working in Inkscape and desire to line things up, look for this icon: 
Clicking that will open the Alignment options, which will look like this:

Control Panel of Alignment
Let’s run down what those options are. Here is a new version of that image:

Instead of running through each of those things listed above I am going to provide a couple examples. At the end of this article you will find a the Inkscape file that I used for these examples. Feel free to download it and use it to get familiar with the alignment tools.
Anchors Away!
When aligning things the most important thing is understanding which object is the anchor. The anchor is the object that will not move when the command is applied. You can choose the anchor with the options from the “RELATIVE TO” box at the top, which are the following options:
- Last Selected
- First Selected
- Biggest Object
- Smallest Object
- Page
- Drawing
- Selection
The three that I use the most are “Last Selected,” “First Selected,” and “Page.”
When selecting multiple items, if you chose the anchor last, then you should set RELATIVE TO to “Last Selected.” That way when you choose the alignment function, the anchor will appropriately stay put and the other objects will move.
Likewise, the “First Selected” option will cause the anchor to be the first object you select. Both of these options are nice because you can make sure you’ll know which object won’t be moving.
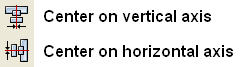
Using the “Page” option will align things with the page. The Page is represented by the black box in the middle of the canvas when opening a new document. I use this a ton when designing artwork for cards since it allows me to center things on the page. This one can come in very handy. You can align things to the center of the page by using these two alignment functions:
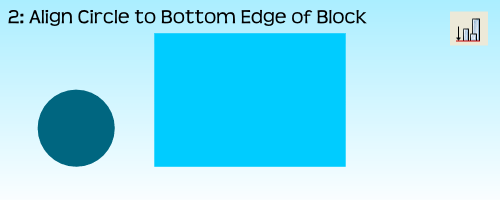
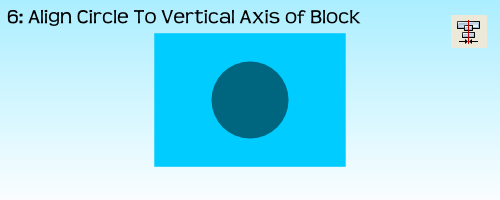
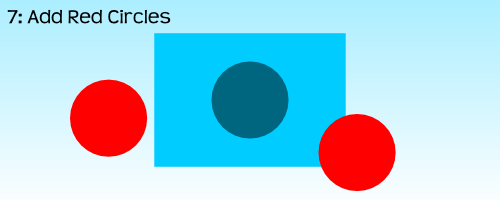
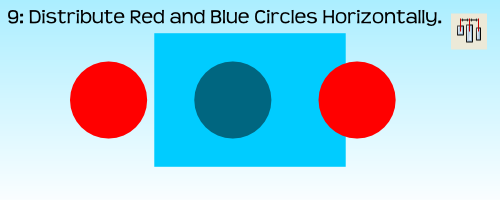
Alignment Examples
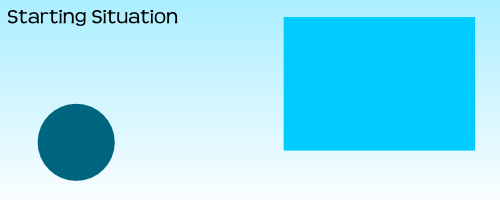
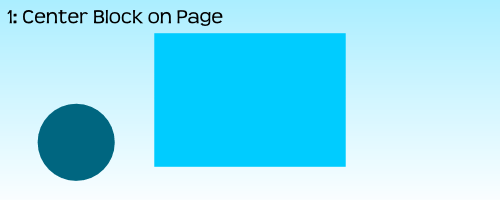
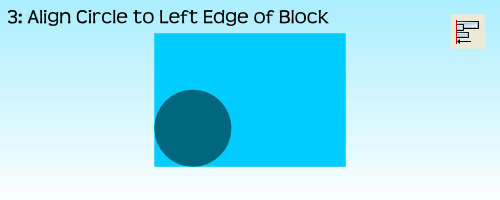
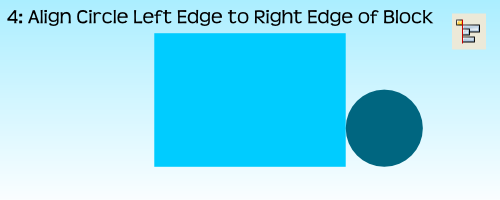
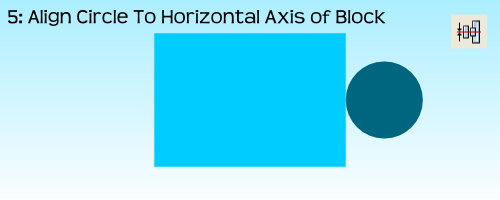
I’m going to use a circle and a block and show you how several of the functions work. After centering the block on the page I’ll be using the block as the anchor for the remaining alignments.

 For the very last example, step 10, I had to use the “Treat Selection As Group” option. If I had not used it the result would have been to stack all three circles on the vertical axis of the block:
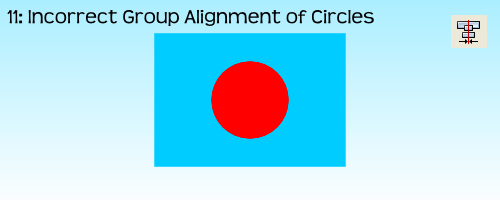
By treating the three circles as a group it allows for the whole group to be aligned without adjusting the relative locations of the objects in the group. Often I’ll just group objects myself before aligning them and then ungrouping them after the alignment. But feel free to do it however you like.
That’s Basically It
I have found that these alignment tools are very useful when making prototype artwork for my game designs. It allows you to consistently place things in the same spots. It allows you to make things line up correctly. And it allows Inkscape to help design your awesomeness!
Here is the file: BoardsAndBarleyAlignmentExample.svg
It is located in Google Drive and to get it to work you’ll have to download it. Please let me know if you have any questions. Thanks for reading.
Design Me: Manhunt
It’s Friday and I haven’t exercised my brain lately. So today I am doing a Design Me challenge.
Design Me challenges are all about exercising your brain. Like soccer players need to practice when not playing games, so I believe designers should practice their design skills. A Design Me challenge is a great way to exercise your designer mind. So let’s exercise our minds using this combination of theme, mechanics, and victory condition from Boardgamizer:
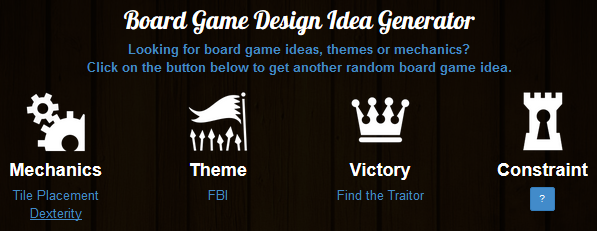
FBI tile placement with a dexterity aspect! Piece of cake!
If you have never checked out Boardgamizer, go do so right now! You just might be inspired for your next awesome game design.
MANHUNT
Manhunt is a tile (card) placement dexterity game for 2 to who knows how many players. Let’s say 8. So 2-8 players. Each player is given an objective card at the beginning of the game. On each card are two goals. The first player to complete both goals will win this fast-paced fun and interactive game!
Components
This game has very few components. They are:
- 8 Objective Tiles
- 46 City Tiles of varying terrain
- Manhunt tokens
- Objective tokens
- Rulebook
How To Play
 Deal each player one Objective tile. This represents that player’s victory condition. Shuffle the City deck and place it face down near the edge of the table. Flip one tile face up and place it in the center of the table. Then flip two more tiles and place them face up next to the deck.
On your turn you will either choose one of the two face up tiles OR you will draw a tile off the top of the deck. Then you will flip, drop, toss, or whatever you need to do to get the tile onto the table. However, you simply cannot place the card on the table.
No matter where the tile lands it becomes part of the city.
Of course you will want to try to do certain things. Let’s look at the tiles and then discuss some strategy:
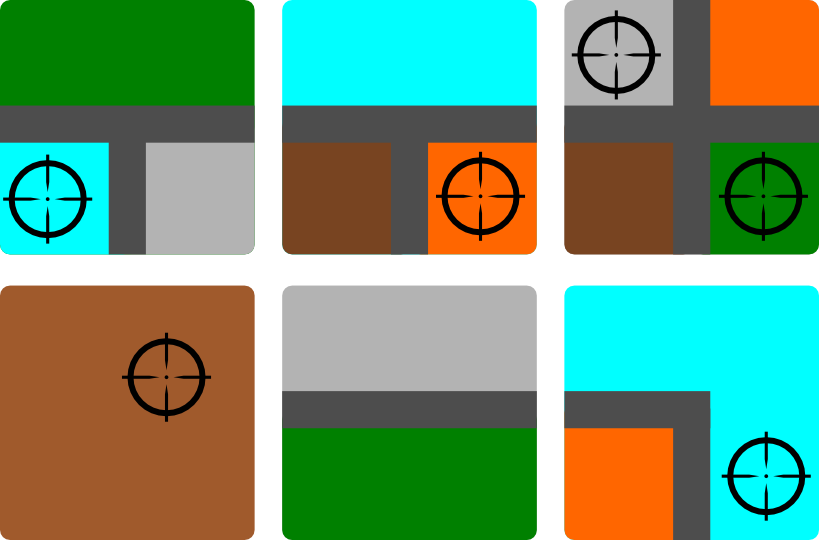
Some sample tiles. The lines that separate the colors represent roads.
Some of the objectives require you to earn Manhunt tokens. To earn a Manhunt token you you to get your tile to cover up a cross-hairs icon. For each icon that you cover you will earn 1 Manhunt token.
Some of the objectives require grouping colors together. So if you can get a group of four brown city sections together then you might meet your objective.
Some objectives could be to get roads together. If you can get three road sections to line up you might meet your objective.
When you complete an objective you should take an Objective token and place it onto your objective tile to indicate that the objective has been met.
So using roads, city sections, and cross-hair symbols you can have a slew of different objectives to meet. The first player who can meet their objectives from their tile will be the winner.
Design Thoughts?
I have successfully exercised my mind and created a tile placement dexterity game that I think could be a fun 10-15 minute filler. I have not played Jason Tagmire’s Maximum Throwdown but I imagine this is similar to that. Sorry, Jason, if this is a rip-off of that. Or I suppose this is similar to FlowerFall. If you think a game like this could be fun, then I suggest you check out Maximum Throwdown or FlowerFall.
Thanks for reading and don’t forget to exercise you designer mind!
Real Favorite Things
April Fool’s Version of B&B
Most of you understood that my “Hexes & Hops” article was an April Fool’s joke. Others mentioned that they actually preferred the green motif. If you missed out on the fun and want to see what it looked like, just click the image to the right.
I had fun writing that article and I hope you enjoyed reading it. Today I’m posting a true version of my favorite things. And I’m using all the same categories from the April Fool’s article.
Let’s get started with my favorite Barley things…
Barley Favorites:
BEER STYLE: Just about anything Belgian
I love Belgian beers, specifically Trappist beers. They have floral notes and beautiful body. And they are easy enough to understand with the names Dubbel, Tripel, Quadrupel, etc. Of those varieties I would say Tripel is my favorite. But be careful because these tend to be on the strong side. Here’s a picture from Wikipedia showing some of the best Trappist beers and their glasses:

For the next Board Game Night???
Honorable Mention: Honey Anything, Scotch Ale, Hefeweizen
BEER ESTABLISHMENTS: Breweries/BrewPubs
If I’m going out for a beer I’m gonna go someplace where they either brew beer or they serve local beer on tap. There are actually two new places being built near me that will be great Beer Establishments. I’m also blessed to have a brewery within 1 mile of my house, another big one 25 minutes away, and several more within the city. Madison, Wisconsin is a great beer town!
So I’m not going to bother going to one of those places with the bucket of Miller Lite. I’m going to a place that offers at least 10 different “good” beers on tap. I recommend this strategy.
 BEER: Duvel or Orval
To go along with my favorite beer style, I would say my favorite beer would be either Orval, which is trappist, or Duvel. These are both awesome beers with amazing flavor. Of course Chimay, Rochefort, Westmalle, and La Trappe are great substitutes.
Honorable Mention: Leffe, New Glarus Cabin Fever Honey Bock (local), Lake Louie Warped Speed Scotch Ale (local)
BEER BREWING PHASE: Cracking open the first of a new batch!
I’d be fooling myself if drinking that first new beer wasn’t my favorite part. It’s way better than the boiling, racking, or bottling. Obviously we don’t brew beer so we can have fun brewing. That’s a side benefit. The real reason we brew beer is so that we savor and enjoy fine beer!

Boards Favorites:
GAME MECHANIC: Worker Placement
I love worker placement games. Some of my favorites are Agricola (which I rarely play), Belfort, and Stone Age. I like the idea that each player has a “crew” to work with and the winner will be the player who best utilized their crew.
If you want to learn more about the Worker Placement mechanic check out iSlayTheDragon’s guide: Take This Job and Place It.
PLAYER STYLE: Fun People
Games are all about fun. So if you are playing and conversing in a manner that is fun and you are fun to be around, then you fit in the category of “Fun People.”
GAME NIGHT HABITS: Contributors
I like it when people bring beverages, snacks, and games to a Board Game Night. It shows you are taking ownership of it. It shows you are there to have a good time. It shows you are part of the group rather than a clinger-on. I also like it when people take charge and read game rules ahead of time or come prepared to teach a game that they enjoy. Be part of it, people!
GAME ART: Merchants & Marauders
This game wins for the board and the player mats. I absolutely love the use of vivid and bright color. I’ll skip the explanations and just show you the art:

This doesn’t even do it justice.
When you’ve got ships out there on the board sailing around then you can really immerse yourself in the Pirate culture!
GAME: Scoville
Alright… call me out on loving my own game. That’s fine. But I wouldn’t have designed it if I didn’t at least like it. And it turns out that I really love Scoville. I’ve played or taught it over 125 times and I’m not sick of it. It is simple, elegant, easy to learn and play, but deep in the interaction and gameplay departments. When it gets produced I hope you’ll check it out.
GAME DESIGN TIPS (Rebuttal of the fake ones):
- DO NOT hire an artist for a prototype. Let the game persuade a publisher and then THEY will hire an artist.
- DO NOT quit your day job after one successful game. Board game design doesn’t pay the bills.
- You should playtest a game no less than 40 times. Preferably closer to 100. Fine tune that thing like it’s a 50s Corvette that still roars like a lion!
- Playtest your game enough to find any place where it might be broken and fix those places. Broken games suck and demonstrate that you probably haven’t put enough work into it.
- Don’t go hog wild over adding tons of components. Try to keep the component list as streamlined as possible. But if you need to components to make your game great, then go for it!
- Don’t sell out a Kickstarter campaign by adding minis. Just make a great game.
- Don’t force a long playtest on people. Play long enough to get valuable feedback.
- Don’t use spinners. There are almost always better, more fun ways to design random elements of gameplay.
- Paper money works, but I prefer chit coins.
- Don’t design a CCG. But if you do, make it great!
There you go. April Fool’s is over and this article should fit much more closely with your Boards & Barley habits. Feel free to chime in with your favorites as well!
Hexes & Hops Favorite Things
I’m sick of that old Boards & Barley motif. So I’m switching it up for the foreseeable future. Today I want to provide you with a list of my favorite things in the gaming and brewing world. There are many things that make both the gaming and brewing hobbies awesome and I imagine you will share in a lot of my opinions today. Let’s start on the Hops side of things…
Hops Favorites:

Perfect color! (And flavor, for sure!)
BEER STYLE: Adjunct American Lager
I’ve had Bocks, Cream Ales, Dunkelweizens, Trippels and just about everything that you can think of. I just can’t help but possess an affinity toward the American Adjunct Lagers. I mean, so many people drink them that you can’t help but love them. And the television advertisements with Clydesdales and Vortex bottles are AMAZING!
Plus, my family is all geniuses (according to MENSA) and they prefer American Adjunct Lagers. So of course this would be my favorite beer style. Also, I really prefer my beer looking the same coming in or going out. The clearish yellow color is ideal for that. ‘Merica is really nailing in on the head with this beer style!
BEER ESTABLISHMENTS: College Bars
Sure, some of you may prefer those high end establishments with 40+ beers on tap from all over the world. You’re wrong. The college bar seen, with it’s 3 American Adjunct Lagers on tap or buckets of 5 cans for $6 are the truest beer scene there is. And they usually have so much history. Often they are named after some famous old dude who somehow managed to skirt the law during Prohibition. So they’ve got history and awesome beer at incredible prices.

See how happy everyone is? College bars are the best!

Just like graffiti, PBR has a special place in many people’s hearts!
BEER: Pabst Blue Ribbon
I’ve gotta be a homer on this one and choose a local beer. Anything that wins a blue ribbon is fine by me! PBR is from Milwaukee, where I grew up. So maybe I’m biased. I’m not. It’s fantastic beer and I’m just finishing my third of the day.
Did you know that it’s also perfect for eating with your cereal. I actually prefer pouring an ice cold PBR over my Honey Nut Cheerios instead of milk. When that sugary layer on the Cheerios melts away you are left with a PBR that is infused with the sweetness of honey. So Good!
BEER BREWING PHASE: Bottling
There’s nothing better than having to wash 50 bottles, a plastic 5 gallon bucket, an auto-siphon, 50 bottle caps, a plastic tube, and some plates to rest the stuff on. Boiling the wort is alright. Transferring the beer from the plastic fermenter to the carboy is fine. But the best part of homebrewing is getting to spend three hours with my 50 newest friends (the bottles). Sanitizing and filling each bottle one at a time is so fulfilling! Why would anyone ever want a kegging kit. Those people are totally missing out!
***
Those are my favorite HOPS related things… lets move on to my favorites from the HEXES category!
Hex Favorites:
GAME MECHANIC: Roll & Move
I grew up with this game mechanic. I think we all grew up with this mechanic. And obviously this choice is backed by nostalgia. But seriously… when the game can play itself in such a way that you are sitting there like you’re at the movie theater, that’s awesome!
Think about it… you get the awesome tactile feel of a die in your hands. You shake it, some people blow on it, and then you drop it to the table. Then tension fills the air as you are wondering, hoping, dreaming of seeing the right result on the top face. Sure, sometimes you don’t get the result you were looking for. But when you do it’s as if you’ve got a scissors in your hands and you’re cutting down the nets on your way to the Final Four! Does it get better than that?

Think it through, my friend. Think it through!
PLAYER STYLE: The Thinker
I won’t call it “Analysis Paralysis” as I don’t like that derogatory term. However, the player who thinks through their decisions is really the wisest of sages. They can see the big picture. They can calculate like a NASA rover crew. They know how to optimize their every move. To watch a Thinker in action is like watching Van Gogh paint sunflowers in a field on a warm summer day. Glorious!
The other advantage is that while The Thinker is choosing his or her action it allows for you to have the time to emulate their truly genius play style. Their awesomeness in thinking each decision through and through is what allows you to become a better player by also having time to think about the moves you will make when your turn comes up in 10 minutes.
From now on you should treasure and embrace the Thinker!
GAME NIGHT HABITS: Finger Licking
Some people would probably dislike finger lickers. They’d say something like, “They lick their fingers, then touch my game components. It’s like my game components have been in their mouths!” I disagree. Finger licking is an ages old way of cleaning the crud off your finger tips. Let’s face it, we usually have snacks that stick to your fingertips as you’re eating them. Doritos are guilty of this, but let’s not blame the delicious chips. What better way to clean off your fingers than to lick them, right in front of everyone, so they all know that your fingers are clean? I mean, can you imagine if people had to walk all the way over to the bathroom to wash their fingertips every time they had a snack? Games would take forever!
GAME ART: Glory to Rome
I’m a fan of the KISS method (Keep It Simple, Stupid!). Glory to Rome utilizes the KISS method greatly! The art is so simple. It gloriously portrays what the game is about. The vivid use of color gradients is strong with this one. Check out the box cover:

Simple Font, ✔. Picture of game, ✔. Cartoon art of crazy dude with sword, ✔. Non-cartoon art of roman building, ✔. This game has it all!
I can’t take my eyes off that awesomeness! If you can, then here are two Runners-Up for you: Letter head and Europa 1945-2030.

Tech Support: Allowing us to relive our great experiences since 2005!
GAME: Tech Support
Some games have themes we can’t relate to. Whales in space. Building Bridges. Cross-breeding peppers. You get the idea. But there are some games that are so accessible. There are games that everyone can relate to. This game, Tech Support, is just that!
I mean, everyone loves great tech support and we can all relate to it. I can’t think of anyone I know who hasn’t had a great experience with tech support whether it was about their computer or their phone or their cable. So of course this is a perfect theme with a HUGE potential audience!
GAME DESIGN TIPS:
There are a few favorite game designer tips so I’m lumping them all together here.
- All prototypes should be “publisher ready.” If you haven’t hired an artist for your prototype, don’t bother showing it to a publisher!
- Each game you design will sell at least 50,000 copies. So don’t be afraid to quit your day job.
- You only really need to playtest 1-3 times. (Insider secret!)
- Balance Shmalance: unbalanced games are always more fun as players can try to find the hidden ways
your games are brokenpaths to victory! - Don’t worry if your game has 500 wooden components. They’re so cheap that a publisher won’t mind.
- If you want to launch a Kickstarter campaign, just add minis to your game. It’s the easy path to the money.
- 2 Hour playtests are fine. People are just joking if they complain.
- Spinners are a great way to add randomness to your game design. Dice are way overused.
- Paper money is awesome. Don’t let that Vasel dude fool you.
- CCGs are the wave of the future. Start designing one today!
There you have it. Those are some of my favorite Game Design Tips. I hope you learned a little something from that list!
***
I’m excited to be kicking off this new Hexes & Hops motif with such a great article. Thanks so much for reading. In the rare instance that you may disagree with my choices, please feel free to comment below! You’re the best!

Monday Brews 3-31-14
Yes. My Wisconsin Badgers are in the Final Four! What more could I ask for? This isn’t a sports blog so I’ll spare you the awesome details, just be aware that I’m excited about that.
This is, however, a blog about beer and board games. And each Monday I share a recap of the Boards & Barley that I enjoyed the previous week. So I welcome you here to see what I enjoyed. If you enjoyed something special, please feel free to comment below!
The Barley:
 BARLEY SPOTLIGHT: Redhook IPA
I’m not an IPA guy. I’m not a hoppy guy. But I’m sick of sharing those two disclaimers. So by golly I’m gonna start enjoying these types of beers. There are so many of them out there that I don’t want to exclude them any longer.
So I started this new escapade with the Redhook IPA at a recent board game night. I was pleased by the lack of over-the-top hops. It was bitter, but not unacceptably floral. So I’d say I would enjoy this again. I’m excited to be branching out into a new realm of beer. I’m sure I won’t enjoy them all, but at least I’m diving in!
- Lake Louie Warped Speed Scotch Ale
- NEW! Next Door Brewing Wilbur! – I finally made it to local Next Door Brewing. I chose their Wilbur! beer and it was pretty good.
- Tyranena – The Devil Made Me Do It
- Atwater Vanilla Java Porter
- McKenzie’s Hard Cider
The Boards:
BOARDS SPOTLIGHT: Quantum Orcas
I’m not sure why Quantum Orcas still exists. It’s probably because it only takes 10-15 minutes to play and has a quirky theme. No matter the reason, it is still around and it keeps getting better. I’ll give more details below, but Quantum Orcas has gone beyond “pet project,” as a good friend mentioned, and it’s now a legit game design. I’m pretty excited about that.
- Mad City
- Alhambra
- PROTOTYPE: Scrapyard – This was a neat two-player game where players try to build the best upgraded robot. I really enjoyed the mechanic and I think there is a sweet design inside this concept.
- Backyard Astronaut
Designer’s Corner:
As I mentioned above I’ve kept working on Quantum Orcas. The biggest change I recently made was to change it to allow for 4 players. Previously it was only a two player game. Ultimately there is no good reason for this not to be playable up to 4.
So I designed decks of cards for each player and had my first ever 4 player playtest. It worked pretty well. I don’t think people were in love with the game, but the changes I implemented made it quite a bit better.
Another thing I changed was how the asteroids move through space. (Timeout… I thought this was a game about killer whales eating boats? What’s the deal? Well I changed it based on feedback and now you are an orca in space eating asteroids. That’s the deal!) Previously small asteroids would move toward the upper left corner of the 4×4 grid and large asteroids would move to the lower right corner. This caused a large pile of small asteroids in the 1, 1 spot. And players just didn’t think that helped to make it fun. Now small asteroids move up on the board and large move down. They both follow the star lines on the tiles on the board. This seemed to work quite well without increasing the fiddliness.
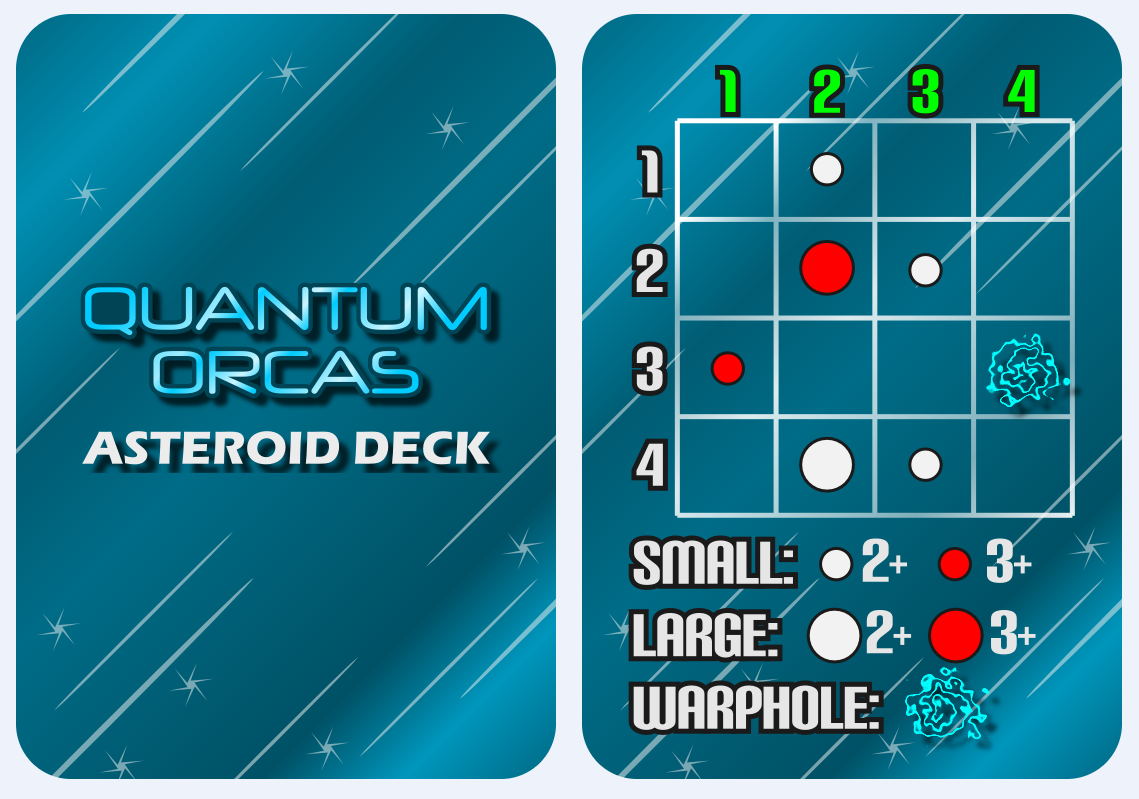
These show the placement of new asteroids and the Quantum Blowhole for each round.
The other change is that I now have an Asteroid Deck. The card example shown above has already changed after I received a suggestion of having the rows be labeled A through D instead of numbers. I originally had numbers in two colors because you would have to roll two d4s for each asteroid that you were to place. That was the fiddly part. Now there are 16 cards for seeding, 8 of which are used in a game of Quantum Orcas. These cards help speed up the game a lot!
The other game you might have heard me talking about is Brooklyn Bridge. I love this game. It has a unique time-based worker placement mechanic that has received awesome feedback. People really seem to love it. The biggest issue with the game currently is that it takes too long. I recently received feedback that will help me cut that quite a bit. I am actively making changes and trying to cycle through playtests with this game. I think there is a lot of potential here and my plan is to have 30 playtests completed and have a refined game by GenCon.
I also came up with a new game design based on a conversation with a co-worker. I don’t want to share any info yet, but I think it could potentially be a really amazing game. The only detail I’ll share is that it would have a space/sci-fi theme.
So those are the Boards & Barley and game design efforts I enjoyed this past week. What did you enjoy?!
