Category Archives: Prototyping
Ziggurat: Building the Game
I designed Ziggurat the Thursday evening before Prototspiel-Madison in October. I prototyped it the Friday of Protospiel. It was played four times during Protospiel. And I am finally putting together the pieces to turn it into an awesome game!
So today I want to share a little bit about the game and the basics of how it plays. But first here’s a history lesson:
What is a Ziggurat?

Ziggurats are like the Sumerian equivalent of Egyptian pyramids. They are basically a huge brick structure with several levels. They served as the focal point of worship in those ancient cultures. Often it is believed that a temple was built atop the ziggurats.
And since I’d rather focus on the game rather than the history, here’s the Wikipedia link: Ziggurat
The Game…
The thrust of the game revolves around building the Ziggurat. As the design currently stands you have two options on your turn:
- Purchase resources (bricks, laborers, special abilities) from the courtyard marketplace.
- Spend bricks and laborers to build the Ziggurat.
One of my design goals is to come up with games that are accessible and easy to teach. Ziggurat is like that. The simplicity of limiting what actions can be taken makes the game accessible for non-gamers.
The region of interest, in terms of adding strategy, is to design compelling and interesting decisions into those two options. For example, when purchasing from the courtyard market, would you be willing to pay a higher price for a better card? Also, when building the Ziggurat, does the location where you are building matter?
These are the sorts of things I’m trying to design into Ziggurat. Let’s take a look at the prototype.
The Prototype…
I had previously obtained some components from The Game Crafter at a prior Protospiel event. It turns out that the components I had worked perfectly for what I wanted to achieve with Ziggurat. Here is a first look at the bare prototype:
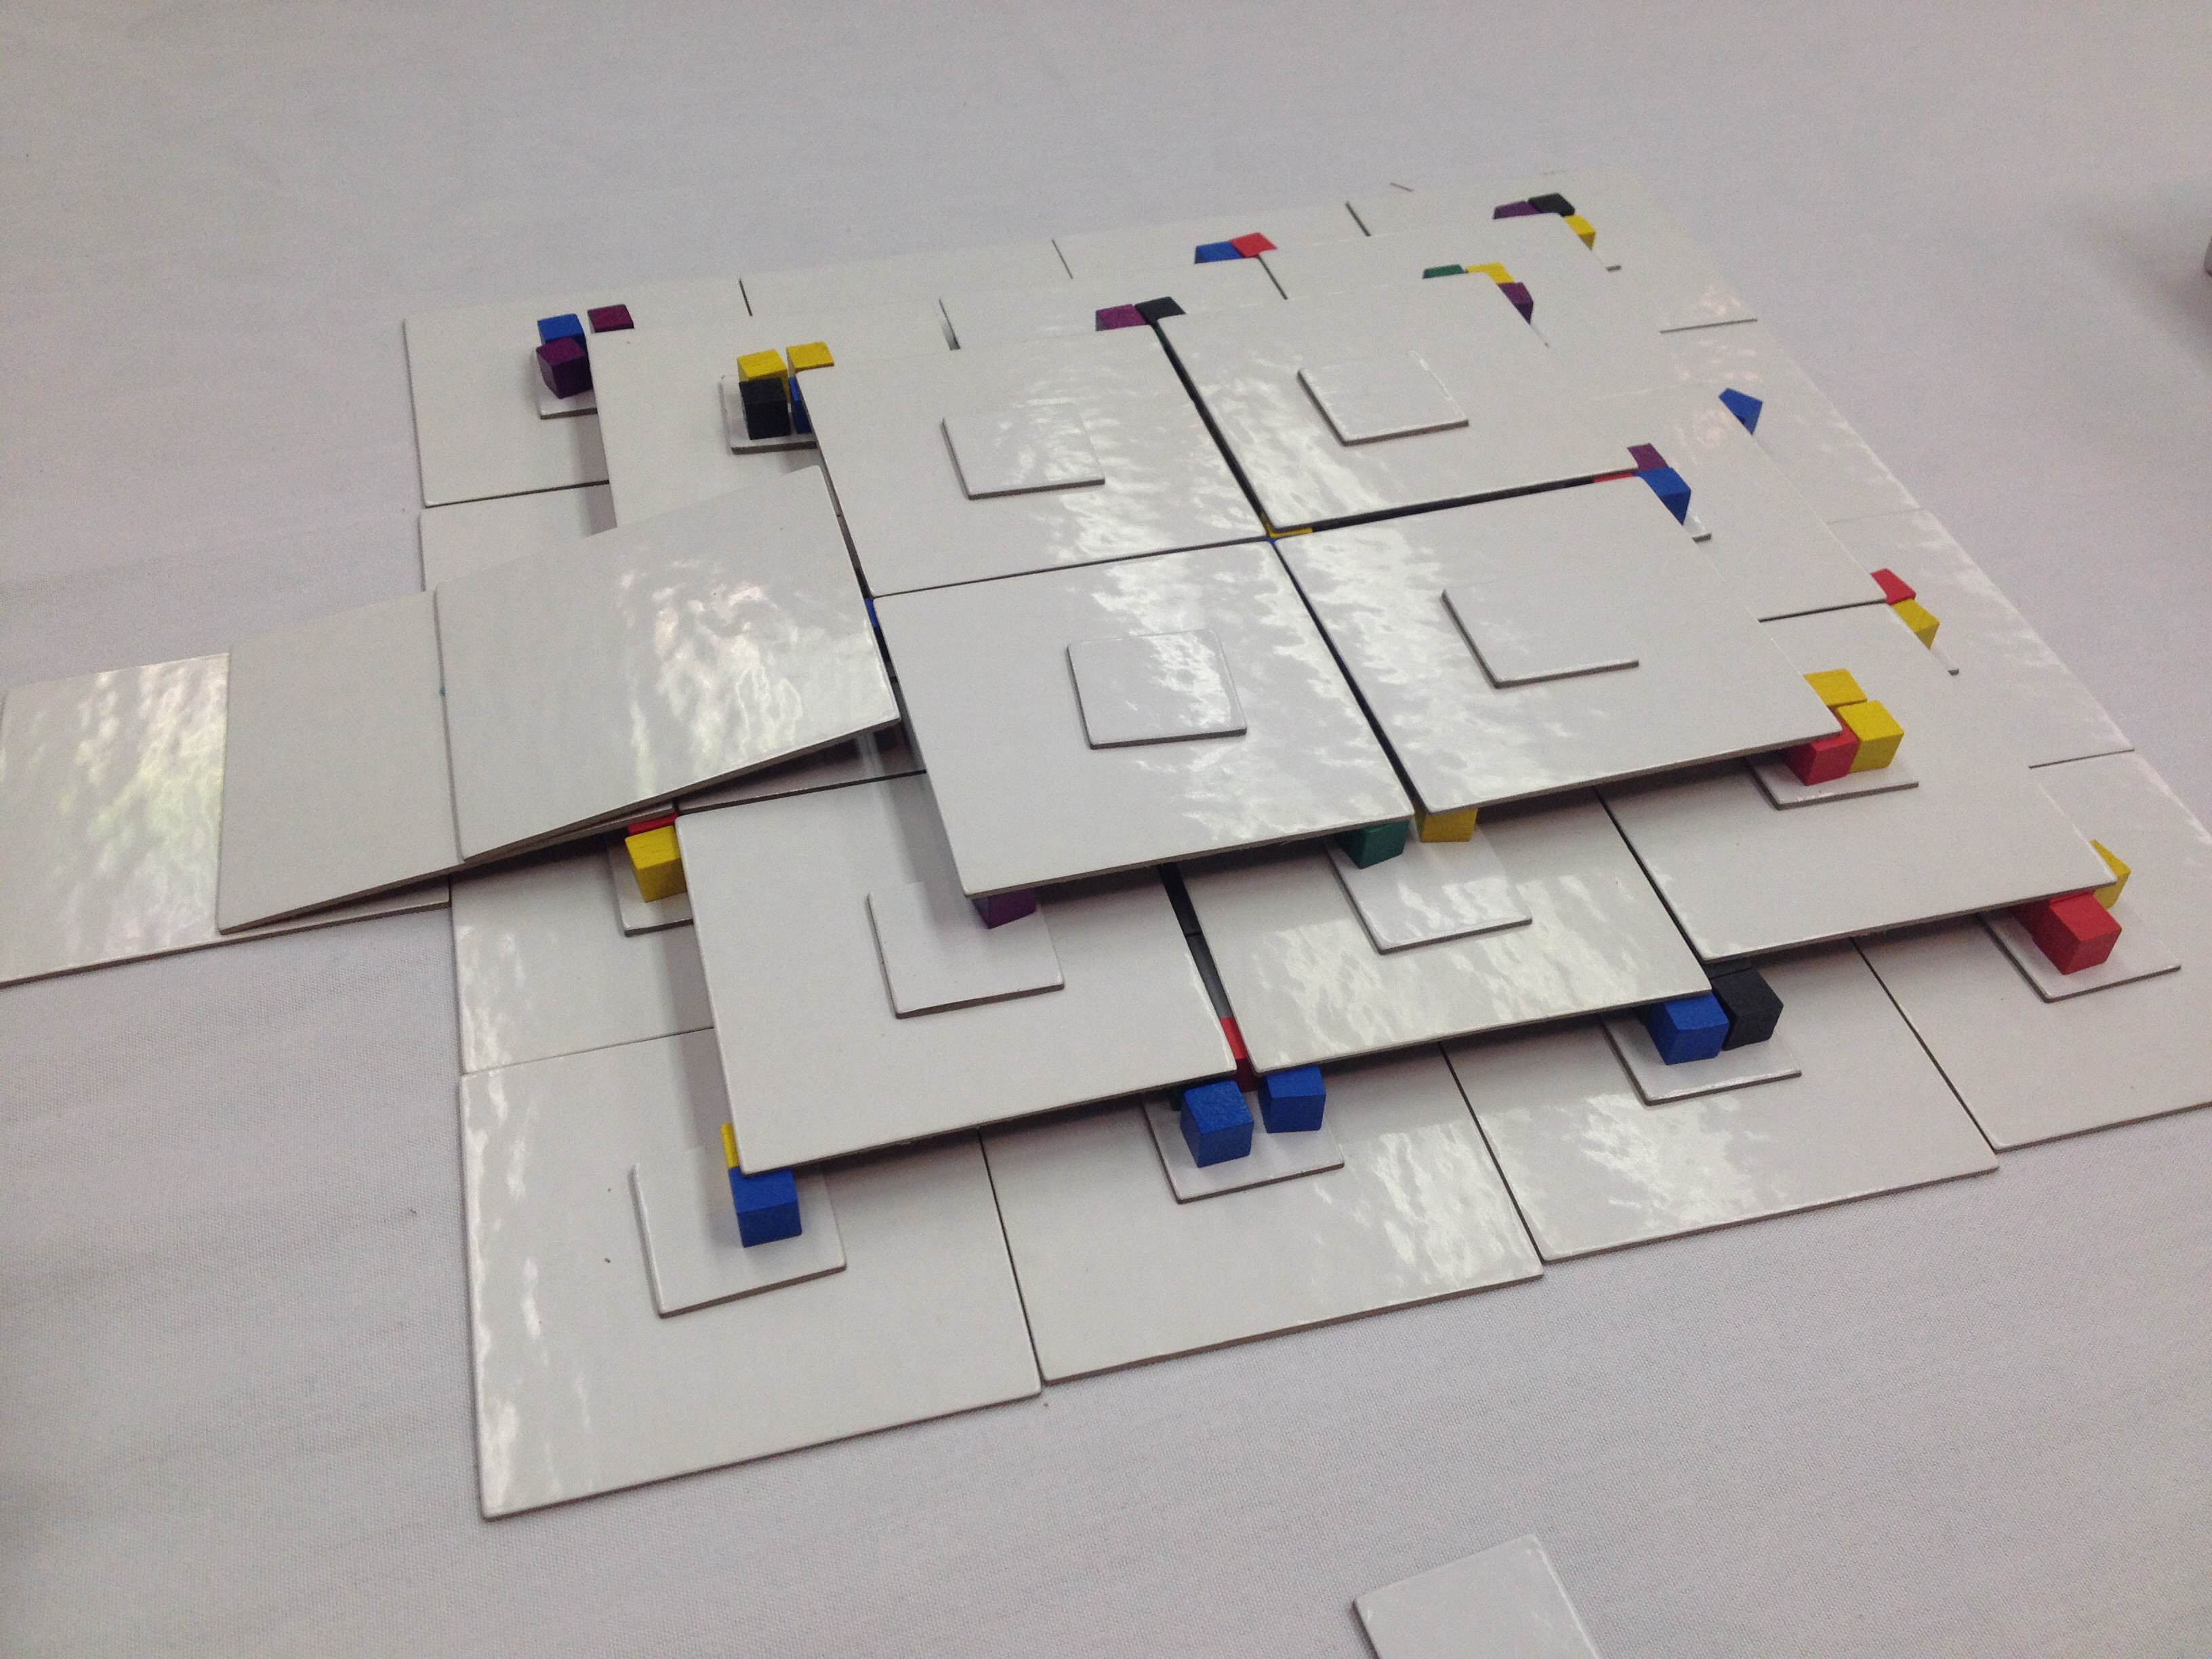
Bare bones prototype demonstrating the 3D nature of the game.
The Ziggurat is composed of three levels. On each level there are platforms that need to be built. Players will build the platforms by spending the appropriate resource and then placing one of their player cubes onto the platform. Once the first level is completed it will be scored. Then the large square tiles for the second level will be placed on top of it. Here is a look at the Prototype with more details on the tiles and platforms.
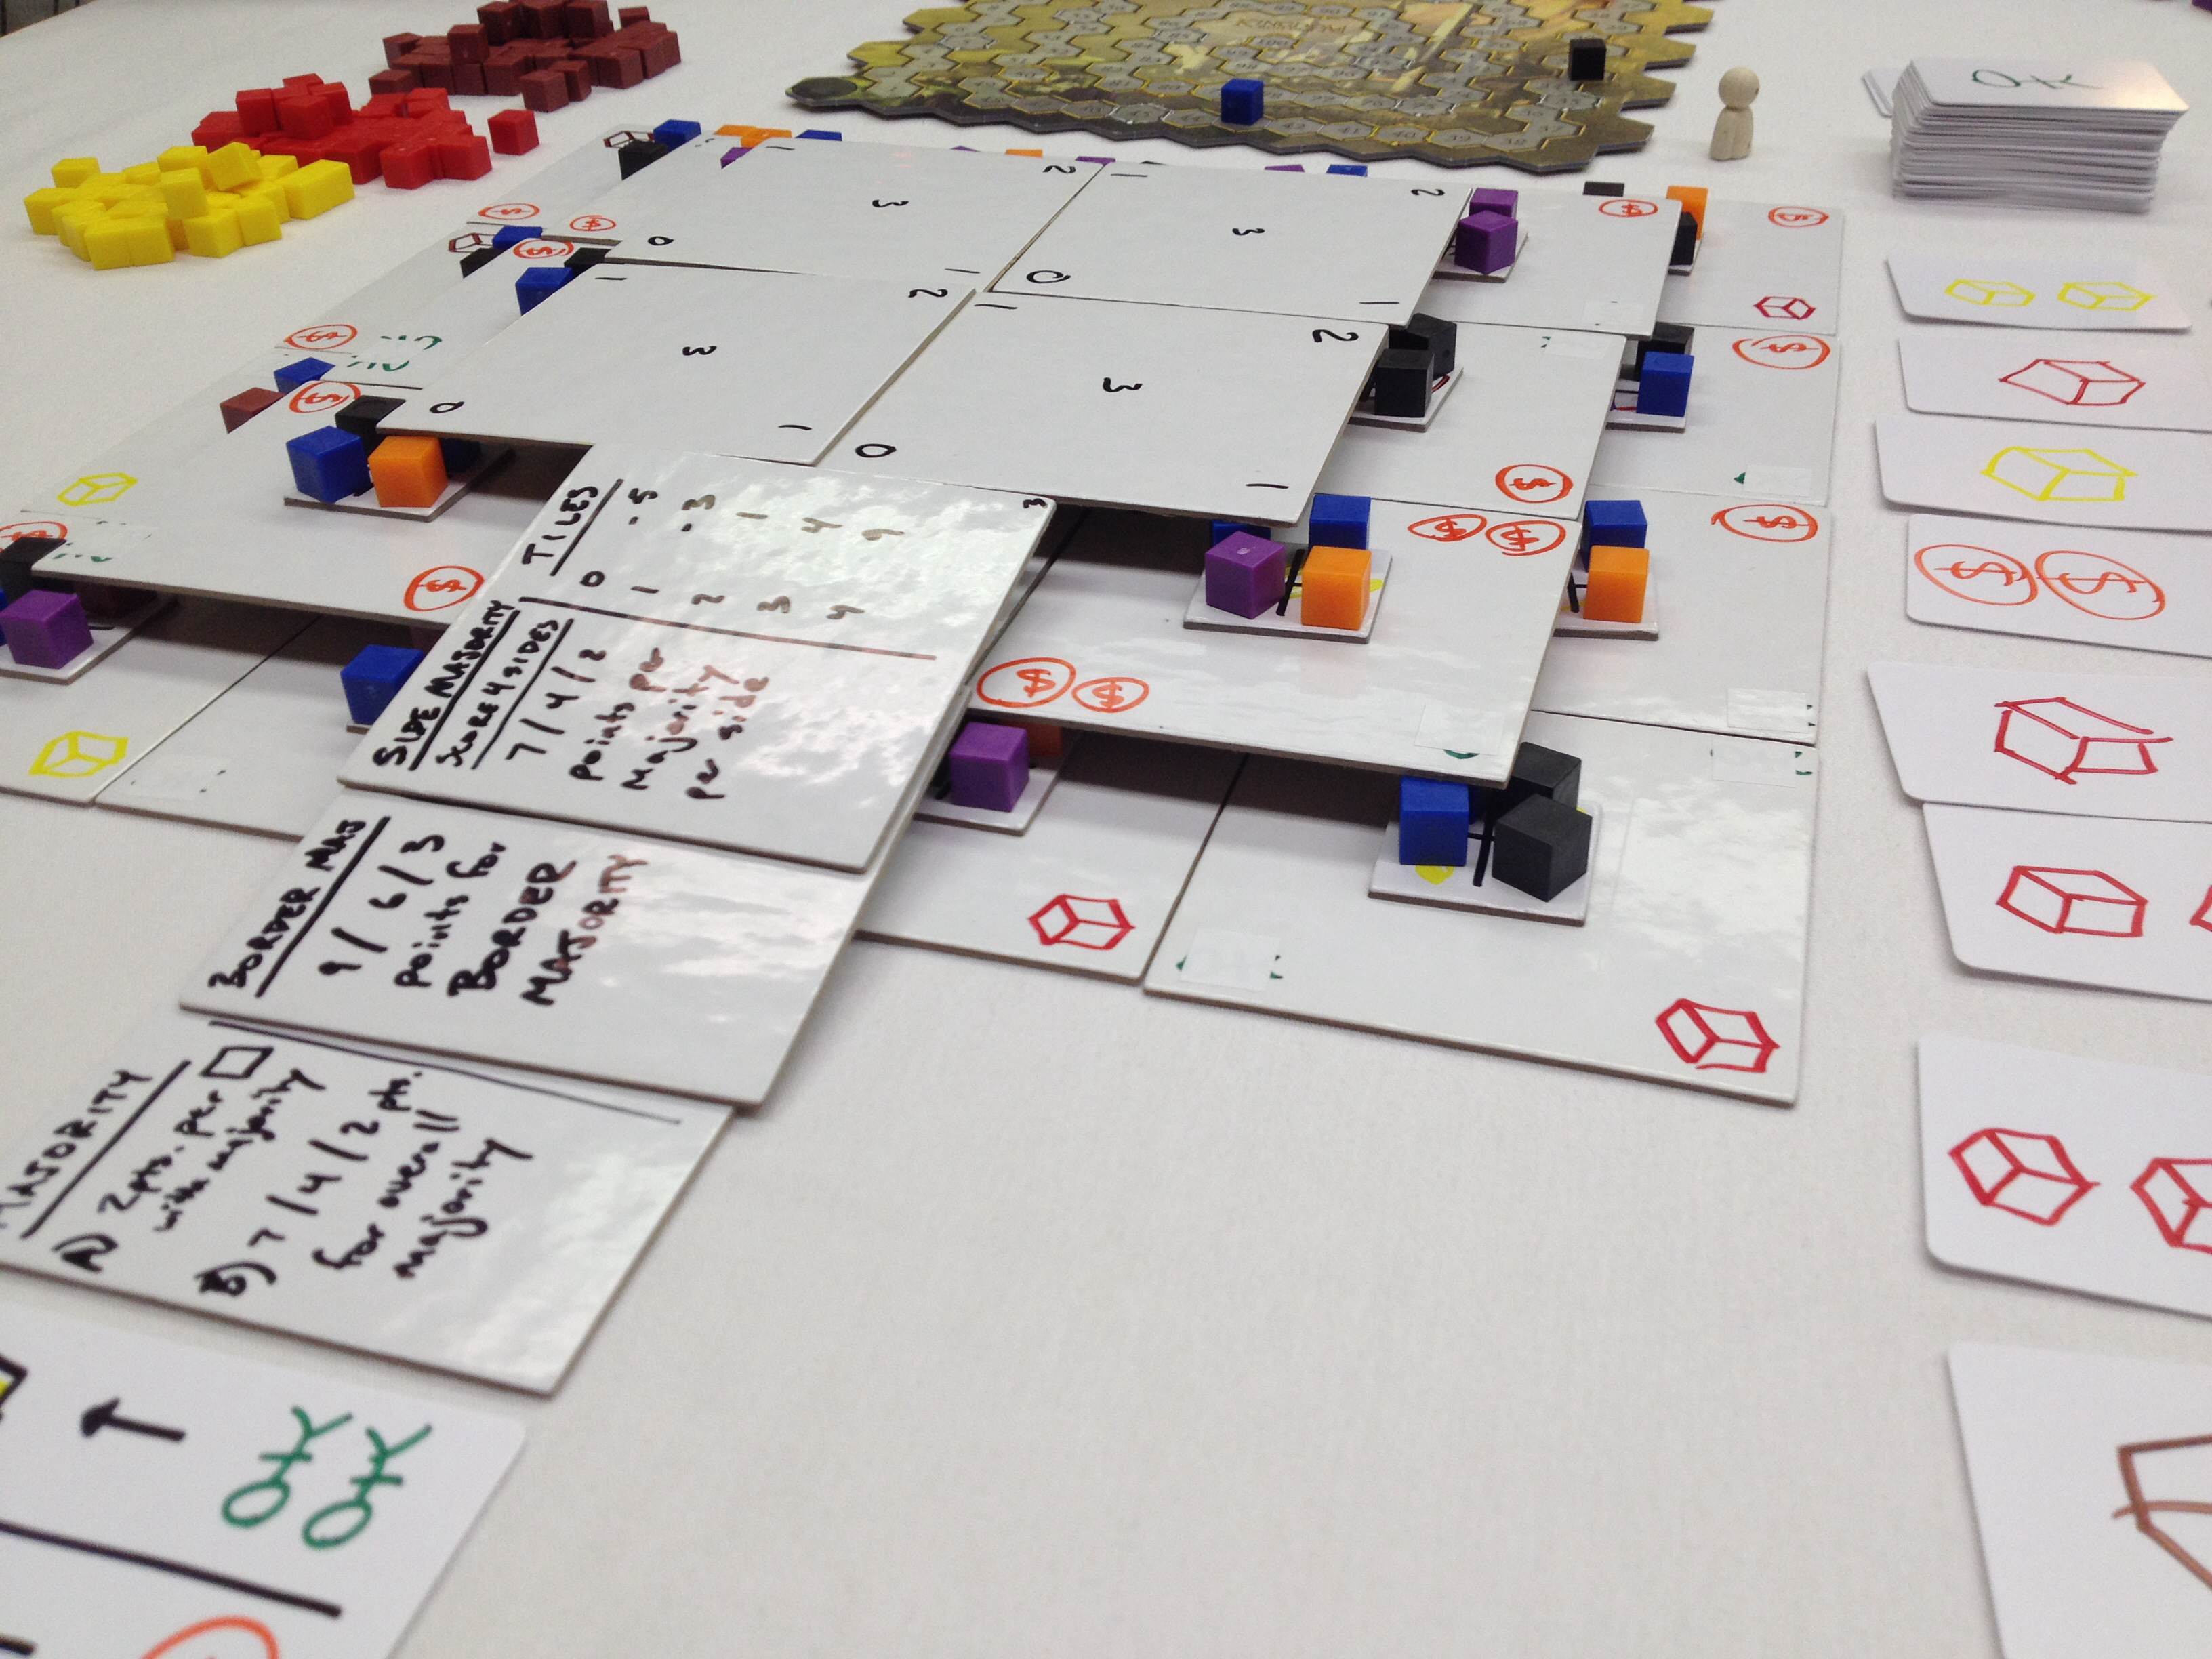
The Ramp lists what the scoring conditions are for the current game.
One thing of great importance in the game are the platforms. Each platform requires 4 cubes. When any given platform is completed, each player who helped build the platform will earn some reward. The rewards available are shown on the corners of the tiles. This is a way to ramp things up in the game and loosen the tightness of the resources. It also incentivizes building, which is the whole idea of the game.
Here’s another picture of Ziggurat at the end of a Protospiel playtest:
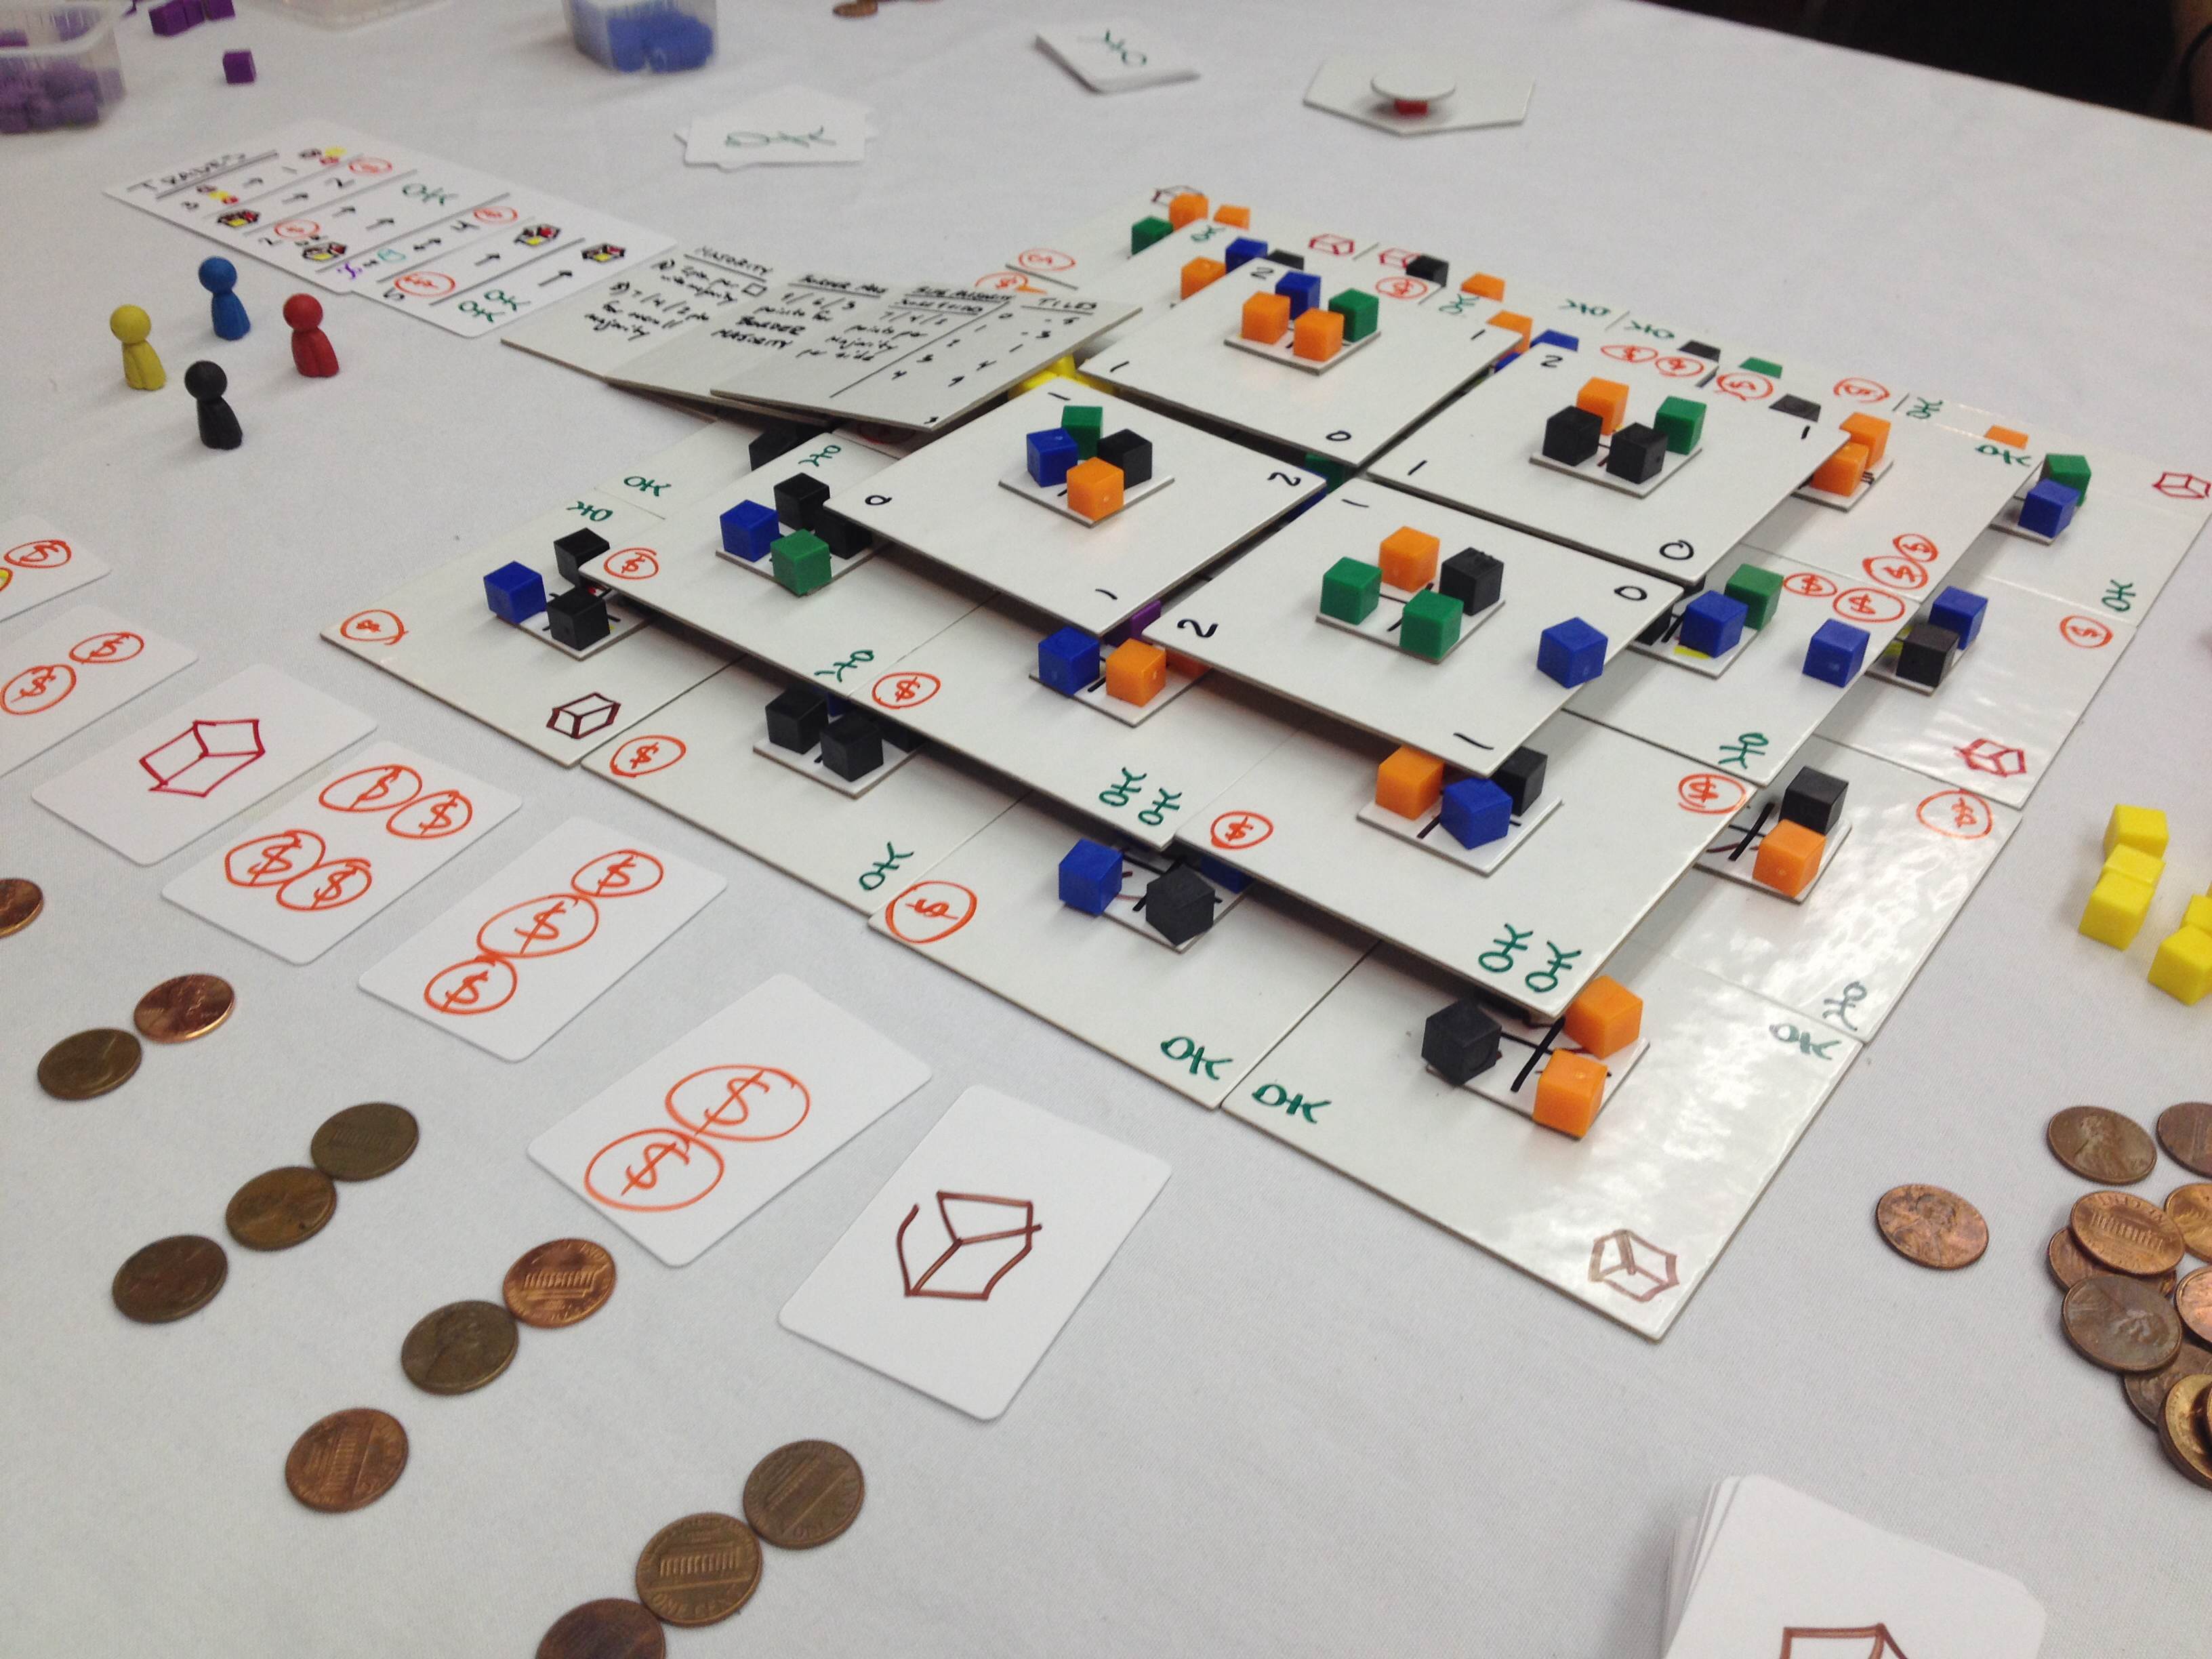
Ziggurat Completed! Time for final scoring.
In the bottom left of the image above you can see the courtyard market. In the current version of the game there are six cards in the market. Players may purchase up to two cards. The card at the end costs zero and the costs ramp up as 1, 1, 2, 3, 4. The image has different costs, which I have since adjusted.
The Latest Prototype…
I’m a sucker for creating decent looking artwork and graphics. I use Inkscape, which I recommend. I mocked up some cards and placed an order with TheGameCrafter.com. Here’s what they look like:

Each card represents a laborer OR the resources on the back.
With a deck made I decided it was time to upgrade the tiles and platforms as well. So I did. Here’s the final result which shows the current state of the game:
Not too shabby, for a prototype!
I have some big plans for the game. I want it to be slightly less singular in terms of your goals so I’ll be adding a few other paths to victory. But I solidly enjoy the game as it is.
Feel free to ask any questions. I’m excited to hear what people think and I’m just as excited about the future of the game. This one feels like Scoville did when I designed that. I think there’s a lot of potential here. Thanks for reading!
Game Design: Starter Prototyping Tools
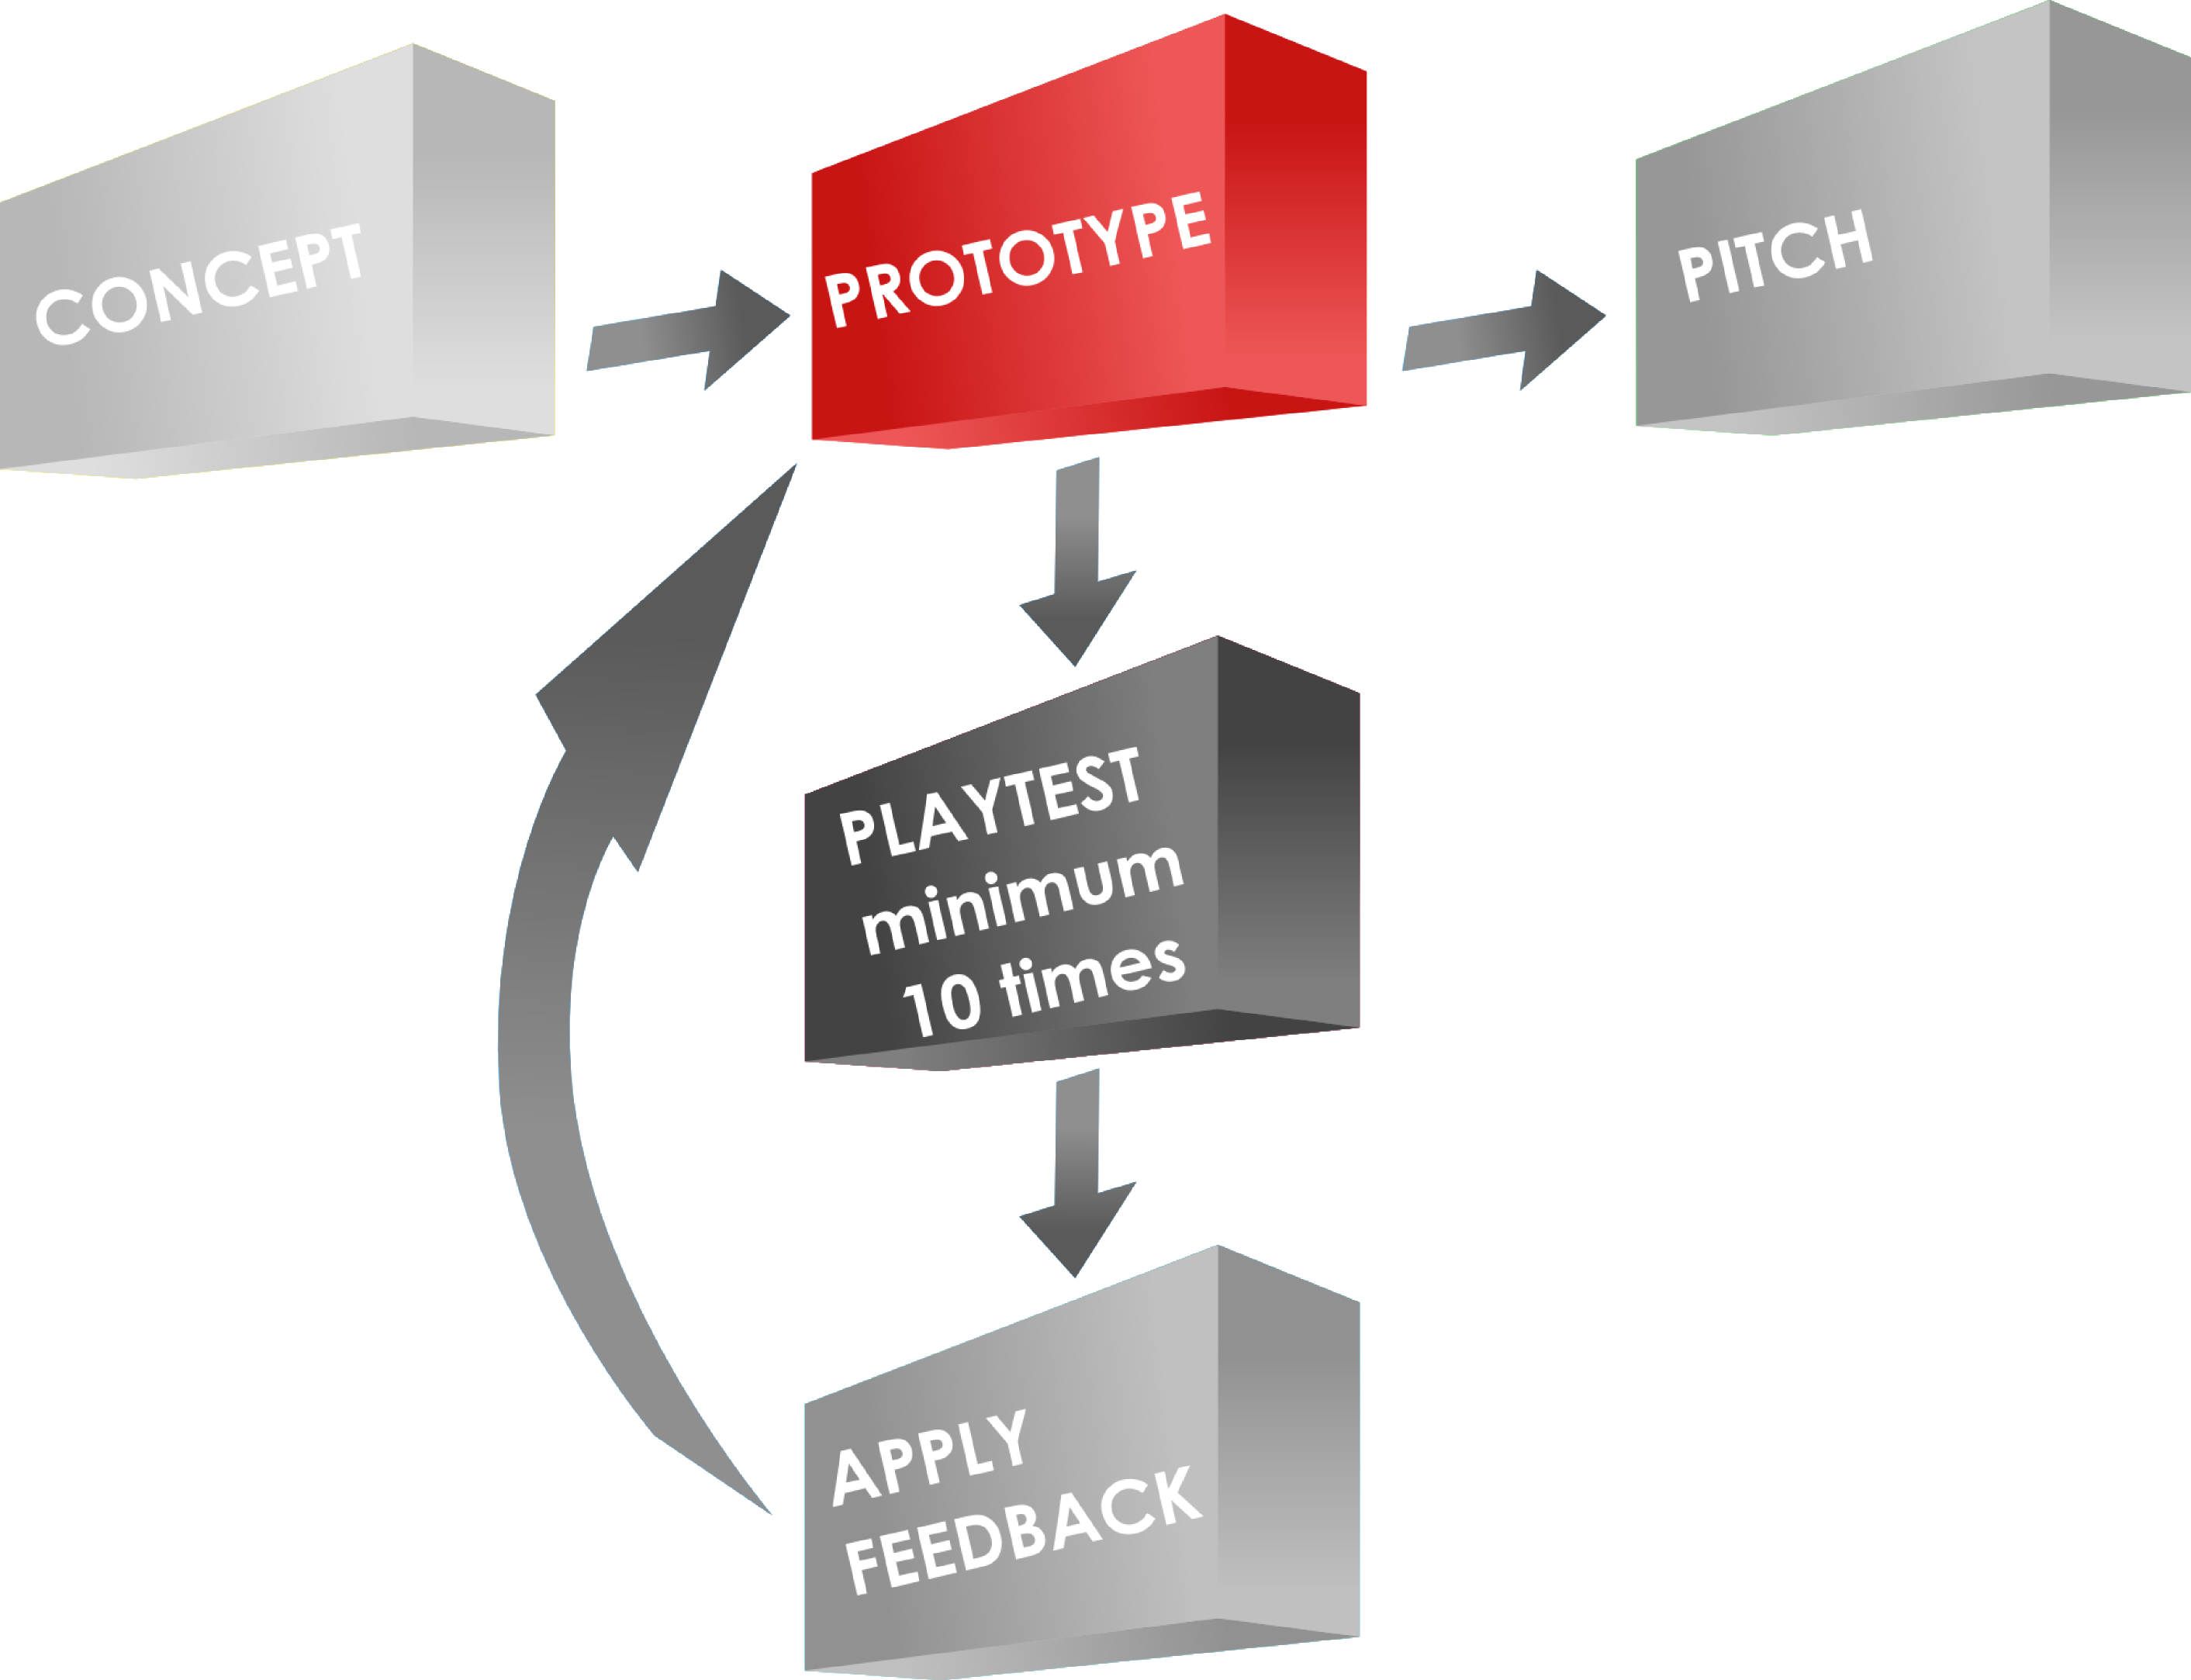
Game Design Process: Prototyping
I recently asked myself the following question: “If I were to start over with game design, which prototyping tools would I buy to get started?” I’ve made numerous prototypes and I’ve learned what to do and what not to do. So today I present a set of prototyping tools to help get you started as a game designer.
When I got started out I didn’t want to throw a lot of money at prototypes. This was because I had no idea if the prototypes would ever actually go anywhere. I was fortunate to have a wife who used to do physical scrapbooking. So I had some tools available to me that wouldn’t have otherwise been available.
Never-the-less, there are some key tools and resources that I think every game designer can utilize to make high quality prototypes at low(ish) cost and with relative ease. For the sake of this article I will assume that you can print on photo paper (I recommend Kodak 8.5×11 – 100 sheets).
Game Prototyping Resources
First, let’s cover where to get some basic resource type things. These are my go-to retailers for these items:
- CUBES: 1,000 1cm cubes from EAI Education for $16.95
- MEEPLES: Avatar pawns from TheGameCrafter.com for $0.15 each
- DICE: Buy a set of Tenzi dice! (Or search Amazon or eBay)
- CARDS: Blank Cards – Different Sizes – from TheGameCrafter.com
Game Prototyping Tools
Things that are not mentioned above include boards, tiles, tokens, reference sheets, rulebooks, and more. I generally use the same process to make all of those except a rulebook. I don’t typically make a rulebook.
To make my prototype components feel like high quality I purchase the following materials:
- Matte board remnants from Hobby Lobby for super cheap. You can get a stack of about 25 12″x12″ matte boards for about $6.
- Kodak Photo Paper (100 sheets for ~ $15)
- Non-OEM ink for my inkjet printer via eBay. (I bought 5 full sets of ink cartridges for ~$20)
- Glue Sticks – you’ll want to keep several on hand.
I often create artwork and then print it on the photo paper. I glue it down to the matte board. Then I break out my most highly recommended tool: The Rotary Cutter!
The Rotary Cutter

Easily worth the cost!
This has been my most-used tool for creating game prototypes.
I have a Fiskars rotary cutter similar to the one shown in the picture. You can buy it here:
It isn’t the best cutter. You can pay a lot more money for better cutters. But it does exactly what I need it to do for my prototypes. Other cutter options include:
There are more options than those, so if you don’t like those options feel free to do more thorough searching.
I use this tool to cut out the components that have been printed and glued to the matter board. This cutter works well enough for that.
Punches

Great for cardstock chits!
Other great tools for designers are punches. These are used to quickly create tokens and chits. When I create tokens and chits I usually prefer printing the artwork onto thicker stock paper so they are more rigid. 90lb or 100lb paper is usually a good weight.
There are a plethora of different punches out there, but for the sake of board games you’ll most likely be interested in circle and hex punches and corner rounders. Here are some options.
- Fiskars Squeeze Punches
- Fiskars Lever Punches
- Fiskars Corner Rounders
- List of Punches on Scrapbook.com
As before, go ahead and do some more searching to find the right product for you.
Sharpies

I am firmly in the Sharpie camp. I love them. They are bold, colorful, and extremely useful. Sharpies can be used to create prototype components rapidly, especially in the case where you own blank cards because you took my recommendation above.
By having a variety of Sharpies you become an unstoppable force of game design awesomeness!
I use them to create prototypes. I use them to mark up my prototypes. I use them to revise my prototypes. I use them to draw silly pictures for my kids.
Seriously, Sharpies are fantastic. I feel they are a must-have for any game designer, if for no other reason than to be able to practice your signature for the time when lovers of your games will ask for your autograph for their game box!

I feel like this article needs more tools in it, but those are the only tools I utilize on a regular basis. Are there prototyping tools that you use regularly? Post a comment and let everyone know which prototyping tools you prefer!
Grand Illusion Update

Today I wanted to report on the progress of The Grand Illusion. Normally I do that on Thursdays and I was planning on posting a game review today but I’m excited about the game so I figured I’d write about it.
What’s New?
I’ve begun prototyping! I have created a deck of skill cards. These cards represent the 9 types of magic in the game. The types of magic are in two separate tiers: basic and advanced. There are 6 basic types and 3 advanced types. Here is a picture showing the skill cards (thanks to The Game Crafter for blank cards – They have blank poker cards on sale right now for 1 cent each!).
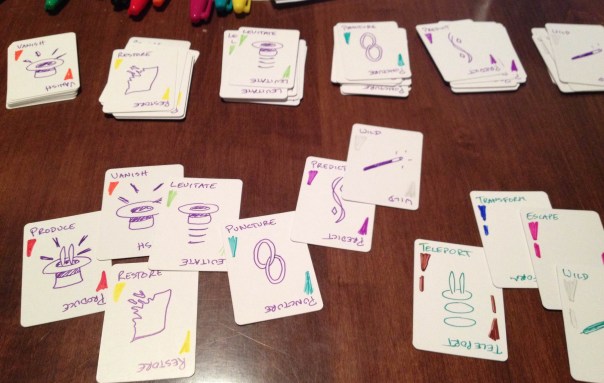
Collect these and use them to perform never-before-seen magic tricks to appease your growing audience!
Those are hand-drawn icons, people!
What’s Next?
The next step for the prototype is to create a deck of Trick cards. These are cards that represent magic tricks. During the game you’ll need to collect the skill cards shown above and then turn them in to complete the magic tricks.
Once you perform a magic trick you will earn the rewards and audience shown on the card.
So let’s discuss audience… Audience is actually a currency in the game. It is necessary to build an audience during the game or you will not meet the requirements on your Grand Illusion card. So each time you perform a trick, if successful, you will gain audience. In the game you will collect skill cards, spend them to perform tricks, gain audience and increase your skills to be able to perform better tricks.
There will definitely be some engine building in the game. The goal of this design is to be an entry-level game with an easy rule set that is quick to teach and play. The main mechanics are set collection and engine building.
Engine Building
Engine building in games refers to the idea of obtaining some ability or benefit that let’s you do things a little better, then getting another one that builds on the previous ability or benefit.
In The Grand Illusion the engine is represented by the skills each magician will gain. Will you become a master of vanishing acts? Perhaps you’ll be the best at restoration magic? Ultimately you’ll have to get proficient at at least two basic types of magic and one advanced magic.
The question I’m currently struggling with is how exactly to create the engine building element. I have two options I’m considering:
1) Splendor-Like
In the game Splendor players turn in poker chips to grab a card from the table. Once they grab that card it usually acts as a poker chip. So for future card grabs they need one less poker chip. This would work perfectly for The Grand Illusion but I don’t want to copycat an existing game.
2) Tech Tree
A tech tree is something where you must complete “Level 1” stuff before you can work on “Level 2.” So in The Grand Illusion I could have a tech tree (pyramid) of trick cards on the table. When a player would perform a trick they would place a token of their player color on the trick to show they’ve completed it. This would also direct their play as there would be advantages and disadvantages for breadth versus depth.
I think that once I create the Trick deck I’ll try out both of these options. The Splendor-like version may work better, but I’m more drawn to the Tech Tree version since it is more original.
My goal is to prototype the skills deck this weekend and aim for the first playtest next week! Thanks for reading. I’d love to hear your thoughts about the different engine building options.
Prototype Art: Alignment in Inkscape
I use Inkscape for all of my game design artwork. It is relatively easy to use and is vector based, so I can make things larger or smaller as needed without any loss in picture quality.
I’ve done a couple other Inkscape tutorials about game design artwork. You can check those out:
Today I want to focus on one specific tool within Inkscape: Alignment.
If you don’t have the software, you can download it from their website: inkscape.org.
Let’s Line Things Up!
The tool I find I use the most within Inkscape is the alignment tool. I use it for every piece of artwork or graphic design that I make in Inkscape.
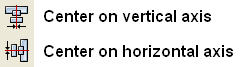
When you are working in Inkscape and desire to line things up, look for this icon: 
Clicking that will open the Alignment options, which will look like this:

Control Panel of Alignment
Let’s run down what those options are. Here is a new version of that image:

Instead of running through each of those things listed above I am going to provide a couple examples. At the end of this article you will find a the Inkscape file that I used for these examples. Feel free to download it and use it to get familiar with the alignment tools.
Anchors Away!
When aligning things the most important thing is understanding which object is the anchor. The anchor is the object that will not move when the command is applied. You can choose the anchor with the options from the “RELATIVE TO” box at the top, which are the following options:
- Last Selected
- First Selected
- Biggest Object
- Smallest Object
- Page
- Drawing
- Selection
The three that I use the most are “Last Selected,” “First Selected,” and “Page.”
When selecting multiple items, if you chose the anchor last, then you should set RELATIVE TO to “Last Selected.” That way when you choose the alignment function, the anchor will appropriately stay put and the other objects will move.
Likewise, the “First Selected” option will cause the anchor to be the first object you select. Both of these options are nice because you can make sure you’ll know which object won’t be moving.
Using the “Page” option will align things with the page. The Page is represented by the black box in the middle of the canvas when opening a new document. I use this a ton when designing artwork for cards since it allows me to center things on the page. This one can come in very handy. You can align things to the center of the page by using these two alignment functions:
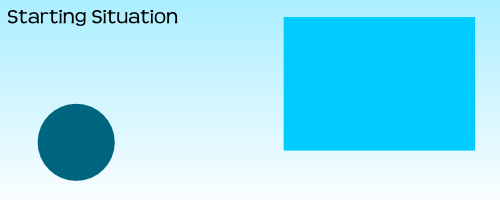
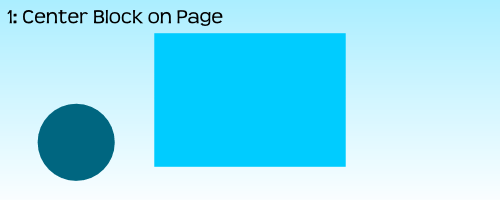
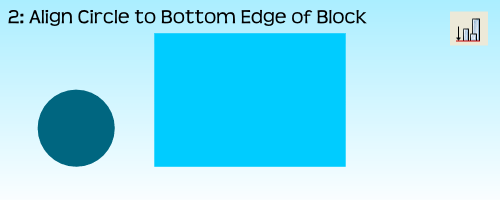
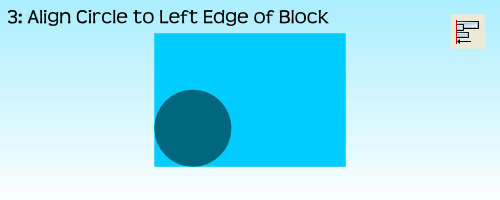
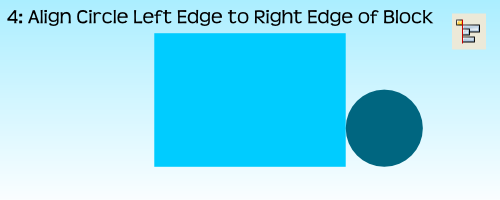
Alignment Examples
I’m going to use a circle and a block and show you how several of the functions work. After centering the block on the page I’ll be using the block as the anchor for the remaining alignments.
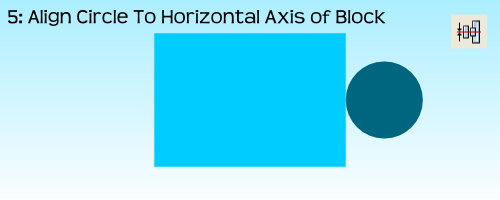
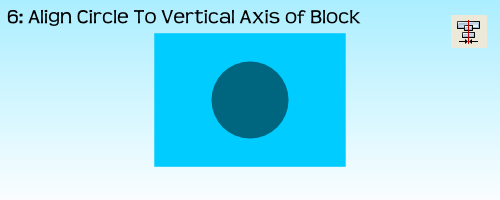
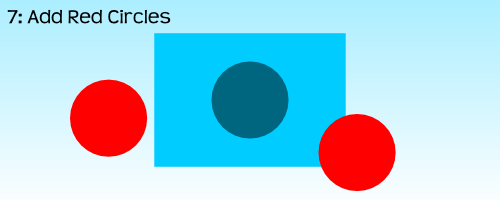

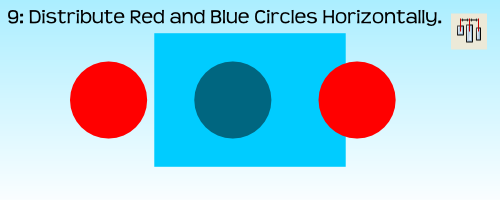
 For the very last example, step 10, I had to use the “Treat Selection As Group” option. If I had not used it the result would have been to stack all three circles on the vertical axis of the block:
By treating the three circles as a group it allows for the whole group to be aligned without adjusting the relative locations of the objects in the group. Often I’ll just group objects myself before aligning them and then ungrouping them after the alignment. But feel free to do it however you like.
That’s Basically It
I have found that these alignment tools are very useful when making prototype artwork for my game designs. It allows you to consistently place things in the same spots. It allows you to make things line up correctly. And it allows Inkscape to help design your awesomeness!
Here is the file: BoardsAndBarleyAlignmentExample.svg
It is located in Google Drive and to get it to work you’ll have to download it. Please let me know if you have any questions. Thanks for reading.
Prototype Art: Icons in Inkscape
Inkscape logo of squidy awesomeness!
One of the things that can take your game design from playable to pitchable is iconography. Icons can really help put a nice polish on a game. There are a few benefits that icons can provide for your game design:
- Ease of viewing/understanding
- Beautification
- Language Independence
Those are a few and I’m sure there are more. So today I wanted to present a tutorial similar to my “Cubes in Inkscape” tutorial to help game designers with the creation of icons for their games.
This article will be focused on the software called Inkscape. It is a free Scalable Vector Graphics (SVG) software. Don’t worry too much about what that means, just know that it’s awesome. If you don’t have the software I recommend downloading it and using it for your game design art. Note: if you have Photoshop/Illustrator then I would recommend staying with that and skipping the rest of the article.
Also, if you love icons but just can’t figure out how to make your own, then head over to Game-Icons.net where they have over 1,000 free icons for your use. So let’s get started.
Let’s Get Iconizing!
So “Iconizing” isn’t really a word. But that’s beside the point. The objective for today is to teach you how to make icons that you can use with confidence in your board game designs. We are going to be making a barley icon. But you’ll hopefully be able to use what you learn here today to make any icons you might need for your game design.
Once you’ve downloaded and opened Inkscape you’ll see a plain canvas outlined in front of you. I like to leave it turned on, but you can turn off the “edges” if you visit the document properties under “File.” Here’s what it should look like:

We will be working with the “Create Circles, Ellipses, and Arcs” command for this article.
You’ll often want a web browser open as well. It is often beneficial to do a web search for the item you are looking to iconize. So here’s a snapshot of a web search page for barley:

Using a web search can give you ideas of how to iconize the item.

Barley, you’re about to be iconized!
After I’ve done a web search I like to copy and paste a picture or two into Inkscape as a starting point. In this case I’ll be using the photo on the right as my guide for creating a barley icon. So copy that picture into Inkscape if you want to follow along.
One thing to remember when creating icons is that we want them to be very clear and understandable. Sometimes icons represent things, like resources. Other times they represent actions, like “move an extra space.” We before we create the icon we need to know what we are going for. In the barley example we will simply use the icon to represent a barley resource.
So now that the picture is in Inkscape we can start our tutorial. I like to use a picture so that I can create the correct shape of something in Inkscape by overlaying that shape on the right part of the picture and making the edges line up. I won’t show that today since this image will be for reference only, but it is a useful thing to do. I may write about that in the future.
The icon of a barley begins with one circle…
Go ahead and click on the “Circles, Ellipses, and Arcs” command and click and drag a circle on the page anywhere you like. If you want to change the color, scroll along the color bar at the bottom. If you want to make sure it is a true circle, hold CTRL when dragging. If you hold CTRL and drag at a different angle then it will jump to an ellipse rather than a circle. Once you’ve dragged out the circle and chosen a color you might have something like this:
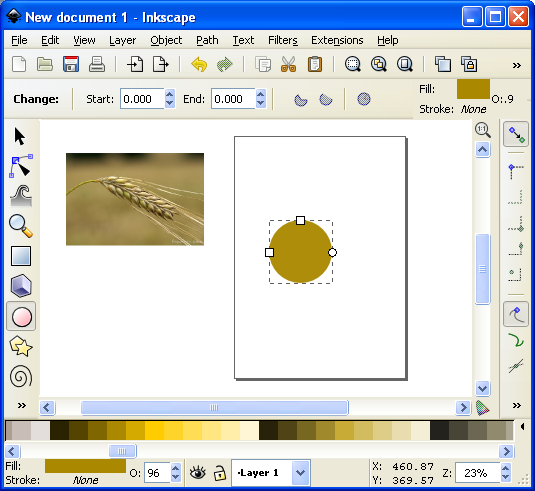
This circle will be one grain of barley.
The next thing we want to do is turn our circle into a Path. There are two ways to do this. The first is to go to the PATH toolbar at the top and click “Object to Path.” The second way to do this is to select the item and press SHIFT + CRTL + C.
 Then we want to use this command from the left toolbar. It is the “Edit Paths by Node” tool and is pretty awesome for what we want to accomplish today. Click on it and then click on our circle. Then your circle should look like this (note that I have zoomed in on the circle):

The dots around the circle are the nodes that we will edit.
What we do next is edit our circle by moving the nodes around. Across the top we have different options for editing the nodes. The tools that I utilize most often are these:
- Insert new nodes into selected segment
- Make selected nodes corner
- Make selected nodes smooth
I recommend playing around with each of those commands so that you become familiar with how node editing works.
So let’s take our circle and turn it into a barley grain. First click on the upper node. Then click on “Make selected nodes corner.” Then you can grab the little circles on the lines extending from the node and move them to wherever you like. Here’s what you might end up with:

By editing the nodes we can make the circle look like a barley grain.
Now go ahead and manipulate the other nodes. I “Cornered” the bottom node and angled up the right side. I moved the bottom node to the right. I moved the top node up and to the left. And I brought in both side nodes. Here’s my result thus far:

Okay. That’s pretty passable for a barley grain. Now we want to make more of them. But instead of following that whole process over and over we are simply going to duplicate this grain. You can duplicate the grain in two ways. The easiest is to simply push CTRL + D. That will make a new copy over the top of the previous version. Then if you click the arrow tool at the top of the left toolbar you can move the new barley grain. Do this about 5 times, line them up, and then you might have something like this (I’ve zoomed out a little):

We are getting there! Who’s excited??
Okay. It is starting to look alright. Let’s go ahead and duplicate the entire thing and mirror it using the “Flip selected objects horizontally” tool. Then you can rotate the whole selection with the arrow tool. You have to click on the selection so that the arrows on the corner of the selection turn into curved arrows. Then click and hold one of the curved arrows and drag to the angle you want. Note that when dragging, if you hold CTRL it will rotate at discrete angles. This can be really useful. After all of that we should have something like this:

Feel free to enjoy a nice brew while we are iconizing barley!
Now we’ve got most of the hard work done. You may desire to shrink a few of the barley grains near the top end. If you do, you can simply click on one with the arrow tool, then click and drag one of the corner arrows around the object you are shrinking. Note that when you drag the corner arrows, if you hold CTRL it will maintain the aspect ratio of the object. If you hold CTRL + SHIFT it will maintain the aspect ratio and resize it while also maintaining its position in reference to its reference point (shown by the plus sign, which can be moved). For the sake of the tutorial today we are not going to shrink any of the barley grains.
So far so good. But now we need the stalk. So we are going to use the “Draw Freehand Lines” tool from the left. With the tool chosen you should then set the tool to “Triangle In” at the top toolbar where it says “SHAPE.” Then starting at the bottom of the stalk click once. Then move the cursor to where you want the stalk to end and double click. A triangle line should be made that looks something like this:

We’re almost done!
You can change the color again by using the color bar along the bottom. And you can manipulate the shape by editing the nodes.
Alright. So I jumped ahead a little bit and did some of the things I’ve already mentioned. I changed the color of the stalk. I make it thicker by adding a “Stroke” to it (See below about adding a “Stroke”). I didn’t like how tall it was so I deleted two of the grains from each side at the top. I shrank two from each side and rotated them slightly. By simplifying all of this I was able to create a better icon for the barley:

It looks more “Icon-y this way.
So there you go. You’ve got yourself the tools to edit nodes, manipulate shapes, and make cool icons. Those are the basics and they can get you off the ground running. But if you want to add some awesomeness, then keep reading!
Adding the Awesomeness!
If you aren’t quite content with your icons there are a few things you can do to spruce them up. The first is to add a border around them. Remember above when I mentioned about adding a “Stroke”? Let’s start with that and see what kind of border we can come up with.
First, with the arrow tool selected, click and drag a box around all the components in the icon. They click on the “Group” tool to group them into one picture. Then go ahead and duplicate that new group. You will have two copies of the same icon. We will add a stroke to one and then place it behind the other. With one of the copies chosen, click on “Object > Fill and Stroke.” This will open a sidebar like this:

Now we can add awesomeness!
On the “Stroke paint” tab we want to set a solid color stroke. This is the solid blue square icon. For now just keep the black color that it should default to. Then on the “Stroke style” tab let’s go ahead and set the stroke to a value that makes it look nice. In this example the value was 20. You should have a nice big black border around the entire barley. Once you have the border, click on the “Lower Selection to Bottom (end)” command and it will send this copy of the icon behind the other copy, which has no stroke:
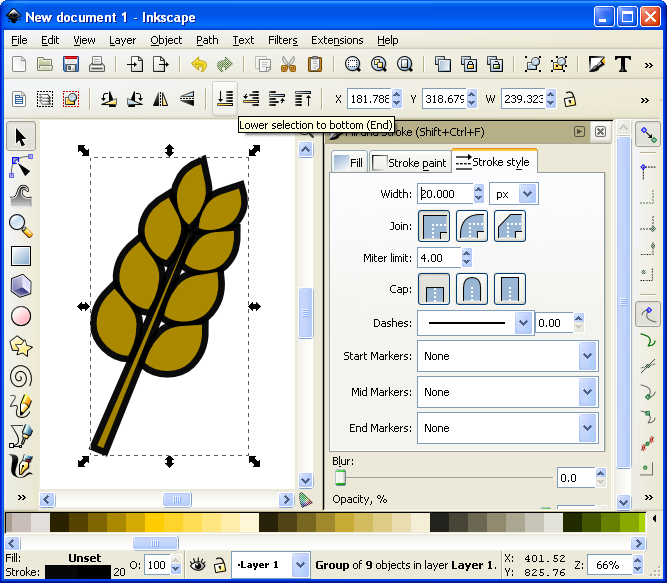
I think it’s really starting to be a nice icon!
Now we’ve got a really nice border. How else might we add awesomeness? We could add gradients to the grains and the stalk!
If you are content with the icon like that, then by all means leave it that way. I think it looks pretty good and icons like that will certainly help with the presentation of your prototype. But if you want to go another level you can add gradients. So let’s see what happens…
First you’ll want to ungroup that top level copy of the barley. We want to add gradients individually to the grains. With it ungrouped go ahead and click on one of the grains. Let’s choose the lower left grain for this example. Then you can click on the “Create and edit gradients” tool on the left toolbar.
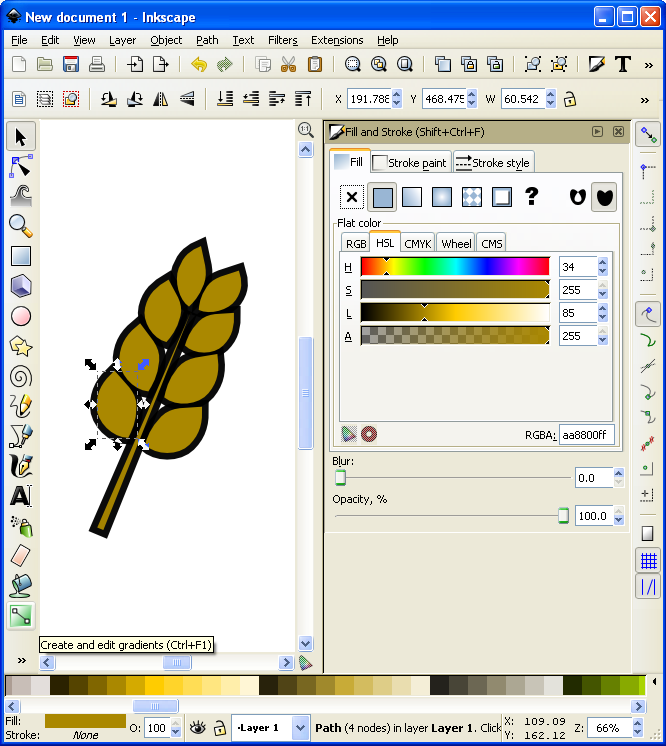
It’s about to get wild!
Then click and drag from one side of the selected grain to the other. You will want to play around with the gradient editor to familiarize yourself with the gradient editing options. The easiest are linear gradients. I recommend you start there. Otherwise a radial gradient could look nice. I’ve used one for the grains (each individually) here (Note that you could have applied a radial gradient after editing the first circle and then duplicated that for each grain of barley):
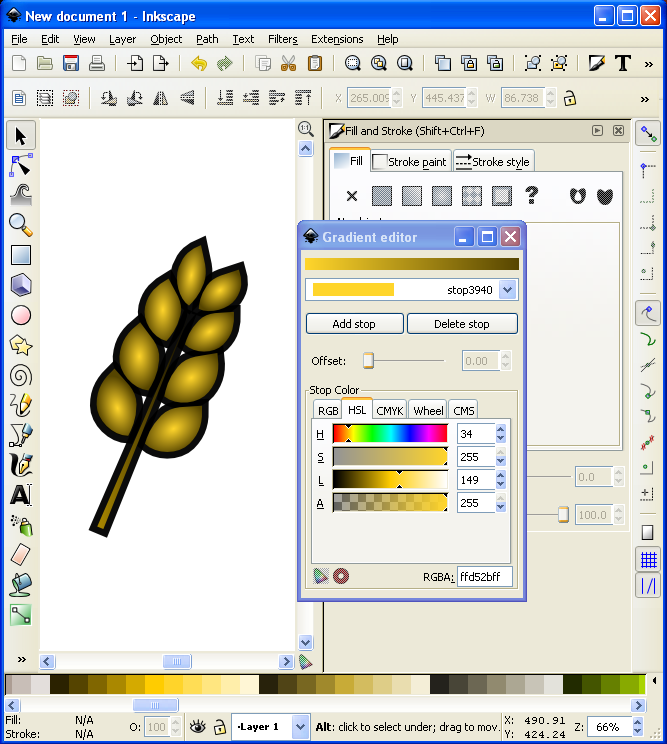
I might actually use this icon!
Alright… we have time for one more layer of awesomeness. What could it be other than a drop shadow??? Thankfully I don’t really have to teach you anything here since Inkscape makes it so easy! With the entire icon (both copies) highlighted go to “Filters > Shadows and Glow > Drop Shadow” and it will open a popup window. If you click on “Live Preview” it will show you what the drop shadow will look like.
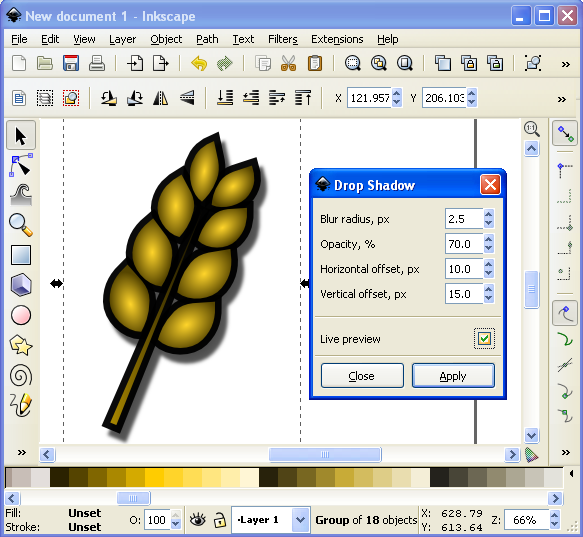
Now that’s what I’m talking about!
And there you have it. A nice and simple icon with three points of awesomeness!
Lesson Complete!
Here is my finished icon of barley, with radial gradients on the grains, a linear gradient on the stalk, a nice “Stroke” border, and a decent drop shadow:
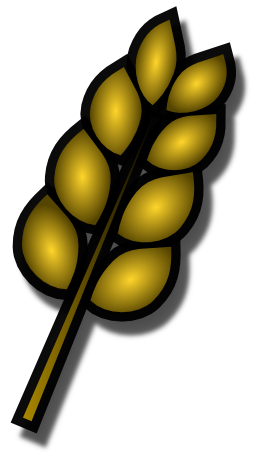
Not too shabby!
That’s all I’ve got for you today. I hope that this article was able to equip you to add some high quality iconography to your game designs to help take them from playable to pitchable and give you confidence in front of the publishers! Please let me know if you have any questions. I would love to help you out. Thanks for reading!
